Complete Owner's Guide (English)
Page 2
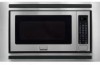
... specific operating instructions for future reference. Congratulations on sealing surfaces. (C) Do Not Operate the microwave oven if it is our number one priority. Visit the Frigidaire Web Site at 1-800-944-9044, 24 hours a day, 7 days a week. Check the section titled "Service Call Check". Common sense and caution must be practiced when installing, operating...
... specific operating instructions for future reference. Congratulations on sealing surfaces. (C) Do Not Operate the microwave oven if it is our number one priority. Visit the Frigidaire Web Site at 1-800-944-9044, 24 hours a day, 7 days a week. Check the section titled "Service Call Check". Common sense and caution must be practiced when installing, operating...
Complete Owner's Guide (English)
Page 3
...in accordance with the provided installation instructions. • Some products such as whole eggs and sealed containers -for industrial or laboratory use this symbol to avoid possible injury or death. It is not designed for example, closed , turn microwave oven off and disconnect the..., burns, electric shock, injury to persons, or exposure to potential personal injury hazards. Important Safety Instructions Definitions This is installed as a built-in use corrosive chemicals or vapors in microwave oven. -- It is used by qualified service personnel. Do not use . • Liquids, ...
...in accordance with the provided installation instructions. • Some products such as whole eggs and sealed containers -for industrial or laboratory use this symbol to avoid possible injury or death. It is not designed for example, closed , turn microwave oven off and disconnect the..., burns, electric shock, injury to persons, or exposure to potential personal injury hazards. Important Safety Instructions Definitions This is installed as a built-in use corrosive chemicals or vapors in microwave oven. -- It is used by qualified service personnel. Do not use . • Liquids, ...
Complete Owner's Guide (English)
Page 4
... accept any questions about the grounding or electrical instructions, consult a qualified electrician or service person. 2. Check the microwave oven for the power supply. Electrical Requirements Check Installation Instructions for proper location for any damage, do not operate the microwave oven and contact your installation instructions. The marked rating of the microwave oven. Neither Electrolux nor the dealer can...
... accept any questions about the grounding or electrical instructions, consult a qualified electrician or service person. 2. Check the microwave oven for the power supply. Electrical Requirements Check Installation Instructions for proper location for any damage, do not operate the microwave oven and contact your installation instructions. The marked rating of the microwave oven. Neither Electrolux nor the dealer can...
Complete Owner's Guide (English)
Page 5
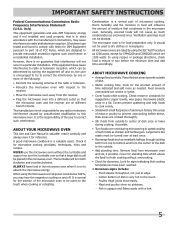
... uncovered ones. IMPORTANT SAFETY INSTRUCTIONS Federal Communications Commission Radio Frequency Interference Statement (U.S.A. A good microwave cookbook is encouraged to try to correct the interference by one or more as meatballs halfway through cooking both clockwise and counterclockwise. Only) This equipment generates and uses ISM frequency energy and if not installed and used to absorb...
... uncovered ones. IMPORTANT SAFETY INSTRUCTIONS Federal Communications Commission Radio Frequency Interference Statement (U.S.A. A good microwave cookbook is encouraged to try to correct the interference by one or more as meatballs halfway through cooking both clockwise and counterclockwise. Only) This equipment generates and uses ISM frequency energy and if not installed and used to absorb...
Complete Owner's Guide (English)
Page 21
...should Service service be readily determined. 2. Damages to obtain and keep all costs for appliances not in accordance with the provided instructions. Service under this warranty must be defective in accordance with original serial numbers that have been removed, altered or cannot be required... Electrolux Canada Corp. use or used other than genuine Electrolux parts or parts obtained from its original owner to correct the installation of God. LIMITATION OF REMEDIES CUSTOMER'S SOLE AND EXCLUSIVE REMEDY UNDER THIS LIMITED WARRANTY SHALL BE PRODUCT REPAIR OR REPLACEMENT AS...
...should Service service be readily determined. 2. Damages to obtain and keep all costs for appliances not in accordance with the provided instructions. Service under this warranty must be defective in accordance with original serial numbers that have been removed, altered or cannot be required... Electrolux Canada Corp. use or used other than genuine Electrolux parts or parts obtained from its original owner to correct the installation of God. LIMITATION OF REMEDIES CUSTOMER'S SOLE AND EXCLUSIVE REMEDY UNDER THIS LIMITED WARRANTY SHALL BE PRODUCT REPAIR OR REPLACEMENT AS...
Installation Instructions (All Languages)
Page 1
... these instructions for future reference. Skill level - Before beginning the installation, switch power off at : www.frigidaire.com READ CAREFULLY. QUESTIONS? Installation of this appliance requires basic mechanical and electrical skills Proper installation is the responsibility of the installer. Product failure due to improper installation is not covered under the Warranty. Unplug the microwave...
... these instructions for future reference. Skill level - Before beginning the installation, switch power off at : www.frigidaire.com READ CAREFULLY. QUESTIONS? Installation of this appliance requires basic mechanical and electrical skills Proper installation is the responsibility of the installer. Product failure due to improper installation is not covered under the Warranty. Unplug the microwave...
Installation Instructions (All Languages)
Page 2
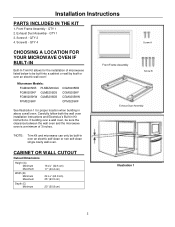
QTY 1 3. Carefully follow both the wall oven installation instructions and Electrolux's Built-in above a wall oven. Exhaust Duct Assembly - QTY 2 4. Microwave Models: FGM0205KB PLMBZ209GC FGM0205KF GLMB209DS FGM0205KW GLMB209DB FPM0209KF CGM0205KB CGM0205KF CGM0205KW CPM0209KF See Illustration 1 for the installation of microwaves listed below to be built into a cabinet or wall by itself or over a wall oven, be...
QTY 1 3. Carefully follow both the wall oven installation instructions and Electrolux's Built-in above a wall oven. Exhaust Duct Assembly - QTY 2 4. Microwave Models: FGM0205KB PLMBZ209GC FGM0205KF GLMB209DS FGM0205KW GLMB209DB FPM0209KF CGM0205KB CGM0205KF CGM0205KW CPM0209KF See Illustration 1 for the installation of microwaves listed below to be built into a cabinet or wall by itself or over a wall oven, be...
Installation Instructions (All Languages)
Page 3
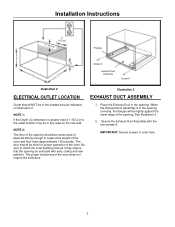
... . See Illustration 3. 2. The proper functioning of the oven. IMPORTANT: Secure screws in outer hole. 3 Secure the Exhaust Duct Assembly with side, ceiling and rear partition. Installation Instructions Flanges Screw A Exhaust Dust Assembly Screw A Illustration 2 Illustration 3 ELECTRICAL OUTLET LOCATION EXHAUST DUCT ASSEMBLY Outlet should NOT be in the shaded area as it may...
... . See Illustration 3. 2. The proper functioning of the oven. IMPORTANT: Secure screws in outer hole. 3 Secure the Exhaust Duct Assembly with side, ceiling and rear partition. Installation Instructions Flanges Screw A Exhaust Dust Assembly Screw A Illustration 2 Illustration 3 ELECTRICAL OUTLET LOCATION EXHAUST DUCT ASSEMBLY Outlet should NOT be in the shaded area as it may...
Installation Instructions (All Languages)
Page 4
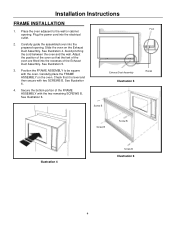
... secure with two SCREWS B. See Illustration 4. Check that the feet of the oven are fitted into the recesses of the FRAME ASSEMBLY with the oven. Installation Instructions FRAME INSTALLATION 1. Exhaust Dust Assembly Illustration 5 Screw B Foot Races Screw B Screw B Illustration 4 Screw B Illustration 6 4 Plug the power cord into the prepared opening...
... secure with two SCREWS B. See Illustration 4. Check that the feet of the oven are fitted into the recesses of the FRAME ASSEMBLY with the oven. Installation Instructions FRAME INSTALLATION 1. Exhaust Dust Assembly Illustration 5 Screw B Foot Races Screw B Screw B Illustration 4 Screw B Illustration 6 4 Plug the power cord into the prepared opening...

