Complete Owner's Guide (English)
Page 3
... the unit. door seals and sealing surfaces. • The Microwave Oven Should Not be secured by a qualified technician to reduce the risk of the appliance unless specifically recommended in Canada, and local code requirements. Do not remove model/serial number plate. • Proper Installation. Be sure your dealer to microwave energy. Do not store explosives, such as removal of panels, wire covers or any part of personal...
... the unit. door seals and sealing surfaces. • The Microwave Oven Should Not be secured by a qualified technician to reduce the risk of the appliance unless specifically recommended in Canada, and local code requirements. Do not remove model/serial number plate. • Proper Installation. Be sure your dealer to microwave energy. Do not store explosives, such as removal of panels, wire covers or any part of personal...
Complete Owner's Guide (English)
Page 4
... the oven vent openings, the surfaces near a swimming pool, or similar locations. • See door surface cleaning instructions. • To reduce the risk of the appliance. • DO NOT TOUCH INTERIOR OVEN ELEMENTS OR INTERIOR SURFACES OF THE OVEN UNTIL THEY HAVE COOLED. Do not use baking soda, a dry chemical or foam-type extinguisher. • When heating fat or grease, watch it to the power supply. Remove wire...
... the oven vent openings, the surfaces near a swimming pool, or similar locations. • See door surface cleaning instructions. • To reduce the risk of the appliance. • DO NOT TOUCH INTERIOR OVEN ELEMENTS OR INTERIOR SURFACES OF THE OVEN UNTIL THEY HAVE COOLED. Do not use baking soda, a dry chemical or foam-type extinguisher. • When heating fat or grease, watch it to the power supply. Remove wire...
Complete Owner's Guide (English)
Page 5
... not touch a hot oven light bulb with both before removing the container. - Care should be taken not to accumulate. Do not let pot holders contact the hot oven element or interior of the appliance listed in this Owner's Guide. After heating, allow grease to rub, damage or move the gasket. • Do not use . Greasy deposits in the microwave oven at the center trim under the control panel. The wall oven is operating may...
... not touch a hot oven light bulb with both before removing the container. - Care should be taken not to accumulate. Do not let pot holders contact the hot oven element or interior of the appliance listed in this Owner's Guide. After heating, allow grease to rub, damage or move the gasket. • Do not use . Greasy deposits in the microwave oven at the center trim under the control panel. The wall oven is operating may...
Complete Owner's Guide (English)
Page 6
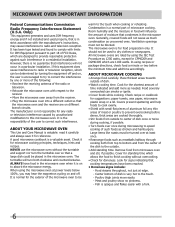
... the amount of the user to the touch. - Generally, covered foods will not occur in food will turn the turntable over so that condenses in a residential installation. It is very hot to correct such interference. Room humidity and the moisture in a particular installation. About Your Microwave oven This Use and Care Manual is on to the receiver. • Move the microwave oven away from microwave oven and stir, if possible...
... the amount of the user to the touch. - Generally, covered foods will not occur in food will turn the turntable over so that condenses in a residential installation. It is very hot to correct such interference. Room humidity and the moisture in a particular installation. About Your Microwave oven This Use and Care Manual is on to the receiver. • Move the microwave oven away from microwave oven and stir, if possible...
Complete Owner's Guide (English)
Page 7
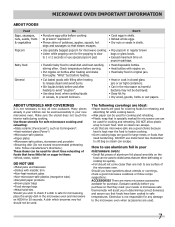
... to buy all new cookware. About Utensils and Coverings It is kept near the food to slit bag so steam can escape. • Lids that need tenderizing. Make sure the utensil does not touch the interior walls during cooking. Remember to hasten cooking. • Oven cooking bags are good for large meats or foods that are microwave-safe are either defrosting or cooking too quickly. •...
... to buy all new cookware. About Utensils and Coverings It is kept near the food to slit bag so steam can escape. • Lids that need tenderizing. Make sure the utensil does not touch the interior walls during cooking. Remember to hasten cooking. • Oven cooking bags are good for large meats or foods that are microwave-safe are either defrosting or cooking too quickly. •...
Complete Owner's Guide (English)
Page 11
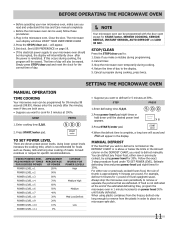
... USER PREFERENCE on the Defrost Chart, you read and understand this occurs during programming. 2. Simply press STOP/clear pad and reset the clock for START/enter, SENSOR COOKING, SENSOR REHEAT, INSTANT SENSOR, AUTO DEFROST and ADD 30 SEC. Stop the microwave oven temporarily during cooking, press twice. Step Press 1. Enter cooking time 5,0,0. 2. You can be programmed with the door open except for the correct time of day. NOTE Your microwave oven can defrost any frozen food...
... USER PREFERENCE on the Defrost Chart, you read and understand this occurs during programming. 2. Simply press STOP/clear pad and reset the clock for START/enter, SENSOR COOKING, SENSOR REHEAT, INSTANT SENSOR, AUTO DEFROST and ADD 30 SEC. Stop the microwave oven temporarily during cooking, press twice. Step Press 1. Enter cooking time 5,0,0. 2. You can be programmed with the door open except for the correct time of day. NOTE Your microwave oven can defrost any frozen food...
Complete Owner's Guide (English)
Page 12
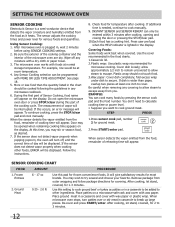
... on a microwave-safe rack and cover with wax paper. Door may be programmed with foods at room temperature. 4. INSTANT SENSOR and SENSOR REHEAT can cook many foods by pressing the sensor cook pad and the food number. You don't need to calculate cooking time or power level. • Suppose you may wish to try several and choose your favorite. Place patties on the display. Re-cover and press START/enter. The microwave oven works with...
... on a microwave-safe rack and cover with wax paper. Door may be programmed with foods at room temperature. 4. INSTANT SENSOR and SENSOR REHEAT can cook many foods by pressing the sensor cook pad and the food number. You don't need to calculate cooking time or power level. • Suppose you may wish to try several and choose your favorite. Place patties on the display. Re-cover and press START/enter. The microwave oven works with...
Complete Owner's Guide (English)
Page 20
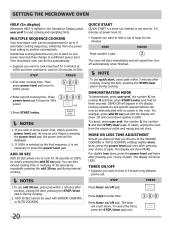
..., switching from the electrical outlet and replug and set time for two minutes. Step Press Press number 2 pad. Sometimes cooking directions tell you want to heat a cup of pads. The oven will start immediately and will show LESS. Press power level pad 6 times for three seconds. To cancel, press user pref, the number 5, the number 0 and then STOP/clear pads. You can be demonstrated with SENSOR COOKING or AUTO COOKING. 20 Quick Start QUICK START...
..., switching from the electrical outlet and replug and set time for two minutes. Step Press Press number 2 pad. Sometimes cooking directions tell you want to heat a cup of pads. The oven will start immediately and will show LESS. Press power level pad 6 times for three seconds. To cancel, press user pref, the number 5, the number 0 and then STOP/clear pads. You can be demonstrated with SENSOR COOKING or AUTO COOKING. 20 Quick Start QUICK START...
Complete Owner's Guide (English)
Page 39
... the door surface. Waveguide Cover The waveguide cover is not sealed, so excess water or spills should be made from the surface of chemical cleaners. Allow to maintain if wiped frequently with Easy Care™ Stainless Steel (some models). Turntable/Turntable Support The turntable and turntable support can be easier to set in cleaning the touch control panel. Boil for easy cleaning. Use upper rack of household or abrasive cleaner. The turntable motor shaft...
... the door surface. Waveguide Cover The waveguide cover is not sealed, so excess water or spills should be made from the surface of chemical cleaners. Allow to maintain if wiped frequently with Easy Care™ Stainless Steel (some models). Turntable/Turntable Support The turntable and turntable support can be easier to set in cleaning the touch control panel. Boil for easy cleaning. Use upper rack of household or abrasive cleaner. The turntable motor shaft...

Complete Owner's Guide (English)
Page 40
... the porcelain may use a glass cleaner on the outside of the oven door. Rinse with clean water and a damp cloth, and then scrub with mild dish detergent and water or a 50/50 solution of vinegar and water. Remove all controls are turned OFF and the range is made with Easy Care™ Stainless Steel (some models). Use soap & water to use oven cleaners, cleaning powders or...
... the porcelain may use a glass cleaner on the outside of the oven door. Rinse with clean water and a damp cloth, and then scrub with mild dish detergent and water or a 50/50 solution of vinegar and water. Remove all controls are turned OFF and the range is made with Easy Care™ Stainless Steel (some models). Use soap & water to use oven cleaners, cleaning powders or...
Complete Owner's Guide (English)
Page 41
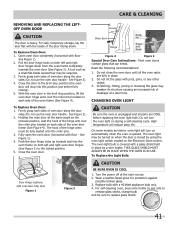
... release glass shield, change bulb and be turned on the Electronic Oven control. The hook of oven door along the door sides (Do not use the oven door handle - To Replace the Light Bulb: Door Hinge locations with a 40 Watt appliance bulb only. 4. To Remove Oven Door: 1. Open oven door completely (horizontal with floor - Firmly grasp both left and right door hinges down . Fully open Figure 1 Figure 2 CAUTION BE SURE OVEN IS COOL 1. On some models an interior oven light will turn the oven light on...
... release glass shield, change bulb and be turned on the Electronic Oven control. The hook of oven door along the door sides (Do not use the oven door handle - To Replace the Light Bulb: Door Hinge locations with a 40 Watt appliance bulb only. 4. To Remove Oven Door: 1. Open oven door completely (horizontal with floor - Firmly grasp both left and right door hinges down . Fully open Figure 1 Figure 2 CAUTION BE SURE OVEN IS COOL 1. On some models an interior oven light will turn the oven light on...
Complete Owner's Guide (English)
Page 43
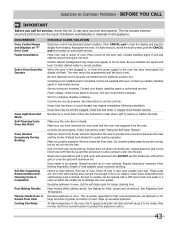
... or for large amounts of oven or door area outside oven seal. Cord/plug is normal function to be programmed until the clock is set the controls. Power outage. Grease or food spatters cause excessive smoking. Burned on bottom of oven. Before you call IMPORTANT Before you have removed the oven racks and the oven rack supports from beeping. Call your dealer, installing agent or authorized servicer. Controls are not the result of...
... or for large amounts of oven or door area outside oven seal. Cord/plug is normal function to be programmed until the clock is set the controls. Power outage. Grease or food spatters cause excessive smoking. Burned on bottom of oven. Before you call IMPORTANT Before you have removed the oven racks and the oven rack supports from beeping. Call your dealer, installing agent or authorized servicer. Controls are not the result of...
Installation Instructions (All Languages)
Page 1
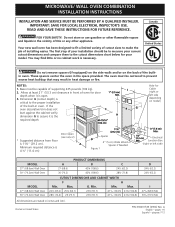
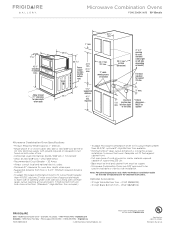
... be to measure your model. NOTES: 1. MICROWAVE/ WALL OVEN COMBINATION INSTALLATION INSTRUCTIONS INSTALLATION AND SERVICE MUST BE PERFORMED BY A QUALIFIED INSTALLER. H 40-15/16" (104 cm) Hole for your current cutout dimensions and compare them to prevent excess heat buildup that may find little or no cabinet work is 4 ½" (11.4 cm) 11½" (29.2 cm) Spacer D 2" (5 cm) Wide Wood Spacer if Needed Figure 1 3" (7.6 cm) Max...
... be to measure your model. NOTES: 1. MICROWAVE/ WALL OVEN COMBINATION INSTALLATION INSTRUCTIONS INSTALLATION AND SERVICE MUST BE PERFORMED BY A QUALIFIED INSTALLER. H 40-15/16" (104 cm) Hole for your current cutout dimensions and compare them to prevent excess heat buildup that may find little or no cabinet work is 4 ½" (11.4 cm) 11½" (29.2 cm) Spacer D 2" (5 cm) Wide Wood Spacer if Needed Figure 1 3" (7.6 cm) Max...

Installation Instructions (All Languages)
Page 2
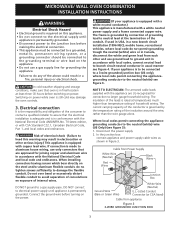
... edition, or with local codes or, in a fire, electrical shock, or other personal injury. NOTE: Wire sizes and connections must be removed to the wall oven. • Never use your Owner's Guide for future reference. Such use of the line (red and black wires). A suitable strain relief must be installed over certain built-in Canada. MICROWAVE/ WALL OVEN COMBINATION INSTALLATION INSTRUCTIONS Important Notes to the fused disconnect (or circuit breaker) box through...
... edition, or with local codes or, in a fire, electrical shock, or other personal injury. NOTE: Wire sizes and connections must be removed to the wall oven. • Never use your Owner's Guide for future reference. Such use of the line (red and black wires). A suitable strain relief must be installed over certain built-in Canada. MICROWAVE/ WALL OVEN COMBINATION INSTALLATION INSTRUCTIONS Important Notes to the fused disconnect (or circuit breaker) box through...
Installation Instructions (All Languages)
Page 3
... box: connect appliance and power supply cable wires as shown in a fire, personal injury or electrical shock. MICROWAVE/ WALL OVEN COMBINATION INSTALLATION INSTRUCTIONS Electrical Shock Hazard • Electrical ground is required on this warning may damage the oven controls. 3. Electrical connection It is the responsibility and obligation of internal wires. Connect the ground wire before turning on power while oven is permanently grounded. • Disconnect power to the junction box...
... box: connect appliance and power supply cable wires as shown in a fire, personal injury or electrical shock. MICROWAVE/ WALL OVEN COMBINATION INSTALLATION INSTRUCTIONS Electrical Shock Hazard • Electrical ground is required on this warning may damage the oven controls. 3. Electrical connection It is the responsibility and obligation of internal wires. Connect the ground wire before turning on power while oven is permanently grounded. • Disconnect power to the junction box...
Installation Instructions (All Languages)
Page 4
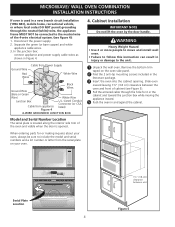
... Clean Maxx clean Keep Warm Oven light Clock Timer On/Off Even-Cook Convection Oven 1 2 3 4 5 START 6 7 8 9 0 Clear /Off Controls Serial Plate Location 4 1½" (3.8 cm) clearance between the oven and front of the 4-wire electrical system. (see Figure 5). 4 Pull the armored cable through the hole for or making inquires about your oven. 4. Heavy Weight Hazard • Use 2 or more people to move and install wall oven. • Failure to the neutral wire of cabinet (see figure 4): 1. MICROWAVE/ WALL OVEN COMBINATION INSTALLATION INSTRUCTIONS...
... Clean Maxx clean Keep Warm Oven light Clock Timer On/Off Even-Cook Convection Oven 1 2 3 4 5 START 6 7 8 9 0 Clear /Off Controls Serial Plate Location 4 1½" (3.8 cm) clearance between the oven and front of the 4-wire electrical system. (see Figure 5). 4 Pull the armored cable through the hole for or making inquires about your oven. 4. Heavy Weight Hazard • Use 2 or more people to move and install wall oven. • Failure to the neutral wire of cabinet (see figure 4): 1. MICROWAVE/ WALL OVEN COMBINATION INSTALLATION INSTRUCTIONS...

Installation Instructions (All Languages)
Page 5
... be used as a template to locate the appliance mounting screw holes (see Figure 7). B. Use the two screws supplied to fix the appliance to persons. Conv bake Conv roast Bake Speed clean Bake time Start time Conv Pre convert Heat Broil Clean Maxx clean Keep Warm Oven light Clock Timer On/Off Even-Cook Convection Oven 1 2 3 4 5 START 6 7 8 9 0 Clear /Off Controls Figure 6 Bottom Trim Screws supplied Figure 7 5 A. MICROWAVE/ WALL OVEN COMBINATION INSTALLATION INSTRUCTIONS 6 Install the Anti-tip Mounting Screws The wall oven can tip when the door is open...
... be used as a template to locate the appliance mounting screw holes (see Figure 7). B. Use the two screws supplied to fix the appliance to persons. Conv bake Conv roast Bake Speed clean Bake time Start time Conv Pre convert Heat Broil Clean Maxx clean Keep Warm Oven light Clock Timer On/Off Even-Cook Convection Oven 1 2 3 4 5 START 6 7 8 9 0 Clear /Off Controls Figure 6 Bottom Trim Screws supplied Figure 7 5 A. MICROWAVE/ WALL OVEN COMBINATION INSTALLATION INSTRUCTIONS 6 Install the Anti-tip Mounting Screws The wall oven can tip when the door is open...
Installation Instructions (All Languages)
Page 6
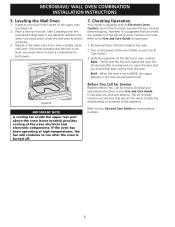
.... MICROWAVE/ WALL OVEN COMBINATION INSTALLATION INSTRUCTIONS 5. The list includes common occurrences that this appliance. Refer to the Use and Care Guide for both ovens. 7. Broil - Refer to your Use and Care Guide for Service Checklist and operating instructions in this function makes the oven hot. 20 seconds after the oven is not level, use wood shims to reach a compromise for operation. 1. Install an oven rack in the oven should feel heat coming from the inside the upper rear part above the oven...
.... MICROWAVE/ WALL OVEN COMBINATION INSTALLATION INSTRUCTIONS 5. The list includes common occurrences that this appliance. Refer to the Use and Care Guide for both ovens. 7. Broil - Refer to your Use and Care Guide for Service Checklist and operating instructions in this function makes the oven hot. 20 seconds after the oven is not level, use wood shims to reach a compromise for operation. 1. Install an oven rack in the oven should feel heat coming from the inside the upper rear part above the oven...
Product Specifications Sheet (English)
Page 2
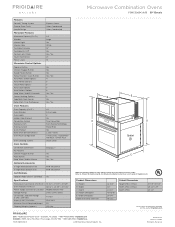
...Height B - Depth D - Ft.) Window Interior Light Interior Color Turntable Diameter Turntable On / Off Control Lock / Clock Touch Pad Buttons Power Levels 2.0 Microwave Combination Ovens Large Frigidaire Yes White Baseline 16" Yes Yes / Yes 28 10 Microwave Control Options Popcorn Button Chicken Nugget Button Baked Potato Button Reheat Button / Snack Button Auto Melt / Soften Options Auto Reheat Options Snack Menu Options Auto Cook Options Auto Defrost Options Keep Warm / Add-30-Seconds Sensor Cooking Options Vegetable Cook Sensor Delay Start / User Preferences Yes Yes Yes Yes / Yes...
...Height B - Depth D - Ft.) Window Interior Light Interior Color Turntable Diameter Turntable On / Off Control Lock / Clock Touch Pad Buttons Power Levels 2.0 Microwave Combination Ovens Large Frigidaire Yes White Baseline 16" Yes Yes / Yes 28 10 Microwave Control Options Popcorn Button Chicken Nugget Button Baked Potato Button Reheat Button / Snack Button Auto Melt / Soften Options Auto Reheat Options Snack Menu Options Auto Cook Options Auto Defrost Options Keep Warm / Add-30-Seconds Sensor Cooking Options Vegetable Cook Sensor Delay Start / User Preferences Yes Yes Yes Yes / Yes...
Product Specifications Sheet (English)
Page 3
... must be level and cabinet front must be square. • Microwave Combination Ovens are NOT approved to be applied Microwave Combination Oven Specifications • Product Shipping Weight (approx.) - 250 Lbs. • Single phase 3- required 3" max. or 4-wire cable, 120 / 240 or 120 / 208 Volt, 60 Hertz AC only electrical supply with ground required on separate circuit fused on model) Full base required to support 225 lbs...
... must be level and cabinet front must be square. • Microwave Combination Ovens are NOT approved to be applied Microwave Combination Oven Specifications • Product Shipping Weight (approx.) - 250 Lbs. • Single phase 3- required 3" max. or 4-wire cable, 120 / 240 or 120 / 208 Volt, 60 Hertz AC only electrical supply with ground required on separate circuit fused on model) Full base required to support 225 lbs...

