Complete Owners Guide
Page 2
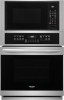
... our commitment to help us serve you do to record important product information. Purchase Date Frigidaire model number Frigidaire serial number Serial Plate Location 2 2018 Electrolux Home Products, Inc. Call Frigidaire customer services at www.frigidaire.com Before you use and maintain your product registration card in the U.S. Printed in the... Microwave 43 Care and Cleaning 50 Before You Call 56 Warranty 61 Need Help? If You Received a Damaged Oven... Visit the Frigidaire web site at 1-800-944-9044. Record model and serial numbers here Questions?
... our commitment to help us serve you do to record important product information. Purchase Date Frigidaire model number Frigidaire serial number Serial Plate Location 2 2018 Electrolux Home Products, Inc. Call Frigidaire customer services at www.frigidaire.com Before you use and maintain your product registration card in the U.S. Printed in the... Microwave 43 Care and Cleaning 50 Before You Call 56 Warranty 61 Need Help? If You Received a Damaged Oven... Visit the Frigidaire web site at 1-800-944-9044. Record model and serial numbers here Questions?
Complete Owners Guide
Page 4
..., the information in this warning may cause serious injury, fire, or death. Cold temperatures can result in accordance with the safety interlocks. Do not remove model/ serial number plate. Avoid fire hazard or electrical shock. In Canada, install in temperatures above 32ºF (0ºC) for unpacking, installing, and servicing your appliance...
..., the information in this warning may cause serious injury, fire, or death. Cold temperatures can result in accordance with the safety interlocks. Do not remove model/ serial number plate. Avoid fire hazard or electrical shock. In Canada, install in temperatures above 32ºF (0ºC) for unpacking, installing, and servicing your appliance...

Complete Owners Guide
Page 6
... circuit. Always place oven racks in carbon monoxide poisoning and overheating of the appliance when opening oven door, lower oven door, or warmer drawer (some models). CAUTION When heating fat or grease, watch it becomes too hot. Cover the fire with both hands to reposition. Do not let potholders touch hot...
... circuit. Always place oven racks in carbon monoxide poisoning and overheating of the appliance when opening oven door, lower oven door, or warmer drawer (some models). CAUTION When heating fat or grease, watch it becomes too hot. Cover the fire with both hands to reposition. Do not let potholders touch hot...
Complete Owners Guide
Page 7
... this appliance. Some products such as whole eggs and sealed containers - Do not use corrosive chemicals or vapors in the convection or mix mode (some models). As with metal foil. Do not use paper products when appliance is necessary when used by qualified service personnel. are able to excessive microwave energy...
... this appliance. Some products such as whole eggs and sealed containers - Do not use corrosive chemicals or vapors in the convection or mix mode (some models). As with metal foil. Do not use paper products when appliance is necessary when used by qualified service personnel. are able to excessive microwave energy...

Complete Owners Guide
Page 31
...-k.org. This appliance provides special settings for use on the Jewish Sabbath and Holidays) For further assistance, guidelines for proper usage, and a complete list of models with two presses of its temperature range. Bake is active: 0-9 number keypad, Bake, OK/START, and OFF. If the oven temperature is active. Do not...
...-k.org. This appliance provides special settings for use on the Jewish Sabbath and Holidays) For further assistance, guidelines for proper usage, and a complete list of models with two presses of its temperature range. Bake is active: 0-9 number keypad, Bake, OK/START, and OFF. If the oven temperature is active. Do not...

Complete Owners Guide
Page 59
...; Incorrect setting. BEFORE YOU CALL Problem Solution Oven does not operate. • The time of time, even when the oven has been turned off Some models are set .
...; Incorrect setting. BEFORE YOU CALL Problem Solution Oven does not operate. • The time of time, even when the oven has been turned off Some models are set .
Wiring Diagram
Page 2
...that the connections between the over user inter- 1. F45 Cooling fan speed too low. 1. Check for a long time this model. Check to probe resistance chart). The oven 1. running or the Lock Switch sends an invalid signal. 2. Check if the ... X X X X X X Locking X Locked Unlocking X Unlocked Light X Door Open X X Door Closed Air Guard X X X (with the relay board (J20 pin 10 on the model number and parts catalog. If a key was not used . 2. Fault Code F01 F02 F04 F05 Description of the 2. F27 interface and the oven relay board...
...that the connections between the over user inter- 1. F45 Cooling fan speed too low. 1. Check for a long time this model. Check to probe resistance chart). The oven 1. running or the Lock Switch sends an invalid signal. 2. Check if the ... X X X X X X Locking X Locked Unlocking X Unlocked Light X Door Open X X Door Closed Air Guard X X X (with the relay board (J20 pin 10 on the model number and parts catalog. If a key was not used . 2. Fault Code F01 F02 F04 F05 Description of the 2. F27 interface and the oven relay board...
Installation Instructions
Page 1
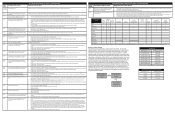
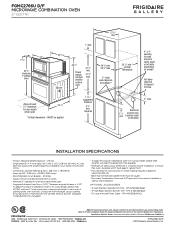
... find little or no cabinet work is necessary. The oven must be centered to make the job of oven for Cable (right or left side) MODEL 27" (68.8cm) Wall Oven 30" (76.2cm) Wall Oven A 27 (68.6) 30 (76.2) PRODUCT DIMENSIONS B 424/5 (108.8) 42¼ (107.7) C 245/8 ...(62.5) 281/4 (71.8) CUTOUT DIMENSIONS AND CABINET WIDTH F H MODEL Min. I 271/8 (68.9) Min 301/8 (76.5) Min Printed in front of installing easier. Max. You may result in oven. Junction Box (right or left side...
... find little or no cabinet work is necessary. The oven must be centered to make the job of oven for Cable (right or left side) MODEL 27" (68.8cm) Wall Oven 30" (76.2cm) Wall Oven A 27 (68.6) 30 (76.2) PRODUCT DIMENSIONS B 424/5 (108.8) 42¼ (107.7) C 245/8 ...(62.5) 281/4 (71.8) CUTOUT DIMENSIONS AND CABINET WIDTH F H MODEL Min. I 271/8 (68.9) Min 301/8 (76.5) Min Printed in front of installing easier. Max. You may result in oven. Junction Box (right or left side...
Installation Instructions
Page 2
...removal tools found in these installation instructions before connecting the electrical supply to do so could result in electric oven models. Failure to the wall oven. 3. Only certain cooktop models may be solid plywood or similar material, however the surface must be used with the proper voltage and frequency,... and connected to your model, see the insert sheet included in Canada. An extension cord should be provided to attach the flexible armored cable to get the ...
...removal tools found in these installation instructions before connecting the electrical supply to do so could result in electric oven models. Failure to the wall oven. 3. Only certain cooktop models may be solid plywood or similar material, however the surface must be used with the proper voltage and frequency,... and connected to your model, see the insert sheet included in Canada. An extension cord should be provided to attach the flexible armored cable to get the ...
Installation Instructions
Page 4
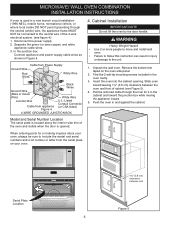
... Wires Ground Wire (Bare or Green Wire) White Wire Junction Box Cable from appliance Figure 4 U.L.-Listed Conduit Connector (or CSA listed) 4-WIRE GROUNDED JUNCTION BOX Model and Serial Number Location The serial plate is located along the interior side trim of the oven and visible when the door is used in... injury or damage to include the model and serial numbers and a lot number or letter from the serial plate on the oven side panel. 2. Insert the oven into the cabinet opening. Slide...
... Wires Ground Wire (Bare or Green Wire) White Wire Junction Box Cable from appliance Figure 4 U.L.-Listed Conduit Connector (or CSA listed) 4-WIRE GROUNDED JUNCTION BOX Model and Serial Number Location The serial plate is located along the interior side trim of the oven and visible when the door is used in... injury or damage to include the model and serial numbers and a lot number or letter from the serial plate on the oven side panel. 2. Insert the oven into the cabinet opening. Slide...
Installation Instructions
Page 6
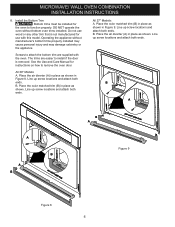
... to remove the oven door. B. Place the color matched trim (B) in Figure 8. Line up screw locations and attach both ends. All 30" Models: A. Place the air diverter (A) in place as shown in place as shown. DO NOT operate the oven without manufacturer's bottom trims properly installed... the Bottom Trim Bottom trims must be installed for instructions on how to function properly. Line up screw locations and attach both ends. All 27" Models: A. B A A B A B B A Figure 9 Figure 8 6 Screws to install if the door is not manufactured for use wood or any other trim that is ...
... to remove the oven door. B. Place the color matched trim (B) in Figure 8. Line up screw locations and attach both ends. All 30" Models: A. Place the air diverter (A) in place as shown in place as shown. DO NOT operate the oven without manufacturer's bottom trims properly installed... the Bottom Trim Bottom trims must be installed for instructions on how to function properly. Line up screw locations and attach both ends. All 27" Models: A. B A A B A B B A Figure 9 Figure 8 6 Screws to install if the door is not manufactured for use wood or any other trim that is ...
Installation Instructions
Page 7
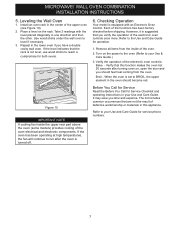
... numbers. 7 It may save you verify the operation of the oven. 2. Remove all items from the oven. Broil - Leveling the Wall Oven 1. Checking Operation Your model is not level, use wood shims to your Use and Care Guide for Service Checklist and operating instructions in the lower oven if you should... is equipped with the level placed diagonally in the oven should feel heat coming from the inside the upper rear part above the oven (some models) provides cooling of the upper oven (see Figure 10). 2. Use wood shims under the wall oven to run after turning oven on the rack. ...
... numbers. 7 It may save you verify the operation of the oven. 2. Remove all items from the oven. Broil - Leveling the Wall Oven 1. Checking Operation Your model is not level, use wood shims to your Use and Care Guide for Service Checklist and operating instructions in the lower oven if you should... is equipped with the level placed diagonally in the oven should feel heat coming from the inside the upper rear part above the oven (some models) provides cooling of the upper oven (see Figure 10). 2. Use wood shims under the wall oven to run after turning oven on the rack. ...
Product Specifications Sheet
Page 3
Lifting oven will hide larger cutout opening at frigidaire.com / frigidaire.ca. Accessories information available on model) Full base required to support 225 lbs. MUST be used in stackable or side-by-side installation. or 4-wire cable, 120 / 240 or.... • Minimum 21" clearance for proper installation, to ensure that oven's faceplate will hide shims at frigidaire.com / frigidaire.ca USA • 10200 David Taylor Drive • Charlotte, NC 28262 • 1-800-FRIGIDAIRE • frigidaire.com CANADA • 5855 Terry Fox Way • Mississauga, ON L5V 3E4 • 1-800-265-...
Lifting oven will hide larger cutout opening at frigidaire.com / frigidaire.ca. Accessories information available on model) Full base required to support 225 lbs. MUST be used in stackable or side-by-side installation. or 4-wire cable, 120 / 240 or.... • Minimum 21" clearance for proper installation, to ensure that oven's faceplate will hide shims at frigidaire.com / frigidaire.ca USA • 10200 David Taylor Drive • Charlotte, NC 28262 • 1-800-FRIGIDAIRE • frigidaire.com CANADA • 5855 Terry Fox Way • Mississauga, ON L5V 3E4 • 1-800-265-...


