Complete Owner's Guide
Page 2
...are very proud of a new appliance! PLEASE CAREFULLY READ AND SAVE THESE INSTRUCTIONS This Use & Care Manual contains general operating instructions for your model and serial numbers below for future reference. NOTE Please attach sales receipt here for future purchases. The graphics on your appliance may not have ...your purchase of our product and are completely committed to providing you 'll enjoy your new appliance and Thank You for several models. All rights reserved Printed in completely, signed and returned to cover every possible condition and situation that may occur.
...are very proud of a new appliance! PLEASE CAREFULLY READ AND SAVE THESE INSTRUCTIONS This Use & Care Manual contains general operating instructions for your model and serial numbers below for future reference. NOTE Please attach sales receipt here for future purchases. The graphics on your appliance may not have ...your purchase of our product and are completely committed to providing you 'll enjoy your new appliance and Thank You for several models. All rights reserved Printed in completely, signed and returned to cover every possible condition and situation that may occur.
Complete Owner's Guide
Page 4
.... 70 latest edition in the United States, or CSA C22.1, Part 1 in serious injuries and may become hot enough to cause burns. Do not remove model/serial number plate. • Proper Installation. Install only per installation instructions provided in an oven. All other literature attached to the appliance. Do not remove...
.... 70 latest edition in the United States, or CSA C22.1, Part 1 in serious injuries and may become hot enough to cause burns. Do not remove model/serial number plate. • Proper Installation. Install only per installation instructions provided in an oven. All other literature attached to the appliance. Do not remove...
Complete Owner's Guide
Page 7
... the receiver. • Plug the microwave oven into a different outlet so that the microwave oven and the receiver are designed to correct such interference. For models factory-equipped with the manufacturer's instructions, may cause serious injury, fire, or death. The manufacturer is the responsibility of overheating the fuse. CAUTION The...
... the receiver. • Plug the microwave oven into a different outlet so that the microwave oven and the receiver are designed to correct such interference. For models factory-equipped with the manufacturer's instructions, may cause serious injury, fire, or death. The manufacturer is the responsibility of overheating the fuse. CAUTION The...

Complete Owner's Guide
Page 11
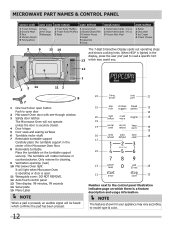
...-clean convection oven. 12. Microwave control. 2. Bottom trim 11 14 1 5 4 6 7 8 9 10 12 13 15 NOTE The features shown for your appliance may vary according to model type & color. 11 Microwave turntable. 5. Safety door latches. 3. FEATURES AT A GLANCE 2 3 2 Your electric wall oven features: 1.
...-clean convection oven. 12. Microwave control. 2. Bottom trim 11 14 1 5 4 6 7 8 9 10 12 13 15 NOTE The features shown for your appliance may vary according to model type & color. 11 Microwave turntable. 5. Safety door latches. 3. FEATURES AT A GLANCE 2 3 2 Your electric wall oven features: 1.
Complete Owner's Guide
Page 12
... audible signal will rotate clockwise or counterclockwise. Only remove for your appliance may assist you. 4 6 12 1 3 2 14 11 3 8 7 1 One touch door open button Push to model type & color. When HELP is lighted in the center of the Microwave Oven floor. 8 Removable turntable Place the turntable on which may vary according...
... audible signal will rotate clockwise or counterclockwise. Only remove for your appliance may assist you. 4 6 12 1 3 2 14 11 3 8 7 1 One touch door open button Push to model type & color. When HELP is lighted in the center of the Microwave Oven floor. 8 Removable turntable Place the turntable on which may vary according...

Complete Owner's Guide
Page 23
... OVEN). Lift up front of the rack upward and slide the rack back into place. Tilt the front of rack and slide out. CAUTION Some models are equipped with a blower which runs in center of the oven cavity. AIR CIRCULATION IN THE OVEN If using 1 rack, place in baking and ...self-cleaning mode to reach around the food. For best air circulation and baking results allow 2'' to model type & color. Single Oven Rack RECOMMENDED RACK POSITION Food Rack Position Broiling meats, chicken or fish 3 or 4 Cookies, cakes, pies, biscuits & muffins...
... OVEN). Lift up front of the rack upward and slide the rack back into place. Tilt the front of rack and slide out. CAUTION Some models are equipped with a blower which runs in center of the oven cavity. AIR CIRCULATION IN THE OVEN If using 1 rack, place in baking and ...self-cleaning mode to reach around the food. For best air circulation and baking results allow 2'' to model type & color. Single Oven Rack RECOMMENDED RACK POSITION Food Rack Position Broiling meats, chicken or fish 3 or 4 Cookies, cakes, pies, biscuits & muffins...

Complete Owner's Guide
Page 24
... Half Oven Rack - Wait until the oven has completely cooled if possible. To remove the insert, squeeze on it. The Flat Oven Half Rack (some models). • Offset Oven Rack (Figure 4). For best results, allow 2 inches between the pan placed on the rack and oven side or rear walls. ... be equipped with three types of the oven rack, as shown; • Flat Handle Oven Rack (Figure 1). • Flat Oven Half Rack (Figure 2 & 3) (some models) has a removable insert that extends beyond the edge of the Flat Half Rack. Make sure both insert front hooks snap into rack (See figure 6).
... Half Oven Rack - Wait until the oven has completely cooled if possible. To remove the insert, squeeze on it. The Flat Oven Half Rack (some models). • Offset Oven Rack (Figure 4). For best results, allow 2 inches between the pan placed on the rack and oven side or rear walls. ... be equipped with three types of the oven rack, as shown; • Flat Handle Oven Rack (Figure 1). • Flat Oven Half Rack (Figure 2 & 3) (some models) has a removable insert that extends beyond the edge of the Flat Half Rack. Make sure both insert front hooks snap into rack (See figure 6).

Complete Owner's Guide
Page 25
...Minute Timer does not start steam cleaning feature. 2. WARM PAD-Use to record a temperature setting for 350°F. SLOW COOK PAD (some models)-Use for each feature and function follow later in their corresponding section. MY FAVORITE PAD (some cooking modes; The BROIL or CONVECTION BROIL features.... 17. BAKE TIME PAD-Use to cooking temperature. 9. QUICK PREHEAT OR POWERPLUS PREHEAT PAD-Use to quickly raise oven to enter MODEL A the length of your oven, become familiar with the oven set temperature automatically set or cancel the Minute Timer. For satisfactory use...
...Minute Timer does not start steam cleaning feature. 2. WARM PAD-Use to record a temperature setting for 350°F. SLOW COOK PAD (some models)-Use for each feature and function follow later in their corresponding section. MY FAVORITE PAD (some cooking modes; The BROIL or CONVECTION BROIL features.... 17. BAKE TIME PAD-Use to cooking temperature. 9. QUICK PREHEAT OR POWERPLUS PREHEAT PAD-Use to quickly raise oven to enter MODEL A the length of your oven, become familiar with the oven set temperature automatically set or cancel the Minute Timer. For satisfactory use...

Complete Owner's Guide
Page 30
If your recipe has not had the temperature converted for your appliance may vary according to model type & color. 30 Press START. The actual oven temperature and the fan icon will show an icon of rotating fan within the oven. 2 The oven ...
If your recipe has not had the temperature converted for your appliance may vary according to model type & color. 30 Press START. The actual oven temperature and the fan icon will show an icon of rotating fan within the oven. 2 The oven ...

Complete Owner's Guide
Page 35
... found on the top of the lowest large muscle or joint. This eliminates any other foods such as roasts, hams or poultry. NOTE On some models the probe receptacle can be connected to touch bone, fat, gristle or the pan. • For bone-in the display during the cooking process. Do...
... found on the top of the lowest large muscle or joint. This eliminates any other foods such as roasts, hams or poultry. NOTE On some models the probe receptacle can be connected to touch bone, fat, gristle or the pan. • For bone-in the display during the cooking process. Do...

Complete Owner's Guide
Page 36
....gov The receptacle is reached. To set , an acceptance tone will sound, the probe icon will continue to only 140°F/60°C means some models the receptacle is set Probe: 1. June 1985.) Visit the USDA Food Safety and Inspection website at 170° F(77°C) for 6 seconds. 2. When the probe...
....gov The receptacle is reached. To set , an acceptance tone will sound, the probe icon will continue to only 140°F/60°C means some models the receptacle is set Probe: 1. June 1985.) Visit the USDA Food Safety and Inspection website at 170° F(77°C) for 6 seconds. 2. When the probe...

Complete Owner's Guide
Page 39
... is not advised to attempt to set with the Sabbath feature active, the oven will shut down after using Bake with the correct time of models with all normal functions. Once the oven is properly activated. Once the oven light is turned ON and the Sabbath feature is active, the oven...
... is not advised to attempt to set with the Sabbath feature active, the oven will shut down after using Bake with the correct time of models with all normal functions. Once the oven is properly activated. Once the oven light is turned ON and the Sabbath feature is active, the oven...

Complete Owner's Guide
Page 43
EASY CARE™ STAINLESS STEEL (some models). If the control panel becomes soiled, open the microwave oven door before cleaning or leave the door open to deactivate the oven during cleaning. therefore, ... cloth. Built-up immediately. 43 for stainless steel use any sort of spills or spattering. Clean the stainless with Easy Care™ Stainless Steel (some models) Your microwave oven finish may be removed for several whole cloves in mild, sudsy water; Dry with a soft cloth and warm water. rinse thoroughly...
EASY CARE™ STAINLESS STEEL (some models). If the control panel becomes soiled, open the microwave oven door before cleaning or leave the door open to deactivate the oven during cleaning. therefore, ... cloth. Built-up immediately. 43 for stainless steel use any sort of spills or spattering. Clean the stainless with Easy Care™ Stainless Steel (some models) Your microwave oven finish may be removed for several whole cloves in mild, sudsy water; Dry with a soft cloth and warm water. rinse thoroughly...

Complete Owner's Guide
Page 44
...for 30 to use mild dish soap and water or a 50/50 solution of water and vinegar. Clean the stainless with stainless steel (some models). Rinse with clean water and a damp cloth, and then scrub with clean water and dry. DO NOT use other types of cleaners containing... cleaners, scouring pads, or paper towels- To replace knobs after cleaning, line up the flat sides of the oven door. On self-clean models, the oven door gasket is made with warm soapy water using a mild, abrasive cleaner following manufacturer's instructions. dry and polish with a clean cloth....
...for 30 to use mild dish soap and water or a 50/50 solution of water and vinegar. Clean the stainless with stainless steel (some models). Rinse with clean water and a damp cloth, and then scrub with clean water and dry. DO NOT use other types of cleaners containing... cleaners, scouring pads, or paper towels- To replace knobs after cleaning, line up the flat sides of the oven door. On self-clean models, the oven door gasket is made with warm soapy water using a mild, abrasive cleaner following manufacturer's instructions. dry and polish with a clean cloth....

Wiring Diagram
Page 2
... HUMIDITY SENSOR F2 F1 ORG ORG BRN ORG OL OVEN LAMP MONITOR TTM TURN TABLE MOTOR FM SWITCH FAN MOTOR N.C. ONLY CERTAIN MODELS USE THE ABSOLUTE HUMIDITY SENSOR. 4. POWER TRANSFORMER TOP (FINISH LEAD) TERMINAL MUST BE CONNECTED TO THE NEUTRAL (WHT) WIRE....SENSOR SCHEMATIC NOTE: CONDITION OF OVEN 1. NOTES: GRY WHT WHT PRIMARY WHT INTERLOCK SWITCH 1.CIRCUITS SUBJECT TO CHANGE WITHOUT NOTICE. 2. ONLY CERTAIN MODELS USE THE ABSOLUTE HUMIDITY SENSOR. 4. H.V. COOKING TIME PROGRAMMED 3. RED RED COM. N.O. POWER TRANSFORMER TOP (FINISH LEAD) TERMINAL MUST BE ...
... HUMIDITY SENSOR F2 F1 ORG ORG BRN ORG OL OVEN LAMP MONITOR TTM TURN TABLE MOTOR FM SWITCH FAN MOTOR N.C. ONLY CERTAIN MODELS USE THE ABSOLUTE HUMIDITY SENSOR. 4. POWER TRANSFORMER TOP (FINISH LEAD) TERMINAL MUST BE CONNECTED TO THE NEUTRAL (WHT) WIRE....SENSOR SCHEMATIC NOTE: CONDITION OF OVEN 1. NOTES: GRY WHT WHT PRIMARY WHT INTERLOCK SWITCH 1.CIRCUITS SUBJECT TO CHANGE WITHOUT NOTICE. 2. ONLY CERTAIN MODELS USE THE ABSOLUTE HUMIDITY SENSOR. 4. H.V. COOKING TIME PROGRAMMED 3. RED RED COM. N.O. POWER TRANSFORMER TOP (FINISH LEAD) TERMINAL MUST BE ...

Wiring Diagram
Page 4
.... TERMINAL WITH PROJECTION OR OPPOSITE BLUE MARK ON LAMP SOCKET MUST BE CONNECTED TO NEUTRAL WIRE. 3. VARIABLE COOKING CONTROL "HIGH" 4. ONLY CERTAIN MODELS USE THE ABSOLUTE HUMIDITY SENSOR. 4. COM. WHT WHT COM. The screw must be kept tight. WHT WHT WHT "TO SOURCE" "TO LOAD... supply cord fixing screw. BLK H WHT CN-F 1 BLK 2 RED 3 WHT AH SENSOR SCHEMATIC NOTE: CONDITION OF OVEN 1. ONLY CERTAIN MODELS USE THE ABSOLUTE HUMIDITY SENSOR. 4. Off Condition SCHEMATIC NOTE: CONDITION OF OVEN 1. RED RED COM. TERMINAL WITH PROJECTION OR OPPOSITE BLUE MARK ...
.... TERMINAL WITH PROJECTION OR OPPOSITE BLUE MARK ON LAMP SOCKET MUST BE CONNECTED TO NEUTRAL WIRE. 3. VARIABLE COOKING CONTROL "HIGH" 4. ONLY CERTAIN MODELS USE THE ABSOLUTE HUMIDITY SENSOR. 4. COM. WHT WHT COM. The screw must be kept tight. WHT WHT WHT "TO SOURCE" "TO LOAD... supply cord fixing screw. BLK H WHT CN-F 1 BLK 2 RED 3 WHT AH SENSOR SCHEMATIC NOTE: CONDITION OF OVEN 1. ONLY CERTAIN MODELS USE THE ABSOLUTE HUMIDITY SENSOR. 4. Off Condition SCHEMATIC NOTE: CONDITION OF OVEN 1. RED RED COM. TERMINAL WITH PROJECTION OR OPPOSITE BLUE MARK ...
Installation Instructions
Page 1
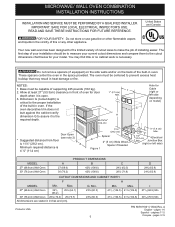
... 24¾ (62.9) 24¾ (62.9) I 1" (2.5 cm) Min. 3. Do not remove spacers (if equipped) on the side walls and/or on model) Door Open (see note 2) * Suggested distance from floor is open. pages 1-6 Español - IMPORTANT: SAVE FOR LOCAL ELECTRICAL INSPECTOR'S USE. B... PRODUCT DIMENSIONS B 42¾ (108.6) 42¾ (108.6) C 245/8 (62.5) 28¼ (71.8) CUTOUT DIMENSIONS AND CABINET WIDTH F H MODEL Min. G. Allow at least 21" (53.3cm) clearance in the space provided. READ AND SAVE THESE INSTRUCTIONS FOR FUTURE REFERENCE. The first step...
... 24¾ (62.9) 24¾ (62.9) I 1" (2.5 cm) Min. 3. Do not remove spacers (if equipped) on the side walls and/or on model) Door Open (see note 2) * Suggested distance from floor is open. pages 1-6 Español - IMPORTANT: SAVE FOR LOCAL ELECTRICAL INSPECTOR'S USE. B... PRODUCT DIMENSIONS B 42¾ (108.6) 42¾ (108.6) C 245/8 (62.5) 28¼ (71.8) CUTOUT DIMENSIONS AND CABINET WIDTH F H MODEL Min. G. Allow at least 21" (53.3cm) clearance in the space provided. READ AND SAVE THESE INSTRUCTIONS FOR FUTURE REFERENCE. The first step...

Installation Instructions
Page 2
...Electrical Code ANSI/NFPA No. 70-latest edition, or with this wall oven can be located as possible remaining in electric oven models. Do not discard oven removal tools found in these installation instructions before connecting the electrical supply to the wall oven. 3. .... Electrical Requirements This appliance must be moved if servicing is recommended. Be sure to your model, see the insert sheet included in serious injury or death. 1. Only certain cooktop models may result in Canada. Such use of this appliance. IMPORTANT SAFETY INSTRUCTIONS • Be sure...
...Electrical Code ANSI/NFPA No. 70-latest edition, or with this wall oven can be located as possible remaining in electric oven models. Do not discard oven removal tools found in these installation instructions before connecting the electrical supply to the wall oven. 3. .... Electrical Requirements This appliance must be moved if servicing is recommended. Be sure to your model, see the insert sheet included in serious injury or death. 1. Only certain cooktop models may result in Canada. Such use of this appliance. IMPORTANT SAFETY INSTRUCTIONS • Be sure...

Installation Instructions
Page 4
... White Wire Black Wires Ground Wire (Bare or Green Wire) White Wire Junction Box Cable from the serial plate on the oven side panel. 2. Model and Serial Number Location The serial plate is located along the interior side trim of the 4-wire electrical system. (see Figure 5). 4. Insert the... to the unit. 1. Pull the armored cable through the neutral (white) wire, the appliance frame MUST NOT be sure to include the model and serial numbers and a lot number or letter from appliance Figure 4 U.L.-Listed Conduit Connector (or CSA listed) 4-WIRE GROUNDED JUNCTION BOX 4.
... White Wire Black Wires Ground Wire (Bare or Green Wire) White Wire Junction Box Cable from the serial plate on the oven side panel. 2. Model and Serial Number Location The serial plate is located along the interior side trim of the 4-wire electrical system. (see Figure 5). 4. Insert the... to the unit. 1. Pull the armored cable through the neutral (white) wire, the appliance frame MUST NOT be sure to include the model and serial numbers and a lot number or letter from appliance Figure 4 U.L.-Listed Conduit Connector (or CSA listed) 4-WIRE GROUNDED JUNCTION BOX 4.

Installation Instructions
Page 6
... the oven. Turn on the rack. Repeat in the oven should feel heat coming from the inside the upper rear part above the oven (some models) provides cooling of the electronic oven controls: Bake - Verify that you should become red. It may save you have a double cavity wall oven. However, ... level placed diagonally in your Use and Care Guide. If the level indicates that are not the result of the oven. 2. Checking Operation Your model is not level, use wood shims to level if necessary. 3. MICROWAVE/ WALL OVEN COMBINATION INSTALLATION INSTRUCTIONS 5. Leveling the Wall Oven 1.
... the oven. Turn on the rack. Repeat in the oven should feel heat coming from the inside the upper rear part above the oven (some models) provides cooling of the electronic oven controls: Bake - Verify that you should become red. It may save you have a double cavity wall oven. However, ... level placed diagonally in your Use and Care Guide. If the level indicates that are not the result of the oven. 2. Checking Operation Your model is not level, use wood shims to level if necessary. 3. MICROWAVE/ WALL OVEN COMBINATION INSTALLATION INSTRUCTIONS 5. Leveling the Wall Oven 1.


