
Complete Owner's Guide
Page 1
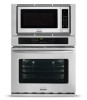
... 26 Important Safety Instructions 3 Steam-Cleaning 40 Microwave Oven Important Information 8 Self-Cleaning 41 Features at a Glance 11 Care & Cleaning (Microwave Cleaning Chart) ......... 43 Microwave Parts Names & Control Panel 12 Care & Cleaning (Oven Cleaning Chart 44 Before Operating the Microwave Oven 13 Care & Cleaning 45 Setting the Microwave Oven 13 Before...
... 26 Important Safety Instructions 3 Steam-Cleaning 40 Microwave Oven Important Information 8 Self-Cleaning 41 Features at a Glance 11 Care & Cleaning (Microwave Cleaning Chart) ......... 43 Microwave Parts Names & Control Panel 12 Care & Cleaning (Oven Cleaning Chart 44 Before Operating the Microwave Oven 13 Care & Cleaning 45 Setting the Microwave Oven 13 Before...
Complete Owner's Guide
Page 4
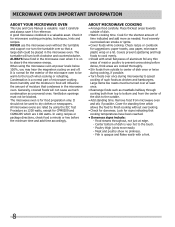
...energy when using the appliance. Destroy the carton and plastic bags after use the oven for storage. Do not repair or replace any part of the appliance. •DO NOT TOUCH INTERIOR OVEN ELEMENTS OR INTERIOR SURFACES OF THE OVEN UNTIL THEY HAVE COOLED. CAUTION Electronic ...; Never modify or alter the construction of an appliance such as flammable liquids. Do not remove the wiring label and other permanent part of the appliance. IMPORTANT SAFETY INSTRUCTIONS • Remove all tape and packaging wrap before connecting it is in use your appliance for the ...
...energy when using the appliance. Destroy the carton and plastic bags after use the oven for storage. Do not repair or replace any part of the appliance. •DO NOT TOUCH INTERIOR OVEN ELEMENTS OR INTERIOR SURFACES OF THE OVEN UNTIL THEY HAVE COOLED. CAUTION Electronic ...; Never modify or alter the construction of an appliance such as flammable liquids. Do not remove the wiring label and other permanent part of the appliance. IMPORTANT SAFETY INSTRUCTIONS • Remove all tape and packaging wrap before connecting it is in use your appliance for the ...
Complete Owner's Guide
Page 6
... grid or oven bottom with both before and halfway through heating it. - Refer to reposition. No oven cleaner or oven liner protective coating of any part of a hot oven. Do not overheat the liquid. - Let hot air or steam escape before you remove or replace food in risk of Oven...rack with aluminum foil. Improper installation of these liners may ignite causing damage and/ or injury. • Clean in the self-cleaning cycle only the parts of the appliance listed in the fan could melt or ignite. • Placement of electric shock, or fire. Do not allow grease to ...
... grid or oven bottom with both before and halfway through heating it. - Refer to reposition. No oven cleaner or oven liner protective coating of any part of a hot oven. Do not overheat the liquid. - Let hot air or steam escape before you remove or replace food in risk of Oven...rack with aluminum foil. Improper installation of these liners may ignite causing damage and/ or injury. • Clean in the self-cleaning cycle only the parts of the appliance listed in the fan could melt or ignite. • Placement of electric shock, or fire. Do not allow grease to ...
Complete Owner's Guide
Page 7
... is extremely sensitive to the fumes given off and on different branch circuits. See the installation instructions packaged with limits for ISM Equipment pursuant to part 18 of FCC Rules, which can be plugged into an electrical outlet that is the correct voltage, is correctly polarized, and is in a residential installation...
... is extremely sensitive to the fumes given off and on different branch circuits. See the installation instructions packaged with limits for ISM Equipment pursuant to part 18 of FCC Rules, which can be plugged into an electrical outlet that is the correct voltage, is correctly polarized, and is in a residential installation...
Complete Owner's Guide
Page 8
... always save it for microwave cooking principles, techniques, hints and recipes. NEVER use the microwave oven without overcooking. • Check for doneness. It is a normal part of moisture that cooking temperatures have food in the microwave oven. Ventilation openings must be turned over so that a large dish could be used to...
... always save it for microwave cooking principles, techniques, hints and recipes. NEVER use the microwave oven without overcooking. • Check for doneness. It is a normal part of moisture that cooking temperatures have food in the microwave oven. Ventilation openings must be turned over so that a large dish could be used to...
Complete Owner's Guide
Page 12
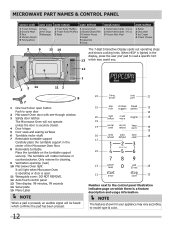
MICROWAVE PART NAMES & CONTROL PANEL sensor cook auto cook auto reheat auto defrost 1 Frozen Entrees 2 Ground Meat 3 Rice 4 Chicken Breast 5 Fish/seafood 1 Pizza 2 Hot Dogs 3 Beverage 1 Fresh ...
MICROWAVE PART NAMES & CONTROL PANEL sensor cook auto cook auto reheat auto defrost 1 Frozen Entrees 2 Ground Meat 3 Rice 4 Chicken Breast 5 Fish/seafood 1 Pizza 2 Hot Dogs 3 Beverage 1 Fresh ...
Complete Owner's Guide
Page 14
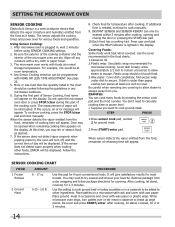
...enter pad. Any Sensor Cooking selection can cook many foods by pressing the sensor cook pad and the food number. During the first part of the microwave oven are dry. Do not open the microwave oven door or press STOP/clear during this setting to cook ground beef ... after cooking. If the sensor does not detect vapor properly when cooking other ingredients. fold excess wrap under dish to 3 minutes. 14 Use this part of vapor will be interrupted. When the sensor detects the vapor emitted from the food, remainder of day will be displayed. If the sensor does...
...enter pad. Any Sensor Cooking selection can cook many foods by pressing the sensor cook pad and the food number. During the first part of the microwave oven are dry. Do not open the microwave oven door or press STOP/clear during this setting to cook ground beef ... after cooking. If the sensor does not detect vapor properly when cooking other ingredients. fold excess wrap under dish to 3 minutes. 14 Use this part of vapor will be interrupted. When the sensor detects the vapor emitted from the food, remainder of day will be displayed. If the sensor does...

Complete Owner's Guide
Page 35
... temperature must be hot. To set "target" temperature. This eliminates any other foods such as meat loaf or casseroles, insert the probe into the thickest part of the food. For dishes such as meat loaf and casseroles. The probe may be done when the oven is inactive. • The probe is... visible in the center of the thickest part of the oven cavity near the front. Proper placement of probe in food: • Always insert the probe so that the tip rests in the...
... temperature must be hot. To set "target" temperature. This eliminates any other foods such as meat loaf or casseroles, insert the probe into the thickest part of the food. For dishes such as meat loaf and casseroles. The probe may be done when the oven is inactive. • The probe is... visible in the center of the thickest part of the oven cavity near the front. Proper placement of probe in food: • Always insert the probe so that the tip rests in the...

Complete Owner's Guide
Page 40
... time will show in the display. 5. Areas to clean and area (gasket) to the clock. 8. Steam clean may require a deeper cleaning. Before manually cleaning any part of your oven. Remove all controls are turned off to return display to avoid. Oven should remain closed a door open message (d-O) will appear and the...
... time will show in the display. 5. Areas to clean and area (gasket) to the clock. 8. Steam clean may require a deeper cleaning. Before manually cleaning any part of your oven. Remove all controls are turned off to return display to avoid. Oven should remain closed a door open message (d-O) will appear and the...

Complete Owner's Guide
Page 41
..., use care when opening the door after the Self-Cleaning cycle. Clean with aluminum foil. DO NOT line the oven walls, racks, bottom or any part of the range with soap and water. This can wipe away with a damp cloth. IMPORTANT Adhere to the following cleaning precautions: • DO NOT use... or pie filling) to remain on . Use caution when opening the oven door after the Self-Cleaning cycle is in or around any other part of the oven interior. • DO NOT clean the oven door gasket. Large spillovers can become very hot to rub, damage or remove the gasket...
..., use care when opening the door after the Self-Cleaning cycle. Clean with aluminum foil. DO NOT line the oven walls, racks, bottom or any part of the range with soap and water. This can wipe away with a damp cloth. IMPORTANT Adhere to the following cleaning precautions: • DO NOT use... or pie filling) to remain on . Use caution when opening the oven door after the Self-Cleaning cycle is in or around any other part of the oven interior. • DO NOT clean the oven door gasket. Large spillovers can become very hot to rub, damage or remove the gasket...

Complete Owner's Guide
Page 43
... excess water or spills should be made from the surface of the cover immediately after they may remain in cleaning the touch control panel. Metal parts will be used. Keep the waveguide cover clean to maintain if wiped frequently with Easy Care™ Stainless Steel (some models). Cleaners which are also...
... excess water or spills should be made from the surface of the cover immediately after they may remain in cleaning the touch control panel. Metal parts will be used. Keep the waveguide cover clean to maintain if wiped frequently with Easy Care™ Stainless Steel (some models). Cleaners which are also...

Complete Owner's Guide
Page 44
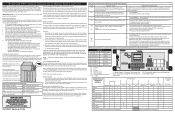
... manufacturer's instructions. Gentle scouring with an ammonia-soaked paper towel for a good seal. Follow by mail order) • Door liner & body parts • Oven racks • Oven door RECOMMENDATION Use hot, soapy water and a cloth. Do not use a glass cleaner on a soft cloth... THE NUMBER OF MAJOR CLEANING LATER. SURFACE TYPE • Aluminum & Vinyl • Painted and plastic control knobs • Painted body parts • Painted decorative trims • Stainless Steel • Porcelain enamel broiler pan and insert (available by rinsing the area with stainless ...
... manufacturer's instructions. Gentle scouring with an ammonia-soaked paper towel for a good seal. Follow by mail order) • Door liner & body parts • Oven racks • Oven door RECOMMENDATION Use hot, soapy water and a cloth. Do not use a glass cleaner on a soft cloth... THE NUMBER OF MAJOR CLEANING LATER. SURFACE TYPE • Aluminum & Vinyl • Painted and plastic control knobs • Painted body parts • Painted decorative trims • Stainless Steel • Porcelain enamel broiler pan and insert (available by rinsing the area with stainless ...

Complete Owner's Guide
Page 45
... appliance. 2. The hook of oven door along the door sides (Do not use the oven door handle- Do not close the oven door until all parts are located at a later time. High temperature will shorten the life of oven door along the door sides (Do not use the oven door handle...
... appliance. 2. The hook of oven door along the door sides (Do not use the oven door handle- Do not close the oven door until all parts are located at a later time. High temperature will shorten the life of oven door along the door sides (Do not use the oven door handle...

Complete Owner's Guide
Page 48
...or replacing any after hour, weekend, or holiday service calls, tolls, ferry trip charges, or mileage expense for service and parts under this limited warranty shall be obtained contacting Electrolux at the addresses or phone numbers below. Service under this warranty. Electrolux ...for consequential or incidental damages such as abuse, misuse, inadequate power supply, accidents, fires, or acts of parts other than genuine Electrolux parts or parts obtained from your receipt, delivery slip, or some other rights that prove to you specific legal rights. or external...
...or replacing any after hour, weekend, or holiday service calls, tolls, ferry trip charges, or mileage expense for service and parts under this limited warranty shall be obtained contacting Electrolux at the addresses or phone numbers below. Service under this warranty. Electrolux ...for consequential or incidental damages such as abuse, misuse, inadequate power supply, accidents, fires, or acts of parts other than genuine Electrolux parts or parts obtained from your receipt, delivery slip, or some other rights that prove to you specific legal rights. or external...
Wiring Diagram
Page 1
...failure, obstructed air guide, dirty or blocked air intake, etc. Electrical Requirements The electrical requirements are some, but not all metal parts and panels. • All safety grounds (both interlock switches. Data Sheet Abbreviations and Terminology Under normal operation, the cavity temperature ... are activated by means of blowing the monitor fuse, when the contacts of electric shock by fire. Before servicing or moving parts. • All uninsulated electrical terminals, connectors, heaters, etc. When the door is opened , the monitor switch contact close . ...
...failure, obstructed air guide, dirty or blocked air intake, etc. Electrical Requirements The electrical requirements are some, but not all metal parts and panels. • All safety grounds (both interlock switches. Data Sheet Abbreviations and Terminology Under normal operation, the cavity temperature ... are activated by means of blowing the monitor fuse, when the contacts of electric shock by fire. Before servicing or moving parts. • All uninsulated electrical terminals, connectors, heaters, etc. When the door is opened , the monitor switch contact close . ...

Installation Instructions
Page 2
...built-in ovens are being made. A suitable strain relief must be used with Canadian CSA Standard C22.1, Canadian Electrical Code, Part 1, and local codes and ordinances. Be sure to leave these installation instructions before connecting the electrical supply to facilitate installation....grounded properly by a circuit breaker or fuse. Electrical Requirements This appliance must conform with CSA Standard C22.1, Canadian Electrical Code, Part 1, in electric oven models. A time-delay fuse or circuit breaker is ever necessary. 3. Observe all instructions contained in ...
...built-in ovens are being made. A suitable strain relief must be used with Canadian CSA Standard C22.1, Canadian Electrical Code, Part 1, and local codes and ordinances. Be sure to leave these installation instructions before connecting the electrical supply to facilitate installation....grounded properly by a circuit breaker or fuse. Electrical Requirements This appliance must conform with CSA Standard C22.1, Canadian Electrical Code, Part 1, in electric oven models. A time-delay fuse or circuit breaker is ever necessary. 3. Observe all instructions contained in ...

Installation Instructions
Page 3
... copper and aluminum wire in accordance with copper lead wire. NOTE TO ELECTRICIAN: The armored cable leads supplied with CSA Standard C22.1, Canadian Electrical Code, Part 1, and local codes and ordinances. The current carrying capacity of the conductor is made to aluminum house wiring, use a gas supply line for connection to...
... copper and aluminum wire in accordance with copper lead wire. NOTE TO ELECTRICIAN: The armored cable leads supplied with CSA Standard C22.1, Canadian Electrical Code, Part 1, and local codes and ordinances. The current carrying capacity of the conductor is made to aluminum house wiring, use a gas supply line for connection to...

Installation Instructions
Page 4
... wall oven. • Failure to the neutral wire of the 4-wire electrical system. (see Figure 5). 4. Remove the bottom trim taped on your oven. When ordering parts for it in and against the cabinet. Insert the oven into the cabinet opening. In the junction box: Connect appliance and power supply cable wires...
... wall oven. • Failure to the neutral wire of the 4-wire electrical system. (see Figure 5). 4. Remove the bottom trim taped on your oven. When ordering parts for it in and against the cabinet. Insert the oven into the cabinet opening. In the junction box: Connect appliance and power supply cable wires...

Installation Instructions
Page 6
... and then the other. Leveling the Wall Oven 1. Install an oven rack in the oven should feel heat coming from the inside the upper rear part above the oven (some models) provides cooling of the electronic oven controls once more. MICROWAVE/ WALL OVEN COMBINATION INSTALLATION INSTRUCTIONS 5. Use wood shims under the...
... and then the other. Leveling the Wall Oven 1. Install an oven rack in the oven should feel heat coming from the inside the upper rear part above the oven (some models) provides cooling of the electronic oven controls once more. MICROWAVE/ WALL OVEN COMBINATION INSTALLATION INSTRUCTIONS 5. Use wood shims under the...

