
Use and Care Guide
Page 2
...you through some common problems that sold you . Need help is part of our commitment to serve you the range. If you use this Use & Care manual. Solutions to continue serving you call for choosing Frigidaire. This Use & Care Guide is only a phone call away...Cleaning 36-39 Cleaning recommendation table 36 Cooktop maintenance and cleaning 37-38 Replacing the oven light 38 Removing and replacing oven door 39 Before You Call - Product Registration Registering your product with Frigidaire enhances our ability to customer satisfaction and product quality throughout the service ...
...you through some common problems that sold you . Need help is part of our commitment to serve you the range. If you use this Use & Care manual. Solutions to continue serving you call for choosing Frigidaire. This Use & Care Guide is only a phone call away...Cleaning 36-39 Cleaning recommendation table 36 Cooktop maintenance and cleaning 37-38 Replacing the oven light 38 Removing and replacing oven door 39 Before You Call - Product Registration Registering your product with Frigidaire enhances our ability to customer satisfaction and product quality throughout the service ...

Use and Care Guide
Page 4
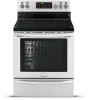
...hot heating elements. Do not let clothing or other servicing should never be stored or discarded. • User servicing-Do not repair or replace any part of the appliance, including the storage drawer, lower broiler drawer, warmer drawer or lower double oven. • Stepping, leaning or sitting...dry chemical or foam-type extinguisher. • When heating fat or grease, watch it is to be allowed to sit or stand on any part of the appliance unless specifically recommended in burns from steam. IMPORTANT SAFETY INSTRUCTIONS • Never modify or alter the construction of a range by ...
...hot heating elements. Do not let clothing or other servicing should never be stored or discarded. • User servicing-Do not repair or replace any part of the appliance, including the storage drawer, lower broiler drawer, warmer drawer or lower double oven. • Stepping, leaning or sitting...dry chemical or foam-type extinguisher. • When heating fat or grease, watch it is to be allowed to sit or stand on any part of the appliance unless specifically recommended in burns from steam. IMPORTANT SAFETY INSTRUCTIONS • Never modify or alter the construction of a range by ...
Use and Care Guide
Page 5
... its insert allow grease to wipe spills on the hood or filter. Care should be sure all parts free of grease that excess residue from the rack before you remove or replace food in the oven. IMPORTANT SAFETY NOTICE The California Safe Drinking Water and Toxic Enforcement Act requires ... that could melt or ignite. • Placement of interior oven racks. SELF-CLEANING OVENS • Clean in the self-cleaning cycle only the parts listed in desired location while oven is essential for models equipped with aluminum foil. Always place oven racks in this Use & Care Manual. Remove ...
... its insert allow grease to wipe spills on the hood or filter. Care should be sure all parts free of grease that excess residue from the rack before you remove or replace food in the oven. IMPORTANT SAFETY NOTICE The California Safe Drinking Water and Toxic Enforcement Act requires ... that could melt or ignite. • Placement of interior oven racks. SELF-CLEANING OVENS • Clean in the self-cleaning cycle only the parts listed in desired location while oven is essential for models equipped with aluminum foil. Always place oven racks in this Use & Care Manual. Remove ...

Use and Care Guide
Page 36
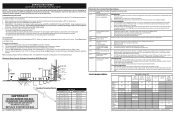
... the door vents. Clean by using hot, soapy water and a dishcloth. CARE & CLEANING Cleaning recommendation table Surface type Recommendation • Painted body parts • Painted decorative trim • Control knobs (some models) • Aluminum, plastic or vinyl trim pieces • Control panel • ...scratch. To remove control knobs (some models) For general cleaning, use abrasive cleaners on the outside glass of the oven door. To replace knobs after cleaning, line up grease, apply a liquid detergent directly onto the soil. Do not use hot, soapy water and a cloth...
... the door vents. Clean by using hot, soapy water and a dishcloth. CARE & CLEANING Cleaning recommendation table Surface type Recommendation • Painted body parts • Painted decorative trim • Control knobs (some models) • Aluminum, plastic or vinyl trim pieces • Control panel • ...scratch. To remove control knobs (some models) For general cleaning, use abrasive cleaners on the outside glass of the oven door. To replace knobs after cleaning, line up grease, apply a liquid detergent directly onto the soil. Do not use hot, soapy water and a cloth...
Use and Care Guide
Page 38
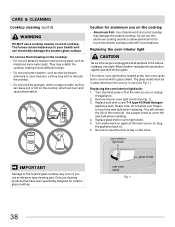
...Foil - The interior oven light bulb is located at the rear oven cavity and is unplugged and all parts are COOL before replacing oven light. Replacing the oven interior light bulb: 1. Replace bulb with a glass shield. Be sure to reset the time of day on the cooktop: •...discoloration. They may scratch the cooktop, making it more difficult to touch the new bulb when replacing. Replace glass interior oven light shield. 5. Only use an abrasive type cleaning pad. Replacing the oven interior light CAUTION Be sure the range is covered with a new T-4 type ...
...Foil - The interior oven light bulb is located at the rear oven cavity and is unplugged and all parts are COOL before replacing oven light. Replacing the oven interior light bulb: 1. Replace bulb with a glass shield. Be sure to reset the time of day on the cooktop: •...discoloration. They may scratch the cooktop, making it more difficult to touch the new bulb when replacing. Replace glass interior oven light shield. 5. Only use an abrasive type cleaning pad. Replacing the oven interior light CAUTION Be sure the range is covered with a new T-4 type ...
Use and Care Guide
Page 44
... warranty does not cover the following: 1. Service calls to repair or replace appliance light bulbs, air filters, water filters, other consumables, or knobs, handles, or other than genuine Electrolux parts or parts obtained from its original owner to change without notice. LIMITATION OF REMEDIES... CUSTOMER'S SOLE AND EXCLUSIVE REMEDY UNDER THIS LIMITED WARRANTY SHALL BE PRODUCT REPAIR OR REPLACEMENT AS PROVIDED HEREIN. THIS WRITTEN WARRANTY GIVES...
... warranty does not cover the following: 1. Service calls to repair or replace appliance light bulbs, air filters, water filters, other consumables, or knobs, handles, or other than genuine Electrolux parts or parts obtained from its original owner to change without notice. LIMITATION OF REMEDIES... CUSTOMER'S SOLE AND EXCLUSIVE REMEDY UNDER THIS LIMITED WARRANTY SHALL BE PRODUCT REPAIR OR REPLACEMENT AS PROVIDED HEREIN. THIS WRITTEN WARRANTY GIVES...
Service Data Sheet
Page 1
...or remove fuse. 2. between EOC & Probe connector. Test continuity of switch contacts. This service data sheet is good replace the EOC. Before servicing or moving parts. • All uninsulated electrical terminals, connectors, heaters, etc. A positive adjustment will create a potential safety hazard.... lock motor runs: 1. If keyboard ciruits check good replace the EOC. Replace the EOC. Note: Changing calibration affects all metal parts and panels. • All safety grounds (both internal and external) are open replace lock motor assemblyy. 3. F14 Membrane switch tail 1. ...
...or remove fuse. 2. between EOC & Probe connector. Test continuity of switch contacts. This service data sheet is good replace the EOC. Before servicing or moving parts. • All uninsulated electrical terminals, connectors, heaters, etc. A positive adjustment will create a potential safety hazard.... lock motor runs: 1. If keyboard ciruits check good replace the EOC. Replace the EOC. Note: Changing calibration affects all metal parts and panels. • All safety grounds (both internal and external) are open replace lock motor assemblyy. 3. F14 Membrane switch tail 1. ...
Service Data Sheet
Page 3
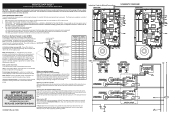
... by properly grounding yourself. The following components: UIB or User Interface Board - are correctly and securely reassembled. this data sheet. Potentiometer display boards - Notes on replacing parts Replacing an induction control assembly* When replacing an induction control assembly on two brackets with screws and stand-offs in the appliance repair trade...
... by properly grounding yourself. The following components: UIB or User Interface Board - are correctly and securely reassembled. this data sheet. Potentiometer display boards - Notes on replacing parts Replacing an induction control assembly* When replacing an induction control assembly on two brackets with screws and stand-offs in the appliance repair trade...

