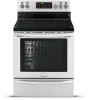
Installation Instructions (All Languages)
Page 1
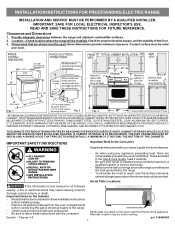
...a fire or electrical shock may be avoided. IF CABINET STORAGE IS TO BE PROVIDED, THE RISK CAN BE REDUCED BY INSTALLING A RANGE HOOD THAT PROJECTS HORIZONTALLY A MINIMUM OF 5" BEYOND THE BOTTOM OF THE CABINETS. Clearances and Dimensions 1. OR 24" MINIMUM WHEN BOTTOM.... 0" CLEARANCE IS THE MINIMUM FOR THE REAR OF THE RANGE. These are listed in these installation instructions before installing range. • Remove all packing material from the oven compartments before connecting the gas & electrical supply to the range. • Observe all governing codes and ordinances. •...
...a fire or electrical shock may be avoided. IF CABINET STORAGE IS TO BE PROVIDED, THE RISK CAN BE REDUCED BY INSTALLING A RANGE HOOD THAT PROJECTS HORIZONTALLY A MINIMUM OF 5" BEYOND THE BOTTOM OF THE CABINETS. Clearances and Dimensions 1. OR 24" MINIMUM WHEN BOTTOM.... 0" CLEARANCE IS THE MINIMUM FOR THE REAR OF THE RANGE. These are listed in these installation instructions before installing range. • Remove all packing material from the oven compartments before connecting the gas & electrical supply to the range. • Observe all governing codes and ordinances. •...
Installation Instructions (All Languages)
Page 4
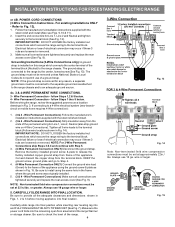
...'s installation instructions supplied with the strain relief and install (Also see Figs. 9, 10 & 11). 2. Always use 10 ga. Tighten all the adequate clearances and dimensions shown in ./lbs. Electrical failure or loss of the appliance. Remove the factory ... Permanent Connections skip Steps 3 & 4 and continue with Step 5. 3. (4-Wire Permanent Connection ONLY) Disconnect the ground strap. Before wiring the range, review the suggested power source location drawings in Fig. 15. Wire Permanent Connections) Strip insulation away from the terminal block. follow Steps 1,2 ...
...'s installation instructions supplied with the strain relief and install (Also see Figs. 9, 10 & 11). 2. Always use 10 ga. Tighten all the adequate clearances and dimensions shown in ./lbs. Electrical failure or loss of the appliance. Remove the factory ... Permanent Connections skip Steps 3 & 4 and continue with Step 5. 3. (4-Wire Permanent Connection ONLY) Disconnect the ground strap. Before wiring the range, review the suggested power source location drawings in Fig. 15. Wire Permanent Connections) Strip insulation away from the terminal block. follow Steps 1,2 ...


