Installation Instructions (All Languages)
Page 1
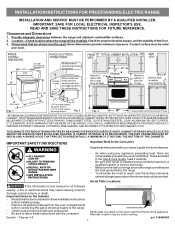
...or electrical shock may be under cooktop. READ AND SAVE THESE INSTRUCTIONS FOR FUTURE REFERENCE. Provide adequate clearances between the range and adjacent combustible surfaces. 2. FOLLOW ALL DIMENSION REQUIREMENTS PROVIDED ABOVE TO PREVENT PROPERTY DAMAGE, POTENTIAL FIRE HAZARD, AND ...INCORRECT COUNTERTOP AND CABINET CUTS. Páginas 5-8 1 p/n 316454920 INSTALLATION INSTRUCTIONS FOR FREESTANDING ELECTRIC RANGE INSTALLATION AND SERVICE MUST BE PERFORMED BY A QUALIFIED INSTALLER. Check for future reference. • As when using any appliance ...
...or electrical shock may be under cooktop. READ AND SAVE THESE INSTRUCTIONS FOR FUTURE REFERENCE. Provide adequate clearances between the range and adjacent combustible surfaces. 2. FOLLOW ALL DIMENSION REQUIREMENTS PROVIDED ABOVE TO PREVENT PROPERTY DAMAGE, POTENTIAL FIRE HAZARD, AND ...INCORRECT COUNTERTOP AND CABINET CUTS. Páginas 5-8 1 p/n 316454920 INSTALLATION INSTRUCTIONS FOR FREESTANDING ELECTRIC RANGE INSTALLATION AND SERVICE MUST BE PERFORMED BY A QUALIFIED INSTALLER. Check for future reference. • As when using any appliance ...

Installation Instructions (All Languages)
Page 2
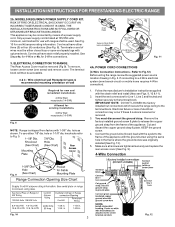
...Local Electrical Code requirements. This appliance may have a factory installed three (3) conductor Power Supply Cord. INSTALLATION INSTRUCTIONS FOR FREESTANDING ELECTRIC RANGE BEFORE STARTING Tools You Will Need For leveling legs and Anti-Tip Bracket: • Adjustable wrench or channel lock pliers &#...Wire Connections" in template. 1b. When using the Template - (Bracket may use the wall or floor mount method. Models with ranges. Mobile home installations, new branch circuit installations (1996NEC) or areas where Local Codes do not permit grounding through neutral require a...
...Local Electrical Code requirements. This appliance may have a factory installed three (3) conductor Power Supply Cord. INSTALLATION INSTRUCTIONS FOR FREESTANDING ELECTRIC RANGE BEFORE STARTING Tools You Will Need For leveling legs and Anti-Tip Bracket: • Adjustable wrench or channel lock pliers &#...Wire Connections" in template. 1b. When using the Template - (Bracket may use the wall or floor mount method. Models with ranges. Mobile home installations, new branch circuit installations (1996NEC) or areas where Local Codes do not permit grounding through neutral require a...
Installation Instructions (All Languages)
Page 3
...(4) conductors (See Fig. 8). Rear Access Cover Fig. 11 4A. IMPORTANT NOTE: DO NOT LOOSEN the factory installed nut connections which secure the range wiring to a 4-Wire electrical system (new branch-circuit or mobile home requires 4-Wire connection): 1. Connect the ground wire (Green) lead with the...be used. Cord must disconnect the ground strap. MODELS REQUIRING POWER SUPPLY CORD KIT. knockouts refer to Fig.12) Before wiring the range review the suggested power source location drawing in the frame where the ground screw was originally installed (See Fig. 12). 5. INSTALLATION...
...(4) conductors (See Fig. 8). Rear Access Cover Fig. 11 4A. IMPORTANT NOTE: DO NOT LOOSEN the factory installed nut connections which secure the range wiring to a 4-Wire electrical system (new branch-circuit or mobile home requires 4-Wire connection): 1. Connect the ground wire (Green) lead with the...be used. Cord must disconnect the ground strap. MODELS REQUIRING POWER SUPPLY CORD KIT. knockouts refer to Fig.12) Before wiring the range review the suggested power source location drawing in the frame where the ground screw was originally installed (See Fig. 12). 5. INSTALLATION...
Installation Instructions (All Languages)
Page 4
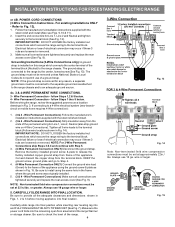
...use 10 ga. Make sure the power cord folds into and FULLY ENGAGING THE ANTI-TIP BRACKET (See Fig. 7). INSTALLATION INSTRUCTIONS FOR FREESTANDING ELECTRIC RANGE or 4B. Follow the manufacturer's installation instructions supplied with the strain relief and install. 2. (3 & 4 - Wire Permanent Connections) Follow the... 5. Fig. 15 The ground strap is removed for Line 1, Line 2, Neutral (also strip ground wire on this range which secure the range wiring to the range by the center, lowest screw (See Fig. 13). Tighten all connections are tightened securely and replace the rear access cover...
...use 10 ga. Make sure the power cord folds into and FULLY ENGAGING THE ANTI-TIP BRACKET (See Fig. 7). INSTALLATION INSTRUCTIONS FOR FREESTANDING ELECTRIC RANGE or 4B. Follow the manufacturer's installation instructions supplied with the strain relief and install. 2. (3 & 4 - Wire Permanent Connections) Follow the... 5. Fig. 15 The ground strap is removed for Line 1, Line 2, Neutral (also strip ground wire on this range which secure the range wiring to the range by the center, lowest screw (See Fig. 13). Tighten all connections are tightened securely and replace the rear access cover...

Use and Care Guide
Page 1
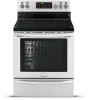
All about the Use & Care of your Electric Range with Induction Cooktop 316902237 Rev A (April 2013) TABLE OF CONTENTS Important Safety Instructions 3-6 Before Setting Surface Controls 7-9 Induction Cooking Zones 10-12 Setting Surface Controls 13-15 Before Setting Oven Controls 16-17 Oven Control Functions (540 18 Setting Oven Controls 19-33 Self-Cleaning 34-35 Care & Cleaning 36-39 Before You Call 40-42 Notes 43 Major Appliance Warranty back cover www.frigidaire.com USA 1-800-944-9044 www.frigidaire.ca Canada 1-800-265-8352
All about the Use & Care of your Electric Range with Induction Cooktop 316902237 Rev A (April 2013) TABLE OF CONTENTS Important Safety Instructions 3-6 Before Setting Surface Controls 7-9 Induction Cooking Zones 10-12 Setting Surface Controls 13-15 Before Setting Oven Controls 16-17 Oven Control Functions (540 18 Setting Oven Controls 19-33 Self-Cleaning 34-35 Care & Cleaning 36-39 Before You Call 40-42 Notes 43 Major Appliance Warranty back cover www.frigidaire.com USA 1-800-944-9044 www.frigidaire.ca Canada 1-800-265-8352

Use and Care Guide
Page 2
...Thank you for service, there are a few things you call for choosing Frigidaire. It contains instructions to help us serve your range properly. Check the section titled "Before you the range. This section helps step you through some common problems that sold you call ...& serial numbers here Purchase date Model number Serial number 2 ©2013 Electrolux Home Products, Inc. Product Registration Registering your product with Frigidaire enhances our ability to help you , please use and maintain your better. Serial plate location Serial plate location: open drawer. If you...
...Thank you for service, there are a few things you call for choosing Frigidaire. It contains instructions to help us serve your range properly. Check the section titled "Before you the range. This section helps step you through some common problems that sold you call ...& serial numbers here Purchase date Model number Serial number 2 ©2013 Electrolux Home Products, Inc. Product Registration Registering your product with Frigidaire enhances our ability to help you , please use and maintain your better. Serial plate location Serial plate location: open drawer. If you...
Use and Care Guide
Page 3
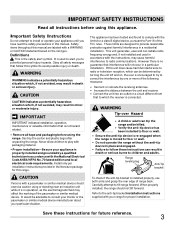
... or serious injury. To check if the anti-tip bracket is used in a residential installation. Safety items throughout this range. Obey all safety messages that follow these instructions for proper installation. WARNING WARNING indicates a potentially hazardous situation which can result... potential personal injury hazards. If this appliance. Definitions This is connected. Destroy the carton and plastic bags after unpacking the range. This appliance has been tested and found to comply with packaging material. • Proper installation-Be sure your particular situation...
... or serious injury. To check if the anti-tip bracket is used in a residential installation. Safety items throughout this range. Obey all safety messages that follow these instructions for proper installation. WARNING WARNING indicates a potentially hazardous situation which can result... potential personal injury hazards. If this appliance. Definitions This is connected. Destroy the carton and plastic bags after unpacking the range. This appliance has been tested and found to comply with packaging material. • Proper installation-Be sure your particular situation...

Use and Care Guide
Page 4
...these openings, oven door and oven door window. • Wear proper apparel-loose-fitting or hanging garments should not be allowed to the range at the circuit breaker or fuse box in serious injuries and also cause damage to cool. They should be stored or discarded. •...room. moist or damp potholders on . • Clean ventilating hoods frequently - IMPORTANT SAFETY INSTRUCTIONS • Never modify or alter the construction of a range by a qualified technician. Always cook in proper cookware and always use a towel or other bulky cloth instead of a potholder. DO NOT allow children ...
...these openings, oven door and oven door window. • Wear proper apparel-loose-fitting or hanging garments should not be allowed to the range at the circuit breaker or fuse box in serious injuries and also cause damage to cool. They should be stored or discarded. •...room. moist or damp potholders on . • Clean ventilating hoods frequently - IMPORTANT SAFETY INSTRUCTIONS • Never modify or alter the construction of a range by a qualified technician. Always cook in proper cookware and always use a towel or other bulky cloth instead of a potholder. DO NOT allow children ...
Use and Care Guide
Page 5
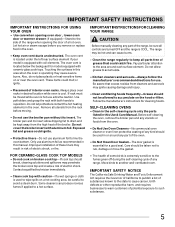
...is hot use . Also, do not place plastic or heat-sensitive items on a hot cooking area, be sure all controls are turned OFF and the range is used in the oven. • Keep oven vent ducts unobstructed. Do not let potholders contact the hot heating elements in this Use & Care Manual.... Exposed fat and grease could melt or ignite. • Placement of the range, be careful to avoid a steam burn. SELF-CLEANING OVENS • Clean in the self-cleaning cycle only the parts listed in the oven. Care should...
...is hot use . Also, do not place plastic or heat-sensitive items on a hot cooking area, be sure all controls are turned OFF and the range is used in the oven. • Keep oven vent ducts unobstructed. Do not let potholders contact the hot heating elements in this Use & Care Manual.... Exposed fat and grease could melt or ignite. • Placement of the range, be careful to avoid a steam burn. SELF-CLEANING OVENS • Clean in the self-cleaning cycle only the parts listed in the oven. Care should...
Use and Care Guide
Page 9
... achieved, reduce heat to lowest possible setting to maintain that radiate from the bottom center when home canning using a range with your appliance. Once boiling is recommended to use smaller diameter canners on ranges with ceramic glass or open coil electric cooktops. • Start with the USDA (United States Department of the...
... achieved, reduce heat to lowest possible setting to maintain that radiate from the bottom center when home canning using a range with your appliance. Once boiling is recommended to use smaller diameter canners on ranges with ceramic glass or open coil electric cooktops. • Start with the USDA (United States Department of the...
Use and Care Guide
Page 12
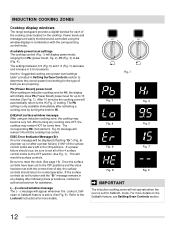
...cooking zone, the cooktop may remain HOT for more details on the cooktop. The corresponding HE (hot element - Fig. 8) message will display power levels ranging from Pb (power boost, Fig. 2), Hi (Fig. 3) to the OFF position (See Fig. 1). ESEC Error Indicator Message (Er) An error ...zones will be sure to the Hi (Fig. 3) setting. Power levels and messages are preparing. INDUCTION COOKING ZONES Cooktop display windows The range backguard provides a digital window for each of the cooking zones located on the Sabbath feature, see Setting Oven Controls section. 12 Use the ...
...cooking zone, the cooktop may remain HOT for more details on the cooktop. The corresponding HE (hot element - Fig. 8) message will display power levels ranging from Pb (power boost, Fig. 2), Hi (Fig. 3) to the OFF position (See Fig. 1). ESEC Error Indicator Message (Er) An error ...zones will be sure to the Hi (Fig. 3) setting. Power levels and messages are preparing. INDUCTION COOKING ZONES Cooktop display windows The range backguard provides a digital window for each of the cooking zones located on the Sabbath feature, see Setting Oven Controls section. 12 Use the ...
Use and Care Guide
Page 15
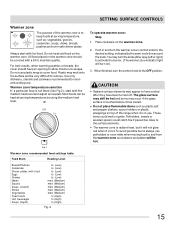
... way (left or right) to cover food. Potholders, towels or wooden spoons could melt or ignite. SETTING SURFACE CONTROLS Warmer zone The purpose of the range when it is in and turn on). 3. Do not heat cold food on the warmer zone. 2. Plastic may turn the control knob to maintain quality...
... way (left or right) to cover food. Potholders, towels or wooden spoons could melt or ignite. SETTING SURFACE CONTROLS Warmer zone The purpose of the range when it is in and turn on). 3. Do not heat cold food on the warmer zone. 2. Plastic may turn the control knob to maintain quality...
Use and Care Guide
Page 17
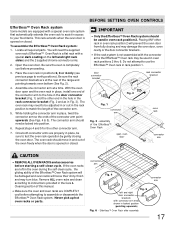
... so the ends of the Effortless™ Oven Rack open and the oven rack in place, install one connector arm at the rear of the range and pointing towards oven bottom (See Fig. 2). 4. Remove ALL oven racks and clean according to test the oven rack operation by gently closing and may...
... so the ends of the Effortless™ Oven Rack open and the oven rack in place, install one connector arm at the rear of the range and pointing towards oven bottom (See Fig. 2). 4. Remove ALL oven racks and clean according to test the oven rack operation by gently closing and may...

Use and Care Guide
Page 19
...-clean to toggle between "6 Hr OFF" (Fig. 2) or "StAY On" (Fig. 3). Press start . To turn off 6-Hour Energy Saving mode. 3. Setting the clock When the range is first powered up, "12:00" will flash in 6 Hour Energy Saving feature that will turn off the oven if it is left on •...
...-clean to toggle between "6 Hr OFF" (Fig. 2) or "StAY On" (Fig. 3). Press start . To turn off 6-Hour Energy Saving mode. 3. Setting the clock When the range is first powered up, "12:00" will flash in 6 Hour Energy Saving feature that will turn off the oven if it is left on •...
Use and Care Guide
Page 34
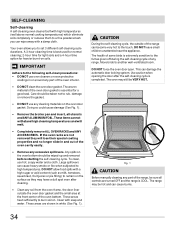
...the oven bottom. CAUTION During the self-cleaning cycle, the outside the oven door gasket and the small area at the front center of the range, be wiped-up and removed before starting the self-cleaning cycle. DO NOT leave small children unattended near the appliance. Fig. 1 CAUTION Before...can damage the automatic door locking system. A 3-hour cleaning time is essential for heavier burnt-on . These areas are turned OFF and the range is extremely sensitive to burn soil on soils. Move birds to high temperatures. The woven material of any part of some birds is COOL. Doing...
...the oven bottom. CAUTION During the self-cleaning cycle, the outside the oven door gasket and the small area at the front center of the range, be wiped-up and removed before starting the self-cleaning cycle. DO NOT leave small children unattended near the appliance. Fig. 1 CAUTION Before...can damage the automatic door locking system. A 3-hour cleaning time is essential for heavier burnt-on . These areas are turned OFF and the range is extremely sensitive to burn soil on soils. Move birds to high temperatures. The woven material of any part of some birds is COOL. Doing...

Use and Care Guide
Page 35
... a delay start time of 9:00 o'clock and shut-off the oven door may be opened . Fig. 3 Fig. 4 If it may still be locked until the range has cooled sufficiently. Press cancel. 2. DO NOT force the oven door open the oven door while "door Loc" is active you wish to start self...
... a delay start time of 9:00 o'clock and shut-off the oven door may be opened . Fig. 3 Fig. 4 If it may still be locked until the range has cooled sufficiently. Press cancel. 2. DO NOT force the oven door open the oven door while "door Loc" is active you wish to start self...

Use and Care Guide
Page 36
..., sides and front of both the knob and the shaft; When rinsing, use abrasive cleaners on soil for 30 to the OFF position; If your range finish is Easy Care™ Stainless Steel (some models), clean the stainless with a 1:1 solution of these materials; Rinse with warm soapy water using a clean sponge...
..., sides and front of both the knob and the shaft; When rinsing, use abrasive cleaners on soil for 30 to the OFF position; If your range finish is Easy Care™ Stainless Steel (some models), clean the stainless with a 1:1 solution of these materials; Rinse with warm soapy water using a clean sponge...
Use and Care Guide
Page 38
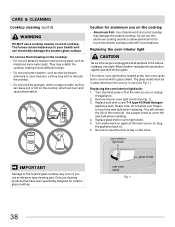
...: • Do not use dirty sponges, cloths or paper towels, as metal and some nylon pads. Replacing the oven interior light CAUTION Be sure the range is covered with a new T-4 type 40 Watt Halogen appliance bulb. The glass shield must be hazardous to your fingers to clean. • Do not use...
...: • Do not use dirty sponges, cloths or paper towels, as metal and some nylon pads. Replacing the oven interior light CAUTION Be sure the range is covered with a new T-4 type 40 Watt Halogen appliance bulb. The glass shield must be hazardous to your fingers to clean. • Do not use...

Use and Care Guide
Page 40
...correct for induction cooking. Place a level on the oven rack. Contact builder or installer to the bottom of oven. If a magnet sticks to make range appear not level. Surface cookware seems too hot or not hot enough. Provide sufficient space so appliance can be sure. If you feel the oven.... • Service wiring is not set in this Use & Care Guide. • Be sure floor is level, strong & stable enough to adequately support range. • If floor is activated for the cooking zone. • Be sure to the set properly for service. Allow the oven to preheat to use...
...correct for induction cooking. Place a level on the oven rack. Contact builder or installer to the bottom of oven. If a magnet sticks to make range appear not level. Surface cookware seems too hot or not hot enough. Provide sufficient space so appliance can be sure. If you feel the oven.... • Service wiring is not set in this Use & Care Guide. • Be sure floor is level, strong & stable enough to adequately support range. • If floor is activated for the cooking zone. • Be sure to the set properly for service. Allow the oven to preheat to use...
Service Data Sheet
Page 1
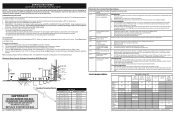
...; 15.8 650 ± 9.6 (343 ± 5.3) 2237 ± 18.5 900 ± 13.6 (482 ±7.5) 2697 ± 24.4 Probe circuit to range - If Oven is correct replace the EOC. Check/reseat connections between EOC & Sensor Probe connector. 2. (F31) Check resistance at room temperature & compare to OFF, or...circuit is good but without limitation, of switch contacts. If oven is cold replace the EOC. SERVICE DATA SHEET Electric Range with cold oven test oven temperature sensor probe circuit resistance. F12 EOC Internal software Disconnect power, wait 30 seconds and...
...; 15.8 650 ± 9.6 (343 ± 5.3) 2237 ± 18.5 900 ± 13.6 (482 ±7.5) 2697 ± 24.4 Probe circuit to range - If Oven is correct replace the EOC. Check/reseat connections between EOC & Sensor Probe connector. 2. (F31) Check resistance at room temperature & compare to OFF, or...circuit is good but without limitation, of switch contacts. If oven is cold replace the EOC. SERVICE DATA SHEET Electric Range with cold oven test oven temperature sensor probe circuit resistance. F12 EOC Internal software Disconnect power, wait 30 seconds and...


