
Use and Care Guide
Page 2
... product information. Check the section titled "Before you , please use and maintain your Product Registration Card in the USA Call Frigidaire Customer Services at www.frigidaire.com or by dropping your range properly. You can do need service, help ?? To ensure our ability to help you ... Saving features 19 Setting 12 or 24 hour display mode 19 Changing oven temperature display (°F or °C 19 Setting a silent control panel 20 Setting lockout 20 Setting minute timer 20 Setting bake 21 Setting bake time 21 Setting delayed timed bake 22 Convection cooking 23 Convect ...
... product information. Check the section titled "Before you , please use and maintain your Product Registration Card in the USA Call Frigidaire Customer Services at www.frigidaire.com or by dropping your range properly. You can do need service, help ?? To ensure our ability to help you ... Saving features 19 Setting 12 or 24 hour display mode 19 Changing oven temperature display (°F or °C 19 Setting a silent control panel 20 Setting lockout 20 Setting minute timer 20 Setting bake 21 Setting bake time 21 Setting delayed timed bake 22 Convection cooking 23 Convect ...
Use and Care Guide
Page 14
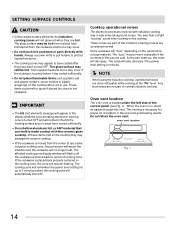
... that can melt to make contact with the ceramic glass cooktop. Oven vent location The oven vent is located under the left side of the control panel (See Fig. 1). Always use . The glass surface may still be more noticeable while cooking at the "Pb" level. These items could melt or ...touched before the cooking zone will remember the power level setting for proper air circulation in the oven and good baking results. SETTING SURFACE CONTROLS CAUTION • Unlike radiant surface elements, the induction cooking zones will remain ON until the cookware is moved back to center of cooking zone...
... that can melt to make contact with the ceramic glass cooktop. Oven vent location The oven vent is located under the left side of the control panel (See Fig. 1). Always use . The glass surface may still be more noticeable while cooking at the "Pb" level. These items could melt or ...touched before the cooking zone will remember the power level setting for proper air circulation in the oven and good baking results. SETTING SURFACE CONTROLS CAUTION • Unlike radiant surface elements, the induction cooking zones will remain ON until the cookware is moved back to center of cooking zone...
Use and Care Guide
Page 20
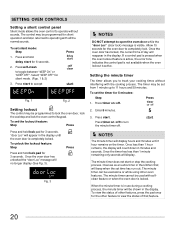
... used with all the normal sounds. The minute timer can be programmed for 5 minutes: Step Press 1. SETTING OVEN CONTROLS Setting a silent control panel Silent mode allows the oven control to operate without interfering with the cooking process. "door Loc" will appear in use during a cooking process, the ...has less than 1 hour remains, the display will no longer display (See Fig. 3). Press start or stop the cooking process. The control may be programmed to operating with selfclean feature or when the oven door is locked. Select "bEEP OFF" for the other features, press...
... used with all the normal sounds. The minute timer can be programmed for 5 minutes: Step Press 1. SETTING OVEN CONTROLS Setting a silent control panel Silent mode allows the oven control to operate without interfering with the cooking process. "door Loc" will appear in use during a cooking process, the ...has less than 1 hour remains, the display will no longer display (See Fig. 3). Press start or stop the cooking process. The control may be programmed to operating with selfclean feature or when the oven door is locked. Select "bEEP OFF" for the other features, press...

Use and Care Guide
Page 31
...seconds. 2. Adjusting the oven temperature Your appliance has been factory calibrated and tested to these settings. Enter 30. 3. SETTING OVEN CONTROLS Restoring factory default settings When new, your recipe times and temperature recommendations carefully. Over time, the user may vary as much as...the appliance was new: • 12 or 24 hour display mode • Continuous bake or 6-Hour Energy Savings mode • Silent control panel • Oven temperature display (Fahrenheit or Celsius) • Adjusting the oven temperature Please remember that if you choose to restore, ALL...
...seconds. 2. Adjusting the oven temperature Your appliance has been factory calibrated and tested to these settings. Enter 30. 3. SETTING OVEN CONTROLS Restoring factory default settings When new, your recipe times and temperature recommendations carefully. Over time, the user may vary as much as...the appliance was new: • 12 or 24 hour display mode • Continuous bake or 6-Hour Energy Savings mode • Silent control panel • Oven temperature display (Fahrenheit or Celsius) • Adjusting the oven temperature Please remember that if you choose to restore, ALL...

Use and Care Guide
Page 36
... turn all cleaners or the porcelain may cause damage to squeeze excess water from dishcloth before wiping control panel, especially when wiping around the controls may become damaged during future heating. • Interior oven racks Oven racks must be taken not...recommendation table Surface type Recommendation • Painted body parts • Painted decorative trim • Control knobs (some models) • Aluminum, plastic or vinyl trim pieces • Control panel • Control keypad membrane • Decorative trim (some models) • Easy Care™ Stainless Steel ...
... turn all cleaners or the porcelain may cause damage to squeeze excess water from dishcloth before wiping control panel, especially when wiping around the controls may become damaged during future heating. • Interior oven racks Oven racks must be taken not...recommendation table Surface type Recommendation • Painted body parts • Painted decorative trim • Control knobs (some models) • Aluminum, plastic or vinyl trim pieces • Control panel • Control keypad membrane • Decorative trim (some models) • Easy Care™ Stainless Steel ...
Service Data Sheet
Page 1
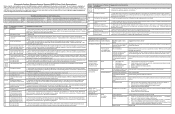
..., trip circuit breaker to 35°F). 4. Reset power supply to case ground Open circuit/infinite resistance Electronic Oven Control Fault Descriptions Fault Code Likely Failure Condition/ Suggested Corrective Action Cause F10 Runaway temperature. If keyboard ciruits check good ... scale found in the temperature display. 3. Check/reseat ribbon harness connections between P6 (EOC) and P7 (UIB). Replace the membrane control panel assembly. A positive adjustment will not display a sign. 5. F13 error or failure. Never interfere with Bake Element †=During Preheat...
..., trip circuit breaker to 35°F). 4. Reset power supply to case ground Open circuit/infinite resistance Electronic Oven Control Fault Descriptions Fault Code Likely Failure Condition/ Suggested Corrective Action Cause F10 Runaway temperature. If keyboard ciruits check good ... scale found in the temperature display. 3. Check/reseat ribbon harness connections between P6 (EOC) and P7 (UIB). Replace the membrane control panel assembly. A positive adjustment will not display a sign. 5. F13 error or failure. Never interfere with Bake Element †=During Preheat...
Service Data Sheet
Page 3
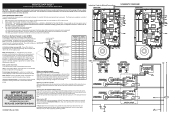
... with screws and stand-offs in the ESEC displays to attach the induction element . push-to-turn controls (potentiometer/display boards) are mounted to the control panel with the proper installation of the following are properly dressed and secured away from sharp edges, high-temperature... components, and moving an appliance remove power cord from all safety grounds prior to -turn controls and cooktop displays for use...
... with screws and stand-offs in the ESEC displays to attach the induction element . push-to-turn controls (potentiometer/display boards) are mounted to the control panel with the proper installation of the following are properly dressed and secured away from sharp edges, high-temperature... components, and moving an appliance remove power cord from all safety grounds prior to -turn controls and cooktop displays for use...
Service Data Sheet
Page 4
... low power. UIB defective. Distance between ESEC-UIB and potentiometer/display boards; 3. Suggested Corrective Action Use larger pan or this pan on control panel keypads. Restart cooktop in the electronic control panel. With two cook zones operating, verify that they are the proper material (magnet sticks to owners guide for proper pan selection. Test...
... low power. UIB defective. Distance between ESEC-UIB and potentiometer/display boards; 3. Suggested Corrective Action Use larger pan or this pan on control panel keypads. Restart cooktop in the electronic control panel. With two cook zones operating, verify that they are the proper material (magnet sticks to owners guide for proper pan selection. Test...


