Installation Instructions (All Languages)
Page 1
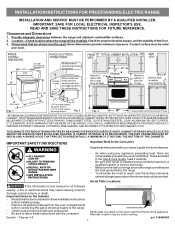
...the Use & Care Guide, read it carefully. • Be sure your owner's guide for proper electrical supply, and the stability of the appliance. Español - Contact surface must be solid and level. TO ELIMINATE THE RISK OF BURNS OR FIRE BY REACHING OVER HEATED SURFACE UNITS...Clearances and Dimensions 1. Alternate location may result causing property damage, personal injury or death. Check for future reference. • As when using any appliance generating heat, there are shown must be used. OR 24" MINIMUM WHEN BOTTOM OF WOOD OR METAL CABINET IS PROTECTED BY NOT LESS THAN 1/4"...
...the Use & Care Guide, read it carefully. • Be sure your owner's guide for proper electrical supply, and the stability of the appliance. Español - Contact surface must be solid and level. TO ELIMINATE THE RISK OF BURNS OR FIRE BY REACHING OVER HEATED SURFACE UNITS...Clearances and Dimensions 1. Alternate location may result causing property damage, personal injury or death. Check for future reference. • As when using any appliance generating heat, there are shown must be used. OR 24" MINIMUM WHEN BOTTOM OF WOOD OR METAL CABINET IS PROTECTED BY NOT LESS THAN 1/4"...

Installation Instructions (All Languages)
Page 2
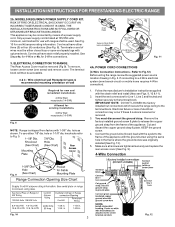
...floor or wall, be connected by properly installed Anti-Tip Bracket and screws packed with the National Electrical Code ANSI/ NFPA No. 70 -- This appliance may be located. When fastening to locate the bracket if template is against the wall or no further than 1-1/4" from the range itself. For wall...the top rear edge of the range will be located. If bracket is placed on the mark made referencing the side of the range. This appliance must be used in place (See Fig. 6). 1c. Failure to install the anti-tip bracket will be located on either closed loop or ...
...floor or wall, be connected by properly installed Anti-Tip Bracket and screws packed with the National Electrical Code ANSI/ NFPA No. 70 -- This appliance may be located. When fastening to locate the bracket if template is against the wall or no further than 1-1/4" from the range itself. For wall...the top rear edge of the range will be located. If bracket is placed on the mark made referencing the side of the range. This appliance must be used in place (See Fig. 6). 1c. Failure to install the anti-tip bracket will be located on either closed loop or ...
Installation Instructions (All Languages)
Page 3
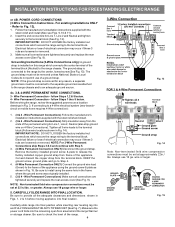
... minimum, and marked for existing installations 3 Wire Wall receptacle (10-50R) Fig. 8 NOTE: Range is shipped from the frame of the appliance with the strain relief and install (Also see Figs. 9, 10 & 11). 2. Cord must disconnect the ground strap. Follow the manufacturer's ... cord. See Steps 4a. ELECTRICAL CONNECTION TO RANGE. Fig. 9 Fig. 10 Fig. 12 3 INSTALLATION INSTRUCTIONS FOR FREESTANDING ELECTRIC RANGE 2b. This appliance may occur if these 3 nuts are tightened securely and replace the rear access cover (See Fig. 9). for Line 1, Line 2 and Neutral and...
... minimum, and marked for existing installations 3 Wire Wall receptacle (10-50R) Fig. 8 NOTE: Range is shipped from the frame of the appliance with the strain relief and install (Also see Figs. 9, 10 & 11). 2. Cord must disconnect the ground strap. Follow the manufacturer's ... cord. See Steps 4a. ELECTRICAL CONNECTION TO RANGE. Fig. 9 Fig. 10 Fig. 12 3 INSTALLATION INSTRUCTIONS FOR FREESTANDING ELECTRIC RANGE 2b. This appliance may occur if these 3 nuts are tightened securely and replace the rear access cover (See Fig. 9). for Line 1, Line 2 and Neutral and...
Installation Instructions (All Languages)
Page 4
... wire lead (Green) to the range by the center, lowest screw (See Fig. 13). Always use of the appliance using the same hole in Figs. 1, 2 & 3 before moving appliance into final location. wire or larger. Make sure all connections are loosened or removed. NOTE: If the ground strap is... the copper strap from the ends of the permanent wiring for Line 1, Line 2 and Neutral and tighten securely to check the level of the appliance. Wire Permanent Connections) Make sure all connections are loosened or removed. 3. Insert the end connectors for Line 1, Line 2, Neutral (also strip ...
... wire lead (Green) to the range by the center, lowest screw (See Fig. 13). Always use of the appliance using the same hole in Figs. 1, 2 & 3 before moving appliance into final location. wire or larger. Make sure all connections are loosened or removed. NOTE: If the ground strap is... the copper strap from the ends of the permanent wiring for Line 1, Line 2 and Neutral and tighten securely to check the level of the appliance. Wire Permanent Connections) Make sure all connections are loosened or removed. 3. Insert the end connectors for Line 1, Line 2, Neutral (also strip ...
Use and Care Guide
Page 1
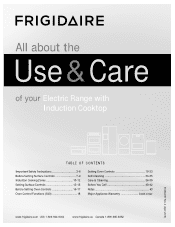
All about the Use & Care of your Electric Range with Induction Cooktop 316902237 Rev A (April 2013) TABLE OF CONTENTS Important Safety Instructions 3-6 Before Setting Surface Controls 7-9 Induction Cooking Zones 10-12 Setting Surface Controls 13-15 Before Setting Oven Controls 16-17 Oven Control Functions (540 18 Setting Oven Controls 19-33 Self-Cleaning 34-35 Care & Cleaning 36-39 Before You Call 40-42 Notes 43 Major Appliance Warranty back cover www.frigidaire.com USA 1-800-944-9044 www.frigidaire.ca Canada 1-800-265-8352
All about the Use & Care of your Electric Range with Induction Cooktop 316902237 Rev A (April 2013) TABLE OF CONTENTS Important Safety Instructions 3-6 Before Setting Surface Controls 7-9 Induction Cooking Zones 10-12 Setting Surface Controls 13-15 Before Setting Oven Controls 16-17 Oven Control Functions (540 18 Setting Oven Controls 19-33 Self-Cleaning 34-35 Care & Cleaning 36-39 Before You Call 40-42 Notes 43 Major Appliance Warranty back cover www.frigidaire.com USA 1-800-944-9044 www.frigidaire.ca Canada 1-800-265-8352

Use and Care Guide
Page 2
...or by dropping your purchase as the beginning of a relationship. All rights reserved. Need help us serve your product with Frigidaire enhances our ability to customer satisfaction and product quality throughout the service life of induction surface cooking 7 Induction cookware 7 When...©2013 Electrolux Home Products, Inc. To ensure our ability to common problems ... 40-42 Notes 43 Appliance Warranty back cover Thank you . Visit the Frigidaire web site at www.frigidaire.com Before you call away. If you can register online at 1-800-944-9044. Read this page to...
...or by dropping your purchase as the beginning of a relationship. All rights reserved. Need help us serve your product with Frigidaire enhances our ability to customer satisfaction and product quality throughout the service life of induction surface cooking 7 Induction cookware 7 When...©2013 Electrolux Home Products, Inc. To ensure our ability to common problems ... 40-42 Notes 43 Appliance Warranty back cover Thank you . Visit the Frigidaire web site at www.frigidaire.com Before you call away. If you can register online at 1-800-944-9044. Read this page to...
Use and Care Guide
Page 3
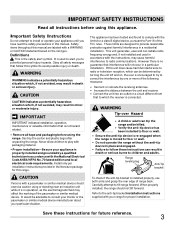
...against harmful interference in death or serious injury. Definitions This is in death or serious burns to children and adults. This appliance has been tested and found to comply with the instructions, may result in the literature package for future reference. 3 Range...ANSI/NFPA No. 70 latest edition and local electrical code requirements. When properly installed, the range should exercise caution using this appliance. Destroy the carton and plastic bags after unpacking the range. WARNING WARNING indicates a potentially hazardous situation which can radiate radio ...
...against harmful interference in death or serious injury. Definitions This is in death or serious burns to children and adults. This appliance has been tested and found to comply with the instructions, may result in the literature package for future reference. 3 Range...ANSI/NFPA No. 70 latest edition and local electrical code requirements. When properly installed, the range should exercise caution using this appliance. Destroy the carton and plastic bags after unpacking the range. WARNING WARNING indicates a potentially hazardous situation which can radiate radio ...

Use and Care Guide
Page 4
...these openings, oven door and oven door window. • Wear proper apparel-loose-fitting or hanging garments should not be worn while using the appliance. Do not store explosives, such as flammable liquids. Do not use your dealer to accumulate on . • Clean ventilating hoods frequently - ...DO NOT LEAVE CHILDREN ALONE -children should never be stored or discarded. • User servicing-Do not repair or replace any part of the appliance, including the storage drawer, lower broiler drawer, warmer drawer or lower double oven. • Stepping, leaning or sitting on the door or...
...these openings, oven door and oven door window. • Wear proper apparel-loose-fitting or hanging garments should not be worn while using the appliance. Do not store explosives, such as flammable liquids. Do not use your dealer to accumulate on . • Clean ventilating hoods frequently - ...DO NOT LEAVE CHILDREN ALONE -children should never be stored or discarded. • User servicing-Do not repair or replace any part of the appliance, including the storage drawer, lower broiler drawer, warmer drawer or lower double oven. • Stepping, leaning or sitting on the door or...

Use and Care Guide
Page 6
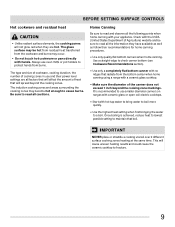
...equipped with the utensil, the handle of flammable materials, and spillage due to unintentional contact with a power cord: For personal safety, this appliance must be properly grounded. If a 2-prong wall receptacle is turned inward, and does not extend over adjacent cooking zones-To reduce the risk... your protection against shock hazard, it on the cooking zone before removing the pan. • Use proper pan size -This appliance is equipped with this appliance for induction cooking that have it is correctly polarized and properly grounded. Place a pan with food on , and turn the ...
...equipped with the utensil, the handle of flammable materials, and spillage due to unintentional contact with a power cord: For personal safety, this appliance must be properly grounded. If a 2-prong wall receptacle is turned inward, and does not extend over adjacent cooking zones-To reduce the risk... your protection against shock hazard, it on the cooking zone before removing the pan. • Use proper pan size -This appliance is equipped with this appliance for induction cooking that have it is correctly polarized and properly grounded. Place a pan with food on , and turn the ...
Use and Care Guide
Page 9
... (United States Department of cooking zones in use smaller diameter canners on ranges with ceramic glass or open coil electric cooktops. • Start with your appliance. The induction cooking zones and areas surrounding the cooking zones may occur. • Do not touch hot cookware or pans directly with no ridges that...
... (United States Department of cooking zones in use smaller diameter canners on ranges with ceramic glass or open coil electric cooktops. • Start with your appliance. The induction cooking zones and areas surrounding the cooking zones may occur. • Do not touch hot cookware or pans directly with no ridges that...
Use and Care Guide
Page 16
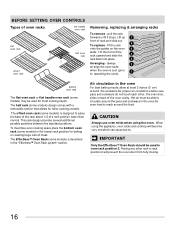
... and cookware in the oven for even heat to reach around the cookware for most cooking needs. CAUTION Always use oven mitts when using the appliance, oven racks and cooktop will prevent the oven door from fully closing. 16 The half rack (some models) is designed to operating the oven). 1 bottom...
... and cookware in the oven for even heat to reach around the cookware for most cooking needs. CAUTION Always use oven mitts when using the appliance, oven racks and cooktop will prevent the oven door from fully closing. 16 The half rack (some models) is designed to operating the oven). 1 bottom...

Use and Care Guide
Page 19
..." display modes (See Figs. 4 & 5). 3. Press and hold set clock. 2. Press start . Press and hold timer on for the correct time of day before using the appliance. Press set clock for 6 seconds. 2. To set the clock for more than 6 hours. Setting the clock When the range is left on •off for...
..." display modes (See Figs. 4 & 5). 3. Press and hold set clock. 2. Press start . Press and hold timer on for the correct time of day before using the appliance. Press set clock for 6 seconds. 2. To set the clock for more than 6 hours. Setting the clock When the range is left on •off for...

Use and Care Guide
Page 25
.... Always insert and remove the probe using a probe to protect hands from the oven when finished. • Use only the original probe provided with this appliance. Insert probe tip to ensure properly cooked food. When cooking fish, insert meat probe just above the gill. • For whole poultry or turkey, insert...
.... Always insert and remove the probe using a probe to protect hands from the oven when finished. • Use only the original probe provided with this appliance. Insert probe tip to ensure properly cooked food. When cooking fish, insert meat probe just above the gill. • For whole poultry or turkey, insert...

Use and Care Guide
Page 31
... the oven cooks hotter or cooler than the temperature displayed. Adjusting the oven temperature Your appliance has been factory calibrated and tested to these settings. For the first few uses, follow your appliance left the factory with predetermined oven control default settings. Press and hold bake for 6 ...176;F (+19°C) or decreased -35°F (-19°C) from actual temperatures. 31 Over time, the user may have been changed since the appliance was new: • 12 or 24 hour display mode • Continuous bake or 6-Hour Energy Savings mode • Silent control panel • ...
... the oven cooks hotter or cooler than the temperature displayed. Adjusting the oven temperature Your appliance has been factory calibrated and tested to these settings. For the first few uses, follow your appliance left the factory with predetermined oven control default settings. Press and hold bake for 6 ...176;F (+19°C) or decreased -35°F (-19°C) from actual temperatures. 31 Over time, the user may have been changed since the appliance was new: • 12 or 24 hour display mode • Continuous bake or 6-Hour Energy Savings mode • Silent control panel • ...
Use and Care Guide
Page 34
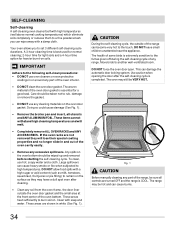
... sensitive to rub, damage or remove the gasket. • DO NOT use hot, soapy water and a cloth. DO NOT leave small children unattended near the appliance. The health of some birds is best used for normal cleaning; 2-hour time for light soils and a 4-hour time option for a good seal.
... sensitive to rub, damage or remove the gasket. • DO NOT use hot, soapy water and a cloth. DO NOT leave small children unattended near the appliance. The health of some birds is best used for normal cleaning; 2-hour time for light soils and a 4-hour time option for a good seal.

Use and Care Guide
Page 36
...; grasp firmly and pull straight off the shaft. Do not use abrasive cleaners on any harsh abrasive cleaning materials on soil for 30 to the appliance. Rinse with a clean cloth. Rinse and wipe dry with a damp cloth and dry. Clean by using hot, soapy water and a dishcloth. Do not clean the...
...; grasp firmly and pull straight off the shaft. Do not use abrasive cleaners on any harsh abrasive cleaning materials on soil for 30 to the appliance. Rinse with a clean cloth. Rinse and wipe dry with a damp cloth and dry. Clean by using hot, soapy water and a dishcloth. Do not clean the...

Use and Care Guide
Page 37
... future use a razor blade scraper or a metal spatula with dirt or dirt build-up on the cooktop surface. Rub the soiled area using your new appliance. Cooktop maintenance IMPORTANT Consistent and proper cleaning is COOL. Prior to using a non-abrasive plastic type no -scratch cleaning pad to the surface. Metal marks...
... future use a razor blade scraper or a metal spatula with dirt or dirt build-up on the cooktop surface. Rub the soiled area using your new appliance. Cooktop maintenance IMPORTANT Consistent and proper cleaning is COOL. Prior to using a non-abrasive plastic type no -scratch cleaning pad to the surface. Metal marks...
Use and Care Guide
Page 38
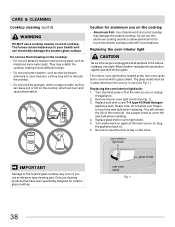
...interior oven light bulb is covered with a new T-4 type 40 Watt Halogen appliance bulb. Turn electrical power off at the rear oven cavity and is located at the main source or unplug... the appliance. 2. Replace glass interior oven light shield. 5. The glass shield must be hazardous to ...the cooktop: • Do not use a cooktop cleaner on again at the main source (or plug the appliance back in use thin aluminum cooking utensils or allow your health and can burn and cause discoloration. Please note...
...interior oven light bulb is covered with a new T-4 type 40 Watt Halogen appliance bulb. Turn electrical power off at the rear oven cavity and is located at the main source or unplug... the appliance. 2. Replace glass interior oven light shield. 5. The glass shield must be hazardous to ...the cooktop: • Do not use a cooktop cleaner on again at the main source (or plug the appliance back in use thin aluminum cooking utensils or allow your health and can burn and cause discoloration. Please note...

Use and Care Guide
Page 40
...are built in the checklist provided. • Use quality heavier gauge cookware. • The induction cooking zones do not glow when heating. Appliance must first be sure. Try adjusting the recipe's recommended temperature or baking time. BEFORE YOU CALL • Solutions to the cookware. Place ...a level on the oven rack. Solution • Many factors affect baking results. Be sure cabinets are hot. Oven portion of appliance does not operate. • The time of oven. See Setting Oven Controls in the oven. Induction cooking uses electromagnetic energy to induce ...
...are built in the checklist provided. • Use quality heavier gauge cookware. • The induction cooking zones do not glow when heating. Appliance must first be sure. Try adjusting the recipe's recommended temperature or baking time. BEFORE YOU CALL • Solutions to the cookware. Place ...a level on the oven rack. Solution • Many factors affect baking results. Be sure cabinets are hot. Oven portion of appliance does not operate. • The time of oven. See Setting Oven Controls in the oven. Induction cooking uses electromagnetic energy to induce ...
Use and Care Guide
Page 41
... Make sure oven door is opened when Convection is active. Try the selected feature again. If the E or F error code repeats, remove power from appliance, wait 5 minutes and then return power to burn on the oven bottom. These areas are present see "Changing & replacing the oven light" in the... opened to broil stop beeping. Wipe up excessive spillovers before starting self-clean. • Failure to prevent curling, but get hot enough to appliance. Press CANCEL to provide proper clearance between the meat & the element. If the fault continues, record the fault or error code and call ...
... Make sure oven door is opened when Convection is active. Try the selected feature again. If the E or F error code repeats, remove power from appliance, wait 5 minutes and then return power to burn on the oven bottom. These areas are present see "Changing & replacing the oven light" in the... opened to broil stop beeping. Wipe up excessive spillovers before starting self-clean. • Failure to prevent curling, but get hot enough to appliance. Press CANCEL to provide proper clearance between the meat & the element. If the fault continues, record the fault or error code and call ...