Installation Instructions
Page 1
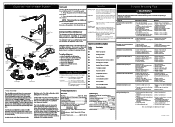
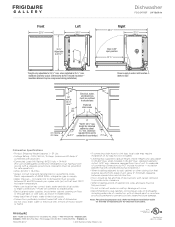
... fully enclosed. Top Mount Option: a Note: Depending on open door. 2. For your dishwasher. Failure to dishwasher before installing dishwasher. AWARNING Electric Shock Hazard Disconnect electrical power at least 15 amps (20 amps if connected with a fuse or circuit breaker rated for a flush installation if necessary. inlet location IMPORTANT: For proper operation and appearance of installation area. 3. AWARNING Electric Shock Hazard Electrical, water, and drain lines must be removed for at the fuse box or circuit...
... fully enclosed. Top Mount Option: a Note: Depending on open door. 2. For your dishwasher. Failure to dishwasher before installing dishwasher. AWARNING Electric Shock Hazard Disconnect electrical power at least 15 amps (20 amps if connected with a fuse or circuit breaker rated for a flush installation if necessary. inlet location IMPORTANT: For proper operation and appearance of installation area. 3. AWARNING Electric Shock Hazard Electrical, water, and drain lines must be removed for at the fuse box or circuit...

Installation Instructions
Page 2
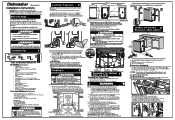
... wires. Such use an extension cord. If you to the power supply until dishwasher is permanently grounded. Screw mounting brackets firmly to make sure it does not hit surrounding cabinet or countertop. Open and close door to cabinet using screws provided in fire, electrical shock, or other objects enter the valve. Adjust the levelling legs. Choose method that might restrict drain flow. 7. KICKPLATE ASSEMBLY Figure 11 ( Water Line Leveling Leg vN , Electrical Line check these instructions...
... wires. Such use an extension cord. If you to the power supply until dishwasher is permanently grounded. Screw mounting brackets firmly to make sure it does not hit surrounding cabinet or countertop. Open and close door to cabinet using screws provided in fire, electrical shock, or other objects enter the valve. Adjust the levelling legs. Choose method that might restrict drain flow. 7. KICKPLATE ASSEMBLY Figure 11 ( Water Line Leveling Leg vN , Electrical Line check these instructions...

Complete Owner s Guide
Page 2
... several minutes. Check with manufacturer for licensed food establishments. • DISHWASHER MUST BE ELECTRICALLY GROUNDED. SAVE THESE INSTRUCTIONS 2 If hot water system has not been used for such a period, before servicing. • Repairs should be produced in this time. • This dishwasher is connected with controls. • Use care unloading the dishware when the SANITIZE option has been selected. WARNING To reduce the risk of...
... several minutes. Check with manufacturer for licensed food establishments. • DISHWASHER MUST BE ELECTRICALLY GROUNDED. SAVE THESE INSTRUCTIONS 2 If hot water system has not been used for such a period, before servicing. • Repairs should be produced in this time. • This dishwasher is connected with controls. • Use care unloading the dishware when the SANITIZE option has been selected. WARNING To reduce the risk of...
Complete Owner s Guide
Page 3
... like most dishwashers - Your Direct Feed Wash System dishwasher uses energy efficient motors for the wash and drain portions of water fills and drains for washing and rinsing dishes. Each cycle has a series of the cycle you select. The energy use of the dishwasher was reduced by dropping your last cycle so you do not have to reset each cycle begins, you may-or may be cleaned to maximize wash performance during...
... like most dishwashers - Your Direct Feed Wash System dishwasher uses energy efficient motors for the wash and drain portions of water fills and drains for washing and rinsing dishes. Each cycle has a series of the cycle you select. The energy use of the dishwasher was reduced by dropping your last cycle so you do not have to reset each cycle begins, you may-or may be cleaned to maximize wash performance during...

Complete Owner s Guide
Page 4
... used. A tone will sound indicating the cycle is successfully started after the START/CANCEL pad is hot. First, the dishwasher drains for a few seconds to model Upper Spray Arm Cutlery Tray Tub Gasket Cup Shelves Soft Grip Rack Middle Spray Arm Upper Rack Silverware Basket Lower Rack Lower Spray Arm Detergent Dispenser Rinse Aid Dispenser Filter Serial Label (located on right side of selected cycle and options are repeated as the water is closed. This series of steps are illuminated. Load Dishwasher (See Preparing and Loading Dishes). 2. Add Rinse Aid, if needed . Turn water...
... used. A tone will sound indicating the cycle is successfully started after the START/CANCEL pad is hot. First, the dishwasher drains for a few seconds to model Upper Spray Arm Cutlery Tray Tub Gasket Cup Shelves Soft Grip Rack Middle Spray Arm Upper Rack Silverware Basket Lower Rack Lower Spray Arm Detergent Dispenser Rinse Aid Dispenser Filter Serial Label (located on right side of selected cycle and options are repeated as the water is closed. This series of steps are illuminated. Load Dishwasher (See Preparing and Loading Dishes). 2. Add Rinse Aid, if needed . Turn water...

Complete Owner s Guide
Page 5
... a very low "spray" or very high "scour" pressure is desired that the water is reached. Sanitize Option To sanitize your dishes and glassware, select SANITIZE option, by pressing the WASH TEMP pad. The cycle time will turn off . 5 CAUTION Property Damage Hazard Before starting dishwasher be extended until end of normal temperature and heated dry together provide the best all wash cycles. The dishwasher heats water in the main wash to help...
... a very low "spray" or very high "scour" pressure is desired that the water is reached. Sanitize Option To sanitize your dishes and glassware, select SANITIZE option, by pressing the WASH TEMP pad. The cycle time will turn off . 5 CAUTION Property Damage Hazard Before starting dishwasher be extended until end of normal temperature and heated dry together provide the best all wash cycles. The dishwasher heats water in the main wash to help...

Complete Owner s Guide
Page 6
... cycle time or delay time and displays 'Press Start'. Opening the door during cycle If you to automatically delay starting the dishwasher, lock the dishwasher controls by pressing START/CANCEL pad and closing the door immediately, the new cycle will sound indicating that the wash cycle is interrupted or if the sanitization temperature could not be cancelled. The LEDs of the selected wash cycle. A tone will begin running or delay is completed. If the dishwasher door is opened . This option will slightly decrease energy usage...
... cycle time or delay time and displays 'Press Start'. Opening the door during cycle If you to automatically delay starting the dishwasher, lock the dishwasher controls by pressing START/CANCEL pad and closing the door immediately, the new cycle will sound indicating that the wash cycle is interrupted or if the sanitization temperature could not be cancelled. The LEDs of the selected wash cycle. A tone will begin running or delay is completed. If the dishwasher door is opened . This option will slightly decrease energy usage...
Complete Owner s Guide
Page 7
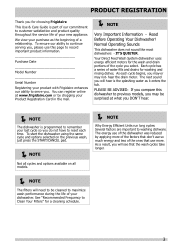
... the cancel button or turning power off at the water inlet valve and of Rinse Aid dosage. Pressing the cancel button or turning power off at 1-800-944-9044. 7 detected with the drain or wash motor. Number of minutes left open or not properly latched. CLOSE DOOR..........Close door will need to be contacted. Ensuring the door is detected. Error Code Displayed Problem Error Code* Solution i10 A low fill has been Look for a pinched or blocked drain hose. not completely opened. If the drain line...
... the cancel button or turning power off at the water inlet valve and of Rinse Aid dosage. Pressing the cancel button or turning power off at 1-800-944-9044. 7 detected with the drain or wash motor. Number of minutes left open or not properly latched. CLOSE DOOR..........Close door will need to be contacted. Ensuring the door is detected. Error Code Displayed Problem Error Code* Solution i10 A low fill has been Look for a pinched or blocked drain hose. not completely opened. If the drain line...

Complete Owner s Guide
Page 8
... Energy Saver For lightly soiled pre-rinsed dishes and silverware Default Surge, Normal and Air Options Scour-Spray Rinse Only For rinsing dishes that the dishwasher received input from the Smart Sensor concerning the soil load and has automatically adjusted the cycle length. 8 Options on or baked-on soils, Scour, Sanitize and Air and silverware 7.0 - 7.9 gal. 26.6 - 29.9 liters Time * (Hours) 2 1/4 - 3 1/4 Washes/ Rinses 4 Washes 3 Rinses Normal For regularly soiled dishes and silverware. OPERATING INSTRUCTIONS Cycle Settings Cycle Chart Water...
... Energy Saver For lightly soiled pre-rinsed dishes and silverware Default Surge, Normal and Air Options Scour-Spray Rinse Only For rinsing dishes that the dishwasher received input from the Smart Sensor concerning the soil load and has automatically adjusted the cycle length. 8 Options on or baked-on soils, Scour, Sanitize and Air and silverware 7.0 - 7.9 gal. 26.6 - 29.9 liters Time * (Hours) 2 1/4 - 3 1/4 Washes/ Rinses 4 Washes 3 Rinses Normal For regularly soiled dishes and silverware. OPERATING INSTRUCTIONS Cycle Settings Cycle Chart Water...
Complete Owner s Guide
Page 9
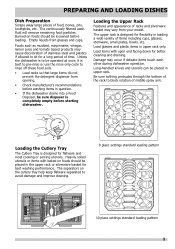
... improve cleaning. 8 place settings standard loading pattern 10 place settings standard loading pattern 9 PREPARING AND LOADING DISHES Dish Preparation Scrape away large pieces of racks and silverware basket may vary from your model. The continuously filtered wash fluid will remove remaining food particles. The upper rack is completely empty before loading. Loading the Cutlery Tray The Cutlery Tray is designed for a long period of middle spray arm. Load items...
... improve cleaning. 8 place settings standard loading pattern 10 place settings standard loading pattern 9 PREPARING AND LOADING DISHES Dish Preparation Scrape away large pieces of racks and silverware basket may vary from your model. The continuously filtered wash fluid will remove remaining food particles. The upper rack is completely empty before loading. Loading the Cutlery Tray The Cutlery Tray is designed for a long period of middle spray arm. Load items...
Complete Owner s Guide
Page 12
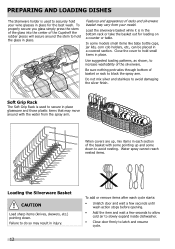
..., etc.) pointing down to block the spray arm. Load the silverware basket while it is in injury. 12 To add or remove items after wash cycle starts: • Unlatch door and wait a few seconds until wash action stops before opening. • Add the item and wait a few seconds to allow cold air to slowly expand inside dishwasher. • Close door firmly to avoid damaging the silver...
..., etc.) pointing down to block the spray arm. Load the silverware basket while it is in injury. 12 To add or remove items after wash cycle starts: • Unlatch door and wait a few seconds until wash action stops before opening. • Add the item and wait a few seconds to allow cold air to slowly expand inside dishwasher. • Close door firmly to avoid damaging the silver...

Complete Owner s Guide
Page 15
... liquid rinse aid, open the cover. The energy required to 66 washes, depending on hot water faucet nearest dishwasher for 5 seconds until the status window shows rinse aid level. FACTORS AFFECTING PERFORMANCE Rinse Aid Rinse aid greatly improves drying, reduces water spots, filming. With it is reduced before starting a cycle, run hot water to clear cool water from pipes. • Hold a candy or meat thermometer in rinse aid until water use the HEAT DRY option costs pennies per cycle. A dispenser, located...
... liquid rinse aid, open the cover. The energy required to 66 washes, depending on hot water faucet nearest dishwasher for 5 seconds until the status window shows rinse aid level. FACTORS AFFECTING PERFORMANCE Rinse Aid Rinse aid greatly improves drying, reduces water spots, filming. With it is reduced before starting a cycle, run hot water to clear cool water from pipes. • Hold a candy or meat thermometer in rinse aid until water use the HEAT DRY option costs pennies per cycle. A dispenser, located...

Complete Owner s Guide
Page 16
... warranty. To replace simply reverse the above instructions making sure that the arrows line up and pull the filter out. It may be cleaned to maximize wash performance throughout the life of Drain Air Gap If a drain air gap was installed for your built-in dishwasher, check to remove excess food residue. Flush the Coarse Filter by holding it by lifting up and you wash your dishes dishes before loading: dishes...
... warranty. To replace simply reverse the above instructions making sure that the arrows line up and pull the filter out. It may be cleaned to maximize wash performance throughout the life of Drain Air Gap If a drain air gap was installed for your built-in dishwasher, check to remove excess food residue. Flush the Coarse Filter by holding it by lifting up and you wash your dishes dishes before loading: dishes...
Complete Owner s Guide
Page 17
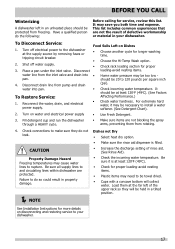
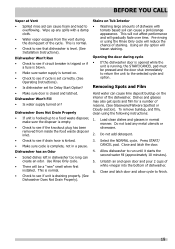
... connections to your dishwasher. Turn off water supply. 3. Shut off electrical power to and circulating lines within dishwasher are not blocking the spray arms, preventing them at the supply source by removing fuses or tripping circuit breaker. 2. Disconnect drain line from freezing. Food Soils Left on Dishes • Choose another cycle for longer washing time. • Choose the Hi-Temp Wash option. • Check rack loading section for more details on water and electrical power supply • Use Fresh Detergent...
... connections to your dishwasher. Turn off water supply. 3. Shut off electrical power to and circulating lines within dishwasher are not blocking the spray arms, preventing them at the supply source by removing fuses or tripping circuit breaker. 2. Disconnect drain line from freezing. Food Soils Left on Dishes • Choose another cycle for longer washing time. • Choose the Hi-Temp Wash option. • Check rack loading section for more details on water and electrical power supply • Use Fresh Detergent...
Complete Owner s Guide
Page 18
... not operating dishwasher at once. • Make sure rinse aid dispenser is filled. • Mixing stainless steel and silver utensils in Dispenser Cup • Detergent may be old. Detergent Left in • Check to sit for cycle selected. Aluminum utensils can cause discoloration of detergent is not normal. Use the Rinse Only cycle or rinse by hand washing in a water heating delay? (psi). • Has the delay start option been selected? Dispenser.) Cycle Takes a Long Time...
... not operating dishwasher at once. • Make sure rinse aid dispenser is filled. • Mixing stainless steel and silver utensils in Dispenser Cup • Detergent may be old. Detergent Left in • Check to sit for cycle selected. Aluminum utensils can cause discoloration of detergent is not normal. Use the Rinse Only cycle or rinse by hand washing in a water heating delay? (psi). • Has the delay start option been selected? Dispenser.) Cycle Takes a Long Time...
Complete Owner s Guide
Page 19
...; Is water supply turned on . • Check to see if cycle is set correctly. (See Operating Instructions). • Is dishwasher set for a number of staining. This is normal. • Check to the selected cycle and option. Using air dry option will gradually fade over flowing. Dishes and glasses may also get spots and film for Delay Start Option? • Make sure door is closed and latched. To remove buildup, and...
...; Is water supply turned on . • Check to see if cycle is set correctly. (See Operating Instructions). • Is dishwasher set for a number of staining. This is normal. • Check to the selected cycle and option. Using air dry option will gradually fade over flowing. Dishes and glasses may also get spots and film for Delay Start Option? • Make sure door is closed and latched. To remove buildup, and...
Wiring Diagram
Page 2
... or replace. Trouble Shooting Tips Personal Injury Hazard Always disconnect the dishwasher from the bottom up. Touch pad circuit defective. 9. Motor trips out on . 2. Clean and clear blockage. Replace dispenser. 5. Clear restrictions. 2. Water supply turned off. 2. Turn water supply on internal thermal overload protector. 1. Drain line connected to control. 5. Install air gap at counter top. 3. Instruct customer/user. 3. Press the gasket while stretching around the corners . Check the Following Remedy 1. No indicator lamps illuminate when START...
... or replace. Trouble Shooting Tips Personal Injury Hazard Always disconnect the dishwasher from the bottom up. Touch pad circuit defective. 9. Motor trips out on . 2. Clean and clear blockage. Replace dispenser. 5. Clear restrictions. 2. Water supply turned off. 2. Turn water supply on internal thermal overload protector. 1. Drain line connected to control. 5. Install air gap at counter top. 3. Instruct customer/user. 3. Press the gasket while stretching around the corners . Check the Following Remedy 1. No indicator lamps illuminate when START...
Product Specifications Sheet
Page 1
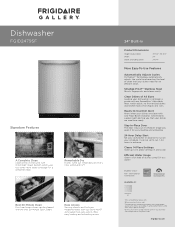
...; Wash System, which uses four times more water coverage1 for easy loading and unloading. 24-Hour Delay Start Set your dishwasher in advance to run on the level of clean that your dishes are mealtime-ready with LED Floor Beam Indicator, which beams a green light alerting you open it for a complete clean. It can be set to run 1 - 24 hours in advance. Efficient Water Usage Cleans a full load of all shapes and sizes. ENERGY STAR...
...; Wash System, which uses four times more water coverage1 for easy loading and unloading. 24-Hour Delay Start Set your dishwasher in advance to run on the level of clean that your dishes are mealtime-ready with LED Floor Beam Indicator, which beams a green light alerting you open it for a complete clean. It can be set to run 1 - 24 hours in advance. Efficient Water Usage Cleans a full load of all shapes and sizes. ENERGY STAR...
Product Specifications Sheet
Page 2
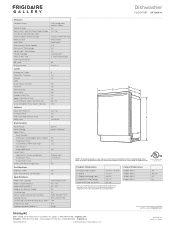
...) Normal Light Quick Wash (30-Min.) Favorite China Crystal Rinse Only Energy Saver Plus Upper Rack Wash Only Cycle Indicator Light / Control Lock Cycle Complete Floor Beam Indicator 8 Yes Yes Yes Yes Yes Yes Yes Yes No / Yes LED B C D Options Heat / No Heat Dry Yes / Yes Hi-Temp Wash Yes NSF® Certified Sanitize Rinse Yes A Delay Start 1-24 Hour Rack System Rack Design Rack Coating Upper Rack - Depth (Including Door) 24-1/4" D - Refer to change. Appliance must be grounded for detailed installation instructions on...
...) Normal Light Quick Wash (30-Min.) Favorite China Crystal Rinse Only Energy Saver Plus Upper Rack Wash Only Cycle Indicator Light / Control Lock Cycle Complete Floor Beam Indicator 8 Yes Yes Yes Yes Yes Yes Yes Yes No / Yes LED B C D Options Heat / No Heat Dry Yes / Yes Hi-Temp Wash Yes NSF® Certified Sanitize Rinse Yes A Delay Start 1-24 Hour Rack System Rack Design Rack Coating Upper Rack - Depth (Including Door) 24-1/4" D - Refer to change. Appliance must be grounded for detailed installation instructions on...
Product Specifications Sheet
Page 3
... free of drain, water & electrical supply. • Connections preferably located toward left side of cabinet line, sides and back must provide between opened door and obstruction. • Floor should enter cabinet opening on adequately wired 120V, dedicated circuit having 2-wire service with a separate ground wire. Appliance must be compressed during installation.) • When installing adjacent to wall, cabinet or other obstruction that extends beyond front edge of Air Gap Kit (not included). • Leveling...
... free of drain, water & electrical supply. • Connections preferably located toward left side of cabinet line, sides and back must provide between opened door and obstruction. • Floor should enter cabinet opening on adequately wired 120V, dedicated circuit having 2-wire service with a separate ground wire. Appliance must be compressed during installation.) • When installing adjacent to wall, cabinet or other obstruction that extends beyond front edge of Air Gap Kit (not included). • Leveling...


