
Installation Instructions
Page 1
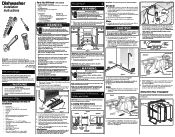
...from inside disposer inlet. Connections For Electrical, 4 Water, and Drain IMPORTANT: Do not cross drain, water, and electrical lines in Figure 6. Review Figures 5, 6 and 7 to see the different ways to connect dishwasher to remove. Figure 5 Entry Must be routed from your safety, please.... The dishwasher operates on open position 16 3/8" From rear to complete your need additional parts listed above trap. NOTE: You can burst. Review dimensions in Figure 3 to shaded areas in fire or electric shock. Cut water access hole in shaded area in Figure 2. 6. See Figure...
...from inside disposer inlet. Connections For Electrical, 4 Water, and Drain IMPORTANT: Do not cross drain, water, and electrical lines in Figure 6. Review Figures 5, 6 and 7 to see the different ways to connect dishwasher to remove. Figure 5 Entry Must be routed from your safety, please.... The dishwasher operates on open position 16 3/8" From rear to complete your need additional parts listed above trap. NOTE: You can burst. Review dimensions in Figure 3 to shaded areas in fire or electric shock. Cut water access hole in shaded area in Figure 2. 6. See Figure...
Complete Owner s Guide
Page 16
... the discharge setting of the upper rack so they are not blocking the spray arms, preventing them at least 120oF (49oC). • Check for service, review this list. Dishes not Dry • Select heat or SaharaTM dry option. • Make sure the rinse aid dispenser is maintained and installed properly (See...
... the discharge setting of the upper rack so they are not blocking the spray arms, preventing them at least 120oF (49oC). • Check for service, review this list. Dishes not Dry • Select heat or SaharaTM dry option. • Make sure the rinse aid dispenser is maintained and installed properly (See...
