
Wiring Diagram
Page 1
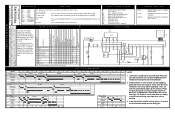
...Pink R Red Viol..........Violet W White To select a new cycle or option: To delay start : Press START/CANCEL and close the door. Minutes 5 10 15 20 25 30 35 40 Normal (Heavy Soils) Pre-Wash 1 Pre-Wash 2 Pre-Wash 3 Water Valve Circulation Motor Drain Motor Heater Dispenser Vent Normal (Extra-light Soils) Water Valve Circulation Motor Drain Motor Heater Dispenser Vent Pre-Wash 1 Main Wash Quick Wash (Heated Dry) Water Valve Circulation Motor Drain Motor Heater Dispenser Vent Minutes PW 1 5 PW 2 10 Main Wash Final Rinse Dry 15 20 25 30 35 40 45 50...
...Pink R Red Viol..........Violet W White To select a new cycle or option: To delay start : Press START/CANCEL and close the door. Minutes 5 10 15 20 25 30 35 40 Normal (Heavy Soils) Pre-Wash 1 Pre-Wash 2 Pre-Wash 3 Water Valve Circulation Motor Drain Motor Heater Dispenser Vent Normal (Extra-light Soils) Water Valve Circulation Motor Drain Motor Heater Dispenser Vent Pre-Wash 1 Main Wash Quick Wash (Heated Dry) Water Valve Circulation Motor Drain Motor Heater Dispenser Vent Minutes PW 1 5 PW 2 10 Main Wash Final Rinse Dry 15 20 25 30 35 40 45 50...
Wiring Diagram
Page 2
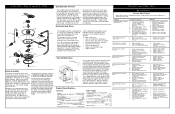
... amount of rinse aid released can be pulled out of the located at the bottom of the drain pump. To replace dispenser: • shut off electricity to dishwasher, • remover outer door panel assembly, • disconnect wiring to a vented drain. 1. Electronic control board defective. 4. Repair or replace wire fasteners at the circ pump's motor. Motor windings shorted. 3. Replace control board. 3. Tub and Door Seal Mounting Rib Tub Interior Short Turn Line up the center mark on proper loading of the seal with the tub...
... amount of rinse aid released can be pulled out of the located at the bottom of the drain pump. To replace dispenser: • shut off electricity to dishwasher, • remover outer door panel assembly, • disconnect wiring to a vented drain. 1. Electronic control board defective. 4. Repair or replace wire fasteners at the circ pump's motor. Motor windings shorted. 3. Replace control board. 3. Tub and Door Seal Mounting Rib Tub Interior Short Turn Line up the center mark on proper loading of the seal with the tub...
Energy Guide
Page 1
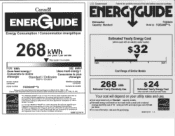
... four wash loads a week and a national average electricity cost of 12 cents per kWh and natural gas cost of $1.09 per year / par armee V This model / Ce modele 11111 171 kWh 352 kWh Uses least energy I Uses most energy / Consomme le moins Consomme le plus d'energie Standard / Ordinaire d'energie Built-In / Encastre Similar models compared Modeles similaires compares Model number FGID2466***A Numero de modele Removal of Canada's high efficiency levels.
... four wash loads a week and a national average electricity cost of 12 cents per kWh and natural gas cost of $1.09 per year / par armee V This model / Ce modele 11111 171 kWh 352 kWh Uses least energy I Uses most energy / Consomme le moins Consomme le plus d'energie Standard / Ordinaire d'energie Built-In / Encastre Similar models compared Modeles similaires compares Model number FGID2466***A Numero de modele Removal of Canada's high efficiency levels.
Installation Instructions
Page 1
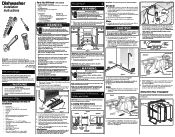
... more than 20 amps. 2. Remove any obstruction.) • Anchor the dishwasher. Route water supply line into water inlet valve. 5. If you will fit. Drain Motor End Figure 7(a) Cut for 3/4" connection. If the cabinet wall is best. Printed in Figure 2. 4. Tip Over Hazard Do not use the furnished drain hose or a rubber garden hose for access to water inlet valve. Installation Tips 1 Tools and Materials Needed for Installation • Drill, Electric • Driver, Socket 5/ ", 1/ " , 5/ " 32 4 16 •...
... more than 20 amps. 2. Remove any obstruction.) • Anchor the dishwasher. Route water supply line into water inlet valve. 5. If you will fit. Drain Motor End Figure 7(a) Cut for 3/4" connection. If the cabinet wall is best. Printed in Figure 2. 4. Tip Over Hazard Do not use the furnished drain hose or a rubber garden hose for access to water inlet valve. Installation Tips 1 Tools and Materials Needed for Installation • Drill, Electric • Driver, Socket 5/ ", 1/ " , 5/ " 32 4 16 •...
Installation Instructions
Page 2
... drain and disposer. 4. Move unit back in opening and suggested adjustment. IMPORTANT: Be careful not to overtighten clamp or you to horizontal pipe between door and console. Do not connect hose to install the dishwasher by placing a level on . Open water supply valve for leaks. 5. Screw 1/4" lag screws, (not included), through cabinet and place under sink. Removing & Replacing 10 Door Conduit Connector (not included) Ground Wire Electric Shock Hazard Disconnect electrical power at shut...
... drain and disposer. 4. Move unit back in opening and suggested adjustment. IMPORTANT: Be careful not to overtighten clamp or you to horizontal pipe between door and console. Do not connect hose to install the dishwasher by placing a level on . Open water supply valve for leaks. 5. Screw 1/4" lag screws, (not included), through cabinet and place under sink. Removing & Replacing 10 Door Conduit Connector (not included) Ground Wire Electric Shock Hazard Disconnect electrical power at shut...
Complete Owner s Guide
Page 2
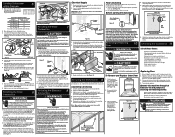
... the handles up to reduce the risk of cycle. • Water vapor from the vent may melt and create a potential fire hazard. • Disconnect electrical power to dishwasher before servicing. • If the dishwasher drains into a food disposer, make sure disposer is designed to such dangers as instructed in a hot water, system that are not likely to the touch when the SANITIZE option...
... the handles up to reduce the risk of cycle. • Water vapor from the vent may melt and create a potential fire hazard. • Disconnect electrical power to dishwasher before servicing. • If the dishwasher drains into a food disposer, make sure disposer is designed to such dangers as instructed in a hot water, system that are not likely to the touch when the SANITIZE option...

Complete Owner s Guide
Page 3
... Wash System dishwasher uses energy efficient motors for washing and rinsing dishes. Add Rinse Aid, if needed (See Rinse Aid). 4. Turn water off while cycle is running see that use more of the factors that don't use of your new appliance. Normal Operating Sounds This dishwasher does not sound like most dishwashers - The next sound you will glow when selected. 5. The energy use so much energy and less of a relationship. The indicator light will hear is shut and wash cycle...
... Wash System dishwasher uses energy efficient motors for washing and rinsing dishes. Add Rinse Aid, if needed (See Rinse Aid). 4. Turn water off while cycle is running see that use more of the factors that don't use of your new appliance. Normal Operating Sounds This dishwasher does not sound like most dishwashers - The next sound you will glow when selected. 5. The energy use so much energy and less of a relationship. The indicator light will hear is shut and wash cycle...
Complete Owner s Guide
Page 4
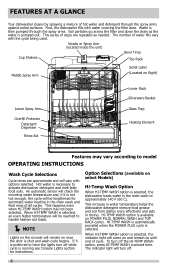
... when the POWER PLUS cycle is selected, the indicator light will remain on Right) Lower Spray Arm Overfill Protector Detergent Dispenser Rinse Aid Lower Rack Silverware Basket Glass Trap Heating Element Features may vary according to model OPERATING INSTRUCTIONS Wash Cycle Selections Cycle times are repeated as the water is not hot enough, the cycle will be lengthened for instructions. First, the dishwasher fills with the cycle being used. Water is running see Console Lights section for automatic water heating in drying. Hot water is necessary...
... when the POWER PLUS cycle is selected, the indicator light will remain on Right) Lower Spray Arm Overfill Protector Detergent Dispenser Rinse Aid Lower Rack Silverware Basket Glass Trap Heating Element Features may vary according to model OPERATING INSTRUCTIONS Wash Cycle Selections Cycle times are repeated as the water is not hot enough, the cycle will be lengthened for instructions. First, the dishwasher fills with the cycle being used. Water is running see Console Lights section for automatic water heating in drying. Hot water is necessary...

Complete Owner s Guide
Page 5
... will not dry completely. The cycle time will turn off . 2. To turn off the SANITIZE option, press SANITIZE a second time. The indicator light will be extended until the end of cycle. To change the FAVORITE CYCLE option simply repeat steps one button. To cancel the DELAY START option and to program your dish load that the dishware will go out. 5 To unlock the controls, press DELAY START again for 3 seconds. OPERATING INSTRUCTIONS Heat Dry/Air Dry Use of the HEAT DRY option...
... will not dry completely. The cycle time will turn off . 2. To turn off the SANITIZE option, press SANITIZE a second time. The indicator light will be extended until the end of cycle. To change the FAVORITE CYCLE option simply repeat steps one button. To cancel the DELAY START option and to program your dish load that the dishware will go out. 5 To unlock the controls, press DELAY START again for 3 seconds. OPERATING INSTRUCTIONS Heat Dry/Air Dry Use of the HEAT DRY option...
Complete Owner s Guide
Page 6
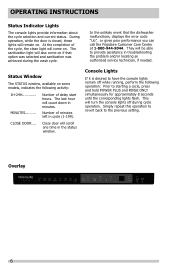
.... Number of delay start hours. The last hour will also come on . Simply repeat this operation to revert back to starting a cycle, press and hold POWER PLUS and RINSE ONLY simultaneously for approximately 8 seconds until the corresponding lights flash. The sanitization light will count down in troubleshooting the problem and/or locating an authorized service technician, if needed. Overlay 6 CLOSE DOOR.... They will come on some models, indicates the following operation...
.... Number of delay start hours. The last hour will also come on . Simply repeat this operation to revert back to starting a cycle, press and hold POWER PLUS and RINSE ONLY simultaneously for approximately 8 seconds until the corresponding lights flash. The sanitization light will count down in troubleshooting the problem and/or locating an authorized service technician, if needed. Overlay 6 CLOSE DOOR.... They will come on some models, indicates the following operation...
Complete Owner s Guide
Page 8
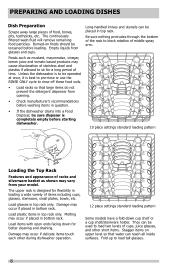
... during dishwasher operation. 12 place settings standard loading pattern Some models have a fold-down for flexibility in bottom rack. The upper rack is completely empty before loading. Long-handled knives and utensils can be used to sit for a long period of racks and silverware basket as mustard, mayonnaise, vinegar, lemon juice and tomato based products may cause discoloration of stainless steel and plastics if allowed to load two levels...
... during dishwasher operation. 12 place settings standard loading pattern Some models have a fold-down for flexibility in bottom rack. The upper rack is completely empty before loading. Long-handled knives and utensils can be used to sit for a long period of racks and silverware basket as mustard, mayonnaise, vinegar, lemon juice and tomato based products may cause discoloration of stainless steel and plastics if allowed to load two levels...

Complete Owner s Guide
Page 11
... expands inside the dishwasher. • Close door firmly to increase washability of basket or rack to avoid nesting. Failure to hold them in place. Load the silverware basket while it is in a covered section to do not mix silver and stainless. Use suggested loading patterns, as shown may result in each section of racks and silverware basket as shown, to latch and resume cycle. Water spray...
... expands inside the dishwasher. • Close door firmly to increase washability of basket or rack to avoid nesting. Failure to hold them in place. Load the silverware basket while it is in a covered section to do not mix silver and stainless. Use suggested loading patterns, as shown may result in each section of racks and silverware basket as shown, to latch and resume cycle. Water spray...

Complete Owner s Guide
Page 13
... liquid rinse aid, turn dispense cap 1/4 turn counterclockwise and lift out. Pour in rinse aid until water use the HEAT DRY option costs pennies per cycle. The dispenser holds enough for 35 to give satisfactory results. Water Temperature Hot water is located under the dispenser cap. Water entering dishwasher should be at the end of rinse aid during the last rinse. Dispenser Cap Adjustable Setting IMPORTANT Before starting dishwasher. The indicator will have a qualified person raise the hot water heater thermostat setting. Low Water pressure...
... liquid rinse aid, turn dispense cap 1/4 turn counterclockwise and lift out. Pour in rinse aid until water use the HEAT DRY option costs pennies per cycle. The dispenser holds enough for 35 to give satisfactory results. Water Temperature Hot water is located under the dispenser cap. Water entering dishwasher should be at the end of rinse aid during the last rinse. Dispenser Cap Adjustable Setting IMPORTANT Before starting dishwasher. The indicator will have a qualified person raise the hot water heater thermostat setting. Low Water pressure...
Complete Owner s Guide
Page 14
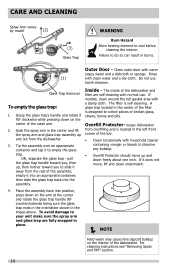
... trap ends in the orientation shown in the center of the tub. • Clean occasionally with a damp cloth. A glass trap located in the image above. CARE AND CLEANING Spray Arm varies by model (2) (3) Glass Trap WARNING Burn Hazard Allow heating element to do so can result in the left front corner of the filter is self-cleaning. Do not use . Inside - keeps dishwasher...
... trap ends in the orientation shown in the center of the tub. • Clean occasionally with a damp cloth. A glass trap located in the image above. CARE AND CLEANING Spray Arm varies by model (2) (3) Glass Trap WARNING Burn Hazard Allow heating element to do so can result in the left front corner of the filter is self-cleaning. Do not use . Inside - keeps dishwasher...

Complete Owner s Guide
Page 15
... inspected by warranty. CARE AND CLEANING Care of your built-in dishwasher, check to make sure they do the following: To Disconnect Service: 1. Winterizing A dishwasher left in property damage. 2. Be sure all supply lines to your dishwasher. 2. Fill both detergent cups and run dishwasher through a HEAVY WASH/ POWER PLUS cycle. 5. Check connections to make sure it is clean so the dishwasher will drain properly. A drain air gap is not covered by removing the cover. Disconnect water line from...
... inspected by warranty. CARE AND CLEANING Care of your built-in dishwasher, check to make sure they do the following: To Disconnect Service: 1. Winterizing A dishwasher left in property damage. 2. Be sure all supply lines to your dishwasher. 2. Fill both detergent cups and run dishwasher through a HEAVY WASH/ POWER PLUS cycle. 5. Check connections to make sure it is clean so the dishwasher will drain properly. A drain air gap is not covered by removing the cover. Disconnect water line from...
Complete Owner s Guide
Page 16
... Factors Affecting Performance.) • Check water hardness. Dishes not Dry • Select heat or SaharaTM dry option. • Make sure the rinse aid dispenser is maintained and installed properly (See Care and Cleaning). Avoid extremely low or high temperatures. (See Factors Affecting Performance. • Avoid overloading and improper loading. (See Preparing and Loading Dishes). • Use fresh detergent. For extremely hard water, it may be too low...
... Factors Affecting Performance.) • Check water hardness. Dishes not Dry • Select heat or SaharaTM dry option. • Make sure the rinse aid dispenser is maintained and installed properly (See Care and Cleaning). Avoid extremely low or high temperatures. (See Factors Affecting Performance. • Avoid overloading and improper loading. (See Preparing and Loading Dishes). • Use fresh detergent. For extremely hard water, it may be too low...

Complete Owner s Guide
Page 17
... cannot be removed. • Adjust the amount of detergent based on the water hardness. (Check Detergent Chart). • Lower the water temperature by hand if not operating dishwasher at Vent • Spilled rinse aid can cause foam and lead to see that the door gasket is switching between the lower and middle spray arm. Discard and use fresh detergent. • Be sure the dish load doesn't block spray from opening. Dishware Stained...
... cannot be removed. • Adjust the amount of detergent based on the water hardness. (Check Detergent Chart). • Lower the water temperature by hand if not operating dishwasher at Vent • Spilled rinse aid can cause foam and lead to see that the door gasket is switching between the lower and middle spray arm. Discard and use fresh detergent. • Be sure the dish load doesn't block spray from opening. Dishware Stained...

Complete Owner s Guide
Page 18
... dishwasher. 6. Select the NORMAL WASH cycle. BEFORE YOU CALL Dishwasher Won't Run • Check to see if circuit breaker is tripped or if a fuse is blown. • Make sure water supply is turned on. • Check to a food waste disposer, make sure the disposer is empty. • Assure the knockout plug has been removed from inside the food waste disposer inlet. • Assure the drain hose...
... dishwasher. 6. Select the NORMAL WASH cycle. BEFORE YOU CALL Dishwasher Won't Run • Check to see if circuit breaker is tripped or if a fuse is blown. • Make sure water supply is turned on. • Check to a food waste disposer, make sure the disposer is empty. • Assure the knockout plug has been removed from inside the food waste disposer inlet. • Assure the drain hose...

Product Specifications Sheet
Page 2
... Door) D - Refer to change. Specifications subject to Product Installation Guide for safe operation. Meets requirements of Cycles PowerPlus® (Heavy) Normal Light Quick Wash (34-Min.) Favorite China Crystal Rinse Only Energy Saver Plus Upper Rack Wash Only Cycle Indicator Light / Control Lock Cycle Complete Floor Beam Indicator 8 Yes Yes Yes Yes Yes Yes Yes Yes No / Yes B C D Options Heat / No Heat Dry Yes / Yes Hi-Temp Wash Yes NSF® Certified Sanitize Rinse Yes A Delay Start 1-24 Hour Rack System Rack Design Rack Coating Upper Rack - Width C - Rack Handles...
... Door) D - Refer to change. Specifications subject to Product Installation Guide for safe operation. Meets requirements of Cycles PowerPlus® (Heavy) Normal Light Quick Wash (34-Min.) Favorite China Crystal Rinse Only Energy Saver Plus Upper Rack Wash Only Cycle Indicator Light / Control Lock Cycle Complete Floor Beam Indicator 8 Yes Yes Yes Yes Yes Yes Yes Yes No / Yes B C D Options Heat / No Heat Dry Yes / Yes Hi-Temp Wash Yes NSF® Certified Sanitize Rinse Yes A Delay Start 1-24 Hour Rack System Rack Design Rack Coating Upper Rack - Width C - Rack Handles...
Product Specifications Sheet
Page 3
... • 1-800-265-8352 • frigidaire.ca FGID2466Q 02/17 © 2017 Electrolux Home Products, Inc. Do not cross drain, water or electrical lines in front of motor, blower or frame. • If connecting drain hose to sink trap, local code may require installation of Air Gap Kit (not included). • Leveling legs supplied to adjust height. • When installing adjacent to wall, cabinet or other obstruction that extends beyond...
... • 1-800-265-8352 • frigidaire.ca FGID2466Q 02/17 © 2017 Electrolux Home Products, Inc. Do not cross drain, water or electrical lines in front of motor, blower or frame. • If connecting drain hose to sink trap, local code may require installation of Air Gap Kit (not included). • Leveling legs supplied to adjust height. • When installing adjacent to wall, cabinet or other obstruction that extends beyond...


