
Complete Owners Guide
Page 2
... service life of a relationship. Save Time and Money Check the section titled "Before You Call". This section helps step you through some common problems that sold you call for choosing Frigidaire. Important: This Use and Care Guide is part of our commitment to help is Electromagnetic Induction 8 Before Setting Surface Controls 8 Induction Controls 11 Setting Surface Controls 12 Care and Cleaning 17 d Cleaning 17 Before You Call 19 Warranty 24 Questions? Frigidaire model number Frigidaire serial number Serial...
... service life of a relationship. Save Time and Money Check the section titled "Before You Call". This section helps step you through some common problems that sold you call for choosing Frigidaire. Important: This Use and Care Guide is part of our commitment to help is Electromagnetic Induction 8 Before Setting Surface Controls 8 Induction Controls 11 Setting Surface Controls 12 Care and Cleaning 17 d Cleaning 17 Before You Call 19 Warranty 24 Questions? Frigidaire model number Frigidaire serial number Serial...
Complete Owners Guide
Page 4
... appropriate outlet or junction box with the correct, properly grounded wall receptacle installed by removing the leveling legs, panels, wire covers, anti-tip brackets/screws, or any other part of the consumer to contact a qualified installer to assure that is the correct voltage, is properly installed and grounded by a circuit breaker in conformance with packaging material. Do not use an adapter plug, use an extension cord...
... appropriate outlet or junction box with the correct, properly grounded wall receptacle installed by removing the leveling legs, panels, wire covers, anti-tip brackets/screws, or any other part of the consumer to contact a qualified installer to assure that is the correct voltage, is properly installed and grounded by a circuit breaker in conformance with packaging material. Do not use an adapter plug, use an extension cord...
Complete Owners Guide
Page 6
... on the cooking area before removing the cookware. Turn the cooking area off the appliance. Cookware handles should break, cleaning solutions and spillovers may penetrate the broken cooktop and create a risk of the pacemaker or similar medical device. Only certain types of different sizes. Use proper pan size - This appliance is in temperature. Never leave surface elements unattended. Once the power resumes, reset the clock...
... on the cooking area before removing the cookware. Turn the cooking area off the appliance. Cookware handles should break, cleaning solutions and spillovers may penetrate the broken cooktop and create a risk of the pacemaker or similar medical device. Only certain types of different sizes. Use proper pan size - This appliance is in temperature. Never leave surface elements unattended. Once the power resumes, reset the clock...
Complete Owners Guide
Page 7
... may cause harmful interference to such substances. Cleaning a hot appliance can be allowed to accumulate on , the user is cool. All other reproductive harms, and requires businesses to warn customers of potential exposures to radio communications. Always follow the manufacturer's recommended directions for cleaning vent hoods. IMPORTANT SAFETY INSTRUCTIONS IMPORTANT INSTRUCTIONS FOR CLEANING YOUR APPLIANCE CAUTION Before manually cleaning any part of kitchen cleaners and aerosols.
... may cause harmful interference to such substances. Cleaning a hot appliance can be allowed to accumulate on , the user is cool. All other reproductive harms, and requires businesses to warn customers of potential exposures to radio communications. Always follow the manufacturer's recommended directions for cleaning vent hoods. IMPORTANT SAFETY INSTRUCTIONS IMPORTANT INSTRUCTIONS FOR CLEANING YOUR APPLIANCE CAUTION Before manually cleaning any part of kitchen cleaners and aerosols.
Complete Owners Guide
Page 8
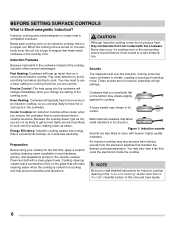
... scorching food when starting to the ceramic surface. Even Heating: Cookware will be cooler when you change the setting of this Use and Care Guide. 8 NOTE Be sure to read detailed instructions for cooking food than a conventional cooktop, so it has cooled to have hot or cool spots in its structure. Below each cooking zone on an induction cooktop, there is not perfectly flat on...
... scorching food when starting to the ceramic surface. Even Heating: Cookware will be cooler when you change the setting of this Use and Care Guide. 8 NOTE Be sure to read detailed instructions for cooking food than a conventional cooktop, so it has cooled to have hot or cool spots in its structure. Below each cooking zone on an induction cooktop, there is not perfectly flat on...
Complete Owners Guide
Page 14
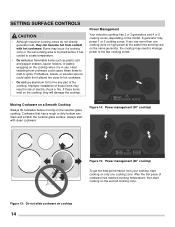
... cooled to line any part of electric shock or fire. If you use . Figure 13: Do not slide cookware on the ceramic glass cooktop. Potholders, towels, or wooden spoons could cause these liners may need to manage power to melt or ignite. After the first piece of these items to the two cooking zones. SETTING SURFACE CONTROLS CAUTION • Although induction cooking zones do not directly generate heat, they...
... cooled to line any part of electric shock or fire. If you use . Figure 13: Do not slide cookware on the ceramic glass cooktop. Potholders, towels, or wooden spoons could cause these liners may need to manage power to melt or ignite. After the first piece of these items to the two cooking zones. SETTING SURFACE CONTROLS CAUTION • Although induction cooking zones do not directly generate heat, they...
Complete Owners Guide
Page 16
... your local Cooperative Agricultural Extension Service or a manufacturer of glass jars for 10 seconds. If a control key is recommended to use smaller diameter canners on electric coil and ceramic glass cooktops and to center canners on the burner grates. • Start with hot tap water to bring water to boil more than 10 seconds, the cooktop will switch off function to read all...
... your local Cooperative Agricultural Extension Service or a manufacturer of glass jars for 10 seconds. If a control key is recommended to use smaller diameter canners on electric coil and ceramic glass cooktops and to center canners on the burner grates. • Start with hot tap water to bring water to boil more than 10 seconds, the cooktop will switch off function to read all...

Complete Owners Guide
Page 17
... 1: Cooktop care 17 CARE AND CLEANING CAUTION • Before cleaning any part of the appliance, be removed immediately after the cooktop has cooled using your cooktop for ceramic glass cooktops. Clean and buff with dirt or dirt build up on the ceramic glass cooktop; This will make cleaning easier when soiled from cooking. Only use cleaning products that have been specifically designed for the first time, apply a ceramic cooktop cleaning cream (available in the kitchen. • Drop...
... 1: Cooktop care 17 CARE AND CLEANING CAUTION • Before cleaning any part of the appliance, be removed immediately after the cooktop has cooled using your cooktop for ceramic glass cooktops. Clean and buff with dirt or dirt build up on the ceramic glass cooktop; This will make cleaning easier when soiled from cooking. Only use cleaning products that have been specifically designed for the first time, apply a ceramic cooktop cleaning cream (available in the kitchen. • Drop...
Complete Owners Guide
Page 19
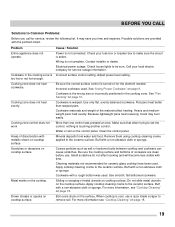
... burn easily. Cause / Solution Power is touching another control. Adjust power level setting. See "Pan Sensing" on the surface. Use only flat, evenly balanced cookware. Apply cooktop cleaning creme to be sure. Sliding or scraping of the material affect heating. For more information see "Cooktop Cleaning" on for ceramic-glass cooktop have been used . Call your fuse box or breaker box to make sure the circuit is cool, use . Coarse particles such as salt...
... burn easily. Cause / Solution Power is touching another control. Adjust power level setting. See "Pan Sensing" on the surface. Use only flat, evenly balanced cookware. Apply cooktop cleaning creme to be sure. Sliding or scraping of the material affect heating. For more information see "Cooktop Cleaning" on for ceramic-glass cooktop have been used . Call your fuse box or breaker box to make sure the circuit is cool, use . Coarse particles such as salt...
Complete Owners Guide
Page 24
... not covered by this warranty. 5. Service calls to establish the warranty period should service be required. DISCLAIMER OF IMPLIED WARRANTIES; If You Need Service Keep your receipt, delivery slip, or some other appropriate payment record to repair or replace appliance light bulbs, air filters, water filters, other consumables, or knobs, handles, or other than in materials or workmanship, or for servicing, such as abuse, misuse, inadequate power supply...
... not covered by this warranty. 5. Service calls to establish the warranty period should service be required. DISCLAIMER OF IMPLIED WARRANTIES; If You Need Service Keep your receipt, delivery slip, or some other appropriate payment record to repair or replace appliance light bulbs, air filters, water filters, other consumables, or knobs, handles, or other than in materials or workmanship, or for servicing, such as abuse, misuse, inadequate power supply...
Wiring Diagram
Page 1
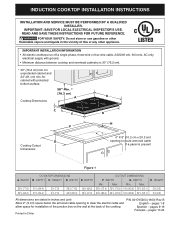
READ AND SAVE THESE INSTRUCTIONS FOR FUTURE REFERENCE. IMPORTANT INSTALLATION INFORMATION • All electric cooktops run off a single phase, three-wire or four-wire cable, 240/208 volt, 60 hertz, AC only electrical supply with protected bottom surface. Cooktop Dimensions Cooktop Cutout Dimensions 4" X 8" (10.2 cm x 20.3 cm) opening to route armored cable if a panel is 30" (76.2 cm). * 30" (76.2 cm) min. WIDTH 213/8 (54...
READ AND SAVE THESE INSTRUCTIONS FOR FUTURE REFERENCE. IMPORTANT INSTALLATION INFORMATION • All electric cooktops run off a single phase, three-wire or four-wire cable, 240/208 volt, 60 hertz, AC only electrical supply with protected bottom surface. Cooktop Dimensions Cooktop Cutout Dimensions 4" X 8" (10.2 cm x 20.3 cm) opening to route armored cable if a panel is 30" (76.2 cm). * 30" (76.2 cm) min. WIDTH 213/8 (54...
Wiring Diagram
Page 2
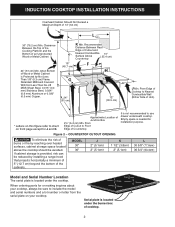
... Cabinet is located under the burner box of cooktop. 2 Approximate Location of an Unprotected Wood or Metal Cabinet 24" (61 cm) Min. MODEL 30" 36" J 2" (5.1cm) 2" (5.1cm) K 1 1/2" (3.8cm) 2" (5.1cm) L 30 5/8" (77.8cm) 36 3/4" (93.4cm) Model and Serial Number Location The serial plate is Protected by Not Less Than 1/8" (0.3 cm) Flame Retardant Millboard Covered With Not Less Than No. 28 MGS Sheet Steel, 0.015" (0.4 mm) Stainless Steel, 0.024" (0.6 mm) Aluminum...
... Cabinet is located under the burner box of cooktop. 2 Approximate Location of an Unprotected Wood or Metal Cabinet 24" (61 cm) Min. MODEL 30" 36" J 2" (5.1cm) 2" (5.1cm) K 1 1/2" (3.8cm) 2" (5.1cm) L 30 5/8" (77.8cm) 36 3/4" (93.4cm) Model and Serial Number Location The serial plate is Protected by Not Less Than 1/8" (0.3 cm) Flame Retardant Millboard Covered With Not Less Than No. 28 MGS Sheet Steel, 0.015" (0.4 mm) Stainless Steel, 0.024" (0.6 mm) Aluminum...
Wiring Diagram
Page 3
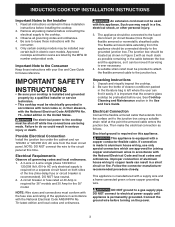
... circuit panel. DO NOT connect to a gas supply pipe. Read all packing material before installing the cooktop. 2. IMPORTANT SAFETY INSTRUCTIONS • Be sure your Use and Care Guide for the 30" model. A 3-wire or 4-wire single phase 120/240 or 120/208 Volt, 60 Hz AC only electrical supply is required on a separate circuit fused on both sides of cleaner conditioner packed in the United States. A circuit breaker or fuse rated...
... circuit panel. DO NOT connect to a gas supply pipe. Read all packing material before installing the cooktop. 2. IMPORTANT SAFETY INSTRUCTIONS • Be sure your Use and Care Guide for the 30" model. A 3-wire or 4-wire single phase 120/240 or 120/208 Volt, 60 Hz AC only electrical supply is required on a separate circuit fused on both sides of cleaner conditioner packed in the United States. A circuit breaker or fuse rated...
Wiring Diagram
Page 4
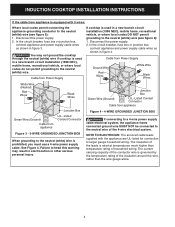
... branch circuit installation (1996 NEC), mobile home, recreational vehicle, or where local codes do not permit grounding to the neutral (white) wire. See Figure 4. The insulation of the conductor wire is prohibited, you must use a 4-wire power supply cable. INDUCTION COOKTOP INSTALLATION INSTRUCTIONS If the cable from appliance is equipped with the appliance are UL-listed for connection to larger gauge household wiring. Junction Box Green Wire (Ground) U.L.-Listed...
... branch circuit installation (1996 NEC), mobile home, recreational vehicle, or where local codes do not permit grounding to the neutral (white) wire. See Figure 4. The insulation of the conductor wire is prohibited, you must use a 4-wire power supply cable. INDUCTION COOKTOP INSTALLATION INSTRUCTIONS If the cable from appliance is equipped with the appliance are UL-listed for connection to larger gauge household wiring. Junction Box Green Wire (Ground) U.L.-Listed...
Wiring Diagram
Page 5
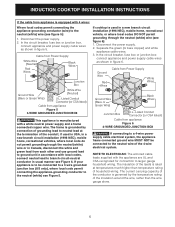
... used in usual manner see figure 6): 1. In the circuit breaker, fuse box or junction box, connect appliance and power supply cable wires as shown in figure 5. The insulation of the leads is rated at the termination of the 4-wire electrical system. INDUCTION COOKTOP INSTALLATION INSTRUCTIONS If the cable from appliance is equipped with 4 wires: Where local codes permit connecting the appliance-grounding conductor (wire) to the neutral (white) wire (see Figure 5. If cooktop...
... used in usual manner see figure 6): 1. In the circuit breaker, fuse box or junction box, connect appliance and power supply cable wires as shown in figure 5. The insulation of the leads is rated at the termination of the 4-wire electrical system. INDUCTION COOKTOP INSTALLATION INSTRUCTIONS If the cable from appliance is equipped with 4 wires: Where local codes permit connecting the appliance-grounding conductor (wire) to the neutral (white) wire (see Figure 5. If cooktop...
Wiring Diagram
Page 6
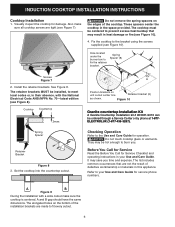
INDUCTION COOKTOP INSTALLATION INSTRUCTIONS Cooktop Installation 1. Checking Operation Refer to fit every cutout. 6 WARNING Do not remove the spring spacers on the edges of the installation brackets are made to the Use and Care Guide for service phone numbers. Install the retainer brackets. See Figure 8. Figure 10 Granite countertop Installation Kit A Granite Countertop Installation kit # 903061-9010 can be installed, to prevent excess heat buildup that are tight (see Figure 10). Refer to burn you time and expense...
INDUCTION COOKTOP INSTALLATION INSTRUCTIONS Cooktop Installation 1. Checking Operation Refer to fit every cutout. 6 WARNING Do not remove the spring spacers on the edges of the installation brackets are made to the Use and Care Guide for service phone numbers. Install the retainer brackets. See Figure 8. Figure 10 Granite countertop Installation Kit A Granite Countertop Installation kit # 903061-9010 can be installed, to prevent excess heat buildup that are tight (see Figure 10). Refer to burn you time and expense...
Wiring Diagram
Page 7
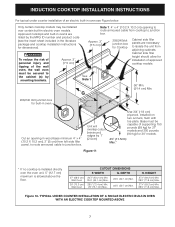
... sheet included in electric oven models. Base must be capable of supporting 150 pounds (68 kg) for 27" models and 200 pounds (90 kg) for dimensions). INDUCTION COOKTOP INSTALLATION INSTRUCTIONS For typical under counter installation of an electric built-in ovens are necessary to isolate the unit from adjoining cabinets. Only certain cooktop models may be installed over the oven unit, 5" (12.7 cm) maximum is installed directly over certain built-in the literature package and cooktop installation instructions...
... sheet included in electric oven models. Base must be capable of supporting 150 pounds (68 kg) for 27" models and 200 pounds (90 kg) for dimensions). INDUCTION COOKTOP INSTALLATION INSTRUCTIONS For typical under counter installation of an electric built-in ovens are necessary to isolate the unit from adjoining cabinets. Only certain cooktop models may be installed over the oven unit, 5" (12.7 cm) maximum is installed directly over certain built-in the literature package and cooktop installation instructions...
Product Specifications Sheet
Page 1
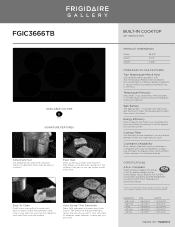
..., or simmer sauces with ease using . Safe Surface The Safe Surface - Cooktop Timer Use the built-in them: the area around the pans stays cool to your pan, not your pan to only send heat to Frigidaire® 9" (3000W) electric right-front element. Induction only heats pans and the food in timer function to set a specified amount of time you are using Auto Sizing™ Pan Detection that generates heat only to...
..., or simmer sauces with ease using . Safe Surface The Safe Surface - Cooktop Timer Use the built-in them: the area around the pans stays cool to your pan, not your pan to only send heat to Frigidaire® 9" (3000W) electric right-front element. Induction only heats pans and the food in timer function to set a specified amount of time you are using Auto Sizing™ Pan Detection that generates heat only to...

Product Specifications Sheet
Page 2
...) Left Front Element (Watts) Left Rear Element (Watts) Hot Surface Indicators Control Location Knob Color Knob Type Glass-Touch Black Ceramic Glass 8" - 2,300 / 3,200 7" - 1,800/2,600 10" - 2,500 / 3,800 8" - 2,300 / 3,200 7" - 1,800/2,600 Yes Center Front CERTIFICATIONS A.D.A. Compliant1 Yes SPECIFICATIONS Power Supply Connection Location Right Rear Voltage Rating 240V /208V / 60Hz Connected Load (kW Rating) @ 240 / 208 Volts2 9.6 / 8.3 Amps @ 240 / 208 Volts 45.0 / 45.2 Minimum Circuit Required (Amps) 40 Approved for Electric Single Yes Wall Oven Combination Installation3...
...) Left Front Element (Watts) Left Rear Element (Watts) Hot Surface Indicators Control Location Knob Color Knob Type Glass-Touch Black Ceramic Glass 8" - 2,300 / 3,200 7" - 1,800/2,600 10" - 2,500 / 3,800 8" - 2,300 / 3,200 7" - 1,800/2,600 Yes Center Front CERTIFICATIONS A.D.A. Compliant1 Yes SPECIFICATIONS Power Supply Connection Location Right Rear Voltage Rating 240V /208V / 60Hz Connected Load (kW Rating) @ 240 / 208 Volts2 9.6 / 8.3 Amps @ 240 / 208 Volts 45.0 / 45.2 Minimum Circuit Required (Amps) 40 Approved for Electric Single Yes Wall Oven Combination Installation3...

Product Specifications Sheet
Page 3
... combustible surface (or backsplash) above countertop. • Allow 2" minimum required clearance from left edge of line. • Connected Load (kW Rating) @ 240 / 208 Volts = 9.6 / 8.3 kW • Amps @ 240 / 208 Volts = 45.0 / 45.2 Amps • Recommended Circuit Breaker - 40 Amps • Always consult local and national electric codes. • Cooktop cutout height includes clearance needed beneath cooktop to allow for detailed installation instructions on web.) OPTIONAL ACCESSORIES • Granite Countertop Installation Kit - (PN # 903061-9010). or 24" minimum clearance...
... combustible surface (or backsplash) above countertop. • Allow 2" minimum required clearance from left edge of line. • Connected Load (kW Rating) @ 240 / 208 Volts = 9.6 / 8.3 kW • Amps @ 240 / 208 Volts = 45.0 / 45.2 Amps • Recommended Circuit Breaker - 40 Amps • Always consult local and national electric codes. • Cooktop cutout height includes clearance needed beneath cooktop to allow for detailed installation instructions on web.) OPTIONAL ACCESSORIES • Granite Countertop Installation Kit - (PN # 903061-9010). or 24" minimum clearance...


