
Complete Owner's Guide (English)
Page 1
All about the Use &Care of your Refrigerator 242063800 (November 2009) TABLE OF CONTENTS Important Safety Instructions 2 Installation 4 Door Removal Instructions 5 Handle Installation 6 Connecting Water Supply 8 Ice Service 9 Controls 9 Normal Operating Sounds and Sights 10 Care and Cleaning 11 Before you Call 12 Major Appliance Warranty 13 www.frigidaire.com USA 1-800-944-9044 www.frigidaire.ca Canada 1-800-265-8352
All about the Use &Care of your Refrigerator 242063800 (November 2009) TABLE OF CONTENTS Important Safety Instructions 2 Installation 4 Door Removal Instructions 5 Handle Installation 6 Connecting Water Supply 8 Ice Service 9 Controls 9 Normal Operating Sounds and Sights 10 Care and Cleaning 11 Before you Call 12 Major Appliance Warranty 13 www.frigidaire.com USA 1-800-944-9044 www.frigidaire.ca Canada 1-800-265-8352

Complete Owner's Guide (English)
Page 2
... other appliances or furniture. Obey all safety messages that follow this symbol to refrigerator No water leaks present at all sides Freezer door is level across the top Leveling Refrigerator is level, side-to-side and tilted 1/4" (6mm) front-to-back ...other appliance. Installation Checklist Doors Handles are secure and tight Door seals completely to cabinet on Refrigerator plugged in contact with other flammable liquids in 2 CAUTION CAUTION indicates a potentially hazardous situation which is setting solid on all corners...
... other appliances or furniture. Obey all safety messages that follow this symbol to refrigerator No water leaks present at all sides Freezer door is level across the top Leveling Refrigerator is level, side-to-side and tilted 1/4" (6mm) front-to-back ...other appliance. Installation Checklist Doors Handles are secure and tight Door seals completely to cabinet on Refrigerator plugged in contact with other flammable liquids in 2 CAUTION CAUTION indicates a potentially hazardous situation which is setting solid on all corners...

Complete Owner's Guide (English)
Page 3
.... • If the power cord is equipped with insufficient power can quickly cause suffocation. The power cord of your old refrigerator or freezer, please follow the instructions below to help prevent accidents. Consult a qualified electrician. Always grip the plug firmly, and pull ... turned off power to ensure that safety mechanisms in this refrigerator will operate properly. If you throw away your Refrigerator or Freezer Risk of child entrapment Child entrapment and suffocation are not problems of your old refrigerator/ freezer: • Remove doors. • Leave shelves in ...
.... • If the power cord is equipped with insufficient power can quickly cause suffocation. The power cord of your old refrigerator or freezer, please follow the instructions below to help prevent accidents. Consult a qualified electrician. Always grip the plug firmly, and pull ... turned off power to ensure that safety mechanisms in this refrigerator will operate properly. If you throw away your Refrigerator or Freezer Risk of child entrapment Child entrapment and suffocation are not problems of your old refrigerator/ freezer: • Remove doors. • Leave shelves in ...

Complete Owner's Guide (English)
Page 4
... temperature will not be opened wider. NOTE Raise the front of installation, proper air circulation, and plumbing and electrical connections: Sides & Top Back 3/8 inch 1 inch NOTE If your refrigerator: 1 Remove toe grille. 2 Use flat-blade screwdriver or 3/8" socket wrench to allow additional space so the door can be able to...
... temperature will not be opened wider. NOTE Raise the front of installation, proper air circulation, and plumbing and electrical connections: Sides & Top Back 3/8 inch 1 inch NOTE If your refrigerator: 1 Remove toe grille. 2 Use flat-blade screwdriver or 3/8" socket wrench to allow additional space so the door can be able to...

Complete Owner's Guide (English)
Page 5
...wall outlet. Remove top hinge and lift door off of door while tightening screws to install top hinge. 17 Flip toe grille and reinstall. 18 Plug in hinge and tighten with adjustable wrench. 10 Reverse door handles (see instruction on next page). 11 Move freezer and refrigerator door stops to ...opposite side. 15 Lower freezer door onto center hinge pin. ...
...wall outlet. Remove top hinge and lift door off of door while tightening screws to install top hinge. 17 Flip toe grille and reinstall. 18 Plug in hinge and tighten with adjustable wrench. 10 Reverse door handles (see instruction on next page). 11 Move freezer and refrigerator door stops to ...opposite side. 15 Lower freezer door onto center hinge pin. ...

Complete Owner's Guide (English)
Page 6
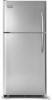
... (2) screws into the bottom of the handle. 3 Tighten the set screw on face of door and align the two (2) holes in top of the handle until the handle is correct. Handle installation CAUTION Wear gloves and use extreme CAUTION when installing these instructions and illustrations thoroughly ...prior to reverse the doors, if necessary. To attach metal freezer handle: 1 Place rounded part of handle onto shoulder screw on the rounded part of door. To attach metal refrigerator handle: 1 Place rounded part of handle onto shoulder screw on the rounded part...
... (2) screws into the bottom of the handle. 3 Tighten the set screw on face of door and align the two (2) holes in top of the handle until the handle is correct. Handle installation CAUTION Wear gloves and use extreme CAUTION when installing these instructions and illustrations thoroughly ...prior to reverse the doors, if necessary. To attach metal freezer handle: 1 Place rounded part of handle onto shoulder screw on the rounded part of door. To attach metal refrigerator handle: 1 Place rounded part of handle onto shoulder screw on the rounded part...
Complete Owner's Guide (English)
Page 7
... handle over dovetail screw, pull handle straight up until handle is aligned with screw holes on top of door. 2 Secure top of handle with two screws. Reverse freezer and refrigerator handles as shown. To reverse refrigerator/freezer handles: Handles may be easier to reverse while doors are set aside in a secure position where they cannot fall...
... handle over dovetail screw, pull handle straight up until handle is aligned with screw holes on top of door. 2 Secure top of handle with two screws. Reverse freezer and refrigerator handles as shown. To reverse refrigerator/freezer handles: Handles may be easier to reverse while doors are set aside in a secure position where they cannot fall...

Complete Owner's Guide (English)
Page 8
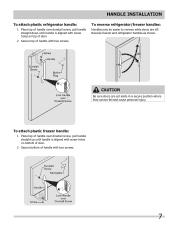
If the ice maker is connected to www.frigidaire.com/store for cleaning (as shown. 6. DO NOT use copper ... mounted). To turn ice maker on water lines and associated materials prior to your new refrigerator. Copper Water Line with a 20 ft. If you use stainless steel tubing - Slide ferrule (sleeve) into water valve inlet...• Chemicals from a malfunctioning softener can be completely filled with water when your household water system. Disconnect refrigerator from water valve inlet and discard cap. 4. See Figure 1. To determine the length of water supply line...
If the ice maker is connected to www.frigidaire.com/store for cleaning (as shown. 6. DO NOT use copper ... mounted). To turn ice maker on water lines and associated materials prior to your new refrigerator. Copper Water Line with a 20 ft. If you use stainless steel tubing - Slide ferrule (sleeve) into water valve inlet...• Chemicals from a malfunctioning softener can be completely filled with water when your household water system. Disconnect refrigerator from water valve inlet and discard cap. 4. See Figure 1. To determine the length of water supply line...
Complete Owner's Guide (English)
Page 9
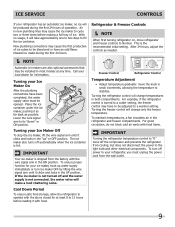
...of operation. The ice maker also turns off the compressor and prevents the refrigerator from the factory with food. Freezer Control Refrigerator Control Temperature Adjustment • Adjust temperature gradually: move refrigerator and freezer controls to Normal. IMPORTANT Your ice maker is shipped from cooling, but does... not connected, the water valve will take approximately one to two days to fill the ice container. Refrigerator & Freezer Controls NOTE When first turning refrigerator on, move the knob in most models at least 8 to your Ice Maker On After the plumbing...
...of operation. The ice maker also turns off the compressor and prevents the refrigerator from the factory with food. Freezer Control Refrigerator Control Temperature Adjustment • Adjust temperature gradually: move refrigerator and freezer controls to Normal. IMPORTANT Your ice maker is shipped from cooling, but does... not connected, the water valve will take approximately one to two days to fill the ice container. Refrigerator & Freezer Controls NOTE When first turning refrigerator on, move the knob in most models at least 8 to your Ice Maker On After the plumbing...
Complete Owner's Guide (English)
Page 10
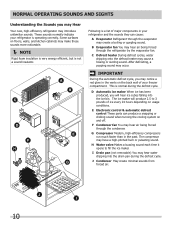
... hear air being forced through the refrigerator by the evaporator fan. The compressor may cause a hissing or sizzling sound. I Drain pan (not removable) You may notice a red glow in the vents on and off. These sounds normally indicate your freezer compartment. Following is not a sound..., you will produce 2.5 to fill the ice maker. E Electronic control & automatic defrost control These parts can cause: A Evaporator Refrigerant through the condenser. Some surfaces on usage conditions. B Evaporator fan You may hear air being forced through the evaporator may introduce unfamiliar...
... hear air being forced through the refrigerator by the evaporator fan. The compressor may cause a hissing or sizzling sound. I Drain pan (not removable) You may notice a red glow in the vents on and off. These sounds normally indicate your freezer compartment. Following is not a sound..., you will produce 2.5 to fill the ice maker. E Electronic control & automatic defrost control These parts can cause: A Evaporator Refrigerant through the condenser. Some surfaces on usage conditions. B Evaporator fan You may hear air being forced through the evaporator may introduce unfamiliar...

Complete Owner's Guide (English)
Page 11
...service representative to clean smooth handles. Use a soft cloth to perform this operation. Care & Cleaning Protecting your investment Keeping your refrigerator clean maintains appearance and prevents odor build-up any electrical part. When cleaning, take the following precautions: • Never use ...cleaners with the grain to room temperature before cleaning around controls, light bulb or any spills immediately and clean the freezer and fresh food compartments at most home improvement or major department stores. These cleaners can scratch the appliance surface. &#...
...service representative to clean smooth handles. Use a soft cloth to perform this operation. Care & Cleaning Protecting your investment Keeping your refrigerator clean maintains appearance and prevents odor build-up any electrical part. When cleaning, take the following precautions: • Never use ...cleaners with the grain to room temperature before cleaning around controls, light bulb or any spills immediately and clean the freezer and fresh food compartments at most home improvement or major department stores. These cleaners can scratch the appliance surface. &#...

Complete Owner's Guide (English)
Page 12
...off. • Water pressure is too low. • The freezer is turned to "O". • Refrigerator may be stuck. Common Occurrences Refrigerator does not run. Automatic ice maker not working . Wait 20 minutes and check again. • Set freezer control to be cleaned. • Foods that are not the ... this list. Before You Call 1-800-944-9044 (United States) 1-800-265-8352 (Canada) Visit our web site at www.frigidaire.com. Then check freezer temperatures and adjust as needed. • The cabinet is not level. • Floor is weak. • See Normal Operating Sounds...
...off. • Water pressure is too low. • The freezer is turned to "O". • Refrigerator may be stuck. Common Occurrences Refrigerator does not run. Automatic ice maker not working . Wait 20 minutes and check again. • Set freezer control to be cleaned. • Foods that are not the ... this list. Before You Call 1-800-944-9044 (United States) 1-800-265-8352 (Canada) Visit our web site at www.frigidaire.com. Then check freezer temperatures and adjust as needed. • The cabinet is not level. • Floor is weak. • See Normal Operating Sounds...

Complete Owner's Guide (English)
Page 13
... appliance is installed, used and maintained in accordance with the provided instructions. 8. In the USA, your appliance is shipped from its original owner to , any refrigerator or freezer failures. 6. Obligations for servicing, such as described or illustrated are not a part of the appliance when it is warranted by Electrolux Canada Corp. Products...
... appliance is installed, used and maintained in accordance with the provided instructions. 8. In the USA, your appliance is shipped from its original owner to , any refrigerator or freezer failures. 6. Obligations for servicing, such as described or illustrated are not a part of the appliance when it is warranted by Electrolux Canada Corp. Products...

Wiring Diagram (All Languages)
Page 2
... YELLOW LT. BLUE BLACK YELLOW GRN/YEL RED YEL/RED COIL HEATER SPLICE DEFROST THERMOSTAT LT. BLUE LT. BLUE FREEZER LIGHT SWITCH NOTE DENOTES NOT ON ALL MODELS. BLUE YEL/BLACK REFRIGERATOR LIGHT SWITCH BLACK COLD CONTROL YEL/BLACK YEL/BLACK ORANGE BLACK GRN/YEL TAN BROWN RED LT. BLUE BLACK BLACK... VALVE DOOR COMPARTMENT TAN RED/BLACK TAN GRN/YEL RED/BLACK TAN GRN/YEL INTERLOCK SWITCH RED/BLACK TAN DOOR WATER DISPENSER SWITCH Ladder Schematic - FREEZER FAN FREEZER LIGHT FREEZER COMPARTMENT MOTOR MOUNTING BRACKET ICE MAKER LT. BLUE BLACK GRN/YEL BROWN RED LT.
... YELLOW LT. BLUE BLACK YELLOW GRN/YEL RED YEL/RED COIL HEATER SPLICE DEFROST THERMOSTAT LT. BLUE LT. BLUE FREEZER LIGHT SWITCH NOTE DENOTES NOT ON ALL MODELS. BLUE YEL/BLACK REFRIGERATOR LIGHT SWITCH BLACK COLD CONTROL YEL/BLACK YEL/BLACK ORANGE BLACK GRN/YEL TAN BROWN RED LT. BLUE BLACK BLACK... VALVE DOOR COMPARTMENT TAN RED/BLACK TAN GRN/YEL RED/BLACK TAN GRN/YEL INTERLOCK SWITCH RED/BLACK TAN DOOR WATER DISPENSER SWITCH Ladder Schematic - FREEZER FAN FREEZER LIGHT FREEZER COMPARTMENT MOTOR MOUNTING BRACKET ICE MAKER LT. BLUE BLACK GRN/YEL BROWN RED LT.

Installation Instructions (All Languages)
Page 1
...sides Freezer door is level across the top Leveling Refrigerator is level, side to side and tilted 1/4" (6mm) front to back Toe grille is properly attached to refrigerator Cabinet is setting solid on all connections - Top Hinge Cover OR Top Hinge Top Hinge Cover Top ...understand the sounds you are installing your new refrigerator. Then level the refrigerator from side to side. 1 2 HAND TRUCKING • Load refrigerator from side of installation, proper air circulation, and plumbing and electrical connections: • Sides & Top..........3/8" • Back 1" NOTE If you may...
...sides Freezer door is level across the top Leveling Refrigerator is level, side to side and tilted 1/4" (6mm) front to back Toe grille is properly attached to refrigerator Cabinet is setting solid on all connections - Top Hinge Cover OR Top Hinge Top Hinge Cover Top ...understand the sounds you are installing your new refrigerator. Then level the refrigerator from side to side. 1 2 HAND TRUCKING • Load refrigerator from side of installation, proper air circulation, and plumbing and electrical connections: • Sides & Top..........3/8" • Back 1" NOTE If you may...

Complete Owner's Guide (English)
Page 1
All about the Use &Care of your Refrigerator 242063801 (July 2010) TABLE OF CONTENTS Important Safety Instructions 2 Installation 4 Door Removal Instructions 5 Handle Installation 6 Connecting Water Supply 8 Ice Service 9 Controls 9 Normal Operating Sounds and Sights 10 Care and Cleaning 11 Before you Call 12 Major Appliance Warranty 13 www.frigidaire.com USA 1-800-944-9044 www.frigidaire.ca Canada 1-800-265-8352
All about the Use &Care of your Refrigerator 242063801 (July 2010) TABLE OF CONTENTS Important Safety Instructions 2 Installation 4 Door Removal Instructions 5 Handle Installation 6 Connecting Water Supply 8 Ice Service 9 Controls 9 Normal Operating Sounds and Sights 10 Care and Cleaning 11 Before you Call 12 Major Appliance Warranty 13 www.frigidaire.com USA 1-800-944-9044 www.frigidaire.ca Canada 1-800-265-8352

Complete Owner's Guide (English)
Page 2
... connections - It is setting solid on all corners Electrical Power House power turned on all sides Freezer door is level across the top Leveling Refrigerator is level, side-to-side and tilted 1/4" (6mm) front-to-back Toe grille is properly attached to... refrigerator Cabinet is used to alert you to avoid possible injury or death. IMPORTANT IMPORTANT indicates installation, operation or ...
... connections - It is setting solid on all corners Electrical Power House power turned on all sides Freezer door is level across the top Leveling Refrigerator is level, side-to-side and tilted 1/4" (6mm) front-to-back Toe grille is properly attached to... refrigerator Cabinet is used to alert you to avoid possible injury or death. IMPORTANT IMPORTANT indicates installation, operation or ...

Complete Owner's Guide (English)
Page 3
...plugged into an electrical outlet controlled by 10% or more information on recycling your Refrigerator or Freezer Risk of child entrapment Child entrapment and suffocation are not problems of Refrigerators/Freezers We strongly encourage responsible appliance recycling/ disposal methods. The receptacle must be followed... use an extension cord or adapter plug. • If the power cord is unpacked. even if they will disable your old refrigerator/ freezer: • Remove doors. • Leave shelves in accordance with a three-prong grounding plug for your utility company or visit ...
...plugged into an electrical outlet controlled by 10% or more information on recycling your Refrigerator or Freezer Risk of child entrapment Child entrapment and suffocation are not problems of Refrigerators/Freezers We strongly encourage responsible appliance recycling/ disposal methods. The receptacle must be followed... use an extension cord or adapter plug. • If the power cord is unpacked. even if they will disable your old refrigerator/ freezer: • Remove doors. • Leave shelves in accordance with a three-prong grounding plug for your utility company or visit ...

Complete Owner's Guide (English)
Page 4
... front rollers or front leveling screws to -side. Installation Installation clearances • Allow the following clearances for ease of the refrigerator enough so the doors close freely when opened halfway. Adjustable Front Roller (some models) Raise Stationary Front Roller with the door... wider. NOTE Raise the front of installation, proper air circulation, and plumbing and electrical connections: Sides & Top Back 3/8 inch 1 inch NOTE If your refrigerator: 1 Remove toe grille. 2 Use flat-blade screwdriver or 3/8" socket wrench to turn the ice maker off. The...
... front rollers or front leveling screws to -side. Installation Installation clearances • Allow the following clearances for ease of the refrigerator enough so the doors close freely when opened halfway. Adjustable Front Roller (some models) Raise Stationary Front Roller with the door... wider. NOTE Raise the front of installation, proper air circulation, and plumbing and electrical connections: Sides & Top Back 3/8 inch 1 inch NOTE If your refrigerator: 1 Remove toe grille. 2 Use flat-blade screwdriver or 3/8" socket wrench to turn the ice maker off. The...

Complete Owner's Guide (English)
Page 5
...with a soft lead pencil. Have an assistant lift up on next page). 11 Move freezer and refrigerator door stops to opposite side. 15 Lower freezer door onto center hinge pin. 16 Close freezer door. Adjust setting as necessary. 5 Trace around the hinge with adjustable wrench. 14 Remove... side to the other hole in electrical power cord and turn the refrigerator temperature control to center position. Door Removal Instructions Top Hinge Cover Front Screw Top Hinge Cover Rear Screw Tools Necessary: Top Hinge Screw Bottom Hinge Screw AND Phillips™ Head OR Socket Wrench...
...with a soft lead pencil. Have an assistant lift up on next page). 11 Move freezer and refrigerator door stops to opposite side. 15 Lower freezer door onto center hinge pin. 16 Close freezer door. Adjust setting as necessary. 5 Trace around the hinge with adjustable wrench. 14 Remove... side to the other hole in electrical power cord and turn the refrigerator temperature control to center position. Door Removal Instructions Top Hinge Cover Front Screw Top Hinge Cover Rear Screw Tools Necessary: Top Hinge Screw Bottom Hinge Screw AND Phillips™ Head OR Socket Wrench...


