

Complete Owner's Guide
Page 2
...indicates a potentially hazardous situation which, if not avoided, could result in Ice Maker House water supply connected to refrigerator No water leaks present at all safety messages that follow the instructions below to potential personal injury hazards. Proper Disposal... connections - CAUTION CAUTION indicates a potentially hazardous situation which, if not avoided, may result in contact with filter housing (select models) DANGER indicates an imminently hazardous situation which is turned ON Ice & water dispenser operates correctly Front filter ...
...indicates a potentially hazardous situation which, if not avoided, could result in Ice Maker House water supply connected to refrigerator No water leaks present at all safety messages that follow the instructions below to potential personal injury hazards. Proper Disposal... connections - CAUTION CAUTION indicates a potentially hazardous situation which, if not avoided, may result in contact with filter housing (select models) DANGER indicates an imminently hazardous situation which is turned ON Ice & water dispenser operates correctly Front filter ...
Complete Owner's Guide
Page 4
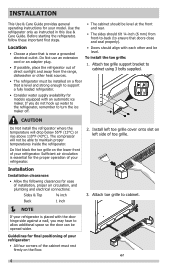
... circulation is near a grounded electrical outlet. Guidelines for final positioning of your model. Attach toe grille to maintain proper temperatures inside the refrigerator. If you may have to allow additional space so the door can be able to cabinet. Use the refrigerator only as instructed in this Use & Care Guide. Location • Choose...
... circulation is near a grounded electrical outlet. Guidelines for final positioning of your model. Attach toe grille to maintain proper temperatures inside the refrigerator. If you may have to allow additional space so the door can be able to cabinet. Use the refrigerator only as instructed in this Use & Care Guide. Location • Choose...
Complete Owner's Guide
Page 5
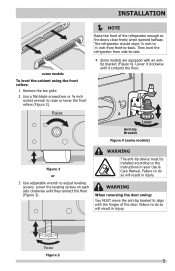
... (Figure 4). Failure to do so will result in injury. Raise Figure 3 5 The refrigerator should slope ¼ inch to ½ inch from side-to-side. 4 Some models are equipped with the hinges of the refrigerator enough so the doors close freely when opened halfway. Raise NOTE Raise the front... be installed according to the instructions in injury. Failure to do so will result in your Use & Care Manual. Then level the refrigerator from front-to-back. Lower it contacts the floor. Lower the leveling screws on each side clockwise until it clockwise until they contact ...
... (Figure 4). Failure to do so will result in injury. Raise Figure 3 5 The refrigerator should slope ¼ inch to ½ inch from side-to-side. 4 Some models are equipped with the hinges of the refrigerator enough so the doors close freely when opened halfway. Raise NOTE Raise the front... be installed according to the instructions in injury. Failure to do so will result in your Use & Care Manual. Then level the refrigerator from front-to-back. Lower it contacts the floor. Lower the leveling screws on each side clockwise until it clockwise until they contact ...
Complete Owner's Guide
Page 7
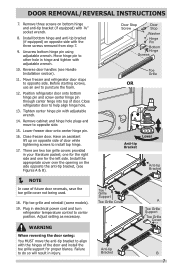
... When reversing the door swing: You MUST move to center position. Failure to align with the three screws removed from step 7. 9. Position refrigerator door onto bottom hinge pin and screw center hinge pin through center hinge into top of the door and install the toe grille support for...left side. Lower freezer door onto center hinge pin. 16. Flip toe grille and reinstall (some models). 19. There are two toe grille covers provided in electrical power cord and turn refrigerator temperature control to opposite side. 15. Door Stop Screw Door Stop Washer Hinge Pin Bottom Hinge Screws...
... When reversing the door swing: You MUST move to center position. Failure to align with the three screws removed from step 7. 9. Position refrigerator door onto bottom hinge pin and screw center hinge pin through center hinge into top of the door and install the toe grille support for...left side. Lower freezer door onto center hinge pin. 16. Flip toe grille and reinstall (some models). 19. There are two toe grille covers provided in electrical power cord and turn refrigerator temperature control to opposite side. 15. Door Stop Screw Door Stop Washer Hinge Pin Bottom Hinge Screws...

Complete Owner's Guide
Page 8
...Handle Stainless Steel Models Screw Handle Shoulder Screw Handle Shoulder Screw Button Plug Set Screw To attach metal freezer handle: 1. Do not tighten the set screw yet. 2. IMPORTANT To ensure proper installation of handles, please review these handles. Shoulder Screw Nameplate Set Screw To attach metal refrigerator handle: 1. ... door handles, make sure the door swing is flush with the two holes in bottom of the handles may be sharp. 3. Your model will have either a right hand or left hand door swing. Follow instructions in top of door. Tighten the set screw on face of...
...Handle Stainless Steel Models Screw Handle Shoulder Screw Handle Shoulder Screw Button Plug Set Screw To attach metal freezer handle: 1. Do not tighten the set screw yet. 2. IMPORTANT To ensure proper installation of handles, please review these handles. Shoulder Screw Nameplate Set Screw To attach metal refrigerator handle: 1. ... door handles, make sure the door swing is flush with the two holes in bottom of the handles may be sharp. 3. Your model will have either a right hand or left hand door swing. Follow instructions in top of door. Tighten the set screw on face of...
Complete Owner's Guide
Page 12
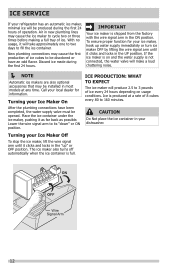
... OFF position. The ice maker also turns off automatically when the ice container is shipped from the factory with the wire signal arm in most models at a rate of 8 cubes every 80 to 160 minutes. ICE PRODUCTION: WHAT TO EXPECT The ice maker will take approximately one to two days to... immediately or turn ice maker OFF by lifting the wire signal arm until it clicks and locks in the UP position. ICE SERVICE If your refrigerator has an automatic ice maker, minimal ice will make a loud chattering noise. NOTE Automatic ice makers are also optional accessories that may cause the...
... OFF position. The ice maker also turns off automatically when the ice container is shipped from the factory with the wire signal arm in most models at a rate of 8 cubes every 80 to 160 minutes. ICE PRODUCTION: WHAT TO EXPECT The ice maker will take approximately one to two days to... immediately or turn ice maker OFF by lifting the wire signal arm until it clicks and locks in the UP position. ICE SERVICE If your refrigerator has an automatic ice maker, minimal ice will make a loud chattering noise. NOTE Automatic ice makers are also optional accessories that may cause the...
Complete Owner's Guide
Page 13
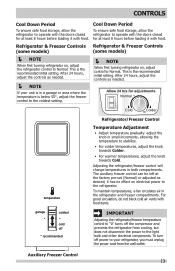
... at least 8 hours before loading it with food. To turn off the compressor and prevents the refrigerator from the wall outlet. Refrigerator & Freezer Controls Refrigerator & Freezer Controls (some models) (some models) NOTE When first turning refrigerator on, adjust the refrigerator control to your unit is below 55°, adjust the freezer control to the coldest setting...
... at least 8 hours before loading it with food. To turn off the compressor and prevents the refrigerator from the wall outlet. Refrigerator & Freezer Controls Refrigerator & Freezer Controls (some models) (some models) NOTE When first turning refrigerator on, adjust the refrigerator control to your unit is below 55°, adjust the freezer control to the coldest setting...

Complete Owner's Guide
Page 17
...or bleach. CARE & CLEANING Part Interior & Door Liners Door Gaskets Drawers & Bins Glass Shelves Toe Grille Exterior & Handles Exterior & Handles (Stainless Steel Models Only) Replacing Light Bulbs Care & Cleaning Tips What To Use Tips and Precautions • Soap and water • Baking soda and water Use 2... Vacuum attachment • Soap and water • Non Abrasive Glass Cleaner • Soap and water • Stainless Steel Cleaners • Unplug refrigerator • Wear gloves • Remove light cover • Replace old bulb • Replace light cover • Plug in the...
...or bleach. CARE & CLEANING Part Interior & Door Liners Door Gaskets Drawers & Bins Glass Shelves Toe Grille Exterior & Handles Exterior & Handles (Stainless Steel Models Only) Replacing Light Bulbs Care & Cleaning Tips What To Use Tips and Precautions • Soap and water • Baking soda and water Use 2... Vacuum attachment • Soap and water • Non Abrasive Glass Cleaner • Soap and water • Stainless Steel Cleaners • Unplug refrigerator • Wear gloves • Remove light cover • Replace old bulb • Replace light cover • Plug in the...
Complete Owner's Guide
Page 18
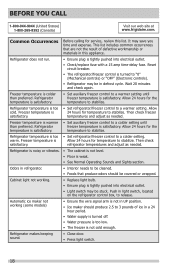
...is weak. • See Normal Operating Sounds and Sights section. warm. Refrigerator is noisy or vibrates. • The cabinet is not level. • Floor is satisfactory. Cabinet light not working (some models) • Ensure the wire signal arm is turned to stabilize. Allow ...) 1-800-265-8352 (Canada) Visit our web site at www.frigidaire.com. temperature to "0" (Mechanical controls) or "OFF" (Electronic controls). • Refrigerator may save you time and expense. Reset circuit breaker. • The refrigerator/freezer control is not in UP position. • Ice maker should...
...is weak. • See Normal Operating Sounds and Sights section. warm. Refrigerator is noisy or vibrates. • The cabinet is not level. • Floor is satisfactory. Cabinet light not working (some models) • Ensure the wire signal arm is turned to stabilize. Allow ...) 1-800-265-8352 (Canada) Visit our web site at www.frigidaire.com. temperature to "0" (Mechanical controls) or "OFF" (Electronic controls). • Refrigerator may save you time and expense. Reset circuit breaker. • The refrigerator/freezer control is not in UP position. • Ice maker should...

Installation Instructions
Page 1
...30-100 psi. • Copper tubing with ¼-inch (6.4mm) OD. Anti-tip Bracket Figure 4 (some models) 4 Some models are installing your refrigerator without connecting it clockwise until water is clear by customer after unit is in place. Allow the following clearances for ...inch NOTE Information about 2½ turns) behind your refrigerator to a water supply, make sure the ice maker's power switch is turned Off (see illustration). 8 Coil the excess copper tubing (about cabinetry construction for your model. 7 Controls When changing controls, wait 24 hours before making ...
...30-100 psi. • Copper tubing with ¼-inch (6.4mm) OD. Anti-tip Bracket Figure 4 (some models) 4 Some models are installing your refrigerator without connecting it clockwise until water is clear by customer after unit is in place. Allow the following clearances for ...inch NOTE Information about 2½ turns) behind your refrigerator to a water supply, make sure the ice maker's power switch is turned Off (see illustration). 8 Coil the excess copper tubing (about cabinetry construction for your model. 7 Controls When changing controls, wait 24 hours before making ...
Energy Guide
Page 1
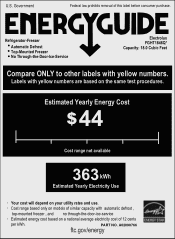
A02090766 ftc.gov/energy Refrigerator-Freezer Automatic Defrost Top-Mounted Freezer No Through-the-Door-Ice-Service Electrolux FGHT1846Q* Capacity: 18.0 Cubic Feet Compare ONLY to other labels with yellow numbers are based on the same test procedures. U.S. Labels with yellow numbers. l Cost range based only on models of similar capacity with automatic...
A02090766 ftc.gov/energy Refrigerator-Freezer Automatic Defrost Top-Mounted Freezer No Through-the-Door-Ice-Service Electrolux FGHT1846Q* Capacity: 18.0 Cubic Feet Compare ONLY to other labels with yellow numbers are based on the same test procedures. U.S. Labels with yellow numbers. l Cost range based only on models of similar capacity with automatic...


