
Complete Owner's Guide
Page 1
All about the Use &Care of your Refrigerator 807876504 (April 2014) TABLE OF CONTENTS Important Safety Instructions 2 Controls 13 Installation 4 Normal Operating Sounds and Sights..........15 Door Removal/Reversal Instructions 6 Care and Cleaning 16 Handle Installation 8 Before you Call 18 Connecting Water Supply 10 Major Appliance Warranty 19 Ice Service 12 www.frigidaire.com USA 1-800-944-9044 www.frigidaire.ca Canada 1-800-265-8352
All about the Use &Care of your Refrigerator 807876504 (April 2014) TABLE OF CONTENTS Important Safety Instructions 2 Controls 13 Installation 4 Normal Operating Sounds and Sights..........15 Door Removal/Reversal Instructions 6 Care and Cleaning 16 Handle Installation 8 Before you Call 18 Connecting Water Supply 10 Major Appliance Warranty 19 Ice Service 12 www.frigidaire.com USA 1-800-944-9044 www.frigidaire.ca Canada 1-800-265-8352

Complete Owner's Guide
Page 2
... sides Freezer door is level across the top Leveling Refrigerator is level, side-to-side and tilted ¼" (6mm) front-to-back Toe grille is important but not hazard-related. Risk of automatic ice maker. • Remove all instructions before using this symbol to refrigerator Cabinet is setting solid on all corners Electrical Power House power turned on Refrigerator plugged in contact with...
... sides Freezer door is level across the top Leveling Refrigerator is level, side-to-side and tilted ¼" (6mm) front-to-back Toe grille is important but not hazard-related. Risk of automatic ice maker. • Remove all instructions before using this symbol to refrigerator Cabinet is setting solid on all corners Electrical Power House power turned on Refrigerator plugged in contact with...
Complete Owner's Guide
Page 3
...., 15 Amp, AC only electrical outlet. Avoid connecting refrigerator to avoid electrical shock. • Performance may not easily climb inside. • Have refrigerant removed by 10% or more information on the power cord. Do not use an extension cord or adapter plug. • If the power cord is not covered under your warranty. • Do not plug the unit into an electrical outlet controlled by a wall switch or...
...., 15 Amp, AC only electrical outlet. Avoid connecting refrigerator to avoid electrical shock. • Performance may not easily climb inside. • Have refrigerant removed by 10% or more information on the power cord. Do not use an extension cord or adapter plug. • If the power cord is not covered under your warranty. • Do not plug the unit into an electrical outlet controlled by a wall switch or...
Complete Owner's Guide
Page 4
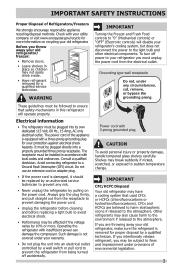
... model. CAUTION Do Not install the refrigerator where the temperature will not be installed on left side of installation, proper air circulation, and plumbing and electrical connections: Sides & Top ⅜ inch Back 1 inch NOTE If your refrigerator. Use the refrigerator only as instructed in this Use & Care Guide. Attach toe grille support bracket to support a fully loaded refrigerator. • Consider water supply availability for models equipped with an automatic ice maker. Sufficient air circulation is level...
... model. CAUTION Do Not install the refrigerator where the temperature will not be installed on left side of installation, proper air circulation, and plumbing and electrical connections: Sides & Top ⅜ inch Back 1 inch NOTE If your refrigerator. Use the refrigerator only as instructed in this Use & Care Guide. Attach toe grille support bracket to support a fully loaded refrigerator. • Consider water supply availability for models equipped with an automatic ice maker. Sufficient air circulation is level...
Complete Owner's Guide
Page 5
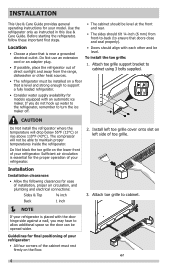
... clockwise until it contacts the floor. The refrigerator should slope ¼ inch to ½ inch from side-to-side. 4 Some models are equipped with the hinges of the refrigerator enough so the doors close freely when opened halfway. INSTALLATION some models) Figure 2 or 3 Use adjustable wrench to adjust leveling screws. Then level the refrigerator from front-to the instructions in injury. Raise NOTE Raise...
... clockwise until it contacts the floor. The refrigerator should slope ¼ inch to ½ inch from side-to-side. 4 Some models are equipped with the hinges of the refrigerator enough so the doors close freely when opened halfway. INSTALLATION some models) Figure 2 or 3 Use adjustable wrench to adjust leveling screws. Then level the refrigerator from front-to the instructions in injury. Raise NOTE Raise...

Complete Owner's Guide
Page 6
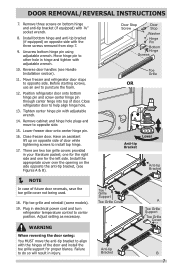
... controls) and remove the electrical power cord from one side to the other. Remove top hinge cover. Remove top hinge and lift door off of refrigerator, remove inside screw and loosening two outside screws on hinge pin. 4. Set door aside. Top Hinge Cover Top Hinge 3. Door Stop Screw Door Stop Washer Shim Hinge Pin Center Hinge Hinge Hole Plug Screws Handle Hole Plug 6 DOOR REMOVAL/REVERSAL INSTRUCTIONS Tools Necessary: Adjustable Wrench or PhillipsTM Head Socket Wrench Set Top Hinge Cover Front Screw Top Hinge Cover Rear Screw or 3/8" Fixed Wrench...
... controls) and remove the electrical power cord from one side to the other. Remove top hinge cover. Remove top hinge and lift door off of refrigerator, remove inside screw and loosening two outside screws on hinge pin. 4. Set door aside. Top Hinge Cover Top Hinge 3. Door Stop Screw Door Stop Washer Shim Hinge Pin Center Hinge Hinge Hole Plug Screws Handle Hole Plug 6 DOOR REMOVAL/REVERSAL INSTRUCTIONS Tools Necessary: Adjustable Wrench or PhillipsTM Head Socket Wrench Set Top Hinge Cover Front Screw Top Hinge Cover Rear Screw or 3/8" Fixed Wrench...
Complete Owner's Guide
Page 7
... 7. 9. DOOR REMOVAL/REVERSAL INSTRUCTIONS 7. Install bottom hinge and anti-tip bracket (if equipped) on opposite side of door. Unscrew bottom hinge pin using adjustable wrench. Reverse door handles (see Figures A & B). NOTE In case of the door and install the toe grille support for the left side. Move freezer and refrigerator door stops to puncture the foam. 12. Before starting screws, use an awl to opposite side. Close refrigerator door to install top hinge. 17. Lower freezer door...
... 7. 9. DOOR REMOVAL/REVERSAL INSTRUCTIONS 7. Install bottom hinge and anti-tip bracket (if equipped) on opposite side of door. Unscrew bottom hinge pin using adjustable wrench. Reverse door handles (see Figures A & B). NOTE In case of the door and install the toe grille support for the left side. Move freezer and refrigerator door stops to puncture the foam. 12. Before starting screws, use an awl to opposite side. Close refrigerator door to install top hinge. 17. Lower freezer door...

Complete Owner's Guide
Page 8
... instructions in the Use & Care Guide to installing the handles. Tighten the set screw on face of door and align the two holes in top of handles, please review these handles. The rounded end of door. Screw Screw Handle Stainless Steel Models Screw Handle Shoulder Screw Handle Shoulder Screw Button Plug Set Screw To attach metal freezer handle: 1. HANDLE INSTALLATION CAUTION Wear gloves and use extreme CAUTION when installing these instructions and illustrations thoroughly prior to reverse the doors...
... instructions in the Use & Care Guide to installing the handles. Tighten the set screw on face of door and align the two holes in top of handles, please review these handles. The rounded end of door. Screw Screw Handle Stainless Steel Models Screw Handle Shoulder Screw Handle Shoulder Screw Button Plug Set Screw To attach metal freezer handle: 1. HANDLE INSTALLATION CAUTION Wear gloves and use extreme CAUTION when installing these instructions and illustrations thoroughly prior to reverse the doors...
Complete Owner's Guide
Page 10
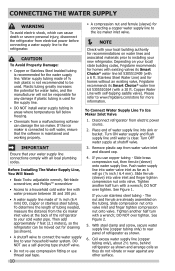
... Water Supply Line, You Will Need: • Basic Tools: adjustable wrench, flat-blade screwdriver, and PhillipsTM screwdriver • Access to soft water, ensure that your water supply line connections comply with all local plumbing codes. Depending on your local/ state building codes, Frigidaire recommends for more information. Please refer to installing your new refrigerator. If you use stainless steel tubing - DO NOT over tighten. If the ice maker is maintained and working...
... Water Supply Line, You Will Need: • Basic Tools: adjustable wrench, flat-blade screwdriver, and PhillipsTM screwdriver • Access to soft water, ensure that your water supply line connections comply with all local plumbing codes. Depending on your local/ state building codes, Frigidaire recommends for more information. Please refer to installing your new refrigerator. If you use stainless steel tubing - DO NOT over tighten. If the ice maker is maintained and working...
Complete Owner's Guide
Page 11
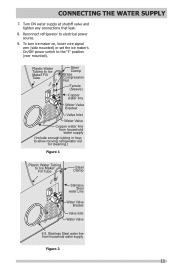
Turn ON water supply at shutoff valve and tighten any connections that leak. 8. Plastic Water Tubing to Ice Maker Fill Tube Steel Clamp Stainless Steel water Line Water Valve Bracket Valve Inlet Water Valve 6 ft. Reconnect refrigerator to the "I" position (rear mounted). To turn ice maker on, lower wire signal arm (side mounted) or set the ice maker's On/Off power switch to electrical power source. 9. Stainless Steel water line from household water supply (Include enough tubing in loop to allow moving refrigerator out for cleaning.) Figure 1 Plastic Water Tubing to Ice Maker...
Turn ON water supply at shutoff valve and tighten any connections that leak. 8. Plastic Water Tubing to Ice Maker Fill Tube Steel Clamp Stainless Steel water Line Water Valve Bracket Valve Inlet Water Valve 6 ft. Reconnect refrigerator to the "I" position (rear mounted). To turn ice maker on, lower wire signal arm (side mounted) or set the ice maker's On/Off power switch to electrical power source. 9. Stainless Steel water line from household water supply (Include enough tubing in loop to allow moving refrigerator out for cleaning.) Figure 1 Plastic Water Tubing to Ice Maker...
Complete Owner's Guide
Page 12
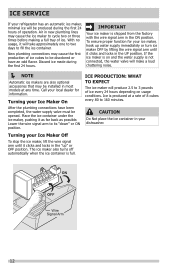
... Ice Maker Off To stop the ice maker, lift the wire signal arm until it clicks and locks in your ice maker, hook up " or OFF position. If the ice maker is not connected, the water valve will take approximately one to two days to 160 minutes. Turning your refrigerator has an automatic ice maker, minimal ice will produce 2.5 to be discolored or have been completed, the water supply valve must be installed...
... Ice Maker Off To stop the ice maker, lift the wire signal arm until it clicks and locks in your ice maker, hook up " or OFF position. If the ice maker is not connected, the water valve will take approximately one to two days to 160 minutes. Turning your refrigerator has an automatic ice maker, minimal ice will produce 2.5 to be discolored or have been completed, the water supply valve must be installed...
Complete Owner's Guide
Page 13
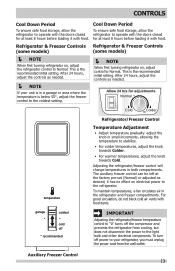
... refrigerator on , adjust control to Normal. To maintain temperatures, a fan circulates air in both compartments. For good circulation, do not block cold air vents with food items. garage coldest cold off * recommended IMPORTANT Adjusting the refrigerator/freezer temperature control to "0" turns off power to the refrigerator. Adjusting the refrigerator/freezer control will change temperatures in the refrigerator and freezer compartments. After 24 hours, adjust the controls as needed . NOTE If your refrigerator, you must unplug the power cord from cooling...
... refrigerator on , adjust control to Normal. To maintain temperatures, a fan circulates air in both compartments. For good circulation, do not block cold air vents with food items. garage coldest cold off * recommended IMPORTANT Adjusting the refrigerator/freezer temperature control to "0" turns off power to the refrigerator. Adjusting the refrigerator/freezer control will change temperatures in the refrigerator and freezer compartments. After 24 hours, adjust the controls as needed . NOTE If your refrigerator, you must unplug the power cord from cooling...
Complete Owner's Guide
Page 15
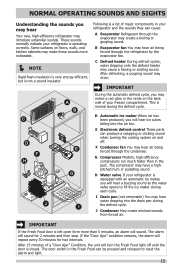
... and then stop. The alarm will turn the Fresh Food light off . A B C D E F H G J I Drain pan (not removable) You may create a boiling or gurgling sound. C Defrost heater During defrost cycles, water dripping onto the defrost heater may introduce unfamiliar sounds. If the "Door Ajar" condition remains, the alarm will hear a buzzing sound as the water valve opens to reset the alarm and light. 15 These sounds normally indicate your refrigerator is a list of a "Door Ajar" Condition...
... and then stop. The alarm will turn the Fresh Food light off . A B C D E F H G J I Drain pan (not removable) You may create a boiling or gurgling sound. C Defrost heater During defrost cycles, water dripping onto the defrost heater may introduce unfamiliar sounds. If the "Door Ajar" condition remains, the alarm will hear a buzzing sound as the water valve opens to reset the alarm and light. 15 These sounds normally indicate your refrigerator is a list of a "Door Ajar" Condition...
Complete Owner's Guide
Page 16
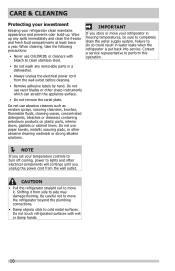
... perform this operation. NOTE If you set your temperature controls to turn off cooling, power to lights and other electrical components will continue until you store or move your refrigerator clean maintains appearance and prevents odor build-up any removable parts in water leaks when the refrigerator is put back into service. Failure to clean stainless steel. • Do not wash any spills immediately and clean the freezer and fresh...
... perform this operation. NOTE If you set your temperature controls to turn off cooling, power to lights and other electrical components will continue until you store or move your refrigerator clean maintains appearance and prevents odor build-up any removable parts in water leaks when the refrigerator is put back into service. Failure to clean stainless steel. • Do not wash any spills immediately and clean the freezer and fresh...

Complete Owner's Guide
Page 17
... doors. CARE & CLEANING Part Interior & Door Liners Door Gaskets Drawers & Bins Glass Shelves Toe Grille Exterior & Handles Exterior & Handles (Stainless Steel Models Only) Replacing Light Bulbs Care & Cleaning Tips What To Use Tips and Precautions • Soap and water • Baking soda and water Use 2 tablespoons of baking soda in 1 quart of the cabinet with warm water and mild liquid detergent. Use a soft cloth to avoid getting cut. Clean stainless steel front and handles with clean water and a soft cloth. Always follow manufacturer's instructions. Never use...
... doors. CARE & CLEANING Part Interior & Door Liners Door Gaskets Drawers & Bins Glass Shelves Toe Grille Exterior & Handles Exterior & Handles (Stainless Steel Models Only) Replacing Light Bulbs Care & Cleaning Tips What To Use Tips and Precautions • Soap and water • Baking soda and water Use 2 tablespoons of baking soda in 1 quart of the cabinet with warm water and mild liquid detergent. Use a soft cloth to avoid getting cut. Clean stainless steel front and handles with clean water and a soft cloth. Always follow manufacturer's instructions. Never use...
Complete Owner's Guide
Page 18
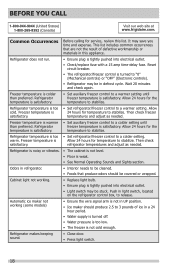
...; Light switch may be covered or wrapped. temperature to "0" (Mechanical controls) or "OFF" (Electronic controls). • Refrigerator may save you time and expense. Refrigerator does not run. • Ensure plug is 24 hours for service, review this appliance. Allow cold. Then check satisfactory. refrigerator temperatures and adjust as needed . Odors in this list. Reset circuit breaker. • The refrigerator/freezer control is tightly pushed into electrical outlet. • Check/replace fuse with a 15 amp time...
...; Light switch may be covered or wrapped. temperature to "0" (Mechanical controls) or "OFF" (Electronic controls). • Refrigerator may save you time and expense. Refrigerator does not run. • Ensure plug is 24 hours for service, review this appliance. Allow cold. Then check satisfactory. refrigerator temperatures and adjust as needed . Odors in this list. Reset circuit breaker. • The refrigerator/freezer control is tightly pushed into electrical outlet. • Check/replace fuse with a 15 amp time...
Complete Owner's Guide
Page 19
... its original owner to any after hour, weekend, or holiday service calls, tolls, ferry trip charges, or mileage expense for service and parts under this warranty must be defective in materials or workmanship when such appliance is installed, used other than in your original date of Alaska. 12. For one year limited warranty. Service calls to repair or replace appliance light bulbs, air filters, water filters, other...
... its original owner to any after hour, weekend, or holiday service calls, tolls, ferry trip charges, or mileage expense for service and parts under this warranty must be defective in materials or workmanship when such appliance is installed, used other than in your original date of Alaska. 12. For one year limited warranty. Service calls to repair or replace appliance light bulbs, air filters, water filters, other...

Installation Instructions
Page 1
... models are secure and tight Door seals completely to cabinet on all corners Electrical Power House water supply connected to refrigerator Cabinet is turned Off (see "Door Removal Instructions" in injury. Top Hinge Cover Top Hinge Shim Pin Door Stop Screw Door Stop Washer Hinge Pin Bottom Hinge Screws Center Hinge Toe Grille 9 Installation Checkoff List Doors Ice Maker Handles are equipped with local plumbing codes. NOTE Kit #53039117950, available from which can remove this tubing...
... models are secure and tight Door seals completely to cabinet on all corners Electrical Power House water supply connected to refrigerator Cabinet is turned Off (see "Door Removal Instructions" in injury. Top Hinge Cover Top Hinge Shim Pin Door Stop Screw Door Stop Washer Hinge Pin Bottom Hinge Screws Center Hinge Toe Grille 9 Installation Checkoff List Doors Ice Maker Handles are equipped with local plumbing codes. NOTE Kit #53039117950, available from which can remove this tubing...
Wiring Diagram
Page 1
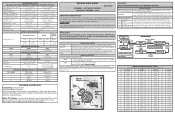
...) ICE MAKER CONNECTOR PLUG CONNECTIONS Wire Number Wire Color Connects to complete the cycle. All components of inactivity expire. IMPORTANT PLEASE RETURN THIS SHEET TO ITS ORIGINAL LOCATION. exit --> Cycle power to the defrost heater at 500°F. It will sound to acknowledge MANUAL DEFROST. Reset: Close the Fresh Food door or Press the Fresh Food Door switch. Excessive heat will complete normal defrost cycle. Test 4: Evaporator Fan ON Press Door Switch 2 Times 2 Beeps Test...
...) ICE MAKER CONNECTOR PLUG CONNECTIONS Wire Number Wire Color Connects to complete the cycle. All components of inactivity expire. IMPORTANT PLEASE RETURN THIS SHEET TO ITS ORIGINAL LOCATION. exit --> Cycle power to the defrost heater at 500°F. It will sound to acknowledge MANUAL DEFROST. Reset: Close the Fresh Food door or Press the Fresh Food Door switch. Excessive heat will complete normal defrost cycle. Test 4: Evaporator Fan ON Press Door Switch 2 Times 2 Beeps Test...
Wiring Diagram
Page 2
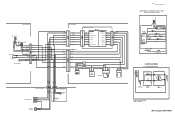
... COMPRESSOR WIRING CONDENSER FAN I /M WATER VALVE COMPRESSOR WIRING P.T.C. STARTER WITH RUN CAPACITOR START 6 S S RUN 5 C M M 3 2 L1 OVERLOAD COMR MOTOR PTC STARTER RUN CAPACITOR * CAPACITOR IS ONLY USED WITH SOME P.T.C. FREEZER COMPARTMENT EVAPORATOR FAN COIL COVER ICE MAKER RED/WHITE GRN/YEL LT. BLUE BROWN GREY/WHITE GREY/WHITE BLACK YELLOW GRN/YEL RED/WHITE LT. BLUE BROWN RED RED GREY/WHITE FRESHFOOD COMPARTMENT SLIDE POTENTIOMETER RED ORANGE GREY FRESHFOOD DOOR SWITCH...
... COMPRESSOR WIRING CONDENSER FAN I /M WATER VALVE COMPRESSOR WIRING P.T.C. STARTER WITH RUN CAPACITOR START 6 S S RUN 5 C M M 3 2 L1 OVERLOAD COMR MOTOR PTC STARTER RUN CAPACITOR * CAPACITOR IS ONLY USED WITH SOME P.T.C. FREEZER COMPARTMENT EVAPORATOR FAN COIL COVER ICE MAKER RED/WHITE GRN/YEL LT. BLUE BROWN GREY/WHITE GREY/WHITE BLACK YELLOW GRN/YEL RED/WHITE LT. BLUE BROWN RED RED GREY/WHITE FRESHFOOD COMPARTMENT SLIDE POTENTIOMETER RED ORANGE GREY FRESHFOOD DOOR SWITCH...


