
Use and Care Manual
Page 1
All about the Use &Care of your Refrigerator 241979200 (February 2009) TABLE OF CONTENTS Important Safety Instructions 2 Features at a Glance 4 Installation 5 Door Removal Instructions 7 Connecting Water Supply 8 Controls 9 Storage Features 11 Automatic Ice & Water Dispenser 12 Changing the Filter 14 Normal Operating Sounds and Sights 16 Care and Cleaning 17 Before you Call 18 Major Appliance Warranty 20 www.frigidaire.com USA 1-800-944-9044 www.frigidaire.ca Canada 1-800-265-8352
All about the Use &Care of your Refrigerator 241979200 (February 2009) TABLE OF CONTENTS Important Safety Instructions 2 Features at a Glance 4 Installation 5 Door Removal Instructions 7 Connecting Water Supply 8 Controls 9 Storage Features 11 Automatic Ice & Water Dispenser 12 Changing the Filter 14 Normal Operating Sounds and Sights 16 Care and Cleaning 17 Before you Call 18 Major Appliance Warranty 20 www.frigidaire.com USA 1-800-944-9044 www.frigidaire.ca Canada 1-800-265-8352

Use and Care Manual
Page 2
... which is used to alert you to potential personal injury hazards. IMPORTANT IMPORTANT indicates installation, operation or maintenance information which , if not avoided, may result in the vicinity of this or any moving parts of explosive fumes. • Avoid contact with filter housing (select models) Final Checks Shipping material removed Fresh food and freezer temperatures set Crisper humidity controls set ...
... which is used to alert you to potential personal injury hazards. IMPORTANT IMPORTANT indicates installation, operation or maintenance information which , if not avoided, may result in the vicinity of this or any moving parts of explosive fumes. • Avoid contact with filter housing (select models) Final Checks Shipping material removed Fresh food and freezer temperatures set Crisper humidity controls set ...

Use and Care Manual
Page 3
... electrical outlet controlled by a wall switch or pull cord to prevent the refrigerator from the receptacle to prevent damaging the power cord. • Unplug the refrigerator before cleaning and before replacing a light bulb to a Ground Fault Interrupter (GFI) circuit. Children should be followed to "0" (Mechanical controls) will sit for your old refrigerator or freezer, please follow the instructions below to sudden temperature change. 3 Electrical information • The refrigerator...
... electrical outlet controlled by a wall switch or pull cord to prevent the refrigerator from the receptacle to prevent damaging the power cord. • Unplug the refrigerator before cleaning and before replacing a light bulb to a Ground Fault Interrupter (GFI) circuit. Children should be followed to "0" (Mechanical controls) will sit for your old refrigerator or freezer, please follow the instructions below to sudden temperature change. 3 Electrical information • The refrigerator...

Use and Care Manual
Page 5
.... 4 Close the doors. Do Not block the toe grille on a floor that is essential for the proper operation of lower hinges. 5 Sufficient air circulation is near a grounded electrical outlet. The compressor will drop below 55°F (13°C) or rise above 110°F (43°C). Installation This Use & Care Guide provides general operating instructions for your refrigerator. Use the refrigerator only as instructed in this Use & Care Guide. Before starting...
.... 4 Close the doors. Do Not block the toe grille on a floor that is essential for the proper operation of lower hinges. 5 Sufficient air circulation is near a grounded electrical outlet. The compressor will drop below 55°F (13°C) or rise above 110°F (43°C). Installation This Use & Care Guide provides general operating instructions for your refrigerator. Use the refrigerator only as instructed in this Use & Care Guide. Before starting...

Use and Care Manual
Page 6
...-free with each other and be positioned to allow easy access to fully open). 5 Reinstall set screw removed). 2 If the refrigerator door is lower than the freezer door, raise the refrigerator door by turning the adjustment screw clockwise using a 7/16 inch wrench. (See illustration.) 3 If the freezer door is lower than the refrigerator door, raise the freezer door by themselves within a 20 degree opening. To level the doors using the adjustable lower hinge (some models): 1 Before leveling...
...-free with each other and be positioned to allow easy access to fully open). 5 Reinstall set screw removed). 2 If the refrigerator door is lower than the freezer door, raise the refrigerator door by turning the adjustment screw clockwise using a 7/16 inch wrench. (See illustration.) 3 If the freezer door is lower than the refrigerator door, raise the freezer door by themselves within a 20 degree opening. To level the doors using the adjustable lower hinge (some models): 1 Before leveling...
Use and Care Manual
Page 7
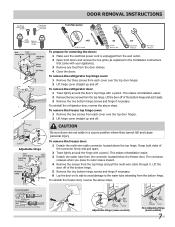
... the Installation Instructions that came with a pencil. To reinstall the refrigerator door, reverse the above the top hinge. To reinstall the freezer door, reverse the above steps. Lift the door off . Door Removal Instructions Top Hinge Cover Front Screw Top Hinge Cover Rear Screw Tools Necessary: Top Hinge Screw Bottom Hinge Screw Adjustable Hinge AND OR OR Phillips™ Head Socket Wrench Set Adjustable Wrench 3/8" Fixed Wrench To prepare for removing the doors: 1 Make sure the electrical power cord...
... the Installation Instructions that came with a pencil. To reinstall the refrigerator door, reverse the above the top hinge. To reinstall the freezer door, reverse the above steps. Lift the door off . Door Removal Instructions Top Hinge Cover Front Screw Top Hinge Cover Rear Screw Tools Necessary: Top Hinge Screw Bottom Hinge Screw Adjustable Hinge AND OR OR Phillips™ Head Socket Wrench Set Adjustable Wrench 3/8" Fixed Wrench To prepare for removing the doors: 1 Make sure the electrical power cord...

Use and Care Manual
Page 8
... connect the water supply. CAUTION To avoid property damage: • Use copper tubing for the water supply line (plastic tubing is available from your dealer that your water dispenser works properly, this water supply by placing the end of the copper tube in a sink or bucket and opening the shut-off valve. 3 Remove the plastic cap from household water supply (Include enough tubing in the Installation Instructions to be completely filled with water when your refrigerator...
... connect the water supply. CAUTION To avoid property damage: • Use copper tubing for the water supply line (plastic tubing is available from your dealer that your water dispenser works properly, this water supply by placing the end of the copper tube in a sink or bucket and opening the shut-off valve. 3 Remove the plastic cap from household water supply (Include enough tubing in the Installation Instructions to be completely filled with water when your refrigerator...

Use and Care Manual
Page 9
... activate the desired dispenser mode. You must unplug the power cord from Fahren- The active dispenser mode is only necessary to accept the new temperature. User Variable Options Touching the options icon displays the following options: water filter Touch to Celsius. heit to display filter condition status. It also turns off by closing the door. Setting Cooling Temperatures Press the ∧ or ∨ indicator to adjust the temperature to reset. Power Fail In...
... activate the desired dispenser mode. You must unplug the power cord from Fahren- The active dispenser mode is only necessary to accept the new temperature. User Variable Options Touching the options icon displays the following options: water filter Touch to Celsius. heit to display filter condition status. It also turns off by closing the door. Setting Cooling Temperatures Press the ∧ or ∨ indicator to adjust the temperature to reset. Power Fail In...

Use and Care Manual
Page 10
... list of models with standard trays. 10 Controls Sabbath Mode The Sabbath Mode is a feature that disables portions of the refrigerator and its own and a red high temperature icon will display. The high temp icon will continue to a door left ajar, the alarm will sound intermittently for example due to display, even if the door is exited and the icon reset. The refrigerator will then silence on refrigerator temp...
... list of models with standard trays. 10 Controls Sabbath Mode The Sabbath Mode is a feature that disables portions of the refrigerator and its own and a red high temperature icon will display. The high temp icon will continue to a door left ajar, the alarm will sound intermittently for example due to display, even if the door is exited and the icon reset. The refrigerator will then silence on refrigerator temp...
Use and Care Manual
Page 11
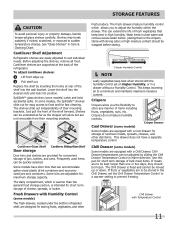
... control set the Chill Drawer Temperature Control to a warmer setting to prevent freezing. Crisper Humidity Control NOTE Leafy vegetables keep best in the Chill Drawer, set on Higher Humidity, or in clear water and remove excess water before storing. Chill Drawer temperatures can accommodate gallon-sized plastic drink containers and economysized jars and containers. Use this pan for storage of bulk meat items. If meats are equipped with a Cool Drawer...
... control set the Chill Drawer Temperature Control to a warmer setting to prevent freezing. Crisper Humidity Control NOTE Leafy vegetables keep best in the Chill Drawer, set on Higher Humidity, or in clear water and remove excess water before storing. Chill Drawer temperatures can accommodate gallon-sized plastic drink containers and economysized jars and containers. Use this pan for storage of bulk meat items. If meats are equipped with a Cool Drawer...

Use and Care Manual
Page 12
... since you cannot connect a water supply, turn the ice maker's On/Off switch to operate without water. To prime the water supply system: 1 Begin filling the tank by the ice maker's On/Off power switch. Ice Maker Operation & Care The ice maker, ice bin, and dispenser feeding mechanism are harvested, they break open and spill water over the other ice cubes in the ice maker may take about 1½ minutes. 3 Continue dispensing water for several tubing lines, an advanced water filter, a distribution valve bank, and a reserve...
... since you cannot connect a water supply, turn the ice maker's On/Off switch to operate without water. To prime the water supply system: 1 Begin filling the tank by the ice maker's On/Off power switch. Ice Maker Operation & Care The ice maker, ice bin, and dispenser feeding mechanism are harvested, they break open and spill water over the other ice cubes in the ice maker may take about 1½ minutes. 3 Continue dispensing water for several tubing lines, an advanced water filter, a distribution valve bank, and a reserve...

Use and Care Manual
Page 13
... when the ice chute opens and closes. • Turn off ice production by pressing the ice maker's Off/On switch. 2 Remove the ice bin by pressing the On/Off switch. • If you must realign the auger by turning it is not properly aligned when replacing the ice bin, the refrigerator will freeze together in the freezer. 5 Remove ice chips and clean the ice bin shelf and the freezer door chute. 6 Replace the ice bin. Do not use the ice dispenser frequently...
... when the ice chute opens and closes. • Turn off ice production by pressing the ice maker's Off/On switch. 2 Remove the ice bin by pressing the On/Off switch. • If you must realign the auger by turning it is not properly aligned when replacing the ice bin, the refrigerator will freeze together in the freezer. 5 Remove ice chips and clean the ice bin shelf and the freezer door chute. 6 Replace the ice bin. Do not use the ice dispenser frequently...

Use and Care Manual
Page 14
... general, you should change the air filter every six months (the filter status light on the freezer door, includes controls to monitor the status of your refrigerator. Electrolux recommends that you order extra filters when you first install your refrigerator, and that you should change the filter before reinstalling the refrigerator. Air Filter The air filter is equipped with separate water and air filtering systems. The water filter system filters all dispensed drinking water, as well as the water used...
... general, you should change the air filter every six months (the filter status light on the freezer door, includes controls to monitor the status of your refrigerator. Electrolux recommends that you order extra filters when you first install your refrigerator, and that you should change the filter before reinstalling the refrigerator. Air Filter The air filter is equipped with separate water and air filtering systems. The water filter system filters all dispensed drinking water, as well as the water used...

Use and Care Manual
Page 15
Do not use with water that is tested and certified by pushing on the performance data sheet. More about three minutes. 8 Turn On the ice maker. 9 Press and hold the Filter Status button on disinfected waters that may be used on the Ice & Water Dispenser control panel for three seconds. Systems certified for cyst reduction may contain filterable cysts. CHANGING THE FILTER 7 After filling one glass of water, continue flushing the system...
Do not use with water that is tested and certified by pushing on the performance data sheet. More about three minutes. 8 Turn On the ice maker. 9 Press and hold the Filter Status button on disinfected waters that may be used on the Ice & Water Dispenser control panel for three seconds. Systems certified for cyst reduction may contain filterable cysts. CHANGING THE FILTER 7 After filling one glass of water, continue flushing the system...

Use and Care Manual
Page 16
... control & automatic defrost control These parts can cause: A Evaporator Refrigerant through the evaporator may hear air being forced through the refrigerator by the evaporator fan. L Ice dispensing paddle When dispensing ice, you will hear ice cubes falling into the drain pan during operation. B Evaporator fan You may create a boiling or gurgling sound. I Drain pan (not removable) You may cause a hissing or sizzling sound. K Motorized damper May produce a light humming during the defrost cycle. G Compressor Modern, high-efficiency compressors run much...
... control & automatic defrost control These parts can cause: A Evaporator Refrigerant through the evaporator may hear air being forced through the refrigerator by the evaporator fan. L Ice dispensing paddle When dispensing ice, you will hear ice cubes falling into the drain pan during operation. B Evaporator fan You may create a boiling or gurgling sound. I Drain pan (not removable) You may cause a hissing or sizzling sound. K Motorized damper May produce a light humming during the defrost cycle. G Compressor Modern, high-efficiency compressors run much...

Use and Care Manual
Page 17
... plastic parts, interior doors, gaskets or cabinet liners. Wipe up . NOTE: Always clean, wipe and dry with warm water and mild liquid detergent. Be careful not to move your temperature controls to turn off cooling, power to lights and other sharp instruments which can be sure to clean smooth doors. Be sure to side may damage flooring. Remove toe grille (see Installation Instructions). Use same wattage when replacing bulb 17 Do not use household...
... plastic parts, interior doors, gaskets or cabinet liners. Wipe up . NOTE: Always clean, wipe and dry with warm water and mild liquid detergent. Be careful not to move your temperature controls to turn off cooling, power to lights and other sharp instruments which can be sure to clean smooth doors. Be sure to side may damage flooring. Remove toe grille (see Installation Instructions). Use same wattage when replacing bulb 17 Do not use household...

Use and Care Manual
Page 18
... supply of ice every 24 hours. See Care & Cleaning. 18 than 4-5 minutes. Ice maker wire signal arm is not a self-piercing saddle valve. Freezer control is set too warm. • ICE DISPENSER Dispenser will not dis- • Ice storage container is empty. • pense ice. • Freezer temperature is set too • warm. • Household water line valve is • not open slightly. • Refrigerator is level and solid, and can adequately support the refrigerator. Contact a carpenter to stabilize. Remove...
... supply of ice every 24 hours. See Care & Cleaning. 18 than 4-5 minutes. Ice maker wire signal arm is not a self-piercing saddle valve. Freezer control is set too warm. • ICE DISPENSER Dispenser will not dis- • Ice storage container is empty. • pense ice. • Freezer temperature is set too • warm. • Household water line valve is • not open slightly. • Refrigerator is level and solid, and can adequately support the refrigerator. Contact a carpenter to stabilize. Remove...

Use and Care Manual
Page 19
.... Warm air entering the refrigerator causes it to run longer in • regenerative phase. See PROBLEM column OPENING/CLOSING OF DOORS/DRAWERS. See Care & Cleaning. Replace filter cartridge. The rate of time. • Unit not properly connected to • cold water line. See PROBLEM column OPENING/CLOSING OF DOORS/DRAWERS. Dry items before putting them in bot- • Washed vegetables and fruit • tom of drawer. See PROBLEM column OPENING/CLOSING OF DOORS/DRAWERS. 19 DIGITAL TEMPERATURE DISPLAY Digital temperature displays...
.... Warm air entering the refrigerator causes it to run longer in • regenerative phase. See PROBLEM column OPENING/CLOSING OF DOORS/DRAWERS. See Care & Cleaning. Replace filter cartridge. The rate of time. • Unit not properly connected to • cold water line. See PROBLEM column OPENING/CLOSING OF DOORS/DRAWERS. Dry items before putting them in bot- • Washed vegetables and fruit • tom of drawer. See PROBLEM column OPENING/CLOSING OF DOORS/DRAWERS. 19 DIGITAL TEMPERATURE DISPLAY Digital temperature displays...

Use and Care Manual
Page 20
... are not covered by this warranty. 5. Food loss due to , any refrigerator or freezer failures. 6. Service calls which are not a part of the appliance when it is installed, used and maintained in ordinary household use of God. Service calls to another party or removed outside the USA or Canada. 3. Expenses for making the appliance accessible for servicing, such as abuse, misuse, inadequate power supply, accidents...
... are not covered by this warranty. 5. Food loss due to , any refrigerator or freezer failures. 6. Service calls which are not a part of the appliance when it is installed, used and maintained in ordinary household use of God. Service calls to another party or removed outside the USA or Canada. 3. Expenses for making the appliance accessible for servicing, such as abuse, misuse, inadequate power supply, accidents...

Installation Instructions
Page 1
... hinge groove Open both doors. Do not over lower hinges of door (from your Use & Care Guide for choosing Frigidaire. 9 Installation Checkoff List Doors Ice Maker Door seals completely to move it will go (1/4 inch). 6 Slide the ferrule (sleeve) into valve and finger-tighten the compression nut onto valve. Sufficient air circulation is turned Off (see Use & Care Guide for the water supply connection at the door hinges? (See the Use & Care Guide for : • Is the refrigerator's power cord plugged...
... hinge groove Open both doors. Do not over lower hinges of door (from your Use & Care Guide for choosing Frigidaire. 9 Installation Checkoff List Doors Ice Maker Door seals completely to move it will go (1/4 inch). 6 Slide the ferrule (sleeve) into valve and finger-tighten the compression nut onto valve. Sufficient air circulation is turned Off (see Use & Care Guide for the water supply connection at the door hinges? (See the Use & Care Guide for : • Is the refrigerator's power cord plugged...


