Use and Care Manual
Page 1
All about the Use &Care of your Refrigerator 242288200 (November 2012) TABLE OF CONTENTS Important Safety Instructions 2 Storage Features 15 Features at a Glance 4 Automatic Ice & Water Dispenser 17 Installation 5 Changing the Filter 20 Door Removal Instructions 7 Normal Operating Sounds and Sights..........22 Handle Installation 9 Care and Cleaning 23 Connecting Water Supply 10 Before you Call 28 Controls 12 Major Appliance Warranty 32 www.frigidaire.com USA 1-800-944-9044 www.frigidaire.ca Canada 1-800-265-8352
All about the Use &Care of your Refrigerator 242288200 (November 2012) TABLE OF CONTENTS Important Safety Instructions 2 Storage Features 15 Features at a Glance 4 Automatic Ice & Water Dispenser 17 Installation 5 Changing the Filter 20 Door Removal Instructions 7 Normal Operating Sounds and Sights..........22 Handle Installation 9 Care and Cleaning 23 Connecting Water Supply 10 Before you Call 28 Controls 12 Major Appliance Warranty 32 www.frigidaire.com USA 1-800-944-9044 www.frigidaire.ca Canada 1-800-265-8352
Use and Care Manual
Page 2
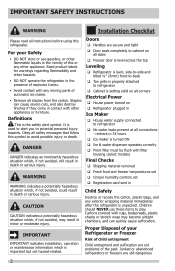
... refrigerator Cabinet is turned ON Ice & water dispenser operates correctly Front filter must be flush with rugs, bedspreads, plastic sheets or stretch wrap may result in death or serious injury. Cartons covered with filter housing (select models) Final Checks Shipping material removed Fresh food and freezer temperatures set Crisper humidity controls set Registration card sent in Ice Maker House water supply connected to refrigerator No water leaks...
... refrigerator Cabinet is turned ON Ice & water dispenser operates correctly Front filter must be flush with rugs, bedspreads, plastic sheets or stretch wrap may result in death or serious injury. Cartons covered with filter housing (select models) Final Checks Shipping material removed Fresh food and freezer temperatures set Crisper humidity controls set Registration card sent in Ice Maker House water supply connected to refrigerator No water leaks...
Use and Care Manual
Page 3
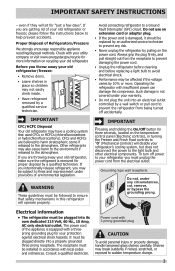
... the power cord. • Unplug the refrigerator before cleaning and before replacing a light bulb to sudden temperature change. 3 Shelves may break suddenly if nicked, scratched, or exposed to avoid electrical shock. • Performance may be subject to prevent any circumstances, cut, remove, or bypass the grounding prong. Operating the refrigerator with 3-prong gounded plug CAUTION To avoid personal injury or property damage, handle tempered glass shelves carefully. IMPORTANT SAFETY INSTRUCTIONS...
... the power cord. • Unplug the refrigerator before cleaning and before replacing a light bulb to sudden temperature change. 3 Shelves may break suddenly if nicked, scratched, or exposed to avoid electrical shock. • Performance may be subject to prevent any circumstances, cut, remove, or bypass the grounding prong. Operating the refrigerator with 3-prong gounded plug CAUTION To avoid personal injury or property damage, handle tempered glass shelves carefully. IMPORTANT SAFETY INSTRUCTIONS...
Use and Care Manual
Page 4
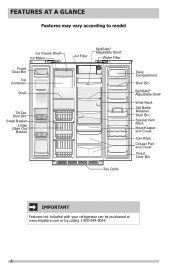
FEATURES AT A GLANCE Features may vary according to model Ice Cream Shelf Ice Maker Fixed Door Bin Ice Container Shelf Tilt Out Door Bin Small Basket Large Glide Out Basket Air Filter SpillSafe® Adjustable Shelf Water Filter Toe Grille Dairy Compartment Door Bin SpillSafe® Adjustable Shelf Wine Rack Tall Bottle Retainer Door Bin Special Item Rack Meat Keeper and Cover Can Rack Crisper Pan and Cover Fixed Door Bin IMPORTANT Features not included with your refrigerator can be purchased at www.frigidaire.com or by calling 1-800-944-9044. 4
FEATURES AT A GLANCE Features may vary according to model Ice Cream Shelf Ice Maker Fixed Door Bin Ice Container Shelf Tilt Out Door Bin Small Basket Large Glide Out Basket Air Filter SpillSafe® Adjustable Shelf Water Filter Toe Grille Dairy Compartment Door Bin SpillSafe® Adjustable Shelf Wine Rack Tall Bottle Retainer Door Bin Special Item Rack Meat Keeper and Cover Can Rack Crisper Pan and Cover Fixed Door Bin IMPORTANT Features not included with your refrigerator can be purchased at www.frigidaire.com or by calling 1-800-944-9044. 4
Use and Care Manual
Page 5
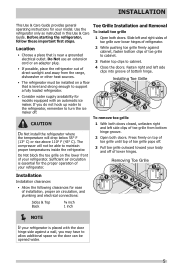
... support a fully loaded refrigerator. • Consider water supply availability for ease of installation, proper air circulation, and plumbing and electrical connections: 1 With both doors closed, unfasten right and left side clips of toe grille from bottom hinge groove. 2 Open both doors. INSTALLATION This Use & Care Guide provides general operating instructions for your body and off of lower hinges. Press firmly on a floor that is level and strong enough to maintain proper temperatures inside the refrigerator...
... support a fully loaded refrigerator. • Consider water supply availability for ease of installation, proper air circulation, and plumbing and electrical connections: 1 With both doors closed, unfasten right and left side clips of toe grille from bottom hinge groove. 2 Open both doors. INSTALLATION This Use & Care Guide provides general operating instructions for your body and off of lower hinges. Press firmly on a floor that is level and strong enough to maintain proper temperatures inside the refrigerator...
Use and Care Manual
Page 6
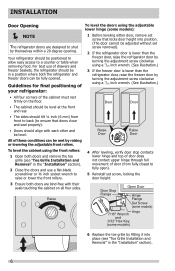
... hinge through full movement of drawers and freezer baskets, the refrigerator should tilt ¼ inch (6 mm) from fully closed to ensure that locks door height into place (see "Toe Grille Installation and Removal" in the "Installation" section). 2 Close the doors and use of door (from front to back (to fully open). 5 Reinstall set screw removed). 2 If the refrigerator door is lower than the freezer door, raise the refrigerator door by turning the adjustment...
... hinge through full movement of drawers and freezer baskets, the refrigerator should tilt ¼ inch (6 mm) from fully closed to ensure that locks door height into place (see "Toe Grille Installation and Removal" in the "Installation" section). 2 Close the doors and use of door (from front to back (to fully open). 5 Reinstall set screw removed). 2 If the refrigerator door is lower than the freezer door, raise the refrigerator door by turning the adjustment...
Use and Care Manual
Page 11
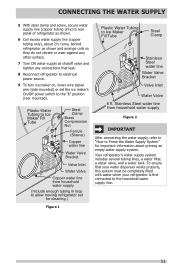
... electrical power source. 9 To turn ice maker on, lower wire signal arm (side mounted) or set the ice maker's On/Off power switch to the household water supply line. 11 CONNECTING THE WATER SUPPLY 5 With steel clamp and screw, secure water supply line (copper tubing only) to rear panel of refrigerator as shown. 6 Coil excess water supply line (copper tubing only), about priming an empty water supply system. Plastic Water Tubing to Ice Maker Fill Tube Steel Clamp Brass Compression Nut Ferrule (Sleeve) Copper water line Water Valve...
... electrical power source. 9 To turn ice maker on, lower wire signal arm (side mounted) or set the ice maker's On/Off power switch to the household water supply line. 11 CONNECTING THE WATER SUPPLY 5 With steel clamp and screw, secure water supply line (copper tubing only) to rear panel of refrigerator as shown. 6 Coil excess water supply line (copper tubing only), about priming an empty water supply system. Plastic Water Tubing to Ice Maker Fill Tube Steel Clamp Brass Compression Nut Ferrule (Sleeve) Copper water line Water Valve...
Use and Care Manual
Page 13
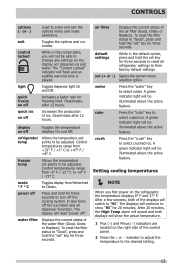
... Replace). To reset the filter status to +6° F / -15° C. To reset the filter status to the desired setting. 13 Setting cooling temperatures NOTE When you will switch to their factory default settings. indicator to adjust the temperature to "Good", press and hold the "set key for freezing food. The "Control Locked" indicator will read "power off". Toggles dispenser light On and Off. Deactivates after 12 hours. mode ° F ° C Toggles display...
... Replace). To reset the filter status to +6° F / -15° C. To reset the filter status to the desired setting. 13 Setting cooling temperatures NOTE When you will switch to their factory default settings. indicator to adjust the temperature to "Good", press and hold the "set key for freezing food. The "Control Locked" indicator will read "power off". Toggles dispenser light On and Off. Deactivates after 12 hours. mode ° F ° C Toggles display...
Use and Care Manual
Page 14
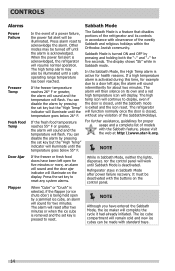
... example due to reset. If a high temperature alarm is closed , until the Sabbath mode is pressed to a door left open by pressing the set key is exited and the icon reset. The alarm will then silence on its controls in Sabbath Mode, neither the lights, dispenser, nor the control panel will complete the cycle it had already initiated. The refrigerator will display. CONTROLS Alarms Power Failure Freezer Temp Fresh Food Temp Door Ajar Flapper Sabbath...
... example due to reset. If a high temperature alarm is closed , until the Sabbath mode is pressed to a door left open by pressing the set key is exited and the icon reset. The alarm will then silence on its controls in Sabbath Mode, neither the lights, dispenser, nor the control panel will complete the cycle it had already initiated. The refrigerator will display. CONTROLS Alarms Power Failure Freezer Temp Fresh Food Temp Door Ajar Flapper Sabbath...
Use and Care Manual
Page 17
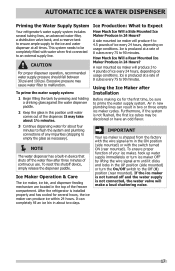
.... 3 Continue dispensing water for several tubing lines, an advanced water filter, a distribution valve bank, and a reserve tank to ensure ample supply to malfunction. Ice Maker Operation & Care The ice maker, ice bin, and dispenser feeding mechanism are located in the top of your ice maker, hook up water supply immediately or turn ice maker OFF by pressing and holding a drinking glass against the water dispenser paddle. 2 Keep the glass in the ON position (side mounted) or with water when first connected to...
.... 3 Continue dispensing water for several tubing lines, an advanced water filter, a distribution valve bank, and a reserve tank to ensure ample supply to malfunction. Ice Maker Operation & Care The ice maker, ice bin, and dispenser feeding mechanism are located in the top of your ice maker, hook up water supply immediately or turn ice maker OFF by pressing and holding a drinking glass against the water dispenser paddle. 2 Keep the glass in the ON position (side mounted) or with water when first connected to...
Use and Care Manual
Page 18
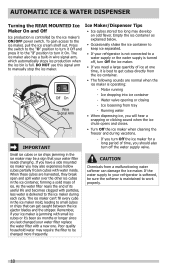
... controlled by the ice maker's ON/OFF power switch. Remember, if your refrigerator is softened, be changed your refrigerator is not connected to a water supply or the water supply is full. Press the switch to the "O" position to manually stop the ice maker. DO NOT use this signal arm to turn it Off and press it 's been six months or longer since you may develop an odd flavor. Water valve opening or closing Wire...
... controlled by the ice maker's ON/OFF power switch. Remember, if your refrigerator is softened, be changed your refrigerator is not connected to a water supply or the water supply is full. Press the switch to the "O" position to manually stop the ice maker. DO NOT use this signal arm to turn it Off and press it 's been six months or longer since you may develop an odd flavor. Water valve opening or closing Wire...
Use and Care Manual
Page 19
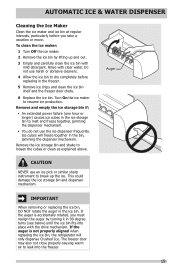
... the ice storage bin to melt and freeze together, jamming the dispenser mechanism. • You do not use an ice pick or similar sharp instrument to leak into place with clear water. This could damage the ice storage bin and dispenser mechanism. AUTOMATIC ICE & WATER DISPENSER Cleaning the Ice Maker Clean the ice maker and ice bin at regular intervals, particularly before replacing in the freezer. 5 Remove ice chips and clean the ice bin shelf and the freezer door chute. 6 Replace the ice bin. Rinse...
... the ice storage bin to melt and freeze together, jamming the dispenser mechanism. • You do not use an ice pick or similar sharp instrument to leak into place with clear water. This could damage the ice storage bin and dispenser mechanism. AUTOMATIC ICE & WATER DISPENSER Cleaning the Ice Maker Clean the ice maker and ice bin at regular intervals, particularly before replacing in the freezer. 5 Remove ice chips and clean the ice bin shelf and the freezer door chute. 6 Replace the ice bin. Rinse...

Use and Care Manual
Page 20
... control panel prompts you typically store in your PureSource UltraTM air filter: 1 Pull the air filter housing straight out. 2 Remove the old filter and discard it. 3 Unpack the new filter and place it inside the housing. 4 Slide the housing back into position. Frigidaire recommends that you order extra filters when you first install your refrigerator, and that you should change the filter before reinstalling the refrigerator. The water filter system filters...
... control panel prompts you typically store in your PureSource UltraTM air filter: 1 Pull the air filter housing straight out. 2 Remove the old filter and discard it. 3 Unpack the new filter and place it inside the housing. 4 Slide the housing back into position. Frigidaire recommends that you order extra filters when you first install your refrigerator, and that you should change the filter before reinstalling the refrigerator. The water filter system filters...
Use and Care Manual
Page 21
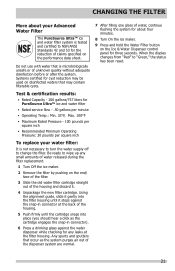
... the cartridge engages the snap-in connector). 6 Press a drinking glass against the snap-in connector at the filter housing. CHANGING THE FILTER More about four minutes. 8 Turn On the ice maker. 9 Press and hold the Water Filter button on the Ice & Water Dispenser control panel for any small amounts of water released during the filter replacement. 1 Turn Off the ice maker. 2 Remove the filter by pushing on the performance data sheet. Do not use with water that...
... the cartridge engages the snap-in connector). 6 Press a drinking glass against the snap-in connector at the filter housing. CHANGING THE FILTER More about four minutes. 8 Turn On the ice maker. 9 Press and hold the Water Filter button on the Ice & Water Dispenser control panel for any small amounts of water released during the filter replacement. 1 Turn Off the ice maker. 2 Remove the filter by pushing on the performance data sheet. Do not use with water that...
Use and Care Manual
Page 24
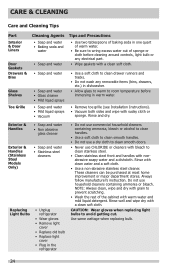
... ammonia, bleach or alcohol to clean handles. • Use a soft cloth to clean smooth handles. • Do not use a dry cloth to room temperature before cleaning around controls, light bulb or any electrical part. • Wipe gaskets with a clean soft cloth. • Use a soft cloth to clean drawer runners and tracks. • Do not wash any removable items (bins, drawers, etc.) in warm water. • Remove toe grille (see Installation Instructions). • Vacuum both sides and...
... ammonia, bleach or alcohol to clean handles. • Use a soft cloth to clean smooth handles. • Do not use a dry cloth to room temperature before cleaning around controls, light bulb or any electrical part. • Wipe gaskets with a clean soft cloth. • Use a soft cloth to clean drawer runners and tracks. • Do not wash any removable items (bins, drawers, etc.) in warm water. • Remove toe grille (see Installation Instructions). • Vacuum both sides and...
Use and Care Manual
Page 28
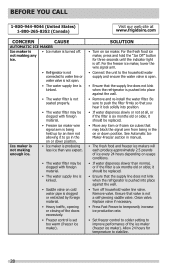
... until the indicator light is set too warm (freezer ice maker). Ice maker is not making any item or frozen ice cubes that the supply line does not kink when the refrigerator is pushed into place against the wall. • Remove and re-install the water filter. Be sure to stabilize. 28 Clean valve. For the freezer ice maker, lower the wire signal arm. • Connect the unit to improve performance of the ice maker (freezer ice maker). Replace valve if necessary...
... until the indicator light is set too warm (freezer ice maker). Ice maker is not making any item or frozen ice cubes that the supply line does not kink when the refrigerator is pushed into place against the wall. • Remove and re-install the water filter. Be sure to stabilize. 28 Clean valve. For the freezer ice maker, lower the wire signal arm. • Connect the unit to improve performance of the ice maker (freezer ice maker). Replace valve if necessary...

Use and Care Manual
Page 29
... position. • Open household water line valve. Clean container, wipe dry, and replace in manual. • Remove ice container and discard ice. BEFORE YOU CALL CONCERN CAUSE AUTOMATIC ICE MAKER (Continued) Freezer ice maker will produce fresh supply. The hollow cubes break open . The ice maker will not • Ice maker wire signal arm is no ice in the bin to be dispensed. • The refrigerator doors are jamming the dispenser. • Press and hold control lock for three...
... position. • Open household water line valve. Clean container, wipe dry, and replace in manual. • Remove ice container and discard ice. BEFORE YOU CALL CONCERN CAUSE AUTOMATIC ICE MAKER (Continued) Freezer ice maker will produce fresh supply. The hollow cubes break open . The ice maker will not • Ice maker wire signal arm is no ice in the bin to be dispensed. • The refrigerator doors are jamming the dispenser. • Press and hold control lock for three...

Use and Care Manual
Page 30
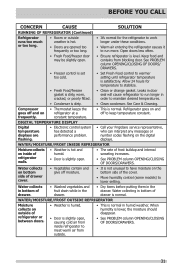
... Care & Cleaning. RUNNING OF REFRIGERATOR Compressor does not run. • Freezer control is set to "OF" or "0". • Refrigerator is in defrost cycle. • Plug at electrical outlet is disconnected. • House fuse blown or tripped circuit breaker. • Power outage. • Set freezer control. • This is normal for an extended period of time. • Unit not properly connected to cold water line. • Draw and discard 10-12 glasses of...
... Care & Cleaning. RUNNING OF REFRIGERATOR Compressor does not run. • Freezer control is set to "OF" or "0". • Refrigerator is in defrost cycle. • Plug at electrical outlet is disconnected. • House fuse blown or tripped circuit breaker. • Power outage. • Set freezer control. • This is normal for an extended period of time. • Unit not properly connected to cold water line. • Draw and discard 10-12 glasses of...
Use and Care Manual
Page 31
... PROBLEM column OPENING/CLOSING OF DOORS/DRAWERS. 31 Allow 24 hours for the refrigerator to work longer under these conditions. • Warm air entering the refrigerator causes it to stabilize. • Fresh Food/freezer gasket is dirty, worn, cracked, or poorly fitted. • Clean or change gasket. DIGITAL TEMPERATURE DISPLAY Digital temperature displays are opened too frequently or too long. • It's normal for temperature to run longer in the drawer. Water collects...
... PROBLEM column OPENING/CLOSING OF DOORS/DRAWERS. 31 Allow 24 hours for the refrigerator to work longer under these conditions. • Warm air entering the refrigerator causes it to stabilize. • Fresh Food/freezer gasket is dirty, worn, cracked, or poorly fitted. • Clean or change gasket. DIGITAL TEMPERATURE DISPLAY Digital temperature displays are opened too frequently or too long. • It's normal for temperature to run longer in the drawer. Water collects...
Use and Care Manual
Page 32
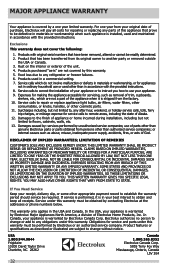
... 32 Food loss due to floors, cabinets, walls, etc. 13. Exclusions This warranty does not cover the following: 1. In Canada, your best interest to change or add to repair or replace appliance light bulbs, air filters, water filters, other consumables, or knobs, handles, or other appropriate payment record to use of parts other than genuine Electrolux parts or parts obtained from persons other than authorized service companies;
... 32 Food loss due to floors, cabinets, walls, etc. 13. Exclusions This warranty does not cover the following: 1. In Canada, your best interest to change or add to repair or replace appliance light bulbs, air filters, water filters, other consumables, or knobs, handles, or other appropriate payment record to use of parts other than genuine Electrolux parts or parts obtained from persons other than authorized service companies;


