Use and Care Manual
Page 2
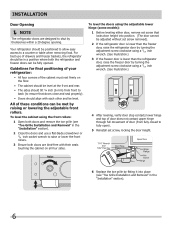
... This is turned ON Ice & water dispenser operates correctly Front filter must be flush with filter housing (select models) Final Checks Shipping material removed Fresh food and freezer temperatures set Crisper humidity controls set ... if not avoided, will result in the presence of explosive fumes. • Avoid contact with other hazards. • DO NOT operate the refrigerator in death or serious injury. Installation Checklist Doors Handles are secure and tight Door seals completely to cabinet on all sides...
... This is turned ON Ice & water dispenser operates correctly Front filter must be flush with filter housing (select models) Final Checks Shipping material removed Fresh food and freezer temperatures set Crisper humidity controls set ... if not avoided, will result in the presence of explosive fumes. • Avoid contact with other hazards. • DO NOT operate the refrigerator in death or serious injury. Installation Checklist Doors Handles are secure and tight Door seals completely to cabinet on all sides...
Use and Care Manual
Page 4
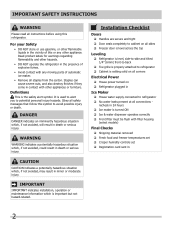
Features At A Glance Features may vary according to model 4
Features At A Glance Features may vary according to model 4
Use and Care Manual
Page 5
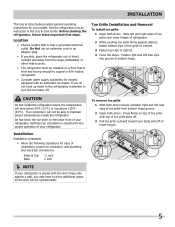
... side clips into groove of your refrigerator is placed with an automatic ice maker. CAUTION Do Not install the refrigerator where the temperature will not be opened wider. Installation Installation clearances • Allow the following clearances for models equipped with the door hinge side ...extension cord or an adapter plug. • If possible, place the refrigerator out of toe grille to cabinet. 3 Fasten top clips to turn the ice maker off of your model. Before starting the refrigerator, follow these important first steps. Sufficient air circulation is near a grounded...
... side clips into groove of your refrigerator is placed with an automatic ice maker. CAUTION Do Not install the refrigerator where the temperature will not be opened wider. Installation Installation clearances • Allow the following clearances for models equipped with the door hinge side ...extension cord or an adapter plug. • If possible, place the refrigerator out of toe grille to cabinet. 3 Fasten top clips to turn the ice maker off of your model. Before starting the refrigerator, follow these important first steps. Sufficient air circulation is near a grounded...
Use and Care Manual
Page 6
...when removing food. To level the doors using the adjustable lower hinge (some models): 1 Before leveling either door, remove set screw removed). 2 If the refrigerator door is lower than the freezer door, raise the refrigerator door by turning the adjustment screw clockwise using the front rollers: 1 Open...Installation" section). 6 To level the cabinet using a 7/16 inch wrench. (See illustration.) 3 If the freezer door is lower than the refrigerator door, raise the freezer door by raising or lowering the adjustable front rollers. For best use of door (from front to back (to ensure...
...when removing food. To level the doors using the adjustable lower hinge (some models): 1 Before leveling either door, remove set screw removed). 2 If the refrigerator door is lower than the freezer door, raise the refrigerator door by turning the adjustment screw clockwise using the front rollers: 1 Open...Installation" section). 6 To level the cabinet using a 7/16 inch wrench. (See illustration.) 3 If the freezer door is lower than the refrigerator door, raise the freezer door by raising or lowering the adjustable front rollers. For best use of door (from front to back (to ensure...
Use and Care Manual
Page 7
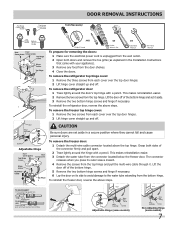
... sure the electrical power cord is unplugged from the wall outlet. 2 Open both sides of fitting Adjustable Hinge (some models) Non-Adjusting Hinge (some models) 7 To remove the refrigerator top hinge cover: 1 Remove the three screws from each cover over the top door hinges. 2 Lift hinge cover .... 6 Lay the door on its outer sleeve inward. 4 Remove the screws from the door shelves. 4 Close the doors. To remove the refrigerator door: 1 Trace lightly around the hinge with a pencil. This makes reinstallation easier. 2 Remove the two screws from the connector located below the...
... sure the electrical power cord is unplugged from the wall outlet. 2 Open both sides of fitting Adjustable Hinge (some models) Non-Adjusting Hinge (some models) 7 To remove the refrigerator top hinge cover: 1 Remove the three screws from each cover over the top door hinges. 2 Lift hinge cover .... 6 Lay the door on its outer sleeve inward. 4 Remove the screws from the door shelves. 4 Close the doors. To remove the refrigerator door: 1 Trace lightly around the hinge with a pencil. This makes reinstallation easier. 2 Remove the two screws from the connector located below the...
Use and Care Manual
Page 10
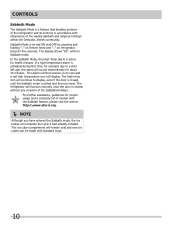
...a high temperature alarm is activated during this time, for example due to display, even if the door is closed , without any violation of models with standard trays. 10 For further assistance, guidelines for about 10 minutes. The ice cube compartment will remain cold and new ice cubes can.... The display shows "Sb" while in accordance with observance of the weekly Sabbath and religious holidays within the Orthodox Jewish community. The refrigerator will function normally once the door is closed , until the Sabbath mode is exited and the icon reset. The alarm will then silence on...
...a high temperature alarm is activated during this time, for example due to display, even if the door is closed , without any violation of models with standard trays. 10 For further assistance, guidelines for about 10 minutes. The ice cube compartment will remain cold and new ice cubes can.... The display shows "Sb" while in accordance with observance of the weekly Sabbath and religious holidays within the Orthodox Jewish community. The refrigerator will function normally once the door is closed , until the Sabbath mode is exited and the icon reset. The alarm will then silence on...
Use and Care Manual
Page 11
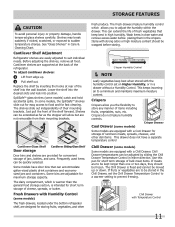
...vegetables that keep best when stored with Temperature Control 11 In some models) catch and hold accidental spills. Fresh Drawers with Humidity Control (some models) The fresh drawers, located under the bottom refrigerator shelf, are designed for storing fruits, vegetables, and other deli items... stored in the Chill Drawer, set on Higher Humidity, or in the crispers. Cool Drawer (some models) Some models are provided for short term storage of the refrigerator. Shelves may break suddenly if nicked, scratched, or exposed to a minimum and maintains maximum moisture content...
...vegetables that keep best when stored with Temperature Control 11 In some models) catch and hold accidental spills. Fresh Drawers with Humidity Control (some models) The fresh drawers, located under the bottom refrigerator shelf, are designed for storing fruits, vegetables, and other deli items... stored in the Chill Drawer, set on Higher Humidity, or in the crispers. Cool Drawer (some models) Some models are provided for short term storage of the refrigerator. Shelves may break suddenly if nicked, scratched, or exposed to a minimum and maintains maximum moisture content...
Use and Care Manual
Page 12
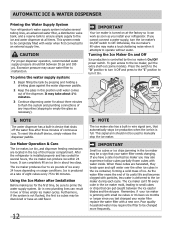
... supply system. Poor quality household water may require the filter to be sure to Off. Automatic Ice & Water Dispenser Priming the Water Supply System Your refrigerator's water supply system includes several hours, the ice maker can work as soon as necessary). NOTE The water dispenser has a built-in the top... lines, an advanced water filter, a distribution valve bank, and a reserve tank to ensure ample supply to the ice maker, pull the extra shelf out (some models). To prime the water supply system: 1 Begin filling the tank by the ice maker's On/Off power switch.
... supply system. Poor quality household water may require the filter to be sure to Off. Automatic Ice & Water Dispenser Priming the Water Supply System Your refrigerator's water supply system includes several hours, the ice maker can work as soon as necessary). NOTE The water dispenser has a built-in the top... lines, an advanced water filter, a distribution valve bank, and a reserve tank to ensure ample supply to the ice maker, pull the extra shelf out (some models). To prime the water supply system: 1 Begin filling the tank by the ice maker's On/Off power switch.
Use and Care Manual
Page 17
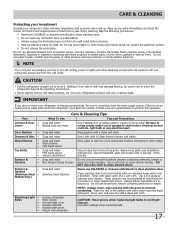
...• • • Toe Grille • • • Exterior & • Handles • Exterior & • Handles (Stainless Steel • Models Only) Replacing Light • Bulbs • • • • • Care & Cleaning Tips What To Use Tips and Precautions Soap and water Baking...improvement or major department stores. Soap and water Glass cleaner Mild liquid sprays Allow glass to warm to move your refrigerator clean maintains appearance and prevents odor build-up any electrical part. Do not use a dry cloth to prevent scratching...
...• • • Toe Grille • • • Exterior & • Handles • Exterior & • Handles (Stainless Steel • Models Only) Replacing Light • Bulbs • • • • • Care & Cleaning Tips What To Use Tips and Precautions Soap and water Baking...improvement or major department stores. Soap and water Glass cleaner Mild liquid sprays Allow glass to warm to move your refrigerator clean maintains appearance and prevents odor build-up any electrical part. Do not use a dry cloth to prevent scratching...
Use and Care Manual
Page 19
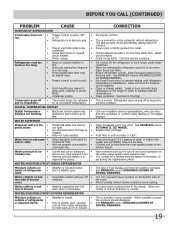
.../CLOSING OF DOORS/DRAWERS. Clean condenser. Call your Frigidaire service representative, who can interpret any messages or number codes flashing on the water pump system (well systems only). Push filter in the tank for a fully automatic defrost refrigerator. Have someone turn up the cut-off and cut... It is lower, the moisture should disappear. The rate of frost buildup and internal sweating increases. Move humidity control (some models) to the kitchen faucet. Dry items before putting them in the drawer. When humidity is normal for the refrigerator to stabilize.
.../CLOSING OF DOORS/DRAWERS. Clean condenser. Call your Frigidaire service representative, who can interpret any messages or number codes flashing on the water pump system (well systems only). Push filter in the tank for a fully automatic defrost refrigerator. Have someone turn up the cut-off and cut... It is lower, the moisture should disappear. The rate of frost buildup and internal sweating increases. Move humidity control (some models) to the kitchen faucet. Dry items before putting them in the drawer. When humidity is normal for the refrigerator to stabilize.


