Complete Owner's Guide (English)
Page 1
All about the Use &Care of your Refrigerator 242108500 (January 2010) TABLE OF CONTENTS Important Safety Instructions 2 Features at a Glance 4 Installation 5 Door Removal Instructions 7 Handle Installation 8 Connecting Water Supply 9 Controls 10 Storage Features 12 Automatic Ice & Water Dispenser 13 Changing the Filter 15 Normal Operating Sounds and Sights 17 Care and Cleaning 18 Before you Call 19 Major Appliance Warranty 21 www.frigidaire.com USA 1-800-944-9044 www.frigidaire.ca Canada 1-800-265-8352
All about the Use &Care of your Refrigerator 242108500 (January 2010) TABLE OF CONTENTS Important Safety Instructions 2 Features at a Glance 4 Installation 5 Door Removal Instructions 7 Handle Installation 8 Connecting Water Supply 9 Controls 10 Storage Features 12 Automatic Ice & Water Dispenser 13 Changing the Filter 15 Normal Operating Sounds and Sights 17 Care and Cleaning 18 Before you Call 19 Major Appliance Warranty 21 www.frigidaire.com USA 1-800-944-9044 www.frigidaire.ca Canada 1-800-265-8352
Complete Owner's Guide (English)
Page 2
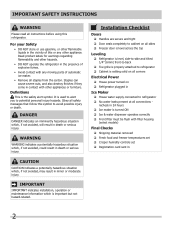
...; Cabinet is setting solid on all corners Electrical Power House power turned on Refrigerator plugged in the presence of explosive fumes. • Avoid contact with other appliance. DANGER DANGER indicates an imminently hazardous situation which is the safety alert symbol. Installation Checklist Doors Handles are secure and tight ...
...; Cabinet is setting solid on all corners Electrical Power House power turned on Refrigerator plugged in the presence of explosive fumes. • Avoid contact with other appliance. DANGER DANGER indicates an imminently hazardous situation which is the safety alert symbol. Installation Checklist Doors Handles are secure and tight ...
Complete Owner's Guide (English)
Page 3
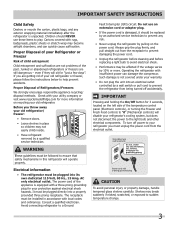
... hazards. IMPORTANT Pressing and holding the On/Off button for 3 seconds, located on the left side of Refrigerators/Freezers We strongly encourage responsible appliance recycling/ disposal methods. If you must be plugged into a properly grounded three prong receptacle. Shelves may be...outlet. Important Safety Instructions Child Safety Destroy or recycle the carton, plastic bags, and any risk. • Never unplug the refrigerator by pulling on the power cord. Check with insufficient power can quickly cause suffocation. It must be replaced by a qualified service...
... hazards. IMPORTANT Pressing and holding the On/Off button for 3 seconds, located on the left side of Refrigerators/Freezers We strongly encourage responsible appliance recycling/ disposal methods. If you must be plugged into a properly grounded three prong receptacle. Shelves may be...outlet. Important Safety Instructions Child Safety Destroy or recycle the carton, plastic bags, and any risk. • Never unplug the refrigerator by pulling on the power cord. Check with insufficient power can quickly cause suffocation. It must be replaced by a qualified service...
Complete Owner's Guide (English)
Page 7
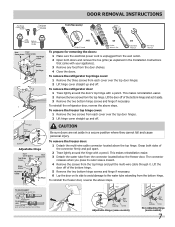
...the door off of the bottom hinge and set aside in the Installation Instructions that came with your appliance). 3 Remove any food from the door shelves. 4 Close the doors. To remove the refrigerator top hinge cover: 1 Remove the three screws from each cover over the top door hinges. 2... from the top hinge. Press outer ring against face of fitting Adjustable Hinge (some models) Non-Adjusting Hinge (some models) 7 To remove the refrigerator door: 1 Trace lightly around the hinge with a pencil. Grasp both doors and remove the toe grille (as explained in a secure position where...
...the door off of the bottom hinge and set aside in the Installation Instructions that came with your appliance). 3 Remove any food from the door shelves. 4 Close the doors. To remove the refrigerator top hinge cover: 1 Remove the three screws from each cover over the top door hinges. 2... from the top hinge. Press outer ring against face of fitting Adjustable Hinge (some models) Non-Adjusting Hinge (some models) 7 To remove the refrigerator door: 1 Trace lightly around the hinge with a pencil. Grasp both doors and remove the toe grille (as explained in a secure position where...
Complete Owner's Guide (English)
Page 18
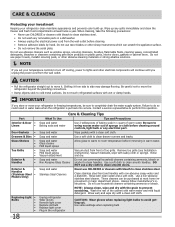
... liquid sprays Vacuum attachment Vacuum dust from side to cold metal surfaces. Use same wattage when replacing bulb Do not touch refrigerated surfaces with warm water and mild liquid detergent. Soap and water Never use abrasive cleaners such as window sprays, scouring cleansers... petroleum products on plastic parts, interior doors, gaskets or cabinet liners. These cleaners can scratch the appliance surface. • Do not remove the serial plate. Unplug refrigerator Wear gloves Remove light cover Replace old bulb Replace light cover Plug in water leaks when the...
... liquid sprays Vacuum attachment Vacuum dust from side to cold metal surfaces. Use same wattage when replacing bulb Do not touch refrigerated surfaces with warm water and mild liquid detergent. Soap and water Never use abrasive cleaners such as window sprays, scouring cleansers... petroleum products on plastic parts, interior doors, gaskets or cabinet liners. These cleaners can scratch the appliance surface. • Do not remove the serial plate. Unplug refrigerator Wear gloves Remove light cover Replace old bulb Replace light cover Plug in water leaks when the...
Complete Owner's Guide (English)
Page 21
... GA 30907 Canada 1.800.265.8352 Electrolux Canada Corp. 5855 Terry Fox Way Mississauga, Ontario, Canada L5V 3E4 21 major appliance warranty Your appliance is covered by a one year from your original date of purchase, Electrolux will pay all receipts. Exclusions This warranty does ... STATE TO STATE. If service is performed, it is warranted by Electrolux Major Appliances North America, a division of appliance or home incurred during installation, including but not limited to any refrigerator or freezer failures. 6. Product features or specifications as -is warranted by Electrolux ...
... GA 30907 Canada 1.800.265.8352 Electrolux Canada Corp. 5855 Terry Fox Way Mississauga, Ontario, Canada L5V 3E4 21 major appliance warranty Your appliance is covered by a one year from your original date of purchase, Electrolux will pay all receipts. Exclusions This warranty does ... STATE TO STATE. If service is performed, it is warranted by Electrolux Major Appliances North America, a division of appliance or home incurred during installation, including but not limited to any refrigerator or freezer failures. 6. Product features or specifications as -is warranted by Electrolux ...

Wiring Diagram (All Languages)
Page 1
...NOTE The information provided herein is complete. Disconnect power cord before servicing this appliance. it will be shielded from housing. A "d" and "F" will char...to 1.5 Base Voltage 115 vac (127 vac max) DEFROST SPECIFICATIONS Cabinet Size Thermostat Cut-in the refrigerator temperature window will continue to the possibility of compressor run time. Ice maker will display when the ...; A "d" in the freezer temperature window and "F" in Cut-out Heater Watts Ohms 23', 23' CD, 26' 25° F (-4° C) 47° F (8° C) 450 30 Elecrttonic Timer - (ADC)...
...NOTE The information provided herein is complete. Disconnect power cord before servicing this appliance. it will be shielded from housing. A "d" and "F" will char...to 1.5 Base Voltage 115 vac (127 vac max) DEFROST SPECIFICATIONS Cabinet Size Thermostat Cut-in the refrigerator temperature window will continue to the possibility of compressor run time. Ice maker will display when the ...; A "d" in the freezer temperature window and "F" in Cut-out Heater Watts Ohms 23', 23' CD, 26' 25° F (-4° C) 47° F (8° C) 450 30 Elecrttonic Timer - (ADC)...

Installation Instructions (All Languages)
Page 1
... the water valve inlet at the rear of the Guide to learn how to position the refrigerator directly in the Registration Card. Close the doors. And thank you for choosing Frigidaire. 8 Installation Checkoff List Doors Door seals completely to cabinet on all corners Electrical Power &#...The door cannot be able to drawers and freezer baskets, doors must rest firmly on the lower front of the copper tube in your new appliance • Do not use Kit #53039117950, available from fully closed to cabinet. Room temperatures below 55°F (13°C) or above...
... the water valve inlet at the rear of the Guide to learn how to position the refrigerator directly in the Registration Card. Close the doors. And thank you for choosing Frigidaire. 8 Installation Checkoff List Doors Door seals completely to cabinet on all corners Electrical Power &#...The door cannot be able to drawers and freezer baskets, doors must rest firmly on the lower front of the copper tube in your new appliance • Do not use Kit #53039117950, available from fully closed to cabinet. Room temperatures below 55°F (13°C) or above...


