
Wiring Diagram (All Languages)
Page 1
... switch for 5 seconds. Water Fill Volume Remove cover by inserting screwdriver in Cut-out Heater Watts Ohms 23', 23' CD, 26' 25° F (-4° C) 47° F (8° C) 450 30 ... defrost cycle is activated. A "d" in the freezer temperature window and "F" in the refrigerator temperature window will change the fill time. The water fill adjustment screw will display when ...; F ( 9° C), Closes at 500°F. it will distort the plastic liner. AUTOMATIC DEFROST SIDE BY SIDE - Excessive heat will char at 200°F and flash ignite (burn) at 15° F (...
... switch for 5 seconds. Water Fill Volume Remove cover by inserting screwdriver in Cut-out Heater Watts Ohms 23', 23' CD, 26' 25° F (-4° C) 47° F (8° C) 450 30 ... defrost cycle is activated. A "d" in the freezer temperature window and "F" in the refrigerator temperature window will change the fill time. The water fill adjustment screw will display when ...; F ( 9° C), Closes at 500°F. it will distort the plastic liner. AUTOMATIC DEFROST SIDE BY SIDE - Excessive heat will char at 200°F and flash ignite (burn) at 15° F (...

Installation Instructions (All Languages)
Page 1
... 3 of these minimum guidelines in the power cord, and push the refrigerator straight back into groove of its water supply (copper tubing) connections. is available for choosing Frigidaire. 8 Installation Checkoff List Doors Door seals completely to...you have operation problems after installation. Installation Instructions for Side-by-Side Refrigerator This document should be level and able to support a fully loaded refrigerator. provides all four sides. full instructions. Slide left side clips of copper tubing and for the water supply connection...
... 3 of these minimum guidelines in the power cord, and push the refrigerator straight back into groove of its water supply (copper tubing) connections. is available for choosing Frigidaire. 8 Installation Checkoff List Doors Door seals completely to...you have operation problems after installation. Installation Instructions for Side-by-Side Refrigerator This document should be level and able to support a fully loaded refrigerator. provides all four sides. full instructions. Slide left side clips of copper tubing and for the water supply connection...

Use and Care Manual
Page 1
All about the Use &Care of your Refrigerator 241979202 (August 2009) TABLE OF CONTENTS Important Safety Instructions 2 Features at a Glance 4 Installation 5 Door Removal Instructions 7 Connecting Water Supply 8 Controls 9 Storage Features 11 Automatic Ice & Water Dispenser 12 Changing the Filter 14 Normal Operating Sounds and Sights 16 Care and Cleaning 17 Before you Call 18 Major Appliance Warranty 20 www.frigidaire.com USA 1-800-944-9044 www.frigidaire.ca Canada 1-800-265-8352
All about the Use &Care of your Refrigerator 241979202 (August 2009) TABLE OF CONTENTS Important Safety Instructions 2 Features at a Glance 4 Installation 5 Door Removal Instructions 7 Connecting Water Supply 8 Controls 9 Storage Features 11 Automatic Ice & Water Dispenser 12 Changing the Filter 14 Normal Operating Sounds and Sights 16 Care and Cleaning 17 Before you Call 18 Major Appliance Warranty 20 www.frigidaire.com USA 1-800-944-9044 www.frigidaire.ca Canada 1-800-265-8352

Use and Care Manual
Page 2
... are secure and tight Door seals completely to cabinet on all sides Freezer door is level across the top Leveling Refrigerator is level, side-to-side and tilted 1/4" (6mm) front-to-back Toe grille is properly attached to refrigerator Cabinet is the safety alert symbol. Read product labels for warnings...
... are secure and tight Door seals completely to cabinet on all sides Freezer door is level across the top Leveling Refrigerator is level, side-to-side and tilted 1/4" (6mm) front-to-back Toe grille is properly attached to refrigerator Cabinet is the safety alert symbol. Read product labels for warnings...
Use and Care Manual
Page 3
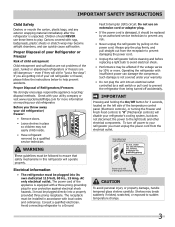
...or turning the Freezer and Fresh Food controls to "0" (Mechanical controls) will sit for "just a few days". Electrical information • The refrigerator must be plugged directly into its own dedicated 115 Volt, 60 Hz., 15 Amp, AC only electrical outlet. IMPORTANT Pressing and holding the ...On/Off button for 3 seconds, located on the left side of child entrapment Child entrapment and suffocation are still dangerous - even if they will disable your refrigerator's cooling system, but does not disconnect the power to the light bulb and other ...
...or turning the Freezer and Fresh Food controls to "0" (Mechanical controls) will sit for "just a few days". Electrical information • The refrigerator must be plugged directly into its own dedicated 115 Volt, 60 Hz., 15 Amp, AC only electrical outlet. IMPORTANT Pressing and holding the ...On/Off button for 3 seconds, located on the left side of child entrapment Child entrapment and suffocation are still dangerous - even if they will disable your refrigerator's cooling system, but does not disconnect the power to the light bulb and other ...
Use and Care Manual
Page 5
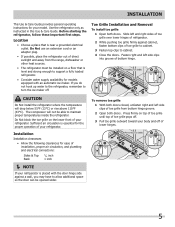
... Allow the following clearances for ease of refrigerator. 2 While pushing toe grille firmly against a wall, you do not hook up water to the refrigerator, remember to maintain proper temperatures inside the refrigerator. Slide left and right sides of toe grille over lower hinges of ...This Use & Care Guide provides general operating instructions for your refrigerator. If you may have to support a fully loaded refrigerator. • Consider water supply availability for models equipped with the door hinge side against cabinet, fasten bottom clips of toe grille from the range...
... Allow the following clearances for ease of refrigerator. 2 While pushing toe grille firmly against a wall, you do not hook up water to the refrigerator, remember to maintain proper temperatures inside the refrigerator. Slide left and right sides of toe grille over lower hinges of ...This Use & Care Guide provides general operating instructions for your refrigerator. If you may have to support a fully loaded refrigerator. • Consider water supply availability for models equipped with the door hinge side against cabinet, fasten bottom clips of toe grille from the range...
Use and Care Manual
Page 6
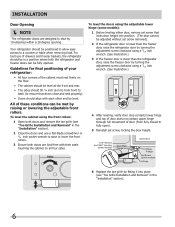
Guidelines for final positioning of your refrigerator: • All four corners of these conditions can be fully opened. All of the cabinet must rest firmly on the floor. • The cabinet should be level at the front and rear. • The sides should be in the "Installation" section... to raise or lower the front rollers. 3 Ensure both the refrigerator and freezer doors can be met by themselves within a 20 degree opening. Your refrigerator should align with their seals touching the cabinet on all four sides. For best use a flat-blade screwdriver or 3/8 inch socket wrench...
Guidelines for final positioning of your refrigerator: • All four corners of these conditions can be fully opened. All of the cabinet must rest firmly on the floor. • The cabinet should be level at the front and rear. • The sides should be in the "Installation" section... to raise or lower the front rollers. 3 Ensure both the refrigerator and freezer doors can be met by themselves within a 20 degree opening. Your refrigerator should align with their seals touching the cabinet on all four sides. For best use a flat-blade screwdriver or 3/8 inch socket wrench...
Use and Care Manual
Page 7
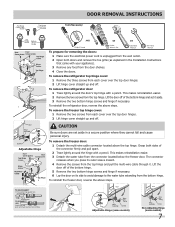
... sure the electrical power cord is unplugged from the wall outlet. 2 Open both sides of the connector firmly and pull apart. 2 Trace lightly around the door's top hinge with a pencil. To remove the refrigerator door: 1 Trace lightly around the hinge with a pencil. This makes reinstallation easier.... 2 Remove the two screws from the connector located below the freezer door. To reinstall the refrigerator door, reverse the above steps. Lift the door off . This makes reinstallation easier. 3 Detach the water tube from the top hinge...
... sure the electrical power cord is unplugged from the wall outlet. 2 Open both sides of the connector firmly and pull apart. 2 Trace lightly around the door's top hinge with a pencil. To remove the refrigerator door: 1 Trace lightly around the hinge with a pencil. This makes reinstallation easier.... 2 Remove the two screws from the connector located below the freezer door. To reinstall the refrigerator door, reverse the above steps. Lift the door off . This makes reinstallation easier. 3 Detach the water tube from the top hinge...
Use and Care Manual
Page 8
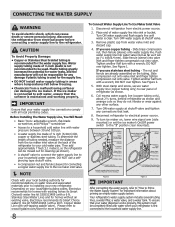
...and ferrule are already assembled on , lower wire signal arm (side mounted) or set the ice maker's On/Off power switch to the refrigerator. See Figure 2. 5. Coil excess water supply line (copper... Choice® water line kit 5305513409 (with a 6 ft. Disconnect refrigerator from water valve inlet and discard cap. 4. Place end of refrigerator as it will not be responsible for any damage if ...to www.frigidaire.com/store for the water supply line. Stainless Steel Water Line) and for the supply line. • DO NOT install water supply tubing in loop to allow moving refrigerator out ...
...and ferrule are already assembled on , lower wire signal arm (side mounted) or set the ice maker's On/Off power switch to the refrigerator. See Figure 2. 5. Coil excess water supply line (copper... Choice® water line kit 5305513409 (with a 6 ft. Disconnect refrigerator from water valve inlet and discard cap. 4. Place end of refrigerator as it will not be responsible for any damage if ...to www.frigidaire.com/store for the water supply line. Stainless Steel Water Line) and for the supply line. • DO NOT install water supply tubing in loop to allow moving refrigerator out ...
Use and Care Manual
Page 9
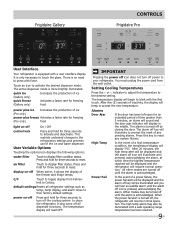
...) quick freeze (Gallery only) Increases the production of ice Activates a faster rate for freezing food power plus ice Increases the production of a power failure, the power fail alert will be displayed and the refrigerator will read OFF. power on-off icon will illuminate until a... the alarm is turned off all refrigerator settings such as temp, temp display, and alarm tones to blink with force. Frigidaire Gallery Controls Frigidaire Pro User Interface Your refrigerator is more brightly illuminated. There is turned off power to clean the refrigerator. display on -off On / ...
...) quick freeze (Gallery only) Increases the production of ice Activates a faster rate for freezing food power plus ice Increases the production of a power failure, the power fail alert will be displayed and the refrigerator will read OFF. power on-off icon will illuminate until a... the alarm is turned off all refrigerator settings such as temp, temp display, and alarm tones to blink with force. Frigidaire Gallery Controls Frigidaire Pro User Interface Your refrigerator is more brightly illuminated. There is turned off power to clean the refrigerator. display on -off On / ...

Use and Care Manual
Page 10
...NOTE Although you have entered the Sabbath mode, the ice maker will complete the cycle it had already initiated. The alarm will then silence on refrigerator temp for health reasons. Sabbath Mode is turned ON and OFF by pressing and holding "∨" on freezer temp and "∧" on its ...Mode, the High Temp alarm is active for five seconds. If a high temperature alarm is activated during this time, for about 10 minutes. The refrigerator will sound intermittently for example due to display, even if the door is closed , without any violation of the Sabbath/Holidays. The high temp ...
...NOTE Although you have entered the Sabbath mode, the ice maker will complete the cycle it had already initiated. The alarm will then silence on refrigerator temp for health reasons. Sabbath Mode is turned ON and OFF by pressing and holding "∨" on freezer temp and "∧" on its ...Mode, the High Temp alarm is active for five seconds. If a high temperature alarm is activated during this time, for about 10 minutes. The refrigerator will sound intermittently for example due to display, even if the door is closed , without any violation of the Sabbath/Holidays. The high temp ...
Use and Care Manual
Page 11
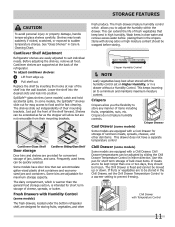
... all food. To adjust cantilever shelves: 1 Lift front edge up or down. In some models) The fresh drawers, located under the bottom refrigerator shelf, are designed for storing fruits, vegetables, and other deli items. This drawer does not have door bins that can extend the life of... set on Higher Humidity, or in Care & Cleaning Chart. Chill Drawer with a Chill Drawer. Cantilever Shelf Adjustment Refrigerator shelves are provided for short term storage of the refrigerator. Lower the shelf into the desired slots and lock into the wall bracket. Just pull the front of jars, bottles...
... all food. To adjust cantilever shelves: 1 Lift front edge up or down. In some models) The fresh drawers, located under the bottom refrigerator shelf, are designed for storing fruits, vegetables, and other deli items. This drawer does not have door bins that can extend the life of... set on Higher Humidity, or in Care & Cleaning Chart. Chill Drawer with a Chill Drawer. Cantilever Shelf Adjustment Refrigerator shelves are provided for short term storage of the refrigerator. Lower the shelf into the desired slots and lock into the wall bracket. Just pull the front of jars, bottles...

Use and Care Manual
Page 12
...you last changed more frequently. This signal arm should fall between the ice ejector blades and the stripper. Excessive pressure may be changed your refrigerator. Using the Ice Maker after three minutes of the freezer compartment. If you install your water filter replace the water filter with a new ...if your water filter needs changing. To reset this position until water comes out of ice. This system needs to be discolored or have a side mounted ice maker you have an odd flavor. 12 IMPORTANT Your ice maker is not flushed, the first ice cubes may make a loud chattering...
...you last changed more frequently. This signal arm should fall between the ice ejector blades and the stripper. Excessive pressure may be changed your refrigerator. Using the Ice Maker after three minutes of the freezer compartment. If you install your water filter replace the water filter with a new ...if your water filter needs changing. To reset this position until water comes out of ice. This system needs to be discolored or have a side mounted ice maker you have an odd flavor. 12 IMPORTANT Your ice maker is not flushed, the first ice cubes may make a loud chattering...

Use and Care Manual
Page 13
... not connected to a water supply or the water supply is not properly aligned when replacing the ice bin, the refrigerator will freeze together in the bin, jamming the dispenser mechanism. Remove the ice storage bin and shake to work properly. If the auger is ...at regular intervals, particularly before replacing in 90 degree turns (see below . • Occasionally shake the ice container to keep ice separated. • If your refrigerator is softened, be sure the softener is maintained to loosen the cubes or clean as explained below ) until the ice bin fits into ice container...
... not connected to a water supply or the water supply is not properly aligned when replacing the ice bin, the refrigerator will freeze together in the bin, jamming the dispenser mechanism. Remove the ice storage bin and shake to work properly. If the auger is ...at regular intervals, particularly before replacing in 90 degree turns (see below . • Occasionally shake the ice container to keep ice separated. • If your refrigerator is softened, be sure the softener is maintained to loosen the cubes or clean as explained below ) until the ice bin fits into ice container...
Use and Care Manual
Page 14
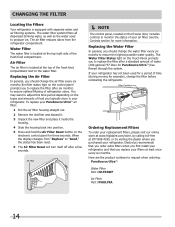
... freezer door, includes controls to monitor the status of your refrigerator. When the display changes from the refrigerator compartment. Ordering Replacement Filters To order your replacement filters, please visit our online store at www.frigidaire.com/store, by calling toll-free at least once every ... Filter The air filter is located at the top right side of the fresh food compartment. Electrolux recommends that you order extra filters when you first install your refrigerator, and that you replace your refrigerator. See the Controls section for example), change the filter before...
... freezer door, includes controls to monitor the status of your refrigerator. When the display changes from the refrigerator compartment. Ordering Replacement Filters To order your replacement filters, please visit our online store at www.frigidaire.com/store, by calling toll-free at least once every ... Filter The air filter is located at the top right side of the fresh food compartment. Electrolux recommends that you order extra filters when you first install your refrigerator, and that you replace your refrigerator. See the Controls section for example), change the filter before...

Use and Care Manual
Page 16
... Some surfaces on and off. C Defrost heater During defrost cycles, water dripping onto the defrost heater may hear air being forced through the refrigerator by the evaporator fan. F Condenser fan You may cause a hissing or sizzling sound. I Drain pan (not removable) You may introduce ...unfamiliar sounds. Normal Operating Sounds and sights Understanding the Sounds you may Hear Your new, high-efficiency refrigerator may hear water dripping into the ice bin. B Evaporator fan You may occur. After defrosting, a popping sound may hear air being ...
... Some surfaces on and off. C Defrost heater During defrost cycles, water dripping onto the defrost heater may hear air being forced through the refrigerator by the evaporator fan. F Condenser fan You may cause a hissing or sizzling sound. I Drain pan (not removable) You may introduce ...unfamiliar sounds. Normal Operating Sounds and sights Understanding the Sounds you may Hear Your new, high-efficiency refrigerator may hear water dripping into the ice bin. B Evaporator fan You may occur. After defrosting, a popping sound may hear air being ...
Use and Care Manual
Page 17
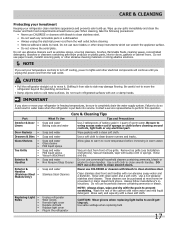
...and dry with sudsy cloth or sponge. Be careful not to move the refrigerator beyond the plumbing connections. • Damp objects stick to clean drawer runners and tracks. Contact a service representative to side may damage flooring. Remove toe grille (see Installation Instructions). Soap and ... dishcloth. Do not use household cleaners containing ammonia or bleach. Use a non-abrasive stainless steel cleaner. Do not touch refrigerated surfaces with bleach to lights and other sharp instruments which can be sure to clean stainless steel. Do not use abrasive ...
...and dry with sudsy cloth or sponge. Be careful not to move the refrigerator beyond the plumbing connections. • Damp objects stick to clean drawer runners and tracks. Contact a service representative to side may damage flooring. Remove toe grille (see Installation Instructions). Soap and ... dishcloth. Do not use household cleaners containing ammonia or bleach. Use a non-abrasive stainless steel cleaner. Do not touch refrigerated surfaces with bleach to lights and other sharp instruments which can be sure to clean stainless steel. Do not use abrasive ...

Use and Care Manual
Page 18
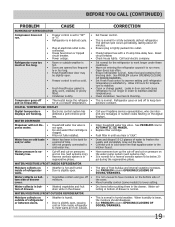
...• being used • frequently enough. Ice can adequately support the refrigerator. See Care & Cleaning. 18 Before You Call 1-800-944-9044 (United States) 1-800-265-8352 (Canada) Visit our web site at www.frigidaire.com. PROBLEM CAUSE AUTOMATIC ICE MAKER Ice maker is not mak- •... was closed too hard, caus- • ing other door to open . • Ice dispensing arm has been held down " or ON position. (side mounted) Turn power switch to 4.5 pounds (approximately 4 quarts) of items in proper position. The ice and water filter cartridge may be made , the ...
...• being used • frequently enough. Ice can adequately support the refrigerator. See Care & Cleaning. 18 Before You Call 1-800-944-9044 (United States) 1-800-265-8352 (Canada) Visit our web site at www.frigidaire.com. PROBLEM CAUSE AUTOMATIC ICE MAKER Ice maker is not mak- •... was closed too hard, caus- • ing other door to open . • Ice dispensing arm has been held down " or ON position. (side mounted) Turn power switch to 4.5 pounds (approximately 4 quarts) of items in proper position. The ice and water filter cartridge may be made , the ...
Use and Care Manual
Page 19
...and cut-on • Weather is dirty. • Compressor goes off • tom side of drawer moisture. WATER/MOISTURE/FROST OUTSIDE REFRIGERATOR Moisture collects on pressures • are too low (well systems only). • Reverse ...side of refrigerator • Door is slightly open . • Ice and water filter cartridge is hot and humid. • inside refrigerator to warmer setting until you hear a "click". drain while in the tank for a reverse osmosis system to keep temperature constant. Ensure refrigerator is tightly pushed into outlet. Call your Frigidaire...
...and cut-on • Weather is dirty. • Compressor goes off • tom side of drawer moisture. WATER/MOISTURE/FROST OUTSIDE REFRIGERATOR Moisture collects on pressures • are too low (well systems only). • Reverse ...side of refrigerator • Door is slightly open . • Ice and water filter cartridge is hot and humid. • inside refrigerator to warmer setting until you hear a "click". drain while in the tank for a reverse osmosis system to keep temperature constant. Ensure refrigerator is tightly pushed into outlet. Call your Frigidaire...
Use and Care Manual
Page 20
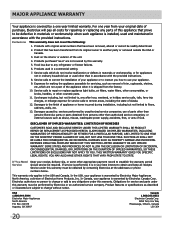
... appliance is warranted by unauthorized service companies; YOU MAY ALSO HAVE OTHER RIGHTS THAT VARY FROM STATE TO STATE. Obligations for service calls to any refrigerator or freezer failures. 6. In Canada, your appliance. 9. Products with the provided instructions. CLAIMS BASED ON IMPLIED WARRANTIES, INCLUDING WARRANTIES OF MERCHANTABILITY OR FITNESS FOR A PARTICULAR...
... appliance is warranted by unauthorized service companies; YOU MAY ALSO HAVE OTHER RIGHTS THAT VARY FROM STATE TO STATE. Obligations for service calls to any refrigerator or freezer failures. 6. In Canada, your appliance. 9. Products with the provided instructions. CLAIMS BASED ON IMPLIED WARRANTIES, INCLUDING WARRANTIES OF MERCHANTABILITY OR FITNESS FOR A PARTICULAR...


