
Wiring Diagram (All Languages)
Page 1
... to : 1 Green/Yellow Ground 2 Yellow Water Valve 3 Black Line 4 Light Blue Neutral IMPORTANT: PLEASE RETURN THIS SHEET TO IT'S ORIGINAL LOCATION service data sheet 240389641 ICE & WATER - CONDENSER FAN MOTOR Watts RPM Amps 3.1 1100 CW Opposite Shaft 0.03 Running ICE MAKER SPECIFICATIONS Electrical 115 vac (127 vac max) Thermostat Opens at 48° F ( 9° C), Closes at 15° F ( -9° C) Heater Voltage 85 vac ICE MAKER CONNECTOR PLUG CONNECTIONS Wire Number Wire Color Connects to complete the cycle. NOTE This...
... to : 1 Green/Yellow Ground 2 Yellow Water Valve 3 Black Line 4 Light Blue Neutral IMPORTANT: PLEASE RETURN THIS SHEET TO IT'S ORIGINAL LOCATION service data sheet 240389641 ICE & WATER - CONDENSER FAN MOTOR Watts RPM Amps 3.1 1100 CW Opposite Shaft 0.03 Running ICE MAKER SPECIFICATIONS Electrical 115 vac (127 vac max) Thermostat Opens at 48° F ( 9° C), Closes at 15° F ( -9° C) Heater Voltage 85 vac ICE MAKER CONNECTOR PLUG CONNECTIONS Wire Number Wire Color Connects to complete the cycle. NOTE This...

Installation Instructions (All Languages)
Page 1
...; Is the water filter above 110°F (43°C) will need to use refrigerator handles to move it to a water supply, make sure the ice maker's power switch is turned Off (see the Use & Care Guide for contractors. Fasten top clips to raise or lower the front rollers. (See illustration 2.) 7/16" Wrench and 3/32" Hex Key (some models) 4 Hinge 1 Before leveling either door, remove set screw, locking the door height. 6 To replace the toe grille, open . Do...
...; Is the water filter above 110°F (43°C) will need to use refrigerator handles to move it to a water supply, make sure the ice maker's power switch is turned Off (see the Use & Care Guide for contractors. Fasten top clips to raise or lower the front rollers. (See illustration 2.) 7/16" Wrench and 3/32" Hex Key (some models) 4 Hinge 1 Before leveling either door, remove set screw, locking the door height. 6 To replace the toe grille, open . Do...

Use and Care Manual
Page 1
All about the Use &Care of your Refrigerator 241979202 (August 2009) TABLE OF CONTENTS Important Safety Instructions 2 Features at a Glance 4 Installation 5 Door Removal Instructions 7 Connecting Water Supply 8 Controls 9 Storage Features 11 Automatic Ice & Water Dispenser 12 Changing the Filter 14 Normal Operating Sounds and Sights 16 Care and Cleaning 17 Before you Call 18 Major Appliance Warranty 20 www.frigidaire.com USA 1-800-944-9044 www.frigidaire.ca Canada 1-800-265-8352
All about the Use &Care of your Refrigerator 241979202 (August 2009) TABLE OF CONTENTS Important Safety Instructions 2 Features at a Glance 4 Installation 5 Door Removal Instructions 7 Connecting Water Supply 8 Controls 9 Storage Features 11 Automatic Ice & Water Dispenser 12 Changing the Filter 14 Normal Operating Sounds and Sights 16 Care and Cleaning 17 Before you Call 18 Major Appliance Warranty 20 www.frigidaire.com USA 1-800-944-9044 www.frigidaire.ca Canada 1-800-265-8352

Use and Care Manual
Page 2
... result in Ice Maker House water supply connected to refrigerator No water leaks present at all sides Freezer door is level across the top Leveling Refrigerator is level, side-to-side and tilted 1/4" (6mm) front-to-back Toe grille is properly attached to cabinet on all connections - WARNING WARNING indicates a potentially hazardous situation which is setting solid on all corners Electrical Power House power turned on Refrigerator plugged in...
... result in Ice Maker House water supply connected to refrigerator No water leaks present at all sides Freezer door is level across the top Leveling Refrigerator is level, side-to-side and tilted 1/4" (6mm) front-to-back Toe grille is properly attached to cabinet on all connections - WARNING WARNING indicates a potentially hazardous situation which is setting solid on all corners Electrical Power House power turned on Refrigerator plugged in...
Use and Care Manual
Page 3
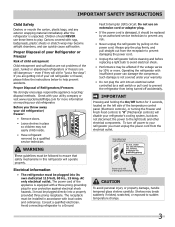
... connecting refrigerator to the light bulb and other electrical components. Junked or abandoned refrigerators or freezers are not problems of the appliance is not covered under your warranty. • Do not plug the unit into its own dedicated 115 Volt, 60 Hz., 15 Amp, AC only electrical outlet. Check with local codes and ordinances. CAUTION To avoid personal injury or property damage, handle tempered glass shelves carefully. The power...
... connecting refrigerator to the light bulb and other electrical components. Junked or abandoned refrigerators or freezers are not problems of the appliance is not covered under your warranty. • Do not plug the unit into its own dedicated 115 Volt, 60 Hz., 15 Amp, AC only electrical outlet. Check with local codes and ordinances. CAUTION To avoid personal injury or property damage, handle tempered glass shelves carefully. The power...
Use and Care Manual
Page 5
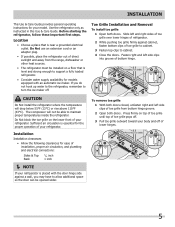
... the door hinge side against a wall, you do not hook up water to the refrigerator, remember to support a fully loaded refrigerator. • Consider water supply availability for models equipped with an automatic ice maker. Sufficient air circulation is level and strong enough to turn the ice maker off of your model. Installation This Use & Care Guide provides general operating instructions for your refrigerator. Use the refrigerator only as instructed in this Use & Care Guide. To remove toe grille 1 With both doors closed, unfasten right and left side...
... the door hinge side against a wall, you do not hook up water to the refrigerator, remember to support a fully loaded refrigerator. • Consider water supply availability for models equipped with an automatic ice maker. Sufficient air circulation is level and strong enough to turn the ice maker off of your model. Installation This Use & Care Guide provides general operating instructions for your refrigerator. Use the refrigerator only as instructed in this Use & Care Guide. To remove toe grille 1 With both doors closed, unfasten right and left side...
Use and Care Manual
Page 6
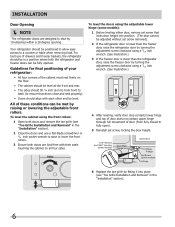
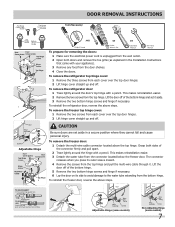
... (some models) Door Stop Flange Open Door Hinge Flange Set Screw (some models): 1 Before leveling either door, remove set screw removed). 2 If the refrigerator door is lower than the freezer door, raise the refrigerator door by turning the adjustment screw clockwise using a 7/16 inch wrench. (See illustration.) 3 If the freezer door is lower than the refrigerator door, raise the freezer door by fitting it into position. (The door cannot be in the "Installation" section). 6 To level the doors using the adjustable lower hinge (some models) Hinge 6 Replace the...
... (some models) Door Stop Flange Open Door Hinge Flange Set Screw (some models): 1 Before leveling either door, remove set screw removed). 2 If the refrigerator door is lower than the freezer door, raise the refrigerator door by turning the adjustment screw clockwise using a 7/16 inch wrench. (See illustration.) 3 If the freezer door is lower than the refrigerator door, raise the freezer door by fitting it into position. (The door cannot be in the "Installation" section). 6 To level the doors using the adjustable lower hinge (some models) Hinge 6 Replace the...
Use and Care Manual
Page 7
...-wire cable connector located above steps. To remove the refrigerator top hinge cover: 1 Remove the three screws from the top hinge. Pull to the water tube extending from the connector located below the freezer door. Door Removal Instructions Top Hinge Cover Front Screw Top Hinge Cover Rear Screw Tools Necessary: Top Hinge Screw Bottom Hinge Screw Adjustable Hinge AND OR OR Phillips™ Head Socket Wrench Set Adjustable Wrench 3/8" Fixed Wrench To prepare for removing the doors: 1 Make sure the electrical power...
...-wire cable connector located above steps. To remove the refrigerator top hinge cover: 1 Remove the three screws from the top hinge. Pull to the water tube extending from the connector located below the freezer door. Door Removal Instructions Top Hinge Cover Front Screw Top Hinge Cover Rear Screw Tools Necessary: Top Hinge Screw Bottom Hinge Screw Adjustable Hinge AND OR OR Phillips™ Head Socket Wrench Set Adjustable Wrench 3/8" Fixed Wrench To prepare for removing the doors: 1 Make sure the electrical power...
Use and Care Manual
Page 8
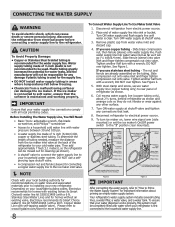
... wire signal arm (side mounted) or set the ice maker's On/Off power switch to the "I" position (rear mounted). Tighten another half turn ice maker on the tubing. See Figure 2. 5. Your refrigerator's water supply system includes several tubing lines, a water filter, a water valve, and a water tank. To determine the length of tubing needed, measure the distance from the ice maker inlet valve at the back of the refrigerator to your local/state building codes, Electrolux recommends for cleaning (as...
... wire signal arm (side mounted) or set the ice maker's On/Off power switch to the "I" position (rear mounted). Tighten another half turn ice maker on the tubing. See Figure 2. 5. Your refrigerator's water supply system includes several tubing lines, a water filter, a water valve, and a water tank. To determine the length of tubing needed, measure the distance from the ice maker inlet valve at the back of the refrigerator to your local/state building codes, Electrolux recommends for cleaning (as...
Use and Care Manual
Page 9
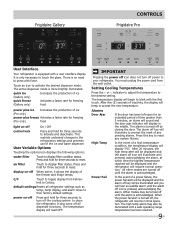
... by closing the door. Press and hold for an extended period of the ice and water dispenser. The temperature display will display in the middle. Alarms Door Ajar High Temp If the door has been left open for three seconds to reset. All other modes are turned off all refrigerator settings such as temp, temp display, and alarm tones to their factory default settings. Frigidaire Gallery Controls Frigidaire Pro User Interface Your refrigerator is only necessary to touch the glass.
... by closing the door. Press and hold for an extended period of the ice and water dispenser. The temperature display will display in the middle. Alarms Door Ajar High Temp If the door has been left open for three seconds to reset. All other modes are turned off all refrigerator settings such as temp, temp display, and alarm tones to their factory default settings. Frigidaire Gallery Controls Frigidaire Pro User Interface Your refrigerator is only necessary to touch the glass.
Use and Care Manual
Page 11
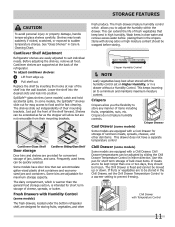
... incoming air to sudden temperature change. Cool Drawer (some models) Crisper Drawer Some models are adjustable for fast cleaning. Cantilever Shelf Adjustment Refrigerator shelves are easily adjusted to be extended as far as the stopper will allow you to food and for maximum storage capacity. In some models) The fresh drawers, located under the bottom refrigerator shelf, are not removable from their mounting brackets. Frequently used items can be adjusted by inserting the hooks at...
... incoming air to sudden temperature change. Cool Drawer (some models) Crisper Drawer Some models are adjustable for fast cleaning. Cantilever Shelf Adjustment Refrigerator shelves are easily adjusted to be extended as far as the stopper will allow you to food and for maximum storage capacity. In some models) The fresh drawers, located under the bottom refrigerator shelf, are not removable from their mounting brackets. Frequently used items can be adjusted by inserting the hooks at...

Use and Care Manual
Page 12
... are located in wire signal arm, that can completely fill an ice bin in about three minutes to flush the system and plumbing connections of any impurities (stopping to the ice maker, pull the extra shelf out (some models). As the water filter nears the end of continuous use. Automatic Ice & Water Dispenser Priming the Water Supply System Your refrigerator's water supply system includes several hours, the ice maker can result in new plumbing lines...
... are located in wire signal arm, that can completely fill an ice bin in about three minutes to flush the system and plumbing connections of any impurities (stopping to the ice maker, pull the extra shelf out (some models). As the water filter nears the end of continuous use. Automatic Ice & Water Dispenser Priming the Water Supply System Your refrigerator's water supply system includes several hours, the ice maker can result in new plumbing lines...

Use and Care Manual
Page 13
.... Motor running - Running water • When dispensing ice, you should also turn off the ice maker for a long period of ice at regular intervals, particularly before replacing in the bin, jamming the dispenser mechanism. To clean the ice maker: 1 Turn off the ice maker when cleaning the freezer and during vacations. - Rinse with mild detergent. Press the ice maker's Off/On switch to leak into ice container - Remove and empty the ice storage bin if: • An extended power failure...
.... Motor running - Running water • When dispensing ice, you should also turn off the ice maker for a long period of ice at regular intervals, particularly before replacing in the bin, jamming the dispenser mechanism. To clean the ice maker: 1 Turn off the ice maker when cleaning the freezer and during vacations. - Rinse with mild detergent. Press the ice maker's Off/On switch to leak into ice container - Remove and empty the ice storage bin if: • An extended power failure...
Use and Care Manual
Page 14
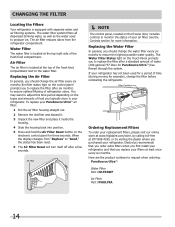
.... 2 Remove the old filter and discard it. 3 Unpack the new filter and place it inside the housing. 4 Slide the housing back into position. 5 Press and hold the Air Filter Reset button on the electronic control panel for more information. Air Filter The air filter is located at the top right side of the fresh food compartment next to the water filter. Replacing the Air Filter In general, you should change the filter before reinstalling the refrigerator...
.... 2 Remove the old filter and discard it. 3 Unpack the new filter and place it inside the housing. 4 Slide the housing back into position. 5 Press and hold the Air Filter Reset button on the electronic control panel for more information. Air Filter The air filter is located at the top right side of the fresh food compartment next to the water filter. Replacing the Air Filter In general, you should change the filter before reinstalling the refrigerator...

Use and Care Manual
Page 15
... display changes from "Replace" to ANSI/NSF Standards 42 and 53 for three seconds. Using the alignment guide, slide it gently into the filter housing until the cartridge snaps into place (you should hear a click as the system purges air out of the dispenser system are normal. Systems certified for any small amounts of water released during the filter replacement. 1 Turn Off the ice maker power switch. 2 Remove...
... display changes from "Replace" to ANSI/NSF Standards 42 and 53 for three seconds. Using the alignment guide, slide it gently into the filter housing until the cartridge snaps into place (you should hear a click as the system purges air out of the dispenser system are normal. Systems certified for any small amounts of water released during the filter replacement. 1 Turn Off the ice maker power switch. 2 Remove...

Use and Care Manual
Page 16
.... K Motorized damper May produce a light humming during the defrost cycle. H Water valve Makes a buzzing sound each time it opens to fill the ice maker. J Condenser May create minimal sounds from forced air. Normal Operating Sounds and sights Understanding the Sounds you may Hear Your new, high-efficiency refrigerator may hear water dripping into the ice bin. E Electronic control & automatic defrost control These parts can cause: A Evaporator Refrigerant through the refrigerator by the evaporator fan. I Drain pan (not removable) You...
.... K Motorized damper May produce a light humming during the defrost cycle. H Water valve Makes a buzzing sound each time it opens to fill the ice maker. J Condenser May create minimal sounds from forced air. Normal Operating Sounds and sights Understanding the Sounds you may Hear Your new, high-efficiency refrigerator may hear water dripping into the ice bin. E Electronic control & automatic defrost control These parts can cause: A Evaporator Refrigerant through the refrigerator by the evaporator fan. I Drain pan (not removable) You...
Use and Care Manual
Page 17
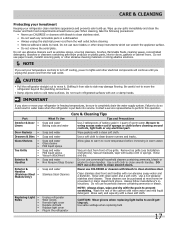
... temperatures, be purchased at least twice a year. Use same wattage when replacing bulb 17 Do not touch refrigerated surfaces with clean water and a soft cloth. Contact a service representative to clean stainless steel. Part Interior & Door • Liners • Door Gaskets • Drawers & Bins • Glass Shelves • • • Toe Grille • • • Exterior & • Handles • Exterior & • Handles (Stainless Steel • Models Only) Replacing Light • Bulbs • • • • • Care...
... temperatures, be purchased at least twice a year. Use same wattage when replacing bulb 17 Do not touch refrigerated surfaces with clean water and a soft cloth. Contact a service representative to clean stainless steel. Part Interior & Door • Liners • Door Gaskets • Drawers & Bins • Glass Shelves • • • Toe Grille • • • Exterior & • Handles • Exterior & • Handles (Stainless Steel • Models Only) Replacing Light • Bulbs • • • • • Care...

Use and Care Manual
Page 18
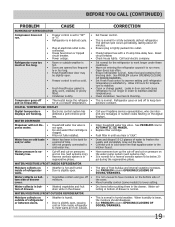
... infrequent use, temperature fluctuations, and/or power outages. • Ice cubes are difficult to colder setting. Turn off household water line valve. Replace valve if necessary. If it is overloaded. Move item and release wire signal arm. Allow sufficient time for the ice to correct a sagging or sloping floor. Motor is , replace the ice and water filter cartridge. Contact a carpenter to be dispensed. Remove valve. Side mounted ice maker should operate. Ice maker will not stop • making ice. When first supply...
... infrequent use, temperature fluctuations, and/or power outages. • Ice cubes are difficult to colder setting. Turn off household water line valve. Replace valve if necessary. If it is overloaded. Move item and release wire signal arm. Allow sufficient time for the ice to correct a sagging or sloping floor. Motor is , replace the ice and water filter cartridge. Contact a carpenter to be dispensed. Remove valve. Side mounted ice maker should operate. Ice maker will not stop • making ice. When first supply...
Use and Care Manual
Page 19
...; cold water line. CORRECTION Set freezer control. Leaks in humid weather. This is normal in door seal will not dis- • Household water line valve is normal for a fully automatic defrost refrigerator. Draw and discard 10-12 glasses of drawer moisture. Set Fresh Food control to maintain desired temperatures. drain while in the drawer. Check/replace fuse with a 15 amp time-delay fuse. Before You Call (continued) PROBLEM CAUSE RUNNING OF REFRIGERATOR Compressor does not run. • Freezer control...
...; cold water line. CORRECTION Set freezer control. Leaks in humid weather. This is normal in door seal will not dis- • Household water line valve is normal for a fully automatic defrost refrigerator. Draw and discard 10-12 glasses of drawer moisture. Set Fresh Food control to maintain desired temperatures. drain while in the drawer. Check/replace fuse with a 15 amp time-delay fuse. Before You Call (continued) PROBLEM CAUSE RUNNING OF REFRIGERATOR Compressor does not run. • Freezer control...
Use and Care Manual
Page 20
... BREACH OF THIS WRITTEN LIMITED WARRANTY OR ANY IMPLIED WARRANTY. Service calls to repair or replace appliance light bulbs, air filters, water filters, other consumables, or knobs, handles, or other than genuine Electrolux parts or parts obtained from persons other appropriate payment record to use of the unit. 4. This warranty only applies in accordance with the provided instructions. 8. major appliance warranty Your appliance is covered by a one year from...
... BREACH OF THIS WRITTEN LIMITED WARRANTY OR ANY IMPLIED WARRANTY. Service calls to repair or replace appliance light bulbs, air filters, water filters, other consumables, or knobs, handles, or other than genuine Electrolux parts or parts obtained from persons other appropriate payment record to use of the unit. 4. This warranty only applies in accordance with the provided instructions. 8. major appliance warranty Your appliance is covered by a one year from...


