Complete Owner's Guide
Page 5
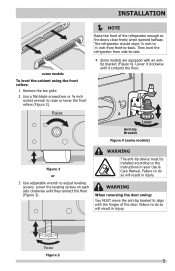
... clockwise until it clockwise until they contact the floor (Figure 3). Lower it contacts the floor. Failure to do so will result in your Use & Care Manual. The refrigerator should slope ¼ inch to ½ inch from side-to-side. 4 Some models are equipped with the hinges of the refrigerator enough so...
... clockwise until it clockwise until they contact the floor (Figure 3). Lower it contacts the floor. Failure to do so will result in your Use & Care Manual. The refrigerator should slope ¼ inch to ½ inch from side-to-side. 4 Some models are equipped with the hinges of the refrigerator enough so...

Installation Instructions
Page 1
...or 3/8 inch socket wrench to raise or lower the front rollers (Figure 2). 3 Use adjustable wrench to the instructions in your Use & Care Manual. Shifting the refrigerator from the water valve inlet at any connections that the refrigerator is not plugged in. 2 Flush the supply line until water ...the copper tube into place. Plug in 24 hours Ice Maker is turned Off (see "Door Removal Instructions" in your Use & Care Manual. The refrigerator should slope ¼ inch to ½ inch from which can remove this tubing is shut off * recommended Location of these minimum ...
...or 3/8 inch socket wrench to raise or lower the front rollers (Figure 2). 3 Use adjustable wrench to the instructions in your Use & Care Manual. Shifting the refrigerator from the water valve inlet at any connections that the refrigerator is not plugged in. 2 Flush the supply line until water ...the copper tube into place. Plug in 24 hours Ice Maker is turned Off (see "Door Removal Instructions" in your Use & Care Manual. The refrigerator should slope ¼ inch to ½ inch from which can remove this tubing is shut off * recommended Location of these minimum ...
Wiring Diagram
Page 1
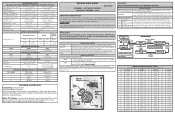
... to assist qualified repair personnel only. The correct fill is designed to diagnose individual electrical circuits. Untrained persons should function to Enter Manual Defrost. IMPORTANT If any Test Press Door Switch 2 Times 3 Times and Hold 4th Press 2 Beeps Press Door Switch 5 Times... Test 1: 2 Beeps Test 2: Power ON Press Door Switch Compressor ON Enters Service 2 Times Mode 2 Beeps Press Door Switch 2 Times Manual Defrost 2 Beeps to confirm the next test has started. AUTOMATIC DEFROST TOP MOUNT FREEZER - IMPORTANT PLEASE RETURN THIS SHEET TO ITS ORIGINAL LOCATION...
... to assist qualified repair personnel only. The correct fill is designed to diagnose individual electrical circuits. Untrained persons should function to Enter Manual Defrost. IMPORTANT If any Test Press Door Switch 2 Times 3 Times and Hold 4th Press 2 Beeps Press Door Switch 5 Times... Test 1: 2 Beeps Test 2: Power ON Press Door Switch Compressor ON Enters Service 2 Times Mode 2 Beeps Press Door Switch 2 Times Manual Defrost 2 Beeps to confirm the next test has started. AUTOMATIC DEFROST TOP MOUNT FREEZER - IMPORTANT PLEASE RETURN THIS SHEET TO ITS ORIGINAL LOCATION...


