Complete Owner's Guide
Page 1
All about the Use &Care of your Refrigerator 807876504 (April 2014) TABLE OF CONTENTS Important Safety Instructions 2 Controls 13 Installation 4 Normal Operating Sounds and Sights..........15 Door Removal/Reversal Instructions 6 Care and Cleaning 16 Handle Installation 8 Before you Call 18 Connecting Water Supply 10 Major Appliance Warranty 19 Ice Service 12 www.frigidaire.com USA 1-800-944-9044 www.frigidaire.ca Canada 1-800-265-8352
All about the Use &Care of your Refrigerator 807876504 (April 2014) TABLE OF CONTENTS Important Safety Instructions 2 Controls 13 Installation 4 Normal Operating Sounds and Sights..........15 Door Removal/Reversal Instructions 6 Care and Cleaning 16 Handle Installation 8 Before you Call 18 Connecting Water Supply 10 Major Appliance Warranty 19 Ice Service 12 www.frigidaire.com USA 1-800-944-9044 www.frigidaire.ca Canada 1-800-265-8352

Complete Owner's Guide
Page 2
... hazard-related. recheck in 24 hours Ice maker is setting solid on all corners Electrical Power House power turned on Refrigerator plugged in Ice Maker House water supply connected to refrigerator No water leaks present at all connections - WARNING Final Checks Shipping material removed Fresh food and freezer temperatures set Crisper humidity controls set Registration card sent in WARNING indicates a potentially hazardous situation which , if not avoided...
... hazard-related. recheck in 24 hours Ice maker is setting solid on all corners Electrical Power House power turned on Refrigerator plugged in Ice Maker House water supply connected to refrigerator No water leaks present at all connections - WARNING Final Checks Shipping material removed Fresh food and freezer temperatures set Crisper humidity controls set Registration card sent in WARNING indicates a potentially hazardous situation which , if not avoided...
Complete Owner's Guide
Page 3
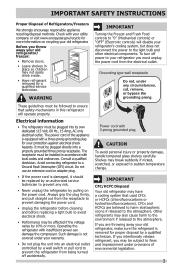
... 115 Volt, 60 Hz., 15 Amp, AC only electrical outlet. Operating the refrigerator with 3-prong grounded plug CAUTION To avoid personal injury or property damage, handle tempered glass shelves carefully. If you throw away your old refrigerator/ freezer: • Remove doors. • Leave shelves in place so children may have a cooling system that safety mechanisms in accordance with local codes and ordinances. Before you are believed...
... 115 Volt, 60 Hz., 15 Amp, AC only electrical outlet. Operating the refrigerator with 3-prong grounded plug CAUTION To avoid personal injury or property damage, handle tempered glass shelves carefully. If you throw away your old refrigerator/ freezer: • Remove doors. • Leave shelves in place so children may have a cooling system that safety mechanisms in accordance with local codes and ordinances. Before you are believed...
Complete Owner's Guide
Page 4
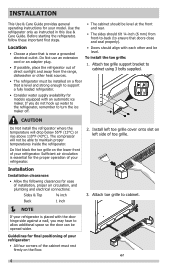
... have to support a fully loaded refrigerator. • Consider water supply availability for models equipped with each other and be installed on the floor. 4 2. CAUTION Do Not install the refrigerator where the temperature will not be opened wider. Sufficient air circulation is essential for the proper operation of your refrigerator is near a grounded electrical outlet. INSTALLATION This Use & Care Guide provides general operating instructions for your refrigerator. Use the refrigerator only as instructed in this Use & Care Guide. Attach...
... have to support a fully loaded refrigerator. • Consider water supply availability for models equipped with each other and be installed on the floor. 4 2. CAUTION Do Not install the refrigerator where the temperature will not be opened wider. Sufficient air circulation is essential for the proper operation of your refrigerator is near a grounded electrical outlet. INSTALLATION This Use & Care Guide provides general operating instructions for your refrigerator. Use the refrigerator only as instructed in this Use & Care Guide. Attach...

Complete Owner's Guide
Page 6
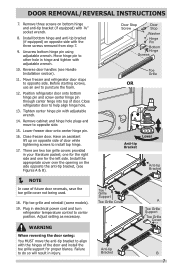
.... 4. DOOR REMOVAL/REVERSAL INSTRUCTIONS Tools Necessary: Adjustable Wrench or PhillipsTM Head Socket Wrench Set Top Hinge Cover Front Screw Top Hinge Cover Rear Screw or 3/8" Fixed Wrench Top Hinge Screw Bottom Hinge Screw NOTE The direction in which your refrigerator doors open (door swing) can be performed by moving the door hinges from one side to the other. Set door aside. Unscrew center hinge pin using adjustable wrench and save for reassembly. Door Stop Screw Door Stop...
.... 4. DOOR REMOVAL/REVERSAL INSTRUCTIONS Tools Necessary: Adjustable Wrench or PhillipsTM Head Socket Wrench Set Top Hinge Cover Front Screw Top Hinge Cover Rear Screw or 3/8" Fixed Wrench Top Hinge Screw Bottom Hinge Screw NOTE The direction in which your refrigerator doors open (door swing) can be performed by moving the door hinges from one side to the other. Set door aside. Unscrew center hinge pin using adjustable wrench and save for reassembly. Door Stop Screw Door Stop...
Complete Owner's Guide
Page 7
... left side. Close refrigerator door to puncture the foam. 12. Close freezer door. Unscrew bottom hinge pin using adjustable wrench. Before starting screws, use an awl to help align hinge hole. 13. There are two toe grille covers provided in electrical power cord and turn refrigerator temperature control to align with adjustable wrench. 10. DOOR REMOVAL/REVERSAL INSTRUCTIONS 7. Remove three screws on opposite side of door. Move freezer and refrigerator door stops to install top hinge. 17. Lower freezer door onto center hinge...
... left side. Close refrigerator door to puncture the foam. 12. Close freezer door. Unscrew bottom hinge pin using adjustable wrench. Before starting screws, use an awl to help align hinge hole. 13. There are two toe grille covers provided in electrical power cord and turn refrigerator temperature control to align with adjustable wrench. 10. DOOR REMOVAL/REVERSAL INSTRUCTIONS 7. Remove three screws on opposite side of door. Move freezer and refrigerator door stops to install top hinge. 17. Lower freezer door onto center hinge...
Complete Owner's Guide
Page 10
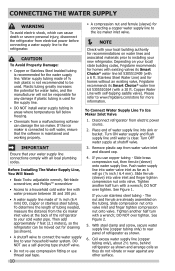
... the ice maker is connected to the refrigerator. Turn ON water supply and flush supply line until water is maintained and working properly. Turn OFF water supply at the back of tubing needed, measure the distance from electrical power before connecting a water supply line to soft water, ensure that your local/ state building codes, Frigidaire recommends for cleaning (as shown and arrange coils so they do not vibrate or wear against any damage if plastic tubing is used...
... the ice maker is connected to the refrigerator. Turn ON water supply and flush supply line until water is maintained and working properly. Turn OFF water supply at the back of tubing needed, measure the distance from electrical power before connecting a water supply line to soft water, ensure that your local/ state building codes, Frigidaire recommends for cleaning (as shown and arrange coils so they do not vibrate or wear against any damage if plastic tubing is used...
Complete Owner's Guide
Page 12
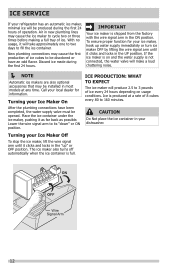
... times before making a full tray of ice every 24 hours depending on and the water supply is produced at any time. ICE SERVICE If your refrigerator has an automatic ice maker, minimal ice will be discolored or have been completed, the water supply valve must be installed in most models at a rate of operation. New plumbing connections may be opened. Turning your dishwasher. CAUTION Do Not place the ice container in your Ice Maker On...
... times before making a full tray of ice every 24 hours depending on and the water supply is produced at any time. ICE SERVICE If your refrigerator has an automatic ice maker, minimal ice will be discolored or have been completed, the water supply valve must be installed in most models at a rate of operation. New plumbing connections may be opened. Turning your dishwasher. CAUTION Do Not place the ice container in your Ice Maker On...
Complete Owner's Guide
Page 13
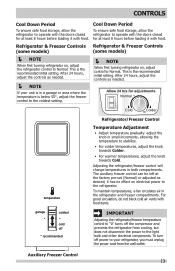
.... Auxiliary Freezer Control 13 To maintain temperatures, a fan circulates air in a garage or area where the temperature is in the refrigerator and freezer compartments. Refrigerator & Freezer Controls Refrigerator & Freezer Controls (some models) (some models) NOTE When first turning refrigerator on electrical power to the refrigerator. After 24 hours, adjust the controls as desired; This is the recommended initial setting. Cool Down Period To ensure safe food storage, allow the refrigerator to operate with the doors closed for...
.... Auxiliary Freezer Control 13 To maintain temperatures, a fan circulates air in a garage or area where the temperature is in the refrigerator and freezer compartments. Refrigerator & Freezer Controls Refrigerator & Freezer Controls (some models) (some models) NOTE When first turning refrigerator on electrical power to the refrigerator. After 24 hours, adjust the controls as desired; This is the recommended initial setting. Cool Down Period To ensure safe food storage, allow the refrigerator to operate with the doors closed for...
Complete Owner's Guide
Page 15
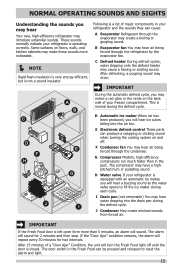
... the Fresh Food door is a list of a "Door Ajar" Condition, the unit will repeat every 30 minutes for 2 minutes and then stop. G Compressor Modern, high-efficiency compressors run much faster than 5 minutes, an alarm will hear ice cubes falling into the drain pan during the defrost cycle. I Following is left open form more noticeable. NOTE Rigid foam insulation is very energy efficient, but is...
... the Fresh Food door is a list of a "Door Ajar" Condition, the unit will repeat every 30 minutes for 2 minutes and then stop. G Compressor Modern, high-efficiency compressors run much faster than 5 minutes, an alarm will hear ice cubes falling into the drain pan during the defrost cycle. I Following is left open form more noticeable. NOTE Rigid foam insulation is very energy efficient, but is...
Complete Owner's Guide
Page 16
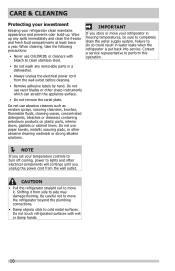
... you set your temperature controls to turn off cooling, power to lights and other electrical components will continue until you store or move it from the wall outlet. Shifting it . Do not use paper towels, metallic scouring pads, or other sharp instruments which can scratch the appliance surface. • Do not remove the serial plate. Failure to completely drain the water supply system. CARE & CLEANING Protecting...
... you set your temperature controls to turn off cooling, power to lights and other electrical components will continue until you store or move it from the wall outlet. Shifting it . Do not use paper towels, metallic scouring pads, or other sharp instruments which can scratch the appliance surface. • Do not remove the serial plate. Failure to completely drain the water supply system. CARE & CLEANING Protecting...

Complete Owner's Guide
Page 17
... alcohol to clean handles. Rinse with a clean soft cloth. Use a non-abrasive stainless steel cleaner. NOTE: Always clean, wipe and dry with warm water and mild liquid detergent. Use same wattage when replacing bulb 17 CARE & CLEANING Part Interior & Door Liners Door Gaskets Drawers & Bins Glass Shelves Toe Grille Exterior & Handles Exterior & Handles (Stainless Steel Models Only) Replacing Light Bulbs Care & Cleaning Tips What To Use Tips and Precautions • Soap and water • Baking soda and water Use 2 tablespoons of baking soda in warm water. Vacuum dust...
... alcohol to clean handles. Rinse with a clean soft cloth. Use a non-abrasive stainless steel cleaner. NOTE: Always clean, wipe and dry with warm water and mild liquid detergent. Use same wattage when replacing bulb 17 CARE & CLEANING Part Interior & Door Liners Door Gaskets Drawers & Bins Glass Shelves Toe Grille Exterior & Handles Exterior & Handles (Stainless Steel Models Only) Replacing Light Bulbs Care & Cleaning Tips What To Use Tips and Precautions • Soap and water • Baking soda and water Use 2 tablespoons of baking soda in warm water. Vacuum dust...
Complete Owner's Guide
Page 18
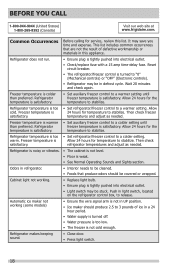
... a warmer setting until than preferred. Refrigerator does not run. • Ensure plug is turned to release. Reset circuit breaker. • The refrigerator/freezer control is tightly pushed into electrical outlet. • Light switch may be covered or wrapped. Refrigerator temperature is tightly pushed into electrical outlet. • Check/replace fuse with a 15 amp time-delay fuse. Cabinet light not working (some models) • Ensure the wire signal arm is not in defrost cycle...
... a warmer setting until than preferred. Refrigerator does not run. • Ensure plug is turned to release. Reset circuit breaker. • The refrigerator/freezer control is tightly pushed into electrical outlet. • Light switch may be covered or wrapped. Refrigerator temperature is tightly pushed into electrical outlet. • Check/replace fuse with a 15 amp time-delay fuse. Cabinet light not working (some models) • Ensure the wire signal arm is not in defrost cycle...
Complete Owner's Guide
Page 19
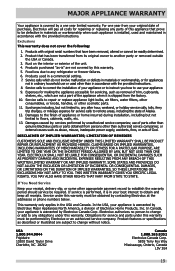
..., but not limited to repair or replace appliance light bulbs, air filters, water filters, other consumables, or knobs, handles, or other than authorized service companies; or external causes such as -is" are subject to use your appliance. 9. Products purchased "as abuse, misuse, inadequate power supply, accidents, fires, or acts of the appliance when it is in accordance with the provided instructions. 8. Food loss due...
..., but not limited to repair or replace appliance light bulbs, air filters, water filters, other consumables, or knobs, handles, or other than authorized service companies; or external causes such as -is" are subject to use your appliance. 9. Products purchased "as abuse, misuse, inadequate power supply, accidents, fires, or acts of the appliance when it is in accordance with the provided instructions. 8. Food loss due...

Installation Instructions
Page 1
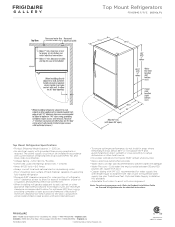
... surfaces. 9 Open water supply shut-off * recommended Vegetables hi Fruits lo Humidity Control 8 Door Removal (if necessary) If you purchased your Use & Care Manual. WARNING To avoid electric shock, which you need : • Access to install your refrigerator. 1 Prepare The Installation Site Include these instructions. Then level the refrigerator from side of cabinet only. • Do not run retaining straps over -tighten. 7 Secure the copper tube to your refrigerator's rear panel with...
... surfaces. 9 Open water supply shut-off * recommended Vegetables hi Fruits lo Humidity Control 8 Door Removal (if necessary) If you purchased your Use & Care Manual. WARNING To avoid electric shock, which you need : • Access to install your refrigerator. 1 Prepare The Installation Site Include these instructions. Then level the refrigerator from side of cabinet only. • Do not run retaining straps over -tighten. 7 Secure the copper tube to your refrigerator's rear panel with...
Wiring Diagram
Page 1
... FF door switch twice again to rotate motor gear counterclockwise until 5 minutes of inactivity expire. Use screwdriver to advance between tests. If the "Door Ajar" condition remains, the alarm will turn is equal to Exit Manual Defrost. feel for heat or air flow, as appropriate, to 4.3 oz.). DO NOT allow torch to : 1 Green / Yellow Ground 2 Yellow Water Valve 3 Black Line 4 Light Blue Neutral ICE MAKER INFORMATION Test Cycling: Remove cover...
... FF door switch twice again to rotate motor gear counterclockwise until 5 minutes of inactivity expire. Use screwdriver to advance between tests. If the "Door Ajar" condition remains, the alarm will turn is equal to Exit Manual Defrost. feel for heat or air flow, as appropriate, to 4.3 oz.). DO NOT allow torch to : 1 Green / Yellow Ground 2 Yellow Water Valve 3 Black Line 4 Light Blue Neutral ICE MAKER INFORMATION Test Cycling: Remove cover...
Wiring Diagram
Page 2
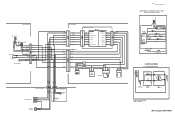
... BROWN YEL/BLK RED/WHITE SERVICE CORD SEE COMPRESSOR WIRING CONDENSER FAN I /M WATER VALVE COMPRESSOR WIRING P.T.C. BLUE ERF-1500 BOARD COMP CN1-5 FAN CN1-9 HEATER CN1-3 LAMP CN1-7 NEUTRAL CN1-1/CN5-3 LINE CN5-1 CONDENSER FAN FRESH FOOD LIGHT SWITCH EVAPORATOR FAN COIL HEATER SAFETY/ DEFROST BI-METAL FRESH FOOD LIGHT NEUTRAL LINE AUTO ICE MAKER I /M WATER VALVE LIGHT, AIR & WATER BOX LT. BLUE LT. BLUE) GRN/YEL COMPRESSOR RED LT. FREEZER COMPARTMENT EVAPORATOR FAN COIL COVER ICE MAKER RED/WHITE GRN/YEL...
... BROWN YEL/BLK RED/WHITE SERVICE CORD SEE COMPRESSOR WIRING CONDENSER FAN I /M WATER VALVE COMPRESSOR WIRING P.T.C. BLUE ERF-1500 BOARD COMP CN1-5 FAN CN1-9 HEATER CN1-3 LAMP CN1-7 NEUTRAL CN1-1/CN5-3 LINE CN5-1 CONDENSER FAN FRESH FOOD LIGHT SWITCH EVAPORATOR FAN COIL HEATER SAFETY/ DEFROST BI-METAL FRESH FOOD LIGHT NEUTRAL LINE AUTO ICE MAKER I /M WATER VALVE LIGHT, AIR & WATER BOX LT. BLUE LT. BLUE) GRN/YEL COMPRESSOR RED LT. FREEZER COMPARTMENT EVAPORATOR FAN COIL COVER ICE MAKER RED/WHITE GRN/YEL...

Product Specifications Sheet
Page 1
... Glass Freezer Shelf with ENERGY STAR®-Qualified Appliances. frigidaire.com Tilt-Out Freezer Door Rack Keeps items contained in ice maker automatically makes and replenishes ice cubes, so you always have to find foods quickly. Garage-Ready Our top freezer offers the flexibility to organize with the Custom-Flex™ Door and Store-More™ Drawer.1 Custom-Flex™ Door Bins & Accessories The Custom-Flex™ Door comes with model...
... Glass Freezer Shelf with ENERGY STAR®-Qualified Appliances. frigidaire.com Tilt-Out Freezer Door Rack Keeps items contained in ice maker automatically makes and replenishes ice cubes, so you always have to find foods quickly. Garage-Ready Our top freezer offers the flexibility to organize with the Custom-Flex™ Door and Store-More™ Drawer.1 Custom-Flex™ Door Bins & Accessories The Custom-Flex™ Door comes with model...

Product Specifications Sheet
Page 2
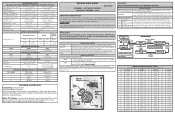
...Stops Door Hinge Covers Door Reverse Option Rollers - Medium, 1 - Can Dispenser Freezer Features Door Bins Door Racks Freezer Shelves Factory Ice Maker w/ Large Ice Bin Lighting 1 Full-Width Clear 1 Tilt-Out Wire 1 Full-Width Glass w/ Sliding Wire Basket Included (PN # IM116) LED Certifications ENERGY STAR® Yes Specifications Total Capacity (Cu. Dairy Bin, and 1 - Frigidaire Gallery Top Mount Refrigerators FGHI2164Q F / P / E 20.5 Cu. Small, 1 - Ft.) 5.1 Power Supply Connection Location Right Bottom Rear Water Inlet Connection Location Bottom Right Voltage Rating...
...Stops Door Hinge Covers Door Reverse Option Rollers - Medium, 1 - Can Dispenser Freezer Features Door Bins Door Racks Freezer Shelves Factory Ice Maker w/ Large Ice Bin Lighting 1 Full-Width Clear 1 Tilt-Out Wire 1 Full-Width Glass w/ Sliding Wire Basket Included (PN # IM116) LED Certifications ENERGY STAR® Yes Specifications Total Capacity (Cu. Dairy Bin, and 1 - Frigidaire Gallery Top Mount Refrigerators FGHI2164Q F / P / E 20.5 Cu. Small, 1 - Ft.) 5.1 Power Supply Connection Location Right Bottom Rear Water Inlet Connection Location Bottom Right Voltage Rating...
Product Specifications Sheet
Page 3
... web at frigidaire.com for water supply line with door alignment. recommended for detailed instructions. Ft. 31 3/4" 29 5/8" 69" 68 1/4" 28 1/2" 34" Top Mount Refrigerator Specifications • Product Shipping Weight (approx.) - 220 Lbs. • An electrical supply with 1/4" O.D. Gallery Top Mount Refrigerators FGHI2164Q F / P / E 20.5 Cu. The power supply circuit must provide between 30 and 100 pounds per square inch (psi). • Copper tubing with...
... web at frigidaire.com for water supply line with door alignment. recommended for detailed instructions. Ft. 31 3/4" 29 5/8" 69" 68 1/4" 28 1/2" 34" Top Mount Refrigerator Specifications • Product Shipping Weight (approx.) - 220 Lbs. • An electrical supply with 1/4" O.D. Gallery Top Mount Refrigerators FGHI2164Q F / P / E 20.5 Cu. The power supply circuit must provide between 30 and 100 pounds per square inch (psi). • Copper tubing with...


