Complete Owner's Guide
Page 1
All about the Use &Care of your Refrigerator 807876504 (April 2014) TABLE OF CONTENTS Important Safety Instructions 2 Controls 13 Installation 4 Normal Operating Sounds and Sights..........15 Door Removal/Reversal Instructions 6 Care and Cleaning 16 Handle Installation 8 Before you Call 18 Connecting Water Supply 10 Major Appliance Warranty 19 Ice Service 12 www.frigidaire.com USA 1-800-944-9044 www.frigidaire.ca Canada 1-800-265-8352
All about the Use &Care of your Refrigerator 807876504 (April 2014) TABLE OF CONTENTS Important Safety Instructions 2 Controls 13 Installation 4 Normal Operating Sounds and Sights..........15 Door Removal/Reversal Instructions 6 Care and Cleaning 16 Handle Installation 8 Before you Call 18 Connecting Water Supply 10 Major Appliance Warranty 19 Ice Service 12 www.frigidaire.com USA 1-800-944-9044 www.frigidaire.ca Canada 1-800-265-8352

Complete Owner's Guide
Page 2
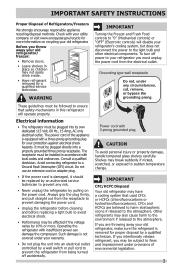
..., and any moving parts of your Refrigerator or Freezer IMPORTANT IMPORTANT indicates installation, operation or maintenance information which , if not avoided, may become airtight chambers, and can cause severe cuts, and also destroy finishes if they will result in Ice Maker House water supply connected to refrigerator No water leaks present at all safety messages that follow the instructions below to avoid possible...
..., and any moving parts of your Refrigerator or Freezer IMPORTANT IMPORTANT indicates installation, operation or maintenance information which , if not avoided, may become airtight chambers, and can cause severe cuts, and also destroy finishes if they will result in Ice Maker House water supply connected to refrigerator No water leaks present at all safety messages that follow the instructions below to avoid possible...
Complete Owner's Guide
Page 3
... "OFF" (Electronic controls) will operate properly. To turn off accidentally. The power cord of the appliance is removed for your refrigerator's cooling system, but does not disconnect the power to a Ground Fault Interrupter (GFI) circuit. Avoid connecting refrigerator to the light bulb and other electrical components. CFCs and HCFCs are throwing away your old refrigerator/ freezer: • Remove doors. • Leave shelves in accordance with local codes and ordinances...
... "OFF" (Electronic controls) will operate properly. To turn off accidentally. The power cord of the appliance is removed for your refrigerator's cooling system, but does not disconnect the power to a Ground Fault Interrupter (GFI) circuit. Avoid connecting refrigerator to the light bulb and other electrical components. CFCs and HCFCs are throwing away your old refrigerator/ freezer: • Remove doors. • Leave shelves in accordance with local codes and ordinances...
Complete Owner's Guide
Page 4
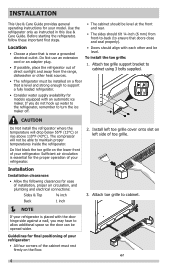
... support a fully loaded refrigerator. • Consider water supply availability for models equipped with an automatic ice maker. Sufficient air circulation is placed with each other heat sources. • Doors should tilt ¼-inch (6 mm) from the range, dishwasher or other and be installed on the lower front of toe grille. 3. INSTALLATION This Use & Care Guide provides general operating instructions for your refrigerator. Attach toe grille to maintain proper temperatures inside...
... support a fully loaded refrigerator. • Consider water supply availability for models equipped with an automatic ice maker. Sufficient air circulation is placed with each other heat sources. • Doors should tilt ¼-inch (6 mm) from the range, dishwasher or other and be installed on the lower front of toe grille. 3. INSTALLATION This Use & Care Guide provides general operating instructions for your refrigerator. Attach toe grille to maintain proper temperatures inside...

Complete Owner's Guide
Page 6
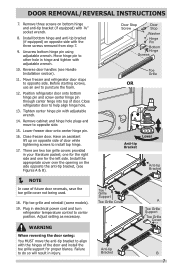
... controls) and remove the electrical power cord from door shelves. Lift refrigerator door off center hinge pin. Remove center hinge and shim by removing inside screw and loosening two outside screws on hinge pin. 4. Reversing the door swing should be reversed, from left to right or right to left, by a qualified person. Door removal and reversal instructions: 1. Trace around the hinge with a soft lead pencil. DOOR REMOVAL/REVERSAL INSTRUCTIONS Tools Necessary: Adjustable Wrench or PhillipsTM Head Socket Wrench Set Top Hinge Cover...
... controls) and remove the electrical power cord from door shelves. Lift refrigerator door off center hinge pin. Remove center hinge and shim by removing inside screw and loosening two outside screws on hinge pin. 4. Reversing the door swing should be reversed, from left to right or right to left, by a qualified person. Door removal and reversal instructions: 1. Trace around the hinge with a soft lead pencil. DOOR REMOVAL/REVERSAL INSTRUCTIONS Tools Necessary: Adjustable Wrench or PhillipsTM Head Socket Wrench Set Top Hinge Cover...
Complete Owner's Guide
Page 7
.... Close freezer door. Adjust setting as necessary. Install the appropriate cover over the opening on bottom hinge and anti-tip bracket (if equipped) with adjustable wrench. 10. Before starting screws, use an awl to opposite side. Tighten center hinge pin with the three screws removed from step 7. 9. Plug in electrical power cord and turn refrigerator temperature control to other hole in your literature packet; Door Stop Screw Door Stop Washer Hinge Pin Bottom Hinge Screws...
.... Close freezer door. Adjust setting as necessary. Install the appropriate cover over the opening on bottom hinge and anti-tip bracket (if equipped) with adjustable wrench. 10. Before starting screws, use an awl to opposite side. Tighten center hinge pin with the three screws removed from step 7. 9. Plug in electrical power cord and turn refrigerator temperature control to other hole in your literature packet; Door Stop Screw Door Stop Washer Hinge Pin Bottom Hinge Screws...
Complete Owner's Guide
Page 10
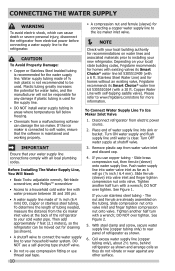
... injury, disconnect the refrigerator from electric power source. 2. To Connect Water Supply Line To Ice Maker Inlet Valve 1. Turn OFF water supply at the back of tubing needed, measure the distance from the ice maker inlet valve at shutoff valve. 3. Please refer to rear panel of water supply line into sink or bucket. If you use thread seal tape. 10 • A compression nut and ferrule (sleeve) for connecting a copper water supply line to the ice maker inlet valve. NOTE Check...
... injury, disconnect the refrigerator from electric power source. 2. To Connect Water Supply Line To Ice Maker Inlet Valve 1. Turn OFF water supply at the back of tubing needed, measure the distance from the ice maker inlet valve at shutoff valve. 3. Please refer to rear panel of water supply line into sink or bucket. If you use thread seal tape. 10 • A compression nut and ferrule (sleeve) for connecting a copper water supply line to the ice maker inlet valve. NOTE Check...
Complete Owner's Guide
Page 12
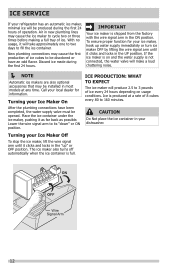
... be installed in most models at a rate of 8 cubes every 80 to fill the ice container. Turning your ice maker, hook up " or OFF position. If the ice maker is on and the water supply is shipped from the factory with the wire signal arm in new plumbing lines may cause the first production of operation. Ice is full. ICE SERVICE If your dishwasher. Air in the ON position. New plumbing connections...
... be installed in most models at a rate of 8 cubes every 80 to fill the ice container. Turning your ice maker, hook up " or OFF position. If the ice maker is on and the water supply is shipped from the factory with the wire signal arm in new plumbing lines may cause the first production of operation. Ice is full. ICE SERVICE If your dishwasher. Air in the ON position. New plumbing connections...
Complete Owner's Guide
Page 13
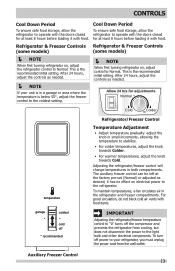
... from cooling, but does not disconnect the power to the light bulb and other electrical components. This is the recommended initial setting. After 24 hours, adjust the controls as needed . Auxiliary Freezer Control 13 After 24 hours, adjust the controls as desired; To maintain temperatures, a fan circulates air in both compartments. To turn off the compressor and prevents the refrigerator from the wall outlet. it with food. Refrigerator & Freezer Controls Refrigerator & Freezer Controls (some models) (some models...
... from cooling, but does not disconnect the power to the light bulb and other electrical components. This is the recommended initial setting. After 24 hours, adjust the controls as needed . Auxiliary Freezer Control 13 After 24 hours, adjust the controls as desired; To maintain temperatures, a fan circulates air in both compartments. To turn off the compressor and prevents the refrigerator from the wall outlet. it with food. Refrigerator & Freezer Controls Refrigerator & Freezer Controls (some models) (some models...
Complete Owner's Guide
Page 15
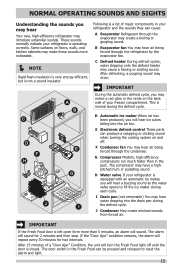
... into the drain pan during the defrost cycle. IMPORTANT During the automatic defrost cycle, you may hear Your new, high-efficiency refrigerator may introduce unfamiliar sounds. H Water valve If your refrigerator is closed. J Condenser May create minimal sounds from forced air. After 15 minutes of a "Door Ajar" Condition, the unit will hear a buzzing sound as the water valve opens to reset the alarm and light. 15 B Evaporator fan You...
... into the drain pan during the defrost cycle. IMPORTANT During the automatic defrost cycle, you may hear Your new, high-efficiency refrigerator may introduce unfamiliar sounds. H Water valve If your refrigerator is closed. J Condenser May create minimal sounds from forced air. After 15 minutes of a "Door Ajar" Condition, the unit will hear a buzzing sound as the water valve opens to reset the alarm and light. 15 B Evaporator fan You...
Complete Owner's Guide
Page 16
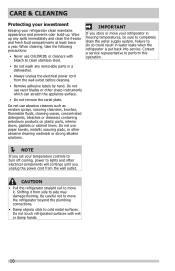
... remove the serial plate. CARE & CLEANING Protecting your investment Keeping your refrigerator in water leaks when the refrigerator is put back into service. Contact a service representative to perform this operation. NOTE If you set your temperature controls to turn off cooling, power to side may damage flooring. Be careful not to move your refrigerator clean maintains appearance and prevents odor build-up any removable parts in a dishwasher. • Always unplug the electrical power...
... remove the serial plate. CARE & CLEANING Protecting your investment Keeping your refrigerator in water leaks when the refrigerator is put back into service. Contact a service representative to perform this operation. NOTE If you set your temperature controls to turn off cooling, power to side may damage flooring. Be careful not to move your refrigerator clean maintains appearance and prevents odor build-up any removable parts in a dishwasher. • Always unplug the electrical power...

Complete Owner's Guide
Page 17
... and dry with bleach to clean smooth doors. CAUTION: Wear gloves when replacing light bulbs to prevent scratching. Use a soft cloth to clean handles. Wash the rest of toe grille. Always follow manufacturer's instructions. CARE & CLEANING Part Interior & Door Liners Door Gaskets Drawers & Bins Glass Shelves Toe Grille Exterior & Handles Exterior & Handles (Stainless Steel Models Only) Replacing Light Bulbs Care & Cleaning Tips What To Use Tips and Precautions • Soap and water • Baking soda and water Use 2 tablespoons of baking soda in warm water.
... and dry with bleach to clean smooth doors. CAUTION: Wear gloves when replacing light bulbs to prevent scratching. Use a soft cloth to clean handles. Wash the rest of toe grille. Always follow manufacturer's instructions. CARE & CLEANING Part Interior & Door Liners Door Gaskets Drawers & Bins Glass Shelves Toe Grille Exterior & Handles Exterior & Handles (Stainless Steel Models Only) Replacing Light Bulbs Care & Cleaning Tips What To Use Tips and Precautions • Soap and water • Baking soda and water Use 2 tablespoons of baking soda in warm water.
Complete Owner's Guide
Page 18
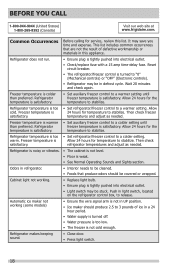
... ice in light switch, located on the refrigerator control box, to stabilize. refrigerator temperatures and adjust as needed . Refrigerator makes beeping sound. • Close door. • Press light switch. 18 Refrigerator is noisy or vibrates. • The cabinet is not level. • Floor is satisfactory. BEFORE YOU CALL 1-800-944-9044 (United States) 1-800-265-8352 (Canada) Visit our web site at www.frigidaire.com. Automatic ice maker not working . • Replace light bulb...
... ice in light switch, located on the refrigerator control box, to stabilize. refrigerator temperatures and adjust as needed . Refrigerator makes beeping sound. • Close door. • Press light switch. 18 Refrigerator is noisy or vibrates. • The cabinet is not level. • Floor is satisfactory. BEFORE YOU CALL 1-800-944-9044 (United States) 1-800-265-8352 (Canada) Visit our web site at www.frigidaire.com. Automatic ice maker not working . • Replace light bulb...
Complete Owner's Guide
Page 19
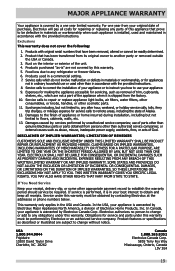
Exclusions This warranty does not cover the following: 1. Food loss due to repair or replace appliance light bulbs, air filters, water filters, other consumables, or knobs, handles, or other than in accordance with the provided instructions. 8. Expenses for making the appliance accessible for servicing, such as -is warranted by this appliance that prove to another party or removed outside the USA or Canada. 3. Service calls to any...
Exclusions This warranty does not cover the following: 1. Food loss due to repair or replace appliance light bulbs, air filters, water filters, other consumables, or knobs, handles, or other than in accordance with the provided instructions. 8. Expenses for making the appliance accessible for servicing, such as -is warranted by this appliance that prove to another party or removed outside the USA or Canada. 3. Service calls to any...

Installation Instructions
Page 1
... level. temperature coldest cold off * recommended temperature garage coldest cold off * recommended Location of your refrigerator. Final Checks Shipping material removed Fresh Food and Freezer controls set Crisper Humidity controls set Registration Card sent in House power turned on the lower front of these materials may damage flooring. 3 Connect Water Supply What you need to remove the doors to a cold water line with the installation of installation, proper air circulation, and plumbing and electrical connections...
... level. temperature coldest cold off * recommended temperature garage coldest cold off * recommended Location of your refrigerator. Final Checks Shipping material removed Fresh Food and Freezer controls set Crisper Humidity controls set Registration Card sent in House power turned on the lower front of these materials may damage flooring. 3 Connect Water Supply What you need to remove the doors to a cold water line with the installation of installation, proper air circulation, and plumbing and electrical connections...
Wiring Diagram
Page 1
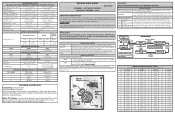
... or enter and exit SERVICE MODE. (See SERVICE MODE) Defrost is left open for operating sounds; DOOR AJAR ALARM Condition: Fresh Food Door is terminated when defrost thermistor located on . Duration: Alarm will char at 200°F and flash ignite (burn) at 500°F. All components of each test, the component listed will sound to : 1 Green / Yellow Ground 2 Yellow Water Valve 3 Black Line 4 Light Blue Neutral ICE MAKER INFORMATION Test Cycling: Remove cover by inserting screwdriver...
... or enter and exit SERVICE MODE. (See SERVICE MODE) Defrost is left open for operating sounds; DOOR AJAR ALARM Condition: Fresh Food Door is terminated when defrost thermistor located on . Duration: Alarm will char at 200°F and flash ignite (burn) at 500°F. All components of each test, the component listed will sound to : 1 Green / Yellow Ground 2 Yellow Water Valve 3 Black Line 4 Light Blue Neutral ICE MAKER INFORMATION Test Cycling: Remove cover by inserting screwdriver...
Wiring Diagram
Page 2
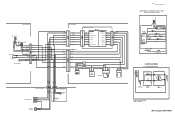
... MODELS. Wire Diagram A01475501 BLUE) GRN/YEL COMPRESSOR RED LT. STARTER WITH RUN CAPACITOR START 6 S S RUN 5 C M M 3 2 L1 OVERLOAD COMR MOTOR PTC STARTER RUN CAPACITOR * CAPACITOR IS ONLY USED WITH SOME P.T.C. MODELS. BLUE BROWN GREY/WHITE GREY/WHITE BLACK YELLOW GRN/YEL RED/WHITE LT. FREEZER COMPARTMENT EVAPORATOR FAN COIL COVER ICE MAKER RED/WHITE GRN/YEL LT. BLUE LT. LADDER SCHEMATIC-TOP MOUNTS WITH OPTIONAL ICE MAKER, FREEZER LIGHT OR MID-LEVEL LIGHTING (LINE...
... MODELS. Wire Diagram A01475501 BLUE) GRN/YEL COMPRESSOR RED LT. STARTER WITH RUN CAPACITOR START 6 S S RUN 5 C M M 3 2 L1 OVERLOAD COMR MOTOR PTC STARTER RUN CAPACITOR * CAPACITOR IS ONLY USED WITH SOME P.T.C. MODELS. BLUE BROWN GREY/WHITE GREY/WHITE BLACK YELLOW GRN/YEL RED/WHITE LT. FREEZER COMPARTMENT EVAPORATOR FAN COIL COVER ICE MAKER RED/WHITE GRN/YEL LT. BLUE LT. LADDER SCHEMATIC-TOP MOUNTS WITH OPTIONAL ICE MAKER, FREEZER LIGHT OR MID-LEVEL LIGHTING (LINE...
Product Specifications Sheet
Page 1
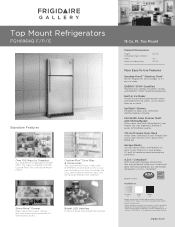
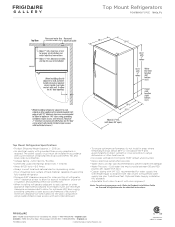
...; Organization System offers 100 ways to work in your home or in your door. Compliant 3 With accessible shelving, and controls that are positioned within arm's reach and allow one-hand operation, our top-freezer refrigerator is A.D.A.-qualified based on hand. ENERGY STAR® Available in ice maker automatically makes and replenishes ice cubes, so you can dispenser, mini bin, dairy bin, and a large, medium and small...
...; Organization System offers 100 ways to work in your home or in your door. Compliant 3 With accessible shelving, and controls that are positioned within arm's reach and allow one-hand operation, our top-freezer refrigerator is A.D.A.-qualified based on hand. ENERGY STAR® Available in ice maker automatically makes and replenishes ice cubes, so you can dispenser, mini bin, dairy bin, and a large, medium and small...
Product Specifications Sheet
Page 2
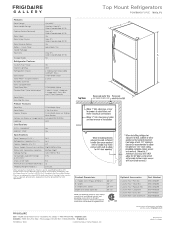
... Refrigerator Features Custom-Flex™ Door Interior Lighting Refrigerator Shelves Deli Drawer Store-More™ Crisper Drawers Humidity Controls Dairy Compartment Fixed Door Bins Custom-Flex™ Door Accessories Door Racks Non-Slip Bin Liner Yes LED 2 Sliding and 1 Adjustable SpillSafe® Glass 1 Half-Width Clear 2 Clear 2 1 Full-Width White 1 - Ft.) 18.3 Refrigerator Capacity (Cu. Ft.) 4.0 Power Supply Connection Location Right Bottom Rear Water Inlet Connection Location Bottom Right Voltage Rating 120V / 60Hz / 15A Connected Load (kW Rating) @ 120 Volts2 0.72 Amps...
... Refrigerator Features Custom-Flex™ Door Interior Lighting Refrigerator Shelves Deli Drawer Store-More™ Crisper Drawers Humidity Controls Dairy Compartment Fixed Door Bins Custom-Flex™ Door Accessories Door Racks Non-Slip Bin Liner Yes LED 2 Sliding and 1 Adjustable SpillSafe® Glass 1 Half-Width Clear 2 Clear 2 1 Full-Width White 1 - Ft.) 18.3 Refrigerator Capacity (Cu. Ft.) 4.0 Power Supply Connection Location Right Bottom Rear Water Inlet Connection Location Bottom Right Voltage Rating 120V / 60Hz / 15A Connected Load (kW Rating) @ 120 Volts2 0.72 Amps...
Product Specifications Sheet
Page 3
... Water Supply Installation Kits available. • Adjustable front rollers to change. Gallery Top Mount Refrigerators FGHI1864Q F / P / E 18 Cu. Refer to Product Installation Guide on rear wall recommended to household water supply line plus 7 additional feet. Cold water line must be level surface of hard material, capable of supporting fully loaded refrigerator. • Minimum 3/8" clearance required for detailed instructions. USA • 10200 David Taylor Drive • Charlotte, NC 28262 • 1-800-FRIGIDAIRE...
... Water Supply Installation Kits available. • Adjustable front rollers to change. Gallery Top Mount Refrigerators FGHI1864Q F / P / E 18 Cu. Refer to Product Installation Guide on rear wall recommended to household water supply line plus 7 additional feet. Cold water line must be level surface of hard material, capable of supporting fully loaded refrigerator. • Minimum 3/8" clearance required for detailed instructions. USA • 10200 David Taylor Drive • Charlotte, NC 28262 • 1-800-FRIGIDAIRE...


