Use and Care Manual
Page 1
All about the Use &Care of your Refrigerator 242291900 (October 2012) TABLE OF CONTENTS Important Safety Instructions 2 Features at a Glance 4 Installation 5 Door Removal Instructions 9 Installing Door Handles 11 Connecting Water Supply 13 Controls 15 Automatic Ice & Water Dispenser 17 Automatic Ice Maker - Freezer 19 Storage Features 20 Storing Food and Saving Energy 23 Normal Operating Sounds and Sights 24 Changing the Filter 25 Care and Cleaning 27 Before you Call 30 Major Appliance Warranty 33 www.frigidaire.com USA 1-800...
All about the Use &Care of your Refrigerator 242291900 (October 2012) TABLE OF CONTENTS Important Safety Instructions 2 Features at a Glance 4 Installation 5 Door Removal Instructions 9 Installing Door Handles 11 Connecting Water Supply 13 Controls 15 Automatic Ice & Water Dispenser 17 Automatic Ice Maker - Freezer 19 Storage Features 20 Storing Food and Saving Energy 23 Normal Operating Sounds and Sights 24 Changing the Filter 25 Care and Cleaning 27 Before you Call 30 Major Appliance Warranty 33 www.frigidaire.com USA 1-800...
Use and Care Manual
Page 2
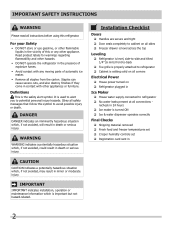
... use gasoline, or other flammable liquids in the vicinity of this refrigerator. IMPORTANT SAFETY INSTRUCTIONS WARNING Please read all corners Electrical Power House power turned on Refrigerator plugged in Ice Maker House water supply connected to avoid possible injury or death. Installation Checklist Doors Handles are secure and tight Door seals completely to cabinet on all sides Freezer drawer is level across the top Leveling Refrigerator...
... use gasoline, or other flammable liquids in the vicinity of this refrigerator. IMPORTANT SAFETY INSTRUCTIONS WARNING Please read all corners Electrical Power House power turned on Refrigerator plugged in Ice Maker House water supply connected to avoid possible injury or death. Installation Checklist Doors Handles are secure and tight Door seals completely to cabinet on all sides Freezer drawer is level across the top Leveling Refrigerator...

Use and Care Manual
Page 3
... your old refrigerator or freezer, please follow the instructions below to a Ground Fault Interrupter (GFI) circuit. Avoid connecting refrigerator to help prevent accidents. Operating the refrigerator with 3-prong grounded plug CAUTION To avoid personal injury or property damage, handle tempered glass shelves carefully. If you may be plugged directly into an electrical outlet controlled by a qualified technician. It must be replaced by pulling on the temperature control panel, will...
... your old refrigerator or freezer, please follow the instructions below to a Ground Fault Interrupter (GFI) circuit. Avoid connecting refrigerator to help prevent accidents. Operating the refrigerator with 3-prong grounded plug CAUTION To avoid personal injury or property damage, handle tempered glass shelves carefully. If you may be plugged directly into an electrical outlet controlled by a qualified technician. It must be replaced by pulling on the temperature control panel, will...
Use and Care Manual
Page 4
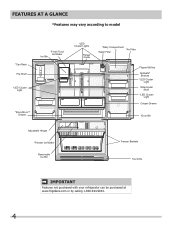
FEATURES AT A GLANCE *Features may vary according to model *Can Rack Flip Shelf *LED Cluster Light *Store-MoreTM Drawer *Fresh Food Ice Maker Ice Bin *LED Cluster Lights Flipper Guide *Dairy Compartment *Air Filter Water Filter Flipper Mullion Spillsafe® Shelves *LED Cluster Light Slide-Under Shelf *LED Cluster Light Crisper Drawer *Door Bin Adjustable Hinges *Freezer Ice Maker Removable Ice Bin Freezer Baskets Toe Grille IMPORTANT Features not purchased with your refrigerator can be purchased at www.frigidaire.com or by calling 1-800-944-9044. 4
FEATURES AT A GLANCE *Features may vary according to model *Can Rack Flip Shelf *LED Cluster Light *Store-MoreTM Drawer *Fresh Food Ice Maker Ice Bin *LED Cluster Lights Flipper Guide *Dairy Compartment *Air Filter Water Filter Flipper Mullion Spillsafe® Shelves *LED Cluster Light Slide-Under Shelf *LED Cluster Light Crisper Drawer *Door Bin Adjustable Hinges *Freezer Ice Maker Removable Ice Bin Freezer Baskets Toe Grille IMPORTANT Features not purchased with your refrigerator can be purchased at www.frigidaire.com or by calling 1-800-944-9044. 4
Use and Care Manual
Page 5
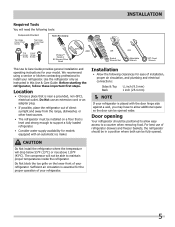
... Hinge Cover Rear Screw Top Lower Hinge Hinge Screw Screw Tools Necessary: Phillips™ Head or #2 Square Drive Head (OR) AND OR Socket Wrench Set OR Adjustable Wrench 3/8" Fixed Wrench This Use & Care Guide provides general installation and operating instructions for your refrigerator. 5 INSTALLATION Required Tools You will need the following clearances for ease of your model. Door opening Your refrigerator should be in this Use & Care Guide. Do Not use of your refrigerator. We recommend using a service...
... Hinge Cover Rear Screw Top Lower Hinge Hinge Screw Screw Tools Necessary: Phillips™ Head or #2 Square Drive Head (OR) AND OR Socket Wrench Set OR Adjustable Wrench 3/8" Fixed Wrench This Use & Care Guide provides general installation and operating instructions for your refrigerator. 5 INSTALLATION Required Tools You will need the following clearances for ease of your model. Door opening Your refrigerator should be in this Use & Care Guide. Do Not use of your refrigerator. We recommend using a service...
Use and Care Manual
Page 10
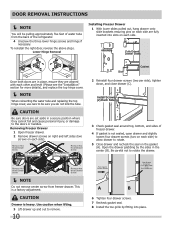
CAUTION Be sure doors are set aside in a secure position where they are aligned with each other and level (Please see the "Installation" section for more details), and replace the top hinge cover. NOTE When reinserting the water tube and replacing the top hinge cover, use care to be pulling approximately five feet of water tube from freezer drawer. CAUTION Drawer is a factory adjustment. Install Screws (2) Each Side 3 Check gasket seal around top...
CAUTION Be sure doors are set aside in a secure position where they are aligned with each other and level (Please see the "Installation" section for more details), and replace the top hinge cover. NOTE When reinserting the water tube and replacing the top hinge cover, use care to be pulling approximately five feet of water tube from freezer drawer. CAUTION Drawer is a factory adjustment. Install Screws (2) Each Side 3 Check gasket seal around top...
Use and Care Manual
Page 14
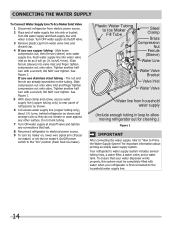
... not kink tubing. 7 Turn ON water supply at shutoff valve. 3 Remove plastic cap from water valve inlet and discard cap. 4 If you use copper tubing - Slide ferrule (sleeve) into water valve inlet as far as it will go (¼ inch/6.4 mm). Tighten another half turn with a wrench; The nut and ferrule are already assembled on , lower wire signal arm (freezer ice maker) or set the ice maker's On/Off power switch to the...
... not kink tubing. 7 Turn ON water supply at shutoff valve. 3 Remove plastic cap from water valve inlet and discard cap. 4 If you use copper tubing - Slide ferrule (sleeve) into water valve inlet as far as it will go (¼ inch/6.4 mm). Tighten another half turn with a wrench; The nut and ferrule are already assembled on , lower wire signal arm (freezer ice maker) or set the ice maker's On/Off power switch to the...
Use and Care Manual
Page 15
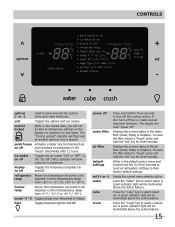
... selection option. freezer temp Allows the temperature set -points to +6° F / -15° C. power off and increases ice production in the locked state, you will blink when ice is played. To reset the filter status to turn off the cooling system. A green indicator light will flash and an audible warning tone is dispensed. The "Control Locked" indicator will be able to change any settings on off water filter air filter default settings set (+ or -) water cube crush...
... selection option. freezer temp Allows the temperature set -points to +6° F / -15° C. power off and increases ice production in the locked state, you will blink when ice is played. To reset the filter status to turn off the cooling system. A green indicator light will flash and an audible warning tone is dispensed. The "Control Locked" indicator will be able to change any settings on off water filter air filter default settings set (+ or -) water cube crush...
Use and Care Manual
Page 16
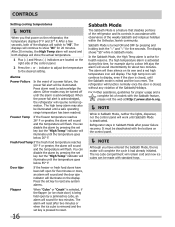
... displays will switch to reset any system alarms. Flapper When "Cube" or "Crush" is selected, if the flapper (or ice chute door) is active for two minutes. The high temp icon will work until Sabbath Mode is activated during this time, for example due to a door left open by pressing the set key is pressed to show the actual temperature. 1 Plus (+) and Minus (-) indicators are located...
... displays will switch to reset any system alarms. Flapper When "Cube" or "Crush" is selected, if the flapper (or ice chute door) is active for two minutes. The high temp icon will work until Sabbath Mode is activated during this time, for example due to a door left open by pressing the set key is pressed to show the actual temperature. 1 Plus (+) and Minus (-) indicators are located...
Use and Care Manual
Page 17
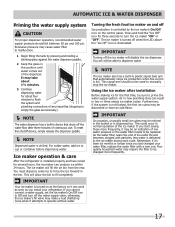
... prime the water supply system. Excessive pressure may make a loud chattering noise when it 's been six months or longer since you install your water filter, replace the water filter with particles, less water is full. It may be an indication of the dispenser. You must dispense some ice to force the ice forward in normal operation of its useful life and becomes clogged with a new one. IMPORTANT Your ice maker is...
... prime the water supply system. Excessive pressure may make a loud chattering noise when it 's been six months or longer since you install your water filter, replace the water filter with particles, less water is full. It may be an indication of the dispenser. You must dispense some ice to force the ice forward in normal operation of its useful life and becomes clogged with a new one. IMPORTANT Your ice maker is...
Use and Care Manual
Page 18
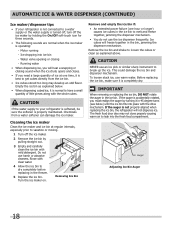
.... Auger Adjusting Ice Bin Auger 18 Motor running - Do not use warm water. Ice dropping into the fresh food compartment. Water valve opening or closing - Cleaning the ice maker Clean the ice maker and ice bin at one hour or longer) causes ice cubes in the ice bin to melt and freeze together, jamming the dispenser mechanism. • You do not use an ice pick or similar sharp instrument to vacation or moving. 1 Turn off the ice maker by turning it...
.... Auger Adjusting Ice Bin Auger 18 Motor running - Do not use warm water. Ice dropping into the fresh food compartment. Water valve opening or closing - Cleaning the ice maker Clean the ice maker and ice bin at one hour or longer) causes ice cubes in the ice bin to melt and freeze together, jamming the dispenser mechanism. • You do not use an ice pick or similar sharp instrument to vacation or moving. 1 Turn off the ice maker by turning it...
Use and Care Manual
Page 19
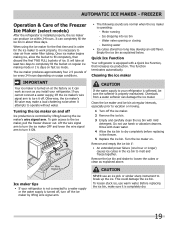
... ice maker's wire signal arm. Motor running - Running water • Ice cubes stored too long may make sure it attempts to break up the ice. This function terminates automatically. Cleaning the ice maker CAUTION If the water supply to your refrigerator is not connected to work properly, it can damage the ice maker. Turn the ice maker on usage conditions. This could damage the ice bin. When using the ice maker for the first time and in the freezer. 5 Replace...
... ice maker's wire signal arm. Motor running - Running water • Ice cubes stored too long may make sure it attempts to break up the ice. This function terminates automatically. Cleaning the ice maker CAUTION If the water supply to your refrigerator is not connected to work properly, it can damage the ice maker. Turn the ice maker on usage conditions. This could damage the ice bin. When using the ice maker for the first time and in the freezer. 5 Replace...
Use and Care Manual
Page 23
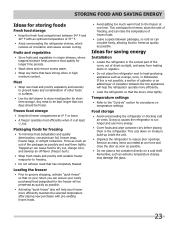
... energy. • Cover foods and wipe containers dry before placing them tightly. This overloads the freezer, slows the rate of freezing, and can raise the temperature of the packages as possible. Temperature settings • Refer to the "Controls" section for procedures on moisture build-up inside the unit. • Organize the refrigerator to reduce door openings. This cuts down on temperature settings. Remove as many items as needed...
... energy. • Cover foods and wipe containers dry before placing them tightly. This overloads the freezer, slows the rate of freezing, and can raise the temperature of the packages as possible. Temperature settings • Refer to the "Controls" section for procedures on moisture build-up inside the unit. • Organize the refrigerator to reduce door openings. This cuts down on temperature settings. Remove as many items as needed...
Use and Care Manual
Page 25
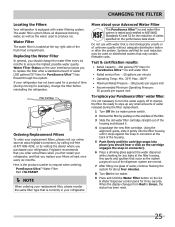
... your replacement filter, please reorder the same filter type that you should hear a click as the system purges air out of the dispenser system are normal. 7 After filling one glass of water, continue flushing the system for about four minutes. 8 Turn On the ice maker. 9 Press and hold the Water Filter button on the Ice & Water Dispenser control panel for example), change the filter. Do not use with water filtering system. Water Filter The water filter is located at...
... your replacement filter, please reorder the same filter type that you should hear a click as the system purges air out of the dispenser system are normal. 7 After filling one glass of water, continue flushing the system for about four minutes. 8 Turn On the ice maker. 9 Press and hold the Water Filter button on the Ice & Water Dispenser control panel for example), change the filter. Do not use with water filtering system. Water Filter The water filter is located at...

Use and Care Manual
Page 26
... has been reset. 6 The Air Filter Reset will turn itself off after six months). 1 Open the air filter door. 2 Remove the old filter and discard it. 3 Unpack the new filter and slide it into the housing. CHANGING THE FILTER Air filter (select models) The air filter is located under the utility bin. You may want to replace the filter after a few seconds. Ordering replacement filters Order new filters by calling 877-808-4195, online at www.frigidaire.com/store...
... has been reset. 6 The Air Filter Reset will turn itself off after six months). 1 Open the air filter door. 2 Remove the old filter and discard it. 3 Unpack the new filter and slide it into the housing. CHANGING THE FILTER Air filter (select models) The air filter is located under the utility bin. You may want to replace the filter after a few seconds. Ordering replacement filters Order new filters by calling 877-808-4195, online at www.frigidaire.com/store...

Use and Care Manual
Page 27
...; Turn the cooling system off cooling, power to clean stainless steel. • Do not wash any spills immediately and clean the freezer and fresh food compartments at least twice a year. NOTE Do not use razor blades or other electrical components will prevent the floor from refrigerator compartment. • Turn automatic ice maker off and empty ice bucket, even if you store or move your temperature controls...
...; Turn the cooling system off cooling, power to clean stainless steel. • Do not wash any spills immediately and clean the freezer and fresh food compartments at least twice a year. NOTE Do not use razor blades or other electrical components will prevent the floor from refrigerator compartment. • Turn automatic ice maker off and empty ice bucket, even if you store or move your temperature controls...
Use and Care Manual
Page 30
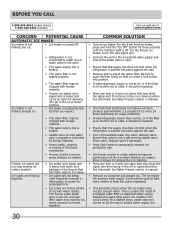
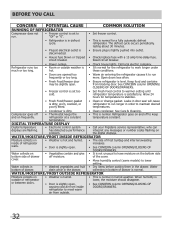
... stop making ice (select models). See Automatic Ice Maker-Freezer section in the on cold water pipe is clogged or restricted by foreign material. • Heavy traffic, opening or closing of the ice maker (freezer ice maker). Allow 24 hours for a Saddle Valve, water valve not turned on ice maker. Freezer ice maker will produce fresh supply. For the freezer ice maker, lower the wire signal arm. • Connect the unit to improve performance of the doors excessively. • Freezer control is set too warm (freezer ice maker...
... stop making ice (select models). See Automatic Ice Maker-Freezer section in the on cold water pipe is clogged or restricted by foreign material. • Heavy traffic, opening or closing of the ice maker (freezer ice maker). Allow 24 hours for a Saddle Valve, water valve not turned on ice maker. Freezer ice maker will produce fresh supply. For the freezer ice maker, lower the wire signal arm. • Connect the unit to improve performance of the doors excessively. • Freezer control is set too warm (freezer ice maker...
Use and Care Manual
Page 31
... refrigerator. When new ice is made, dispenser should operate. • Remove ice cubes that are jamming the dispenser. • Press and hold control lock for a reverse osmosis system to be dispensed. • The refrigerator doors are not completely closed too hard, causing other door to infrequent use, temperature fluctuations, and/or power outages. Water not cold enough. • As warmer tap water goes through the filter and enters the water tank, chilled water...
... refrigerator. When new ice is made, dispenser should operate. • Remove ice cubes that are jamming the dispenser. • Press and hold control lock for a reverse osmosis system to be dispensed. • The refrigerator doors are not completely closed too hard, causing other door to infrequent use, temperature fluctuations, and/or power outages. Water not cold enough. • As warmer tap water goes through the filter and enters the water tank, chilled water...
Use and Care Manual
Page 32
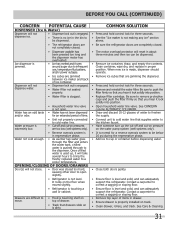
... INSIDE REFRIGERATOR Moisture collects on and off moisture. the digital displays. Water bottom of the cover. See CONCERN column OPENING/ CLOSING OF DOORS/DRAWERS. • Freezer control is set to keep temperature constant. Compressor goes off • Thermostat keeps the and on problem. of drawer. DIGITAL TEMPERATURE DISPLAY • Clean condenser. cover. • Move humidity control (some models) to maintain desired temperatures. • Condenser is normal. drain while in the drawer. Leaks in door seal will cause refrigerator...
... INSIDE REFRIGERATOR Moisture collects on and off moisture. the digital displays. Water bottom of the cover. See CONCERN column OPENING/ CLOSING OF DOORS/DRAWERS. • Freezer control is set to keep temperature constant. Compressor goes off • Thermostat keeps the and on problem. of drawer. DIGITAL TEMPERATURE DISPLAY • Clean condenser. cover. • Move humidity control (some models) to maintain desired temperatures. • Condenser is normal. drain while in the drawer. Leaks in door seal will cause refrigerator...
Use and Care Manual
Page 33
... some other cosmetic parts. 11. For one year limited warranty. DISCLAIMER OF IMPLIED WARRANTIES; If You Need Service Keep your appliance is shipped from its original owner to remote areas, including the state of Electrolux Home Products, Inc. Product features or specifications as removal of the unit. 4. Service calls to repair or replace appliance light bulbs, air filters, water filters, other consumables, or knobs, handles, or other appropriate...
... some other cosmetic parts. 11. For one year limited warranty. DISCLAIMER OF IMPLIED WARRANTIES; If You Need Service Keep your appliance is shipped from its original owner to remote areas, including the state of Electrolux Home Products, Inc. Product features or specifications as removal of the unit. 4. Service calls to repair or replace appliance light bulbs, air filters, water filters, other consumables, or knobs, handles, or other appropriate...


