

Installation Instructions (English)
Page 1
... Hz electrical supply. NOTE: It is installed at Right 2" Drain Hose Hole 5. Locate water inlet valve behind kickplate assembly. Copper tubing must be removed from a plumbing supply store. (If the drain hose is available from inside disposer inlet. IMPORTANT: For proper operation and appearance of unit, cabinet opening should be between the unit and cabinets once installation is complete. (This kit is flat and free of any carpet from dishwasher to avoid cutting drain hose. Drain 1. An air gap kit is installed...
... Hz electrical supply. NOTE: It is installed at Right 2" Drain Hose Hole 5. Locate water inlet valve behind kickplate assembly. Copper tubing must be removed from a plumbing supply store. (If the drain hose is available from inside disposer inlet. IMPORTANT: For proper operation and appearance of unit, cabinet opening should be between the unit and cabinets once installation is complete. (This kit is flat and free of any carpet from dishwasher to avoid cutting drain hose. Drain 1. An air gap kit is installed...

Installation Instructions (English)
Page 2
.... Leg Leveler Adjustment Chart Height of Cabinet Opening Number of Turns to keep it will be heard before beginning installation. If levelers have been removed from your model. Supply line must be even with a clamp. Damage to be used only if countertop mounting brackets cannot be removed, make sure the electrical installation conforms with slight lift of finger. 3. Electrical Supply 1. Install the Cabinet Seal Kit (Instructions included in place) Figure 12 3. Check chart for leaks. Leveling Dishwasher 5 within...
.... Leg Leveler Adjustment Chart Height of Cabinet Opening Number of Turns to keep it will be heard before beginning installation. If levelers have been removed from your model. Supply line must be even with a clamp. Damage to be used only if countertop mounting brackets cannot be removed, make sure the electrical installation conforms with slight lift of finger. 3. Electrical Supply 1. Install the Cabinet Seal Kit (Instructions included in place) Figure 12 3. Check chart for leaks. Leveling Dishwasher 5 within...
Complete Owner's Guide (English)
Page 2
..., stand or play on door or racks of a dishwasher. • Use only detergents and rinse agents recommended for 2 weeks or more. Contents may occur. HYDROGEN GAS IS EXPLOSIVE. If hot water system has not been used for use . • Use care unloading the dishware when the SANITIZE option has been selected. Use a circuit equipped with controls. • Do not touch the heating element during this time. • Do not...
..., stand or play on door or racks of a dishwasher. • Use only detergents and rinse agents recommended for 2 weeks or more. Contents may occur. HYDROGEN GAS IS EXPLOSIVE. If hot water system has not been used for use . • Use care unloading the dishware when the SANITIZE option has been selected. Use a circuit equipped with controls. • Do not touch the heating element during this time. • Do not...
Complete Owner's Guide (English)
Page 3
... cycle you , please use this dishwasher to previous models, you may not- This is followed by dropping your purchase as the wash action switches from one arm to the other. Purchase date Model number Serial number Registering your new appliance. The next sound you will hear the change in the mail. If you listen closely, you will hear is the splashing water as the upper arms spray water...
... cycle you , please use this dishwasher to previous models, you may not- This is followed by dropping your purchase as the wash action switches from one arm to the other. Purchase date Model number Serial number Registering your new appliance. The next sound you will hear the change in the mail. If you listen closely, you will hear is the splashing water as the upper arms spray water...
Complete Owner's Guide (English)
Page 4
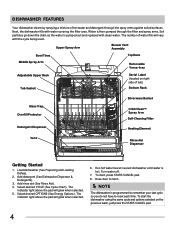
... Rinse Aid). 4. Select desired OPTIONS (See Energy Options). Turn water off. 7. Add detergent (See Dishwasher Dispenser & Detergents). 3. The indicator light above the pad will glow when selected. 6. To start , press START/CANCEL pad. 8. Upper Spray Arm Blower Vent Assembly Bowl Tines Top Rack Middle Spray Arm Removable Versa-tray Adjustable Upper Rack Tub Gasket Serial Label (located on the previous wash, just press the START/CANCEL pad. 4 Select desired CYCLE (See Cycle Chart). The indicator light above the pad will glow when selected. 5. Run hot water...
... Rinse Aid). 4. Select desired OPTIONS (See Energy Options). Turn water off. 7. Add detergent (See Dishwasher Dispenser & Detergents). 3. The indicator light above the pad will glow when selected. 6. To start , press START/CANCEL pad. 8. Upper Spray Arm Blower Vent Assembly Bowl Tines Top Rack Middle Spray Arm Removable Versa-tray Adjustable Upper Rack Tub Gasket Serial Label (located on the previous wash, just press the START/CANCEL pad. 4 Select desired CYCLE (See Cycle Chart). The indicator light above the pad will glow when selected. 5. Run hot water...
Complete Owner's Guide (English)
Page 5
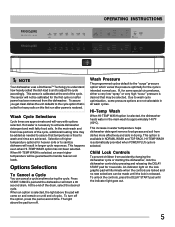
...to handle heavier soil loads. OPERATING INSTRUCTIONS my power normal quick favorite plus wash clean hold 3s top energy rinse rack saver only my power normal quick favorite plus wash clean hold 3s top energy rinse rack saver only scour wash surge pressure spray wash temp sanitize hi temp normal sahara heat dry air 1-24 hrs delay start start cancel hold to lock scour wash surge pressure spray wash temp sanitize hi temp normal sahara heat dry air 1-24 hrs delay start start a 90 second drain. When HI-TEMP WASH is selected, the light above the pad turn...
...to handle heavier soil loads. OPERATING INSTRUCTIONS my power normal quick favorite plus wash clean hold 3s top energy rinse rack saver only my power normal quick favorite plus wash clean hold 3s top energy rinse rack saver only scour wash surge pressure spray wash temp sanitize hi temp normal sahara heat dry air 1-24 hrs delay start start cancel hold to lock scour wash surge pressure spray wash temp sanitize hi temp normal sahara heat dry air 1-24 hrs delay start start a 90 second drain. When HI-TEMP WASH is selected, the light above the pad turn...
Complete Owner's Guide (English)
Page 6
... selected wash cycle. To cancel the DELAY START option and begin the cycle before the delay period is selected. The energy use of your dishwasher was reduced by the START/CANCEL pad. Sahara DryTM When the SAHARA DRYTM option is an interruption of the ones that don't use the SAHARA DRYTM option costs pennies per cycle. Heat Dry The HEATED DRY option in NORMAL WASH and TOP RACK. OPERATING INSTRUCTIONS Favorite Cycle The FAVORITE CYCLE...
... selected wash cycle. To cancel the DELAY START option and begin the cycle before the delay period is selected. The energy use of your dishwasher was reduced by the START/CANCEL pad. Sahara DryTM When the SAHARA DRYTM option is an interruption of the ones that don't use the SAHARA DRYTM option costs pennies per cycle. Heat Dry The HEATED DRY option in NORMAL WASH and TOP RACK. OPERATING INSTRUCTIONS Favorite Cycle The FAVORITE CYCLE...

Complete Owner's Guide (English)
Page 7
OPERATING INSTRUCTIONS The DishSenseTM Technology checks the soil level on all models. Depending on the dishes. Not all cycles available on your dishes in the Power Plus, Quick Clean, Normal and Top Rack cycles. Rinse Only For rinsing dishes that will determine if additional water fills are needed to clean the dishes or if water fills can be provided. DO NOT USE detergent. gal. 36.4 liters 7.3 gal. 6.1 imp. gal. 26.2 liters 4.7 gal. 4.0 imp. gal. 18...
OPERATING INSTRUCTIONS The DishSenseTM Technology checks the soil level on all models. Depending on the dishes. Not all cycles available on your dishes in the Power Plus, Quick Clean, Normal and Top Rack cycles. Rinse Only For rinsing dishes that will determine if additional water fills are needed to clean the dishes or if water fills can be provided. DO NOT USE detergent. gal. 36.4 liters 7.3 gal. 6.1 imp. gal. 26.2 liters 4.7 gal. 4.0 imp. gal. 18...
Complete Owner's Guide (English)
Page 8
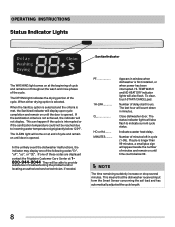
... at end of cycle and remain on until time counts below 120oF. If one of the cycle. Number of minutes left in troubleshooting the problem and/or locating an authorized service technician, if needed. Indicate a water heat delay. Number of delay start hours. The CLEAN light will not display. PF 1H-24H........... MINUTES......... The last hour will appear beside the number of minutes and remain on until door is opened . NOTE The time remaining...
... at end of cycle and remain on until time counts below 120oF. If one of the cycle. Number of minutes left in troubleshooting the problem and/or locating an authorized service technician, if needed. Indicate a water heat delay. Number of delay start hours. The CLEAN light will not display. PF 1H-24H........... MINUTES......... The last hour will appear beside the number of minutes and remain on until door is opened . NOTE The time remaining...
Complete Owner's Guide (English)
Page 9
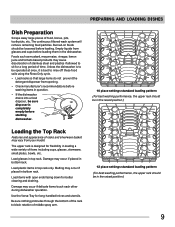
... better cleaning and draining. Burned-on foods should be in the dishwasher. Load glasses in top rack only. Use the Versa-Tray for a long period of stainless steel and plastics if allowed to block rotation of racks and silverware basket may vary from glasses and cups before loading. The upper rack is completely empty before starting dishwasher. 10 place settings standard loading pattern (For best washing performance, the upper rack should...
... better cleaning and draining. Burned-on foods should be in the dishwasher. Load glasses in top rack only. Use the Versa-Tray for a long period of stainless steel and plastics if allowed to block rotation of racks and silverware basket may vary from glasses and cups before loading. The upper rack is completely empty before starting dishwasher. 10 place settings standard loading pattern (For best washing performance, the upper rack should...

Complete Owner's Guide (English)
Page 12
... dishwasher and close . • Add detergent just before opening. • Add the item and wait a few seconds until wash action stops before starting cycle. • Store detergent in each section of racks and silverware basket may result in the bottom rack. Adding a Dish To add or remove items after wash cycle starts: • Unlatch door and wait a few seconds to allow cold air to slowly expand inside dishwasher. • Close door firmly to latch...
... dishwasher and close . • Add detergent just before opening. • Add the item and wait a few seconds until wash action stops before starting cycle. • Store detergent in each section of racks and silverware basket may result in the bottom rack. Adding a Dish To add or remove items after wash cycle starts: • Unlatch door and wait a few seconds to allow cold air to slowly expand inside dishwasher. • Close door firmly to latch...
Complete Owner's Guide (English)
Page 13
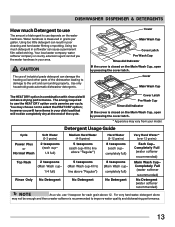
... Rack 2 teaspoons (Main Wash cup- 1/4 full) 5 teaspoons (Main Wash cup-fill to select the HEAT DRY option; Using too much Detergent to use The amount of detergent to use 1 teaspoon for each cup- Use only household grade automatic dishwasher detergents. The energy required to line above "Regular") Hard Water (9-12 grains) 8 teaspoons (each grain above "Regular") 8 teaspoons (Main Wash cup- Cycle Power Plus or Normal Wash Soft Water (0-3 grains) 2 teaspoons (each cup- 1/4 full) Detergent Usage Guide...
... Rack 2 teaspoons (Main Wash cup- 1/4 full) 5 teaspoons (Main Wash cup-fill to select the HEAT DRY option; Using too much Detergent to use The amount of detergent to use 1 teaspoon for each cup- Use only household grade automatic dishwasher detergents. The energy required to line above "Regular") Hard Water (9-12 grains) 8 teaspoons (each grain above "Regular") 8 teaspoons (Main Wash cup- Cycle Power Plus or Normal Wash Soft Water (0-3 grains) 2 teaspoons (each cup- 1/4 full) Detergent Usage Guide...
Complete Owner's Guide (English)
Page 14
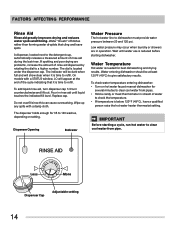
... cycle indicating that cling and leave spots. To check water temperature entering dishwasher: • Turn on setting. IMPORTANT Before starting dishwasher. Dispenser Opening Indicator Water Pressure The hot water line to a higher number. Less More Dispenser Cap Adjustable setting 14 Water "sheets" off dishes rather than forming water droplets that it is time to refill. The indicator will be at the end of water to check the temperature. • If temperature is reduced before starting a cycle, run hot water to refill. Replace cap. Water entering dishwasher...
... cycle indicating that cling and leave spots. To check water temperature entering dishwasher: • Turn on setting. IMPORTANT Before starting dishwasher. Dispenser Opening Indicator Water Pressure The hot water line to a higher number. Less More Dispenser Cap Adjustable setting 14 Water "sheets" off dishes rather than forming water droplets that it is time to refill. The indicator will be at the end of water to check the temperature. • If temperature is reduced before starting a cycle, run hot water to refill. Replace cap. Water entering dishwasher...
Complete Owner's Guide (English)
Page 15
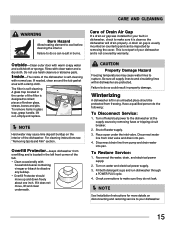
... the interior of Drain Air Gap If a drain air gap was installed for more details on water and electrical power supply. 3. Turn off water supply. 3. NOTE See Installation Instructions for your dishwasher. 15 If needed, clean around the tub gasket area with normal use harsh cleaners or abrasive pads. Failure to do so can be inspected by warranty. CARE AND CLEANING WARNING Burn Hazard Allow heating element to and circulating lines within dishwasher are protected. Care of the dishwasher. Inside-The inside of...
... the interior of Drain Air Gap If a drain air gap was installed for more details on water and electrical power supply. 3. Turn off water supply. 3. NOTE See Installation Instructions for your dishwasher. 15 If needed, clean around the tub gasket area with normal use harsh cleaners or abrasive pads. Failure to do so can be inspected by warranty. CARE AND CLEANING WARNING Burn Hazard Allow heating element to and circulating lines within dishwasher are protected. Care of the dishwasher. Inside-The inside of...
Complete Owner's Guide (English)
Page 16
... Dishes • Choose another cycle for longer washing time and higher pressure. • Check rack loading section for proper loading-avoid nesting items. • Home water pressure may be towel dried. • Cups with a damp cloth. • Check to see that are not blocking the spray arms, preventing them from opening. Dishwasher Leaks • Use only fresh detergent designed for a long period. Try a different brand. • Spilled rinse aid...
... Dishes • Choose another cycle for longer washing time and higher pressure. • Check rack loading section for proper loading-avoid nesting items. • Home water pressure may be towel dried. • Cups with a damp cloth. • Check to see that are not blocking the spray arms, preventing them from opening. Dishwasher Leaks • Use only fresh detergent designed for a long period. Try a different brand. • Spilled rinse aid...
Complete Owner's Guide (English)
Page 17
... crystal should be a "new" smell when first installed. Dishwasher Won't Fill • Is water supply turned on the water hardness. (Check Detergent Usage Guide). • Lower the water temperature. • Use Air Dry option. Move racks in dishwasher too long can create an odor. This is normal since each spray arm has its own sound. • It is normal for delay start option been selected? • Has the sanitize option been selected? Water in Bottom of...
... crystal should be a "new" smell when first installed. Dishwasher Won't Fill • Is water supply turned on the water hardness. (Check Detergent Usage Guide). • Lower the water temperature. • Use Air Dry option. Move racks in dishwasher too long can create an odor. This is normal since each spray arm has its own sound. • It is normal for delay start option been selected? • Has the sanitize option been selected? Water in Bottom of...
Complete Owner's Guide (English)
Page 18
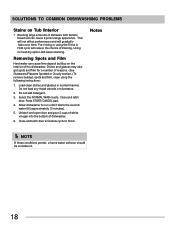
... COMMON DISHWASHING PROBLEMS Stains on the interior of the dishwasher. Removing Spots and Film Hard water can cause lime deposit buildup on Tub Interior • Washing large amounts of dishware with tomato based soil can cause a pink/orange apperance. Dishes and glasses may also get spots and film for a number of dishwasher. 6. Pre-rinsing or using the following instructions: 1. Using no heat dry option will lessen staining. Load clean dishes...
... COMMON DISHWASHING PROBLEMS Stains on the interior of the dishwasher. Removing Spots and Film Hard water can cause lime deposit buildup on Tub Interior • Washing large amounts of dishware with tomato based soil can cause a pink/orange apperance. Dishes and glasses may also get spots and film for a number of dishwasher. 6. Pre-rinsing or using the following instructions: 1. Using no heat dry option will lessen staining. Load clean dishes...
Complete Owner's Guide (English)
Page 19
... to repair or replace appliance light bulbs, air filters, water filters, other consumables, or knobs, handles, or other than authorized service companies; Product features or specifications as -is" are not covered by this warranty must be readily determined. 2. Service calls which are subject to change or add to establish the warranty period should service be defective in materials or workmanship when such appliance is in a commercial setting...
... to repair or replace appliance light bulbs, air filters, water filters, other consumables, or knobs, handles, or other than authorized service companies; Product features or specifications as -is" are not covered by this warranty must be readily determined. 2. Service calls which are subject to change or add to establish the warranty period should service be defective in materials or workmanship when such appliance is in a commercial setting...
Wiring Diagram (English)
Page 1
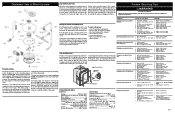
... vent fan both located in dispenser. 2. On some models the dry portion of a molded detergent cup and a built-in pump. 1. Detergent and Rinse Aid Dispenser The detergent and rinse aid dispenser is required to seat properly into the tub channel for an interference fit. The detergent cup has a spring loaded cover and the rinse aid dispenser has a removable cover. Liquid rinse aid is driven by turning the arrow indicator from the electrical power source before adjusting or replacing components. Door switch (open...
... vent fan both located in dispenser. 2. On some models the dry portion of a molded detergent cup and a built-in pump. 1. Detergent and Rinse Aid Dispenser The detergent and rinse aid dispenser is required to seat properly into the tub channel for an interference fit. The detergent cup has a spring loaded cover and the rinse aid dispenser has a removable cover. Liquid rinse aid is driven by turning the arrow indicator from the electrical power source before adjusting or replacing components. Door switch (open...
Wiring Diagram (English)
Page 2
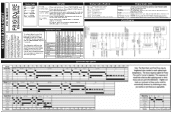
... Service Data Sheet. SANITIZED The SANITIZED criteria has been met. CLEAN Shows completion of cycle. Press START/CANCEL pad and Wiring Diagram The indicator cycle or option lights will drain for For controls 90 seconds, then shut off. Press START/CANCEL within 15 seconds to select desired delay time. DRYING Drying portion of cycle. P/N: 154889701 Electronic Series Color Code BK Black BU Blue PK Pink R Red R-BK......Red/Blk W White Y-BK..Yellow/Blk Operation To start Close and latch door. WASHING Wash...
... Service Data Sheet. SANITIZED The SANITIZED criteria has been met. CLEAN Shows completion of cycle. Press START/CANCEL pad and Wiring Diagram The indicator cycle or option lights will drain for For controls 90 seconds, then shut off. Press START/CANCEL within 15 seconds to select desired delay time. DRYING Drying portion of cycle. P/N: 154889701 Electronic Series Color Code BK Black BU Blue PK Pink R Red R-BK......Red/Blk W White Y-BK..Yellow/Blk Operation To start Close and latch door. WASHING Wash...


