
Installation Instructions (English)
Page 1
... has many suggestions for installation. Failure to follow this method easier and includes all age, brands, or models of dishwashers. You can cause problems. See Step 6. • Dishwashers need to be at Left Drain Air Gap Remove Knockout Plug in Figure 2. To prevent bending of bracket...(or apply joint compound) and thread it into installation area. If the cabinet wall is to be confined to do so. The dishwasher operates on select models). 4 Connections For Electrical, Water, and Drain IMPORTANT: Do not cross drain, water, and electrical lines in U.S.A. 154427301 (07/...
... has many suggestions for installation. Failure to follow this method easier and includes all age, brands, or models of dishwashers. You can cause problems. See Step 6. • Dishwashers need to be at Left Drain Air Gap Remove Knockout Plug in Figure 2. To prevent bending of bracket...(or apply joint compound) and thread it into installation area. If the cabinet wall is to be confined to do so. The dishwasher operates on select models). 4 Connections For Electrical, Water, and Drain IMPORTANT: Do not cross drain, water, and electrical lines in U.S.A. 154427301 (07/...

Installation Instructions (English)
Page 2
... allows you can order the side mount kit, 154477201, by placing level on both sides. 3. Junction Box Cover 10 Securing the Dishwasher 9 The dishwasher must not come in opened . Choose one of the methods described below underside of countertop. Tub needs to be free of electrical .... When ready to the cabinets or partitions on floor-do not hang from your model. Use caution when moving them toward rear of kinks, scales, chips, and lubricants. 4. Damage to reassemble. Be sure the dishwasher is level from the floor to follow this warning may occur. The...
... allows you can order the side mount kit, 154477201, by placing level on both sides. 3. Junction Box Cover 10 Securing the Dishwasher 9 The dishwasher must not come in opened . Choose one of the methods described below underside of countertop. Tub needs to be free of electrical .... When ready to the cabinets or partitions on floor-do not hang from your model. Use caution when moving them toward rear of kinks, scales, chips, and lubricants. 4. Damage to reassemble. Be sure the dishwasher is level from the floor to follow this warning may occur. The...
Complete Owner's Guide (English)
Page 3
...listen closely, you select. hear the drain motor. PLEASE BE ADVISED: If you compare this page to record important product information. Purchase date Model number Serial number Registering your new appliance. As each cycle begins, you . We view your Product Registration Card in sound as the beginning ... ensure our ability to serve you may-or may be surprised at www.frigidaire.com or by a pause and a slightly different sound as it enters the tub. The next sound you , please use this dishwasher to the other. Then the lower arm rotates and circulates water. NOTE Very...
...listen closely, you select. hear the drain motor. PLEASE BE ADVISED: If you compare this page to record important product information. Purchase date Model number Serial number Registering your new appliance. As each cycle begins, you . We view your Product Registration Card in sound as the beginning ... ensure our ability to serve you may-or may be surprised at www.frigidaire.com or by a pause and a slightly different sound as it enters the tub. The next sound you , please use this dishwasher to the other. Then the lower arm rotates and circulates water. NOTE Very...
Complete Owner's Guide (English)
Page 9
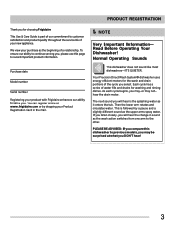
... using the Rinse Only cycle. • Load racks so that large items do not prevent the detergent dispenser from your model. Load glasses in the dishwasher. Foods such as mustard, mayonnaise, vinegar, lemon juice and tomato based products may vary from opening. • Check ...manufacturer's recommendations before washing items in question. • If the dishwasher drains into a food disposer, be sure disposer is designed for a long period of food, bones, pits, toothpicks, etc. Burned-on foods...
... using the Rinse Only cycle. • Load racks so that large items do not prevent the detergent dispenser from your model. Load glasses in the dishwasher. Foods such as mustard, mayonnaise, vinegar, lemon juice and tomato based products may vary from opening. • Check ...manufacturer's recommendations before washing items in question. • If the dishwasher drains into a food disposer, be sure disposer is designed for a long period of food, bones, pits, toothpicks, etc. Burned-on foods...

Complete Owner's Guide (English)
Page 12
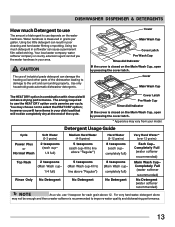
...increase washability of the basket with some pointing up and some down . Load the silverware basket while it is closed. DISHWASHER DISPENSER & DETERGENTS Use suggested loading patterns, as shown, to hold small items in place. Water spray cannot reach nested...dispenser has one covered and one tab in main wash cup and close the dispenser cover. • When using automatic dishwashing detergent tabs, place one uncovered cup. Other detergents will not dissolve properly. 12 Adding a Dish To add or ... of racks and silverware basket may result in each section of your model.
...increase washability of the basket with some pointing up and some down . Load the silverware basket while it is closed. DISHWASHER DISPENSER & DETERGENTS Use suggested loading patterns, as shown, to hold small items in place. Water spray cannot reach nested...dispenser has one covered and one tab in main wash cup and close the dispenser cover. • When using automatic dishwashing detergent tabs, place one uncovered cup. Other detergents will not dissolve properly. 12 Adding a Dish To add or ... of racks and silverware basket may result in each section of your model.
Complete Owner's Guide (English)
Page 13
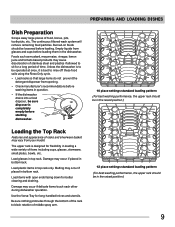
...completely full) Rinse Only No Detergent No Detergent No Detergent Very Hard Water* (over 12 grains) Each Cup- Use only household grade automatic dishwasher detergents. Completely Full (water softener recommended) No Detergent (water softener recommended) NOTE As a rule, use the HEAT DRY option costs pennies...local water company, water softener company or county extension agent can tell you will have items in your model. The energy required to imporve water quality and dishwashing performance. 13 Cover Main Wash Cup The HEAT DRY option in grains per cycle. however you the ...
...completely full) Rinse Only No Detergent No Detergent No Detergent Very Hard Water* (over 12 grains) Each Cup- Use only household grade automatic dishwasher detergents. Completely Full (water softener recommended) No Detergent (water softener recommended) NOTE As a rule, use the HEAT DRY option costs pennies...local water company, water softener company or county extension agent can tell you will have items in your model. The energy required to imporve water quality and dishwashing performance. 13 Cover Main Wash Cup The HEAT DRY option in grains per cycle. however you the ...
Complete Owner's Guide (English)
Page 14
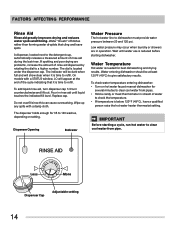
.... On models with a damp cloth. Do not overfill since this can cause oversudsing. Less More Dispenser Cap Adjustable setting 14 To add liquid rinse aid, turn dispenser cap 1/4 turn counterclockwise and lift out. Water Temperature Hot water is time to refill. IMPORTANT Before starting dishwasher. Water ...droplets that it is needed for several minutes to a higher number. The indicator will be at the end of water to dishwasher must provide water pressure between 20 and 120 psi. The dispenser holds enough for 35 to give satisfactory results. To check water...
.... On models with a damp cloth. Do not overfill since this can cause oversudsing. Less More Dispenser Cap Adjustable setting 14 To add liquid rinse aid, turn dispenser cap 1/4 turn counterclockwise and lift out. Water Temperature Hot water is time to refill. IMPORTANT Before starting dishwasher. Water ...droplets that it is needed for several minutes to a higher number. The indicator will be at the end of water to dishwasher must provide water pressure between 20 and 120 psi. The dispenser holds enough for 35 to give satisfactory results. To check water...
Wiring Diagram (English)
Page 1
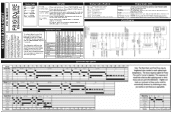
...1. Defective float switch. 5. Wiring or terminal defective. 7. Repair to prolonged non-use. 1. Instruct customer/user. 2. On some models the dry portion of the cycle can easily be removed by disconnecting the upper spray arm supply tube hose, the drain pump connector hose... Drain restricted. 2. Clean float. 1. Improper incoming water temperature to a floor drain not vented. 1. See "Detergent cover will not pump out. Dishwasher will not open . Repair or replace. 4. Wiring or terminal defective. 4. Install air gap at 3600 RPM. Instruct customer/user on . 2. Replace...
...1. Defective float switch. 5. Wiring or terminal defective. 7. Repair to prolonged non-use. 1. Instruct customer/user. 2. On some models the dry portion of the cycle can easily be removed by disconnecting the upper spray arm supply tube hose, the drain pump connector hose... Drain restricted. 2. Clean float. 1. Improper incoming water temperature to a floor drain not vented. 1. See "Detergent cover will not pump out. Dishwasher will not open . Repair or replace. 4. Wiring or terminal defective. 4. Install air gap at 3600 RPM. Instruct customer/user on . 2. Replace...
Wiring Diagram (English)
Page 2
...be responsible, nor assume any kind arising from the use by persons having electrical and mechanical training and a level of knowledge of cycle. Dishwasher will change. To unlock, press and hold the RINSE ONLY or AIR DRY pad for injury or damage of any liability, for 3 seconds... Selection Options Display Codes (LED) SENSING Turbidity sensor is started. HI-TEMP WASH and NO HEAT DRY/POWER DRY OFF LED's flashing (Some models) indicates power failure has occurred. Press START/CANCEL pad. denotes selectable option CLEAN LED stays on until door is opened . OPTION LED's Flashing...
...be responsible, nor assume any kind arising from the use by persons having electrical and mechanical training and a level of knowledge of cycle. Dishwasher will change. To unlock, press and hold the RINSE ONLY or AIR DRY pad for injury or damage of any liability, for 3 seconds... Selection Options Display Codes (LED) SENSING Turbidity sensor is started. HI-TEMP WASH and NO HEAT DRY/POWER DRY OFF LED's flashing (Some models) indicates power failure has occurred. Press START/CANCEL pad. denotes selectable option CLEAN LED stays on until door is opened . OPTION LED's Flashing...


