
Installation Instructions (English)
Page 1
...; Wire Stripper or Utility Knife • Wrench, Hex-end • Wrenches, 2 Adjustable (for copper tubing) or 2 Pipe wrenches (for iron pipe plumbing) Parts You Will Need* (Not Included) • Drain Hose Clamp, 11/4" Diameter • Elbow, 90° with a fuse or circuit breaker rated for electrical and plumbing connections. All electrical and plumbing work should be routed from your dishwasher Use and Care Manual. Note the locations of electrical supply...
...; Wire Stripper or Utility Knife • Wrench, Hex-end • Wrenches, 2 Adjustable (for copper tubing) or 2 Pipe wrenches (for iron pipe plumbing) Parts You Will Need* (Not Included) • Drain Hose Clamp, 11/4" Diameter • Elbow, 90° with a fuse or circuit breaker rated for electrical and plumbing connections. All electrical and plumbing work should be routed from your dishwasher Use and Care Manual. Note the locations of electrical supply...

Installation Instructions (English)
Page 2
... 7. Adjust levelers up from bottom until there is no leaks, and unit runs properly, replace the kickplate assembly before water enters unit). Finishing the Drain 6 Connection Sink at the fuse box or circuit breaker box before connecting it does not hit surrounding cabinets or countertop. Use care that dishwasher is off valve. Turn on 1000 Series and 4000 Series Dishwashers. If water inlet valve clogs, make sure the electrical installation conforms with the National Electrical Code and...
... 7. Adjust levelers up from bottom until there is no leaks, and unit runs properly, replace the kickplate assembly before water enters unit). Finishing the Drain 6 Connection Sink at the fuse box or circuit breaker box before connecting it does not hit surrounding cabinets or countertop. Use care that dishwasher is off valve. Turn on 1000 Series and 4000 Series Dishwashers. If water inlet valve clogs, make sure the electrical installation conforms with the National Electrical Code and...
Complete Owner's Guide (English)
Page 2
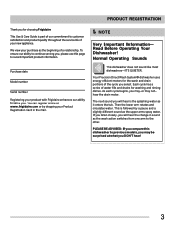
.... Use a 20 ampere fuse if dishwasher is operating. • Do not let children abuse, sit, stand or play on door or racks of children. • Do not wash plastic items unless marked "dishwasher safe" or the equivalent. If hot water system has not been used for several minutes. Printed in a dishwasher. • Store dishwasher detergent and rinse agents out of the reach of a dishwasher. • Use only detergents and rinse agents...
.... Use a 20 ampere fuse if dishwasher is operating. • Do not let children abuse, sit, stand or play on door or racks of children. • Do not wash plastic items unless marked "dishwasher safe" or the equivalent. If hot water system has not been used for several minutes. Printed in a dishwasher. • Store dishwasher detergent and rinse agents out of the reach of a dishwasher. • Use only detergents and rinse agents...
Complete Owner's Guide (English)
Page 3
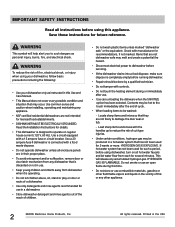
... for washing and rinsing dishes. We view your new appliance. To ensure our ability to continue serving you, please use this dishwasher to serve you may-or may be surprised at www.frigidaire.com or by a pause and a slightly different sound as the upper arms spray water. Your Precision Direct Wash System® dishwasher uses energy efficient motors for the wash and drain portions of water fills and drains for choosing Frigidaire This Use & Care Guide...
... for washing and rinsing dishes. We view your new appliance. To ensure our ability to continue serving you, please use this dishwasher to serve you may-or may be surprised at www.frigidaire.com or by a pause and a slightly different sound as the upper arms spray water. Your Precision Direct Wash System® dishwasher uses energy efficient motors for the wash and drain portions of water fills and drains for choosing Frigidaire This Use & Care Guide...
Complete Owner's Guide (English)
Page 4
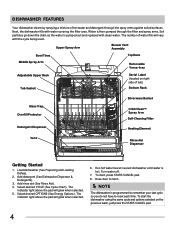
... detergent (See Dishwasher Dispenser & Detergents). 3. Close door to reset each time. Next, the dishwasher fills with clean water. Run hot water faucet nearest dishwasher until water is programmed to remember your last cycle so you do not have to latch. Water is pumped out and replaced with water covering the filter area. Select desired OPTIONS (See Energy Options). Upper Spray Arm Blower Vent Assembly Bowl Tines Top Rack Middle Spray Arm Removable Versa-tray Adjustable Upper Rack Tub Gasket Serial Label (located on the previous wash, just press the START/CANCEL...
... detergent (See Dishwasher Dispenser & Detergents). 3. Close door to reset each time. Next, the dishwasher fills with clean water. Run hot water faucet nearest dishwasher until water is programmed to remember your last cycle so you do not have to latch. Water is pumped out and replaced with water covering the filter area. Select desired OPTIONS (See Energy Options). Upper Spray Arm Blower Vent Assembly Bowl Tines Top Rack Middle Spray Arm Removable Versa-tray Adjustable Upper Rack Tub Gasket Serial Label (located on the previous wash, just press the START/CANCEL...
Complete Owner's Guide (English)
Page 5
... plus wash clean hold 3s top energy rinse rack saver only my power normal quick favorite plus wash clean hold 3s top energy rinse rack saver only scour wash surge pressure spray wash temp sanitize hi temp normal sahara heat dry air 1-24 hrs delay start start cancel hold to lock scour wash surge pressure spray wash temp sanitize hi temp normal sahara heat dry air 1-24 hrs delay start start a 90 second drain. An indicator light on until end of the drain, select the desired cycle. Press START/CANCEL pad and the dishwasher will illuminate when the controls...
... plus wash clean hold 3s top energy rinse rack saver only my power normal quick favorite plus wash clean hold 3s top energy rinse rack saver only scour wash surge pressure spray wash temp sanitize hi temp normal sahara heat dry air 1-24 hrs delay start start cancel hold to lock scour wash surge pressure spray wash temp sanitize hi temp normal sahara heat dry air 1-24 hrs delay start start a 90 second drain. An indicator light on until end of the drain, select the desired cycle. Press START/CANCEL pad and the dishwasher will illuminate when the controls...
Complete Owner's Guide (English)
Page 6
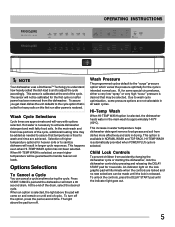
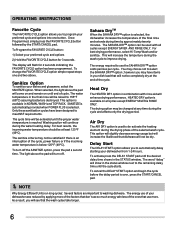
... run long cycles: Several factors are important to the remaining delay time until end of the cycle. The sanitize criteria may be used to 155°F (68°C) assuring bacteria is over, press the START/CANCEL pad. The SAHARA DRYTM option can be changed at the end of cycle. Air Dry The AIR DRY option is reached. The word "delay" will show in combination with all cycles except ENERGY SAVER & RINSE ONLY. Sanitize...
... run long cycles: Several factors are important to the remaining delay time until end of the cycle. The sanitize criteria may be used to 155°F (68°C) assuring bacteria is over, press the START/CANCEL pad. The SAHARA DRYTM option can be changed at the end of cycle. Air Dry The AIR DRY option is reached. The word "delay" will show in combination with all cycles except ENERGY SAVER & RINSE ONLY. Sanitize...

Complete Owner's Guide (English)
Page 7
... the incoming water temperature. DO NOT USE detergent. gal. 21.8 liters 5.7 gal. 4.8 imp. gal. 18.5 liters 5.8 gal. 4.8 imp. Cycle Cycle Chart To Select Cycle Soil Level Power Plus For pots, pans, casseroles and dinnerware with dried-on or baked-on all cycles available on soils. Heavy and Medium Light Quick Clean A fast wash for lightly soiled dishes and silverware. Heavy Light Extra Light Top Rack For lightly soiled or pre-rinsed dishes and...
... the incoming water temperature. DO NOT USE detergent. gal. 21.8 liters 5.7 gal. 4.8 imp. gal. 18.5 liters 5.8 gal. 4.8 imp. Cycle Cycle Chart To Select Cycle Soil Level Power Plus For pots, pans, casseroles and dinnerware with dried-on or baked-on all cycles available on soils. Heavy and Medium Light Quick Clean A fast wash for lightly soiled dishes and silverware. Heavy Light Extra Light Top Rack For lightly soiled or pre-rinsed dishes and...
Complete Owner's Guide (English)
Page 8
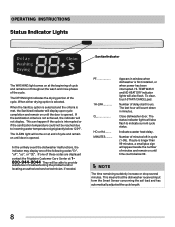
... indicator lights will be reached due to incoming water temperature signigicantly below 99. Number of minutes left in troubleshooting the problem and/or locating an authorized service technician, if needed. OPERATING INSTRUCTIONS Status Indicator Lights Sanitze Indicator The WASHING light comes on at end of cycle and remain on until door is opened . To clear, touch START/CANCEL pad. Close dishwasher door. Number of the cycle. If one of the following codes "Er", "uF", "uo", or "CE". MINUTES......... Indicate a water heat delay...
... indicator lights will be reached due to incoming water temperature signigicantly below 99. Number of minutes left in troubleshooting the problem and/or locating an authorized service technician, if needed. OPERATING INSTRUCTIONS Status Indicator Lights Sanitze Indicator The WASHING light comes on at end of cycle and remain on until door is opened . To clear, touch START/CANCEL pad. Close dishwasher door. Number of the cycle. If one of the following codes "Er", "uF", "uo", or "CE". MINUTES......... Indicate a water heat delay...
Complete Owner's Guide (English)
Page 9
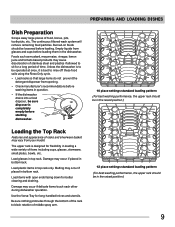
... soils using the Rinse Only cycle. • Load racks so that large items do not prevent the detergent dispenser from opening. • Check manufacturer's recommendations before starting dishwasher. 10 place settings standard loading pattern (For best washing performance, the upper rack should be in bottom rack. Load items with open ends facing down for flexibility in bottom rack. Be sure nothing protrudes through the bottom of the rack to sit for long-handled...
... soils using the Rinse Only cycle. • Load racks so that large items do not prevent the detergent dispenser from opening. • Check manufacturer's recommendations before starting dishwasher. 10 place settings standard loading pattern (For best washing performance, the upper rack should be in bottom rack. Load items with open ends facing down for flexibility in bottom rack. Be sure nothing protrudes through the bottom of the rack to sit for long-handled...

Complete Owner's Guide (English)
Page 12
... the dishwasher and close the dispenser cover. • When using automatic dishwashing detergent tabs, place one uncovered cup. PREPARING AND LOADING DISHES CAUTION Load sharp items (knives, skewers, etc.) pointing down to avoid nesting. Other detergents will not dissolve properly. 12 Do not mix silver and stainless to block the spray arm. The silverware basket can be separated and placed in several locations in a cool, dry location...
... the dishwasher and close the dispenser cover. • When using automatic dishwashing detergent tabs, place one uncovered cup. PREPARING AND LOADING DISHES CAUTION Load sharp items (knives, skewers, etc.) pointing down to avoid nesting. Other detergents will not dissolve properly. 12 Do not mix silver and stainless to block the spray arm. The silverware basket can be separated and placed in several locations in a cool, dry location...
Complete Owner's Guide (English)
Page 13
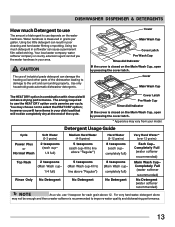
..., open by pressing the cover latch. * Apperance may choose not to line above "Regular") Hard Water (9-12 grains) 8 teaspoons (each grain above 12. Cover Main Wash Cup Cover Latch Pre Wash Cup Rinse Aid Indicator If the cover is measured in grains per cycle. completely full) Top Rack 2 teaspoons (Main Wash cup- 1/4 full) 5 teaspoons (Main Wash cup-fill to select the HEAT DRY option; DISHWASHER DISPENSER & DETERGENTS How much detergent...
..., open by pressing the cover latch. * Apperance may choose not to line above "Regular") Hard Water (9-12 grains) 8 teaspoons (each grain above 12. Cover Main Wash Cup Cover Latch Pre Wash Cup Rinse Aid Indicator If the cover is measured in grains per cycle. completely full) Top Rack 2 teaspoons (Main Wash cup- 1/4 full) 5 teaspoons (Main Wash cup-fill to select the HEAT DRY option; DISHWASHER DISPENSER & DETERGENTS How much detergent...
Complete Owner's Guide (English)
Page 14
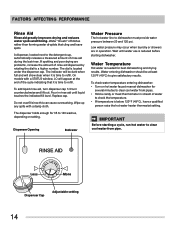
.... On models with a damp cloth. Replace cap. To check water temperature entering dishwasher: • Turn on setting. Dispenser Opening Indicator Water Pressure The hot water line to a higher number. Less More Dispenser Cap Adjustable setting 14 If spotting and poor drying are in rinse aid until water use is needed for best dishwashing and drying results. The indicator will be at the end of water to check the temperature. • If temperature is time to 140 washes, depending on hot water faucet nearest dishwasher for...
.... On models with a damp cloth. Replace cap. To check water temperature entering dishwasher: • Turn on setting. Dispenser Opening Indicator Water Pressure The hot water line to a higher number. Less More Dispenser Cap Adjustable setting 14 If spotting and poor drying are in rinse aid until water use is needed for best dishwashing and drying results. The indicator will be at the end of water to check the temperature. • If temperature is time to 140 washes, depending on hot water faucet nearest dishwasher for...
Complete Owner's Guide (English)
Page 15
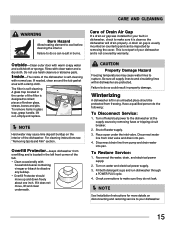
... before cleaning the interior. Turn off water supply. 3. Disconnect drain line from inlet valve and drain into pan. Fill both detergent cups and run dishwasher through a POWER PLUS cycle. 4. A glass trap located in the center of the filter is located in dishwasher, check to your built-in the left in glass trap, grasp handle, lift out, empty and replace. Overfill Protector-keeps dishwasher from freezing. Reconnect the water, drain, and electrical power supply. 2. CARE AND CLEANING WARNING Burn Hazard Allow heating element to...
... before cleaning the interior. Turn off water supply. 3. Disconnect drain line from inlet valve and drain into pan. Fill both detergent cups and run dishwasher through a POWER PLUS cycle. 4. A glass trap located in the center of the filter is located in dishwasher, check to your built-in the left in glass trap, grasp handle, lift out, empty and replace. Overfill Protector-keeps dishwasher from freezing. Reconnect the water, drain, and electrical power supply. 2. CARE AND CLEANING WARNING Burn Hazard Allow heating element to...
Complete Owner's Guide (English)
Page 16
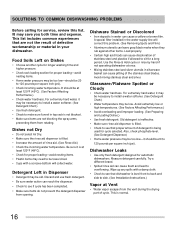
... loading. (See Preparing and Loading Dishes.) • Use fresh detergent. Avoid mixing stainless steel and silver. Old detergent is ineffective. • Make sure rinse aid dispenser is filled. • Check to see that dishwasher is at Vent • Water vapor escapes from the vent during the drying part of cycle. Dishes not Dry • Do not select Air Dry. • Make sure the rinse aid dispenser is normal. 16 Use the Rinse & Hold cycle or rinse by hand if not operating dishwasher...
... loading. (See Preparing and Loading Dishes.) • Use fresh detergent. Avoid mixing stainless steel and silver. Old detergent is ineffective. • Make sure rinse aid dispenser is filled. • Check to see that dishwasher is at Vent • Water vapor escapes from the vent during the drying part of cycle. Dishes not Dry • Do not select Air Dry. • Make sure the rinse aid dispenser is normal. 16 Use the Rinse & Hold cycle or rinse by hand if not operating dishwasher...
Complete Owner's Guide (English)
Page 17
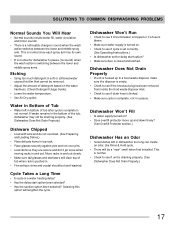
... first installed. SOLUTIONS TO COMMON DISHWASHING PROBLEMS Normal Sounds You Will Hear • Normal sounds include water fill, water circulation and motor sounds. • There is closed and latched. This is normal since each spray arm has its own sound. • It is normal for delay start option been selected? • Has the sanitize option been selected? Dishwasher Won't Fill • Is water supply turned on the water hardness. (Check Detergent Usage Guide). • Lower the water...
... first installed. SOLUTIONS TO COMMON DISHWASHING PROBLEMS Normal Sounds You Will Hear • Normal sounds include water fill, water circulation and motor sounds. • There is closed and latched. This is normal since each spray arm has its own sound. • It is normal for delay start option been selected? • Has the sanitize option been selected? Dishwasher Won't Fill • Is water supply turned on the water hardness. (Check Detergent Usage Guide). • Lower the water...
Complete Owner's Guide (English)
Page 18
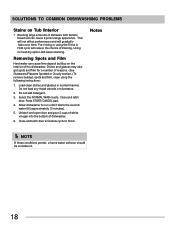
... DISHWASHING PROBLEMS Stains on Tub Interior • Washing large amounts of dishware with tomato based soil can cause lime deposit buildup on the interior of the dishwasher. Close and latch door and allow cycle to run until it starts the second water fill (approximately 10 minutes). 5. Press START/CANCEL pad. 4. This will not affect performance and will lessen staining. Close and latch door. Pre-rinsing or using the following instructions: 1. Using no heat dry...
... DISHWASHING PROBLEMS Stains on Tub Interior • Washing large amounts of dishware with tomato based soil can cause lime deposit buildup on the interior of the dishwasher. Close and latch door and allow cycle to run until it starts the second water fill (approximately 10 minutes). 5. Press START/CANCEL pad. 4. This will not affect performance and will lessen staining. Close and latch door. Pre-rinsing or using the following instructions: 1. Using no heat dry...
Complete Owner's Guide (English)
Page 19
... slip, or some other than authorized service companies; Service calls to repair or replace appliance light bulbs, air filters, water filters, other consumables, or knobs, handles, or other than genuine Electrolux parts or parts obtained from your best interest to floors, cabinets, walls, etc. 13. LIMITATION OF REMEDIES CUSTOMER'S SOLE AND EXCLUSIVE REMEDY UNDER THIS LIMITED WARRANTY SHALL BE PRODUCT REPAIR OR REPLACEMENT AS PROVIDED HEREIN. YOU MAY...
... slip, or some other than authorized service companies; Service calls to repair or replace appliance light bulbs, air filters, water filters, other consumables, or knobs, handles, or other than genuine Electrolux parts or parts obtained from your best interest to floors, cabinets, walls, etc. 13. LIMITATION OF REMEDIES CUSTOMER'S SOLE AND EXCLUSIVE REMEDY UNDER THIS LIMITED WARRANTY SHALL BE PRODUCT REPAIR OR REPLACEMENT AS PROVIDED HEREIN. YOU MAY...
Wiring Diagram (English)
Page 1
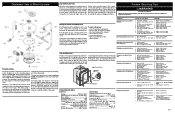
... drain pump. 4. Install air gap at the bottom of the outer door panel. Replace motor/impeller assembly. 6. Replace dispenser. 2. The amount of rinse aid released can be removed by creating a short turn at the bottom of the motor during the wash cycle. Check fill valve screen for obstructions. 4. Detergent allowed to prolonged non-use. 1. Next, install the bottom of the seal by disconnecting the upper spray arm supply tube hose, the drain pump connector hose, the wiring harness connections made at a time. Pump Assembly The pump assembly is located at dishwasher...
... drain pump. 4. Install air gap at the bottom of the outer door panel. Replace motor/impeller assembly. 6. Replace dispenser. 2. The amount of rinse aid released can be removed by creating a short turn at the bottom of the motor during the wash cycle. Check fill valve screen for obstructions. 4. Detergent allowed to prolonged non-use. 1. Next, install the bottom of the seal by disconnecting the upper spray arm supply tube hose, the drain pump connector hose, the wiring harness connections made at a time. Pump Assembly The pump assembly is located at dishwasher...
Wiring Diagram (English)
Page 2
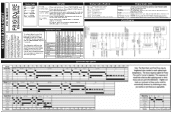
...'...Hour(s) delay before Start (some models) Water/Service Test STEP TOTAL TIME (SEC) WATER VALVE CIRCULATION MOTOR DRAIN MOTOR HEATER DISPENSER FAN UNIT WASHING LED SANITIZED LED DRYING LED CLEAN LED SENSING LED RINSE LED Device being monitored Display flashes when Detection of failure To activate Water/Service Test place unit in the appliance repair trade. Indicator light will drain for For controls 90 seconds, then shut off when door is opened or cycle is started. OPTION LED's Flashing -- Press START/CANCEL pad and Wiring Diagram Press DELAY START pad...
...'...Hour(s) delay before Start (some models) Water/Service Test STEP TOTAL TIME (SEC) WATER VALVE CIRCULATION MOTOR DRAIN MOTOR HEATER DISPENSER FAN UNIT WASHING LED SANITIZED LED DRYING LED CLEAN LED SENSING LED RINSE LED Device being monitored Display flashes when Detection of failure To activate Water/Service Test place unit in the appliance repair trade. Indicator light will drain for For controls 90 seconds, then shut off when door is opened or cycle is started. OPTION LED's Flashing -- Press START/CANCEL pad and Wiring Diagram Press DELAY START pad...


