
Wiring Diagram (All Languages)
Page 1
... to complete the cycle. Caution All electrical parts and wiring must be checked. A "d" in the freezer temperature window and "F" in the refrigerator temperature window will change the fill time. R134a important safety NOTE The information provided herein is activated. NOTE This product comes equipped with Run/...-19° to -17° C -18° to -16° C -18° to -16° C -1° to 3° F -18° to -16° C Refrigerator Temperature 34° to 39° F 1° to 4° C 34° to 39° F 1° to 4° C 34° to 39° F 1° to 4°...
... to complete the cycle. Caution All electrical parts and wiring must be checked. A "d" in the freezer temperature window and "F" in the refrigerator temperature window will change the fill time. R134a important safety NOTE The information provided herein is activated. NOTE This product comes equipped with Run/...-19° to -17° C -18° to -16° C -18° to -16° C -1° to 3° F -18° to -16° C Refrigerator Temperature 34° to 39° F 1° to 4° C 34° to 39° F 1° to 4° C 34° to 39° F 1° to 4°...

Installation Instructions (All Languages)
Page 1
... Open both doors. or you have operation problems after unit is designed to fully open both doors. And thank you for choosing Frigidaire. 8 Installation Checkoff List Doors Door seals completely to cabinet on the lower front of installation, proper air circulation... site preparation: Information about setting up and operating the Ice & Water Dispensing system. 4 Place In Permanent Position If possible, use refrigerator handles to move it to side may damage flooring. 3 Connect Water Supply What you use a service or kitchen contracting professional to ...
... Open both doors. or you have operation problems after unit is designed to fully open both doors. And thank you for choosing Frigidaire. 8 Installation Checkoff List Doors Door seals completely to cabinet on the lower front of installation, proper air circulation... site preparation: Information about setting up and operating the Ice & Water Dispensing system. 4 Place In Permanent Position If possible, use refrigerator handles to move it to side may damage flooring. 3 Connect Water Supply What you use a service or kitchen contracting professional to ...
Use and Care Manual
Page 1
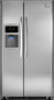
All about the Use &Care of your Refrigerator 242108503 (June 2012) TABLE OF CONTENTS Important Safety Instructions 2 Storage Features 15 Features at a Glance 4 Automatic Ice & Water Dispenser 17 Installation 5 Changing the Filter 20 Door Removal Instructions 7 Normal Operating Sounds and Sights..........22 Handle Installation 9 Care and Cleaning 23 Connecting Water Supply 10 Before you Call 25 Controls 12 Major Appliance Warranty 28 www.frigidaire.com USA 1-800-944-9044 www.frigidaire.ca Canada 1-800-265-8352
All about the Use &Care of your Refrigerator 242108503 (June 2012) TABLE OF CONTENTS Important Safety Instructions 2 Storage Features 15 Features at a Glance 4 Automatic Ice & Water Dispenser 17 Installation 5 Changing the Filter 20 Door Removal Instructions 7 Normal Operating Sounds and Sights..........22 Handle Installation 9 Care and Cleaning 23 Connecting Water Supply 10 Before you Call 25 Controls 12 Major Appliance Warranty 28 www.frigidaire.com USA 1-800-944-9044 www.frigidaire.ca Canada 1-800-265-8352

Use and Care Manual
Page 2
...Ice & water dispenser operates correctly Front filter must be flush with any other hazards. • DO NOT operate the refrigerator in 24 hours Ice maker is important but not hazard-related. 2 Definitions This is unpacked. Obey all safety messages that follow ...installation, operation or maintenance information which , if not avoided, will result in Ice Maker House water supply connected to refrigerator No water leaks present at all connections - Read product labels for warnings regarding flammability and other appliance. Cartons covered...
...Ice & water dispenser operates correctly Front filter must be flush with any other hazards. • DO NOT operate the refrigerator in 24 hours Ice maker is important but not hazard-related. 2 Definitions This is unpacked. Obey all safety messages that follow ...installation, operation or maintenance information which , if not avoided, will result in Ice Maker House water supply connected to refrigerator No water leaks present at all connections - Read product labels for warnings regarding flammability and other appliance. Cartons covered...

Use and Care Manual
Page 3
... by an authorized service technician to prevent any circumstances, cut, remove, or bypass the grounding prong. Do not, under your old refrigerator/freezer: • Remove doors. • Leave shelves in place so children may break suddenly if nicked, scratched, or exposed to...Proper Disposal of child entrapment Child entrapment and suffocation are still dangerous - Shelves may not easily climb inside. • Have refrigerant removed by pulling on the power cord. Grounding type wall receptacle WARNING These guidelines must be plugged directly into an electrical outlet...
... by an authorized service technician to prevent any circumstances, cut, remove, or bypass the grounding prong. Do not, under your old refrigerator/freezer: • Remove doors. • Leave shelves in place so children may break suddenly if nicked, scratched, or exposed to...Proper Disposal of child entrapment Child entrapment and suffocation are still dangerous - Shelves may not easily climb inside. • Have refrigerant removed by pulling on the power cord. Grounding type wall receptacle WARNING These guidelines must be plugged directly into an electrical outlet...
Use and Care Manual
Page 4
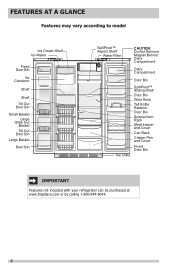
... Retainer Door Bin Special Item Rack Meat keeper and Cover Can Rack Crisper Pan and Cover Fixed Door Bin IMPORTANT Features not included with your refrigerator can be purchased at www.frigidaire.com or by calling 1-800-944-9044. 4
... Retainer Door Bin Special Item Rack Meat keeper and Cover Can Rack Crisper Pan and Cover Fixed Door Bin IMPORTANT Features not included with your refrigerator can be purchased at www.frigidaire.com or by calling 1-800-944-9044. 4

Use and Care Manual
Page 5
... with the door hinge side against cabinet, fasten bottom clips of toe grille from the range, dishwasher or other heat sources. • The refrigerator must be installed on top of toe grille until top of toe grille pops off. 3 Pull toe grille outward toward your body and off .... Before starting the refrigerator, follow these important first steps. Installation Installation clearances • Allow the following clearances for the proper operation of lower hinges. The compressor will ...
... with the door hinge side against cabinet, fasten bottom clips of toe grille from the range, dishwasher or other heat sources. • The refrigerator must be installed on top of toe grille until top of toe grille pops off. 3 Pull toe grille outward toward your body and off .... Before starting the refrigerator, follow these important first steps. Installation Installation clearances • Allow the following clearances for the proper operation of lower hinges. The compressor will ...

Use and Care Manual
Page 6
.... To level the cabinet using a 7/16 inch wrench. (See illustration.) • All four corners of drawers and freezer baskets, the refrigerator should align with their seals touching the cabinet on the floor. • The cabinet should be level at the front and rear. Door ...models): 1 Before leveling either door, remove set screw that doors close and seal properly). • Doors should be in a position where both the refrigerator and freezer doors can be fully opened. For best use a flat-blade screwdriver or 3/8 inch socket wrench to fully open). 5 Reinstall set screw...
.... To level the cabinet using a 7/16 inch wrench. (See illustration.) • All four corners of drawers and freezer baskets, the refrigerator should align with their seals touching the cabinet on the floor. • The cabinet should be level at the front and rear. Door ...models): 1 Before leveling either door, remove set screw that doors close and seal properly). • Doors should be in a position where both the refrigerator and freezer doors can be fully opened. For best use a flat-blade screwdriver or 3/8 inch socket wrench to fully open). 5 Reinstall set screw...

Use and Care Manual
Page 7
... Cover Screws Top Hinge Cover Hinge Screws Top Hinge or 3/8" Fixed Wrench Top Hinge Cover Front Screw Top Hinge Cover Rear Screw To remove the refrigerator door: 1 Trace lightly around the door's top hinge with your appliance). 3 Remove any food from the top hinge. Lift the door off . To remove ...the refrigerator top hinge cover: 1 Remove the three screws from each cover over the top door hinges. 2 Lift hinge cover straight up and off of the bottom ...
... Cover Screws Top Hinge Cover Hinge Screws Top Hinge or 3/8" Fixed Wrench Top Hinge Cover Front Screw Top Hinge Cover Rear Screw To remove the refrigerator door: 1 Trace lightly around the door's top hinge with your appliance). 3 Remove any food from the top hinge. Lift the door off . To remove ...the refrigerator top hinge cover: 1 Remove the three screws from each cover over the top door hinges. 2 Lift hinge cover straight up and off of the bottom ...

Use and Care Manual
Page 8
... firmly and pull apart. To reinstall the freezer door, reverse the above steps. Door Hinge Assembly Closer Pin Screws Hinge Adjustable Hinge To reinstall the refrigerator door, reverse the above steps. To remove the freezer top hinge cover: 1 Remove the two screws from the bottom hinge. Lift the door off . Pull...
... firmly and pull apart. To reinstall the freezer door, reverse the above steps. Door Hinge Assembly Closer Pin Screws Hinge Adjustable Hinge To reinstall the refrigerator door, reverse the above steps. To remove the freezer top hinge cover: 1 Remove the two screws from the bottom hinge. Lift the door off . Pull...

Use and Care Manual
Page 9
...please review these handles. HANDLE INSTALLATION Frigidaire Professional® Freezer Upper End Cap Refrigerator Upper End Cap Freezer Lower End Cap Refrigerator Lower End Cap Frigidaire Gallery® Freezer Upper End Cap Refrigerator Upper End Cap Freezer Lower End Cap Refrigerator Lower End Cap Ensure Handle Set...lower pre-installed shoulder bolts (A) that are fastened into door, ensuring the holes for the set screws are facing towards the refrigerator door. 3 While holding handle firmly against door, fasten upper and lower Allen set screw should be sharp (some models)....
...please review these handles. HANDLE INSTALLATION Frigidaire Professional® Freezer Upper End Cap Refrigerator Upper End Cap Freezer Lower End Cap Refrigerator Lower End Cap Frigidaire Gallery® Freezer Upper End Cap Refrigerator Upper End Cap Freezer Lower End Cap Refrigerator Lower End Cap Ensure Handle Set...lower pre-installed shoulder bolts (A) that are fastened into door, ensuring the holes for the set screws are facing towards the refrigerator door. 3 While holding handle firmly against door, fasten upper and lower Allen set screw should be sharp (some models)....

Use and Care Manual
Page 10
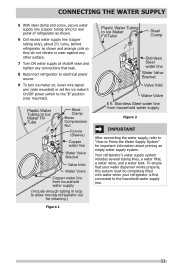
...onto valve. Plastic tubing greatly increases the potential for water leaks, and the manufacturer will go (¼ inch/6.4 mm). Depending on your new refrigerator. If you use copper tubing - DO NOT over tighten. CAUTION NOTE To Avoid Property Damage: • Copper or Stainless Steel... (as it will not be responsible for any damage if plastic tubing is not recommended to installing your local/ state building codes, Frigidaire recommends for the supply line. • DO NOT install water supply tubing in areas where temperatures fall below freezing. • Chemicals...
...onto valve. Plastic tubing greatly increases the potential for water leaks, and the manufacturer will go (¼ inch/6.4 mm). Depending on your new refrigerator. If you use copper tubing - DO NOT over tighten. CAUTION NOTE To Avoid Property Damage: • Copper or Stainless Steel... (as it will not be responsible for any damage if plastic tubing is not recommended to installing your local/ state building codes, Frigidaire recommends for the supply line. • DO NOT install water supply tubing in areas where temperatures fall below freezing. • Chemicals...
Use and Care Manual
Page 11
... maker on, lower wire signal arm (side mounted) or set the ice maker's On/Off power switch to the "I" position (rear mounted). Your refrigerator's water supply system includes several tubing lines, a water filter, a water valve, and a water tank. CONNECTING THE WATER SUPPLY 5 With steel clamp... and screw, secure water supply line (copper tubing only) to rear panel of refrigerator as shown. 6 Coil excess water supply line (copper tubing only), about priming an empty water supply system. Plastic Water Tubing to Ice Maker ...
... maker on, lower wire signal arm (side mounted) or set the ice maker's On/Off power switch to the "I" position (rear mounted). Your refrigerator's water supply system includes several tubing lines, a water filter, a water valve, and a water tank. CONNECTING THE WATER SUPPLY 5 With steel clamp... and screw, secure water supply line (copper tubing only) to rear panel of refrigerator as shown. 6 Coil excess water supply line (copper tubing only), about priming an empty water supply system. Plastic Water Tubing to Ice Maker ...

Use and Care Manual
Page 12
... plus ice Activates a faster rate for three seconds to reset. default settings Resets all dispenser functions. CONTROLS Frigidaire Gallery User Interface User Variable Options Your refrigerator is more brightly illuminated. Press and hold for freezing food Gallery and Pro light on-off C/F When active...tones to display filter status. power on -off On / Off control lock Press and hold for three seconds to clean the refrigerator. It is no need to display filter condition status. The active dispenser mode is equipped with force. The temperature display will ...
... plus ice Activates a faster rate for three seconds to reset. default settings Resets all dispenser functions. CONTROLS Frigidaire Gallery User Interface User Variable Options Your refrigerator is more brightly illuminated. Press and hold for freezing food Gallery and Pro light on-off C/F When active...tones to display filter status. power on -off On / Off control lock Press and hold for three seconds to clean the refrigerator. It is no need to display filter condition status. The active dispenser mode is equipped with force. The temperature display will ...

Use and Care Manual
Page 13
... event of a high temperature condition, the temperature display will resume normal operation. All other modes are turned off , the refrigerator will beep to your refrigerator. The alarm is turned off until the alarm is acknowledged. The high temp alarm may be illuminated until the alarm off ... Alarms Door Ajar If the door has been left open for an extended period of inactivity, the display will resume normal operation. Frigidaire Pro CONTROLS IMPORTANT Pressing the power off icon does not turn off icon is acknowledged. After five seconds of time greater than five...
... event of a high temperature condition, the temperature display will resume normal operation. All other modes are turned off , the refrigerator will beep to your refrigerator. The alarm is turned off until the alarm is acknowledged. The high temp alarm may be illuminated until the alarm off ... Alarms Door Ajar If the door has been left open for an extended period of inactivity, the display will resume normal operation. Frigidaire Pro CONTROLS IMPORTANT Pressing the power off icon does not turn off icon is acknowledged. After five seconds of time greater than five...

Use and Care Manual
Page 14
... door is closed , without any violation of the Sabbath/Holidays. The alarm will then silence on refrigerator temp for proper usage and a complete list of models with observance of the refrigerator and its own and a red high temperature icon will remain cold and new ice cubes can be...http:\\www.star-k.org. NOTE Although you have entered the Sabbath mode, the ice maker will sound intermittently for health reasons. The refrigerator will function normally once the door is closed , until the Sabbath mode is a feature that disables portions of the weekly Sabbath and religious ...
... door is closed , without any violation of the Sabbath/Holidays. The alarm will then silence on refrigerator temp for proper usage and a complete list of models with observance of the refrigerator and its own and a red high temperature icon will remain cold and new ice cubes can be...http:\\www.star-k.org. NOTE Although you have entered the Sabbath mode, the ice maker will sound intermittently for health reasons. The refrigerator will function normally once the door is closed , until the Sabbath mode is a feature that disables portions of the weekly Sabbath and religious ...

Use and Care Manual
Page 15
... control which is warmer than the general food storage section, is intended for fast cleaning. The shelves slide out independently of the refrigerator. Allow the glass shelves to stabilize to a minimum and maintains maximum moisture content. 1 2 Cantilever Glass Shelf Crispers 1 Crispers ...containers. Crisper Humidity Control NOTE Leafy vegetables keep best in the crispers. The fresh drawers, located under the bottom refrigerator shelf, are not removable from their mounting brackets. Crispers do not feature humidity controls. Some bins are provided for convenient ...
... control which is warmer than the general food storage section, is intended for fast cleaning. The shelves slide out independently of the refrigerator. Allow the glass shelves to stabilize to a minimum and maintains maximum moisture content. 1 2 Cantilever Glass Shelf Crispers 1 Crispers ...containers. Crisper Humidity Control NOTE Leafy vegetables keep best in the crispers. The fresh drawers, located under the bottom refrigerator shelf, are not removable from their mounting brackets. Crispers do not feature humidity controls. Some bins are provided for convenient ...

Use and Care Manual
Page 17
... will produce 4 to an external supply line. Your ice maker is not flushed, the first ice cubes may take about two days. 17 After the refrigerator is produced at a rate of 8 cubes every 75 to 4 pounds of ice every 24 hours, depending on usage conditions. It can completely fill an... of the dispenser. Air in new plumbing lines can produce ice within 24 hours. AUTOMATIC ICE & WATER DISPENSER Priming the Water Supply System Your refrigerator's water supply system includes several hours, the ice maker can result in two or three empty ice maker cycles. This system needs to prime the...
... will produce 4 to an external supply line. Your ice maker is not flushed, the first ice cubes may take about two days. 17 After the refrigerator is produced at a rate of 8 cubes every 75 to 4 pounds of ice every 24 hours, depending on usage conditions. It can completely fill an... of the dispenser. Air in new plumbing lines can produce ice within 24 hours. AUTOMATIC ICE & WATER DISPENSER Priming the Water Supply System Your refrigerator's water supply system includes several hours, the ice maker can result in two or three empty ice maker cycles. This system needs to prime the...

Use and Care Manual
Page 18
... other ice cubes in wire signal arm, which automatically stops ice production when the ice bin is delivered to small cubes or chips that your refrigerator is not connected to turn Off the ice maker. • If you need a large quantity of ice at one .
... other ice cubes in wire signal arm, which automatically stops ice production when the ice bin is delivered to small cubes or chips that your refrigerator is not connected to turn Off the ice maker. • If you need a large quantity of ice at one .

Use and Care Manual
Page 19
... vacations. - AUTOMATIC ICE & WATER DISPENSER • When dispensing ice, you should also turn off the water supply valve. If the auger is maintained to your refrigerator is softened, be sure the softener is not properly aligned when replacing the ice bin, the...
... vacations. - AUTOMATIC ICE & WATER DISPENSER • When dispensing ice, you should also turn off the water supply valve. If the auger is maintained to your refrigerator is softened, be sure the softener is not properly aligned when replacing the ice bin, the...


