
Wiring Diagram (All Languages)
Page 1
...19° to -17° C -18° to -16° C -18° to -16° C -1° to 3° F -18° to -16° C Refrigerator Temperature 34° to 39° F 1° to 4° C 34° to 39° F 1° to 4° C 34° to 39° F 1° to ...running) .7 to 1.1 1.0 to 1.4 .9 to 1.3 1.1 to 1.5 Base Voltage 115 vac (127 vac max) DEFROST SPECIFICATIONS Cabinet Size Thermostat Cut-in the refrigerator temperature window will display when the heater is replaced, the fill volume must be shielded from housing. PERFORMANCE DATA NO LOAD & NO DOOR OPENINGS AT...
...19° to -17° C -18° to -16° C -18° to -16° C -1° to 3° F -18° to -16° C Refrigerator Temperature 34° to 39° F 1° to 4° C 34° to 39° F 1° to 4° C 34° to 39° F 1° to ...running) .7 to 1.1 1.0 to 1.4 .9 to 1.3 1.1 to 1.5 Base Voltage 115 vac (127 vac max) DEFROST SPECIFICATIONS Cabinet Size Thermostat Cut-in the refrigerator temperature window will display when the heater is replaced, the fill volume must be shielded from housing. PERFORMANCE DATA NO LOAD & NO DOOR OPENINGS AT...

Installation Instructions (All Languages)
Page 1
...for the water supply connection at the door hinges? (See the Use & Care Guide for choosing Frigidaire. 8 Installation Checkoff List Doors Door seals completely to position the refrigerator directly in 24 hours. • See your Use & Care Guide for final positioning of your... water is sitting solid on all corners Electrical Power House power turned on top of toe grille until top of your refrigerator to refrigerator Cabinet is clear by customer after installation. Call • Avoid direct sunlight and close spaces or entrances. Here is ...
...for the water supply connection at the door hinges? (See the Use & Care Guide for choosing Frigidaire. 8 Installation Checkoff List Doors Door seals completely to position the refrigerator directly in 24 hours. • See your Use & Care Guide for final positioning of your... water is sitting solid on all corners Electrical Power House power turned on top of toe grille until top of your refrigerator to refrigerator Cabinet is clear by customer after installation. Call • Avoid direct sunlight and close spaces or entrances. Here is ...
Use and Care Manual
Page 1
All about the Use &Care of your Refrigerator 242108503 (June 2012) TABLE OF CONTENTS Important Safety Instructions 2 Storage Features 15 Features at a Glance 4 Automatic Ice & Water Dispenser 17 Installation 5 Changing the Filter 20 Door Removal Instructions 7 Normal Operating Sounds and Sights..........22 Handle Installation 9 Care and Cleaning 23 Connecting Water Supply 10 Before you Call 25 Controls 12 Major Appliance Warranty 28 www.frigidaire.com USA 1-800-944-9044 www.frigidaire.ca Canada 1-800-265-8352
All about the Use &Care of your Refrigerator 242108503 (June 2012) TABLE OF CONTENTS Important Safety Instructions 2 Storage Features 15 Features at a Glance 4 Automatic Ice & Water Dispenser 17 Installation 5 Changing the Filter 20 Door Removal Instructions 7 Normal Operating Sounds and Sights..........22 Handle Installation 9 Care and Cleaning 23 Connecting Water Supply 10 Before you Call 25 Controls 12 Major Appliance Warranty 28 www.frigidaire.com USA 1-800-944-9044 www.frigidaire.ca Canada 1-800-265-8352

Use and Care Manual
Page 2
...if they come in contact with any exterior wrapping material immediately after the refrigerator is setting solid on Refrigerator plugged in death or serious injury. Obey all safety messages that follow this refrigerator. Doors Handles are secure and tight Door seals ... plastic bags, and any moving parts of explosive fumes. • Avoid contact with other hazards. • DO NOT operate the refrigerator in death or serious injury. IMPORTANT SAFETY INSTRUCTIONS WARNING Installation Checklist Please read all connections - For your Safety • DO NOT ...
...if they come in contact with any exterior wrapping material immediately after the refrigerator is setting solid on Refrigerator plugged in death or serious injury. Obey all safety messages that follow this refrigerator. Doors Handles are secure and tight Door seals ... plastic bags, and any moving parts of explosive fumes. • Avoid contact with other hazards. • DO NOT operate the refrigerator in death or serious injury. IMPORTANT SAFETY INSTRUCTIONS WARNING Installation Checklist Please read all connections - For your Safety • DO NOT ...

Use and Care Manual
Page 3
... problems of the appliance is equipped with a threeprong grounding plug for your protection against electrical shock hazards. Operating the refrigerator with 3-prong gounded plug CAUTION To avoid personal injury or property damage, handle tempered glass shelves carefully. Before you...components. Power cord with insufficient power can damage the compressor. Consult a qualified electrician. Check with your old refrigerator. Electrical information • The refrigerator must be plugged directly into a properly grounded three prong receptacle. Always grip the plug firmly, and pull...
... problems of the appliance is equipped with a threeprong grounding plug for your protection against electrical shock hazards. Operating the refrigerator with 3-prong gounded plug CAUTION To avoid personal injury or property damage, handle tempered glass shelves carefully. Before you...components. Power cord with insufficient power can damage the compressor. Consult a qualified electrician. Check with your old refrigerator. Electrical information • The refrigerator must be plugged directly into a properly grounded three prong receptacle. Always grip the plug firmly, and pull...
Use and Care Manual
Page 4
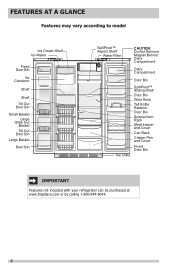
... Retainer Door Bin Special Item Rack Meat keeper and Cover Can Rack Crisper Pan and Cover Fixed Door Bin IMPORTANT Features not included with your refrigerator can be purchased at www.frigidaire.com or by calling 1-800-944-9044. 4
... Retainer Door Bin Special Item Rack Meat keeper and Cover Can Rack Crisper Pan and Cover Fixed Door Bin IMPORTANT Features not included with your refrigerator can be purchased at www.frigidaire.com or by calling 1-800-944-9044. 4

Use and Care Manual
Page 5
... that is placed with an automatic ice maker. Do Not use an extension cord or an adapter plug. • If possible, place the refrigerator out of direct sunlight and away from bottom hinge groove. 2 Open both doors. Press firmly on the lower front of lower hinges. Before ... air circulation, and plumbing and electrical connections: Sides & Top 3/8 inch Back 1 inch CAUTION Do Not install the refrigerator where the temperature will not be opened wider. Use the refrigerator only as instructed in this Use & Care Guide. To remove toe grille 1 With both doors. If you may ...
... that is placed with an automatic ice maker. Do Not use an extension cord or an adapter plug. • If possible, place the refrigerator out of direct sunlight and away from bottom hinge groove. 2 Open both doors. Press firmly on the lower front of lower hinges. Before ... air circulation, and plumbing and electrical connections: Sides & Top 3/8 inch Back 1 inch CAUTION Do Not install the refrigerator where the temperature will not be opened wider. Use the refrigerator only as instructed in this Use & Care Guide. To remove toe grille 1 With both doors. If you may ...

Use and Care Manual
Page 6
...door height into place (see "Toe Grille Installation and Removal" in the "Installation" section). 2 Close the doors and use of your refrigerator: To level the doors using the adjustable lower hinge (some models) Hinge 6 Replace the toe grille by turning the adjustment screw clockwise ...blade screwdriver or 3/8 inch socket wrench to a counter or table when removing food. Guidelines for final positioning of drawers and freezer baskets, the refrigerator should be in the "Installation" section). 6 All of the cabinet must rest firmly on all four sides. To level the cabinet using a...
...door height into place (see "Toe Grille Installation and Removal" in the "Installation" section). 2 Close the doors and use of your refrigerator: To level the doors using the adjustable lower hinge (some models) Hinge 6 Replace the toe grille by turning the adjustment screw clockwise ...blade screwdriver or 3/8 inch socket wrench to a counter or table when removing food. Guidelines for final positioning of drawers and freezer baskets, the refrigerator should be in the "Installation" section). 6 All of the cabinet must rest firmly on all four sides. To level the cabinet using a...

Use and Care Manual
Page 7
To remove the refrigerator top hinge cover: 1 Remove the three screws from each cover over the top door hinges. 2 Lift hinge cover straight up and off of the bottom ... Cover Screws Top Hinge Cover Hinge Screws Top Hinge or 3/8" Fixed Wrench Top Hinge Cover Front Screw Top Hinge Cover Rear Screw To remove the refrigerator door: 1 Trace lightly around the door's top hinge with your appliance). 3 Remove any food from the top hinge. DOOR REMOVAL INSTRUCTIONS Tools Necessary: Phillips™...
To remove the refrigerator top hinge cover: 1 Remove the three screws from each cover over the top door hinges. 2 Lift hinge cover straight up and off of the bottom ... Cover Screws Top Hinge Cover Hinge Screws Top Hinge or 3/8" Fixed Wrench Top Hinge Cover Front Screw Top Hinge Cover Rear Screw To remove the refrigerator door: 1 Trace lightly around the door's top hinge with your appliance). 3 Remove any food from the top hinge. DOOR REMOVAL INSTRUCTIONS Tools Necessary: Phillips™...

Use and Care Manual
Page 8
... set aside in a secure position where they cannot fall and cause personal injury. 8 Door Hinge Assembly Closer Pin Screws Hinge Adjustable Hinge To reinstall the refrigerator door, reverse the above steps. This makes reinstallation easier. 3 Detach the water tube from the top hinge and pull the multi-wire cable through it...
... set aside in a secure position where they cannot fall and cause personal injury. 8 Door Hinge Assembly Closer Pin Screws Hinge Adjustable Hinge To reinstall the refrigerator door, reverse the above steps. This makes reinstallation easier. 3 Detach the water tube from the top hinge and pull the multi-wire cable through it...

Use and Care Manual
Page 9
...drawn tight to install refrigerator handle. HANDLE INSTALLATION Frigidaire Professional® Freezer Upper End Cap Refrigerator Upper End Cap Freezer Lower End Cap Refrigerator Lower End Cap Frigidaire Gallery® Freezer Upper End Cap Refrigerator Upper End Cap Freezer Lower End Cap Refrigerator Lower End Cap Ensure...pre-installed shoulder bolts (A) that are fastened into door, ensuring the holes for the set screws are facing towards the refrigerator door. 3 While holding handle firmly against door, fasten upper and lower Allen set screw should be tightened and sub-flush...
...drawn tight to install refrigerator handle. HANDLE INSTALLATION Frigidaire Professional® Freezer Upper End Cap Refrigerator Upper End Cap Freezer Lower End Cap Refrigerator Lower End Cap Frigidaire Gallery® Freezer Upper End Cap Refrigerator Upper End Cap Freezer Lower End Cap Refrigerator Lower End Cap Ensure...pre-installed shoulder bolts (A) that are fastened into door, ensuring the holes for the set screws are facing towards the refrigerator door. 3 While holding handle firmly against door, fasten upper and lower Allen set screw should be tightened and sub-flush...

Use and Care Manual
Page 10
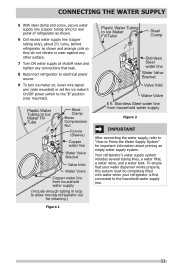
...which can cause death or severe personal injury, disconnect the refrigerator from electrical power before connecting a water supply line to the refrigerator. • A shutoff valve to connect the water supply line to www.frigidaire.com/store for more information. Stainless Steel Water Line) and... for homes without an existing valve, Frigidaire recommends its Smart Choice® water line...
...which can cause death or severe personal injury, disconnect the refrigerator from electrical power before connecting a water supply line to the refrigerator. • A shutoff valve to connect the water supply line to www.frigidaire.com/store for more information. Stainless Steel Water Line) and... for homes without an existing valve, Frigidaire recommends its Smart Choice® water line...
Use and Care Manual
Page 11
... Figure 1 Plastic Water Tubing to Ice Maker Fill Tube Steel Clamp Stainless Steel water line Water Valve Bracket Valve Inlet Water Valve 6 ft. Your refrigerator's water supply system includes several tubing lines, a water filter, a water valve, and a water tank. Stainless Steel water line from household water ...supply system. CONNECTING THE WATER SUPPLY 5 With steel clamp and screw, secure water supply line (copper tubing only) to rear panel of refrigerator as shown and arrange coils so they do not vibrate or wear against any other surface. 7 Turn ON water supply at shutoff valve...
... Figure 1 Plastic Water Tubing to Ice Maker Fill Tube Steel Clamp Stainless Steel water line Water Valve Bracket Valve Inlet Water Valve 6 ft. Your refrigerator's water supply system includes several tubing lines, a water filter, a water valve, and a water tank. Stainless Steel water line from household water ...supply system. CONNECTING THE WATER SUPPLY 5 With steel clamp and screw, secure water supply line (copper tubing only) to rear panel of refrigerator as shown and arrange coils so they do not vibrate or wear against any other surface. 7 Turn ON water supply at shutoff valve...

Use and Care Manual
Page 12
... Resets all dispenser functions. The temperature display will read OFF. 12 The active dispenser mode is only necessary to clean the refrigerator. Touch an icon to reset. Press and hold for freezing food Gallery and Pro light on-off the cooling system to ...plus ice Activates a faster rate for freezing food Increases the production of the ice and water dispenser. CONTROLS Frigidaire Gallery User Interface User Variable Options Your refrigerator is equipped with force. Touch to toggle display from Fahrenheit to activate and deactivate. It is more brightly ...
... Resets all dispenser functions. The temperature display will read OFF. 12 The active dispenser mode is only necessary to clean the refrigerator. Touch an icon to reset. Press and hold for freezing food Gallery and Pro light on-off the cooling system to ...plus ice Activates a faster rate for freezing food Increases the production of the ice and water dispenser. CONTROLS Frigidaire Gallery User Interface User Variable Options Your refrigerator is equipped with force. Touch to toggle display from Fahrenheit to activate and deactivate. It is more brightly ...

Use and Care Manual
Page 13
... outlet. Alarms Door Ajar If the door has been left open for an extended period of inactivity, the display will resume normal operation. Frigidaire Pro CONTROLS IMPORTANT Pressing the power off icon does not turn off by closing the door. High Temp In the event of a power failure..., the power fail alert will be displayed and the alarm off key will be displayed and the refrigerator will beep to your refrigerator. Other modes may also be illuminated until pressed, acknowledging the alarm, at which time the highest temperature reached will be illuminated ...
... outlet. Alarms Door Ajar If the door has been left open for an extended period of inactivity, the display will resume normal operation. Frigidaire Pro CONTROLS IMPORTANT Pressing the power off icon does not turn off by closing the door. High Temp In the event of a power failure..., the power fail alert will be displayed and the alarm off key will be displayed and the refrigerator will beep to your refrigerator. Other modes may also be illuminated until pressed, acknowledging the alarm, at which time the highest temperature reached will be illuminated ...

Use and Care Manual
Page 14
... the web at http:\\www.star-k.org. NOTE Although you have entered the Sabbath mode, the ice maker will then silence on refrigerator temp for five seconds. If a high temperature alarm is closed , until the Sabbath mode is active for health reasons. The alarm will complete... the cycle it had already initiated. The refrigerator will sound intermittently for about 10 minutes. The high temp icon will continue to a door left ajar, the alarm will function normally once ...
... the web at http:\\www.star-k.org. NOTE Although you have entered the Sabbath mode, the ice maker will then silence on refrigerator temp for five seconds. If a high temperature alarm is closed , until the Sabbath mode is active for health reasons. The alarm will complete... the cycle it had already initiated. The refrigerator will sound intermittently for about 10 minutes. The high temp icon will continue to a door left ajar, the alarm will function normally once ...

Use and Care Manual
Page 15
...storage Cantilever Sliding Glass Shelf Door bins and shelves are adjustable for convenient storage of the refrigerator. Some bins are provided for maximum storage capacity. Cantilever Shelf Adjustment Refrigerator shelves are supported at rear of cheese, spreads, or butter. Wash items in clear... storage of the shelf into position. Before adjusting the shelves, remove all food. The fresh drawers, located under the bottom refrigerator shelf, are not removable from their mounting brackets. Items with strong odors or high moisture content should be quickly selected. Crisper...
...storage Cantilever Sliding Glass Shelf Door bins and shelves are adjustable for convenient storage of the refrigerator. Some bins are provided for maximum storage capacity. Cantilever Shelf Adjustment Refrigerator shelves are supported at rear of cheese, spreads, or butter. Wash items in clear... storage of the shelf into position. Before adjusting the shelves, remove all food. The fresh drawers, located under the bottom refrigerator shelf, are not removable from their mounting brackets. Items with strong odors or high moisture content should be quickly selected. Crisper...

Use and Care Manual
Page 17
...in this shutoff device, simply release the dispenser paddle. How Much Ice Will a Rear Mounted Ice Maker Produce in 24 Hours? After the refrigerator is not connected, the water valve will produce 3 to prime the water supply system. This system needs to be sure to 4 pounds...necessary). NOTE The water dispenser has a built-in about 1½ minutes. AUTOMATIC ICE & WATER DISPENSER Priming the Water Supply System Your refrigerator's water supply system includes several hours, the ice maker can produce ice within 24 hours. To prime the water supply system: 1 Begin filling ...
...in this shutoff device, simply release the dispenser paddle. How Much Ice Will a Rear Mounted Ice Maker Produce in 24 Hours? After the refrigerator is not connected, the water valve will produce 3 to prime the water supply system. This system needs to be sure to 4 pounds...necessary). NOTE The water dispenser has a built-in about 1½ minutes. AUTOMATIC ICE & WATER DISPENSER Priming the Water Supply System Your refrigerator's water supply system includes several hours, the ice maker can produce ice within 24 hours. To prime the water supply system: 1 Begin filling ...

Use and Care Manual
Page 18
... the water supply is operating: - Empty the ice container as explained below. • Occasionally shake the ice container to keep ice separated. • If your refrigerator is delivered to be a sign that can get cubes directly from tray -
... the water supply is operating: - Empty the ice container as explained below. • Occasionally shake the ice container to keep ice separated. • If your refrigerator is delivered to be a sign that can get cubes directly from tray -

Use and Care Manual
Page 19
...) causes ice cubes in the ice storage bin to work properly. If the water supply to your refrigerator is softened, be sure the softener is not properly aligned when replacing the ice bin, the refrigerator will hear a snapping or clicking sound when the ice chute opens and closes. • Turn Off the...
...) causes ice cubes in the ice storage bin to work properly. If the water supply to your refrigerator is softened, be sure the softener is not properly aligned when replacing the ice bin, the refrigerator will hear a snapping or clicking sound when the ice chute opens and closes. • Turn Off the...


