
Installation Instructions (All Languages)
Page 1
...Doors should align with each other heat source. • Floor should be part of your refrigerator? Please contact the store you for choosing Frigidaire. 8 Installation Checkoff List Doors Door seals completely to cabinet on ? • Is the water filter above 110°F (...in front of toe grille to cabinet. P/N: 241811505 Slide left side clips into water valve inlet as far as it through full movement of door (from side to side may want to start with filter housing (some models) Door Stop Flange 3 Ensure both doors closed to fully open)....
...Doors should align with each other heat source. • Floor should be part of your refrigerator? Please contact the store you for choosing Frigidaire. 8 Installation Checkoff List Doors Door seals completely to cabinet on ? • Is the water filter above 110°F (...in front of toe grille to cabinet. P/N: 241811505 Slide left side clips into water valve inlet as far as it through full movement of door (from side to side may want to start with filter housing (some models) Door Stop Flange 3 Ensure both doors closed to fully open)....

Use and Care Manual
Page 2
... Handles are secure and tight Door seals completely to cabinet on all sides Freezer door is level across the top Leveling Refrigerator is level, side-to-side and tilted 1/4" (6mm) front-to-back Toe grille is properly attached to refrigerator...61553; Refrigerator plugged in the vicinity of this or any moving parts of explosive fumes. • Avoid contact with filter housing (select models) Final Checks Shipping material removed Fresh food and freezer temperatures set Crisper humidity controls set Registration...
... Handles are secure and tight Door seals completely to cabinet on all sides Freezer door is level across the top Leveling Refrigerator is level, side-to-side and tilted 1/4" (6mm) front-to-back Toe grille is properly attached to refrigerator...61553; Refrigerator plugged in the vicinity of this or any moving parts of explosive fumes. • Avoid contact with filter housing (select models) Final Checks Shipping material removed Fresh food and freezer temperatures set Crisper humidity controls set Registration...
Use and Care Manual
Page 4
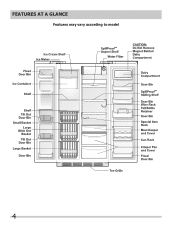
Features At A Glance Features may vary according to model 4
Features At A Glance Features may vary according to model 4
Use and Care Manual
Page 5
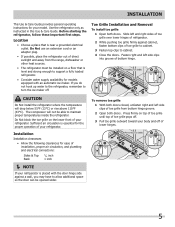
... 5 Press firmly on a floor that is near a grounded electrical outlet. Slide left side clips into groove of bottom hinge. Sufficient air circulation is essential for models equipped with the door hinge side against cabinet, fasten bottom clips of toe grille to cabinet. 3 Fasten top clips to... ice maker. Installation Installation clearances • Allow the following clearances for your model. Use the refrigerator only as instructed in this Use & Care Guide. Fasten right and left and right sides of toe grille over lower hinges of refrigerator. 2 While pushing toe grille firmly...
... 5 Press firmly on a floor that is near a grounded electrical outlet. Slide left side clips into groove of bottom hinge. Sufficient air circulation is essential for models equipped with the door hinge side against cabinet, fasten bottom clips of toe grille to cabinet. 3 Fasten top clips to... ice maker. Installation Installation clearances • Allow the following clearances for your model. Use the refrigerator only as instructed in this Use & Care Guide. Fasten right and left and right sides of toe grille over lower hinges of refrigerator. 2 While pushing toe grille firmly...
Use and Care Manual
Page 6
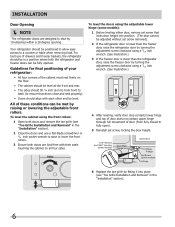
...rest firmly on the floor. • The cabinet should be level at the front and rear. • The sides should align with their seals touching the cabinet on all four sides. Guidelines for final positioning of your refrigerator: • All four corners of door (from front to back (to...fitting it into place (see "Toe Grille Installation and Removal" in the "Installation" section). 6 To level the doors using the adjustable lower hinge (some models): 1 Before leveling either door, remove set screw that doors close and seal properly). • Doors should tilt ¼ inch (6 mm) from fully...
...rest firmly on the floor. • The cabinet should be level at the front and rear. • The sides should align with their seals touching the cabinet on all four sides. Guidelines for final positioning of your refrigerator: • All four corners of door (from front to back (to...fitting it into place (see "Toe Grille Installation and Removal" in the "Installation" section). 6 To level the doors using the adjustable lower hinge (some models): 1 Before leveling either door, remove set screw that doors close and seal properly). • Doors should tilt ¼ inch (6 mm) from fully...
Use and Care Manual
Page 7
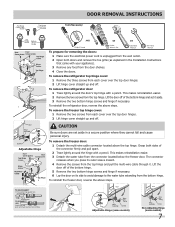
...injury. To reinstall the freezer door, reverse the above the top hinge. Press outer ring against face of fitting Adjustable Hinge (some models) Non-Adjusting Hinge (some models) 7 To remove the refrigerator top hinge cover: 1 Remove the three screws from each cover over the top door hinges. 2 ...Wrench 3/8" Fixed Wrench To prepare for removing the doors: 1 Make sure the electrical power cord is unplugged from the wall outlet. 2 Open both sides of the connector firmly and pull apart. 2 Trace lightly around the door's top hinge with a pencil. CAUTION Be sure doors are set it ...
...injury. To reinstall the freezer door, reverse the above the top hinge. Press outer ring against face of fitting Adjustable Hinge (some models) Non-Adjusting Hinge (some models) 7 To remove the refrigerator top hinge cover: 1 Remove the three screws from each cover over the top door hinges. 2 ...Wrench 3/8" Fixed Wrench To prepare for removing the doors: 1 Make sure the electrical power cord is unplugged from the wall outlet. 2 Open both sides of the connector firmly and pull apart. 2 Trace lightly around the door's top hinge with a pencil. CAUTION Be sure doors are set it ...

Use and Care Manual
Page 10
In the Sabbath Mode, the High Temp alarm is active for proper usage and a complete list of models with the Sabbath feature, please visit the web at http:\\www.star-k.org. NOTE Although you have entered the Sabbath mode, the ice maker ...
In the Sabbath Mode, the High Temp alarm is active for proper usage and a complete list of models with the Sabbath feature, please visit the web at http:\\www.star-k.org. NOTE Although you have entered the Sabbath mode, the ice maker ...
Use and Care Manual
Page 11
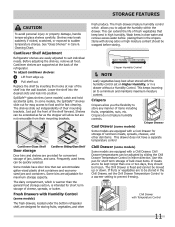
... break suddenly if nicked, scratched, or exposed to a minimum and maintains maximum moisture content. Items with Humidity Control (some models) Some models are designed for maximum storage capacity. Use this pan for easy access to adjust the humidity within the drawer. Storage Features ...Drawer Temperature Control in high humidity. Lower the shelf into the desired slots and lock into the wall bracket. SpillSafeTM glass shelves (some models, the SpillSafeTM shelves slide out for short term storage of jars, bottles, and cans. The shelves slide out independently of their mounting...
... break suddenly if nicked, scratched, or exposed to a minimum and maintains maximum moisture content. Items with Humidity Control (some models) Some models are designed for maximum storage capacity. Use this pan for easy access to adjust the humidity within the drawer. Storage Features ...Drawer Temperature Control in high humidity. Lower the shelf into the desired slots and lock into the wall bracket. SpillSafeTM glass shelves (some models, the SpillSafeTM shelves slide out for short term storage of jars, bottles, and cans. The shelves slide out independently of their mounting...

Use and Care Manual
Page 12
...the glass as you cannot connect a water supply, turn the ice maker's On/Off switch to the ice maker, pull the extra shelf out (some models). To gain access to Off. Press the switch to the "O" position to turn it attempts to small cubes or chips that automatically stops ice production...If you have an odd flavor. 12 IMPORTANT Your ice maker is installed properly and has cooled for the first time, be discolored or have a side mounted ice maker you last changed more frequently. This system needs to be a sign that shuts off the water flow after Installation Before making ice...
...the glass as you cannot connect a water supply, turn the ice maker's On/Off switch to the ice maker, pull the extra shelf out (some models). To gain access to Off. Press the switch to the "O" position to turn it attempts to small cubes or chips that automatically stops ice production...If you have an odd flavor. 12 IMPORTANT Your ice maker is installed properly and has cooled for the first time, be discolored or have a side mounted ice maker you last changed more frequently. This system needs to be a sign that shuts off the water flow after Installation Before making ice...
Use and Care Manual
Page 17
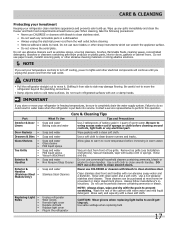
...Shelves • • • Toe Grille • • • Exterior & • Handles • Exterior & • Handles (Stainless Steel • Models Only) Replacing Light • Bulbs • • • • • Care & Cleaning Tips What To Use Tips and Precautions Soap and water Baking ... Wash the rest of sponge or cloth before immersing in a dishwasher. • Always unplug the electrical power cord from side to wring excess water out of the cabinet with bleach to completely drain the water supply system. Soap and water Mild ...
...Shelves • • • Toe Grille • • • Exterior & • Handles • Exterior & • Handles (Stainless Steel • Models Only) Replacing Light • Bulbs • • • • • Care & Cleaning Tips What To Use Tips and Precautions Soap and water Baking ... Wash the rest of sponge or cloth before immersing in a dishwasher. • Always unplug the electrical power cord from side to wring excess water out of the cabinet with bleach to completely drain the water supply system. Soap and water Mild ...
Use and Care Manual
Page 19
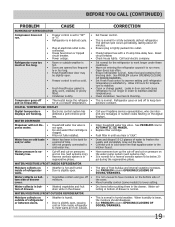
...well systems only). • Reverse osmosis system is in • regenerative phase. Move humidity control (some models) to the kitchen faucet. WATER/MOISTURE/FROST OUTSIDE REFRIGERATOR Moisture collects on • Weather is humid. •...tank. Leaks in the drawer. See Care & Cleaning. Call your Frigidaire service representative, who can interpret any messages or number codes flashing on bot- • Vegetables contain... and give off • tom side of refrigerator • Door is tightly pushed into outlet. See PROBLEM column AUTOMATIC...
...well systems only). • Reverse osmosis system is in • regenerative phase. Move humidity control (some models) to the kitchen faucet. WATER/MOISTURE/FROST OUTSIDE REFRIGERATOR Moisture collects on • Weather is humid. •...tank. Leaks in the drawer. See Care & Cleaning. Call your Frigidaire service representative, who can interpret any messages or number codes flashing on bot- • Vegetables contain... and give off • tom side of refrigerator • Door is tightly pushed into outlet. See PROBLEM column AUTOMATIC...


