
Wiring Diagram (All Languages)
Page 1
... every 6-96 hours of electrical shock. When a water valve is complete. Disconnect power cord before servicing this appliance. Caution All electrical parts and wiring must be displayed until the defrost cycle is replaced, the fill volume must...to 12 psig 43 to 83 kPa 5 to 12 psig 43 to 83 kPa N/A 5 to 12 psig 43 to 83 kPa Low Side Pressure (cut-out) -2 to 2 psig -14 to 14 kPa -2 to 2 psig -14 to 14 kPa -2 to 2 ...psig -14 to 14 kPa -2 to 2 psig -14 to 14 kPa High Side Pressure (last 1/3 cycle) 90 to 105 psig 90 to 115 psig 120 to 135 psig 130 to 155 psig 621 ...
... every 6-96 hours of electrical shock. When a water valve is complete. Disconnect power cord before servicing this appliance. Caution All electrical parts and wiring must be displayed until the defrost cycle is replaced, the fill volume must...to 12 psig 43 to 83 kPa 5 to 12 psig 43 to 83 kPa N/A 5 to 12 psig 43 to 83 kPa Low Side Pressure (cut-out) -2 to 2 psig -14 to 14 kPa -2 to 2 psig -14 to 14 kPa -2 to 2 ...psig -14 to 14 kPa -2 to 2 psig -14 to 14 kPa High Side Pressure (last 1/3 cycle) 90 to 105 psig 90 to 115 psig 120 to 135 psig 130 to 155 psig 621 ...

Installation Instructions (All Languages)
Page 1
.... Slide left and right sides of toe grille over lower hinges of toe grille to a range, 1-877-435-3287. While pushing toe grille firmly against cabinet, fasten bottom clips of refrigerator. Congratulations. Installation Instructions for your new appliance • Do not use...materials for a water supply • A compression nut and ferrule (sleeve) installation, including 25 feet of copper tubing and for choosing Frigidaire. 8 Installation Checkoff List Doors Door seals completely to cabinet on all corners Electrical Power House power turned ...
.... Slide left and right sides of toe grille over lower hinges of toe grille to a range, 1-877-435-3287. While pushing toe grille firmly against cabinet, fasten bottom clips of refrigerator. Congratulations. Installation Instructions for your new appliance • Do not use...materials for a water supply • A compression nut and ferrule (sleeve) installation, including 25 feet of copper tubing and for choosing Frigidaire. 8 Installation Checkoff List Doors Door seals completely to cabinet on all corners Electrical Power House power turned ...

Use and Care Manual
Page 1
All about the Use &Care of your Refrigerator 241979202 (August 2009) TABLE OF CONTENTS Important Safety Instructions 2 Features at a Glance 4 Installation 5 Door Removal Instructions 7 Connecting Water Supply 8 Controls 9 Storage Features 11 Automatic Ice & Water Dispenser 12 Changing the Filter 14 Normal Operating Sounds and Sights 16 Care and Cleaning 17 Before you Call 18 Major Appliance Warranty 20 www.frigidaire.com USA 1-800-944-9044 www.frigidaire.ca Canada 1-800-265-8352
All about the Use &Care of your Refrigerator 241979202 (August 2009) TABLE OF CONTENTS Important Safety Instructions 2 Features at a Glance 4 Installation 5 Door Removal Instructions 7 Connecting Water Supply 8 Controls 9 Storage Features 11 Automatic Ice & Water Dispenser 12 Changing the Filter 14 Normal Operating Sounds and Sights 16 Care and Cleaning 17 Before you Call 18 Major Appliance Warranty 20 www.frigidaire.com USA 1-800-944-9044 www.frigidaire.ca Canada 1-800-265-8352

Use and Care Manual
Page 2
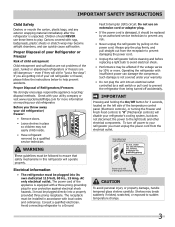
... if not avoided, may result in the vicinity of this or any moving parts of explosive fumes. • Avoid contact with any other appliance. Installation Checklist Doors Handles are secure and tight Door seals completely to cabinet on Refrigerator plugged in 2 recheck... Ice maker is setting solid on all corners Electrical Power House power turned on all sides Freezer door is level across the top Leveling Refrigerator is level, side-to-side and tilted 1/4" (6mm) front-to-back Toe grille is properly attached to refrigerator...
... if not avoided, may result in the vicinity of this or any moving parts of explosive fumes. • Avoid contact with any other appliance. Installation Checklist Doors Handles are secure and tight Door seals completely to cabinet on Refrigerator plugged in 2 recheck... Ice maker is setting solid on all corners Electrical Power House power turned on all sides Freezer door is level across the top Leveling Refrigerator is level, side-to-side and tilted 1/4" (6mm) front-to-back Toe grille is properly attached to refrigerator...
Use and Care Manual
Page 3
...circuit. Do not use these items to sudden temperature change. 3 Junked or abandoned refrigerators or freezers are not problems of the appliance is unpacked. Check with your utility company or visit www.recyclemyoldfridge.com for your old refrigerator. Before you must unplug the ... electrical outlet. The receptacle must be plugged into an electrical outlet controlled by pulling on the left side of Refrigerators/Freezers We strongly encourage responsible appliance recycling/ disposal methods. Always grip the plug firmly, and pull straight out from being turned off ...
...circuit. Do not use these items to sudden temperature change. 3 Junked or abandoned refrigerators or freezers are not problems of the appliance is unpacked. Check with your utility company or visit www.recyclemyoldfridge.com for your old refrigerator. Before you must unplug the ... electrical outlet. The receptacle must be plugged into an electrical outlet controlled by pulling on the left side of Refrigerators/Freezers We strongly encourage responsible appliance recycling/ disposal methods. Always grip the plug firmly, and pull straight out from being turned off ...
Use and Care Manual
Page 7
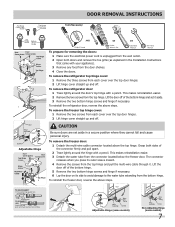
...3/8" Fixed Wrench To prepare for removing the doors: 1 Make sure the electrical power cord is unplugged from the wall outlet. 2 Open both sides of the connector firmly and pull apart. 2 Trace lightly around the door's top hinge with a pencil. This makes reinstallation easier. 3 Detach...fitting Adjustable Hinge (some models) Non-Adjusting Hinge (some models) 7 To remove the refrigerator door: 1 Trace lightly around the hinge with your appliance). 3 Remove any food from each cover over the top door hinges. 2 Lift hinge cover straight up and off . To reinstall the refrigerator...
...3/8" Fixed Wrench To prepare for removing the doors: 1 Make sure the electrical power cord is unplugged from the wall outlet. 2 Open both sides of the connector firmly and pull apart. 2 Trace lightly around the door's top hinge with a pencil. This makes reinstallation easier. 3 Detach...fitting Adjustable Hinge (some models) Non-Adjusting Hinge (some models) 7 To remove the refrigerator door: 1 Trace lightly around the hinge with your appliance). 3 Remove any food from each cover over the top door hinges. 2 Lift hinge cover straight up and off . To reinstall the refrigerator...
Use and Care Manual
Page 17
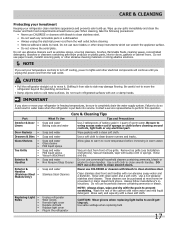
...Steel Cleaners Clean stainless steel front and handles with wet or damp hands. NOTE: Always clean, wipe and dry with bleach to side may damage flooring. Do not use paper towels, metallic scouring pads, or other electrical components will continue until you unplug the power... containing ammonia, bleach or Non Abrasive Glass Cleaner alcohol to clean smooth doors. Rinse with a clean soft cloth. These cleaners can scratch the appliance surface. • Do not remove the serial plate. Use same wattage when replacing bulb 17 Part Interior & Door • Liners •...
...Steel Cleaners Clean stainless steel front and handles with wet or damp hands. NOTE: Always clean, wipe and dry with bleach to side may damage flooring. Do not use paper towels, metallic scouring pads, or other electrical components will continue until you unplug the power... containing ammonia, bleach or Non Abrasive Glass Cleaner alcohol to clean smooth doors. Rinse with a clean soft cloth. These cleaners can scratch the appliance surface. • Do not remove the serial plate. Use same wattage when replacing bulb 17 Part Interior & Door • Liners •...
Use and Care Manual
Page 20
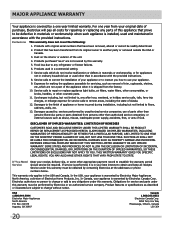
...8352 Electrolux Canada Corp. 5855 Terry Fox Way Mississauga, Ontario, Canada L5V 3E4 20 For one year limited warranty. major appliance warranty Your appliance is warranted by Electrolux Canada Corp. Exclusions This warranty does not cover the following: 1. Products purchased "as removal of this... to any parts of trim, cupboards, shelves, etc.,which do not involve malfunction or defects in materials or workmanship when such appliance is shipped from persons other than authorized service companies; Surcharges including, but not limited to , any after hour, weekend, or...
...8352 Electrolux Canada Corp. 5855 Terry Fox Way Mississauga, Ontario, Canada L5V 3E4 20 For one year limited warranty. major appliance warranty Your appliance is warranted by Electrolux Canada Corp. Exclusions This warranty does not cover the following: 1. Products purchased "as removal of this... to any parts of trim, cupboards, shelves, etc.,which do not involve malfunction or defects in materials or workmanship when such appliance is shipped from persons other than authorized service companies; Surcharges including, but not limited to , any after hour, weekend, or...


