Complete Owner's Guide (English)
Page 2
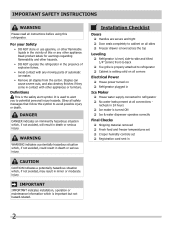
... alert symbol. Installation Checklist Doors Handles are secure and tight Door seals completely to cabinet on all sides Freezer drawer is level across the top Leveling Refrigerator is level, side-to-side and tilted 1/4" (6mm) front-to-back ...death. It is turned ON Ice & water dispenser operates correctly Final Checks Shipping material removed Fresh food and freezer temperatures set Crisper humidity controls set Registration card sent in the presence of automatic ice maker. • Remove all corners...
... alert symbol. Installation Checklist Doors Handles are secure and tight Door seals completely to cabinet on all sides Freezer drawer is level across the top Leveling Refrigerator is level, side-to-side and tilted 1/4" (6mm) front-to-back ...death. It is turned ON Ice & water dispenser operates correctly Final Checks Shipping material removed Fresh food and freezer temperatures set Crisper humidity controls set Registration card sent in the presence of automatic ice maker. • Remove all corners...
Complete Owner's Guide (English)
Page 3
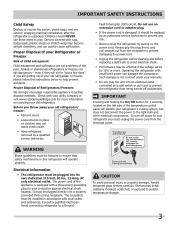
...) circuit. Operating the refrigerator with a three-prong grounding plug for "just a few days". Junked or abandoned refrigerators or freezers are getting rid of the temperature control panel will disable your refrigerator you must unplug the power cord from being turned off ... the past. Avoid connecting refrigerator to prevent any exterior wrapping material immediately after the refrigerator is not covered under your old refrigerator/ freezer: • Remove doors. • Leave shelves in accordance with rugs, bedspreads, plastic sheets or stretch wrap may break suddenly...
...) circuit. Operating the refrigerator with a three-prong grounding plug for "just a few days". Junked or abandoned refrigerators or freezers are getting rid of the temperature control panel will disable your refrigerator you must unplug the power cord from being turned off ... the past. Avoid connecting refrigerator to prevent any exterior wrapping material immediately after the refrigerator is not covered under your old refrigerator/ freezer: • Remove doors. • Leave shelves in accordance with rugs, bedspreads, plastic sheets or stretch wrap may break suddenly...
Complete Owner's Guide (English)
Page 4
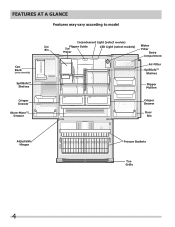
Features At A Glance Features may vary according to model Ice Bin Can Rack (select models) SpillSafeTM Shelves Crisper Drawer Store-More TM Drawer Incandescent Light (select models) Flipper Guide Ice Maker LED Light (select models) Water Filter Dairy Compartment Air Filter SpillSafeTM Shelves Flipper Mullion Crisper Drawer Door Bin Adjustable Hinges Freezer Baskets Toe Grille 4
Features At A Glance Features may vary according to model Ice Bin Can Rack (select models) SpillSafeTM Shelves Crisper Drawer Store-More TM Drawer Incandescent Light (select models) Flipper Guide Ice Maker LED Light (select models) Water Filter Dairy Compartment Air Filter SpillSafeTM Shelves Flipper Mullion Crisper Drawer Door Bin Adjustable Hinges Freezer Baskets Toe Grille 4
Complete Owner's Guide (English)
Page 5
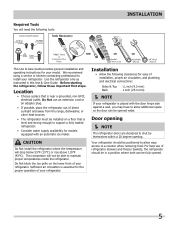
... food. Location • Choose a place that is essential for your model. Do Not block the toe grille on the lower front of refrigerator drawers and freezer baskets, the refrigerator should be installed on a floor that is placed with an automatic ice maker. Use the refrigerator only as instructed in a position where...
... food. Location • Choose a place that is essential for your model. Do Not block the toe grille on the lower front of refrigerator drawers and freezer baskets, the refrigerator should be installed on a floor that is placed with an automatic ice maker. Use the refrigerator only as instructed in a position where...
Complete Owner's Guide (English)
Page 6
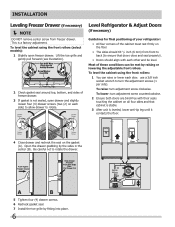
... (to turn adjustment screw clockwise. use a 3/8 inch socket wrench to ensure that cabinet is stable. 3 After unit is a factory adjustment. Push Against Freezer Drawer Grab Drawer At Center From Both Sides Then Pull Drawer Out A B 5 Tighten four (4) drawer screws. 6 Recheck gasket seal. 7 Install the... open drawer and slightly loosen four (4) drawer screws (two (2) on the floor. • The sides should tilt 1/4 inch (6 mm) from freezer drawer. Open the drawer grabbing by fitting into place. 6 Door Door Anti-tip Leg Raise Lower Be careful not to rotate. Lift the toe ...
... (to turn adjustment screw clockwise. use a 3/8 inch socket wrench to ensure that cabinet is stable. 3 After unit is a factory adjustment. Push Against Freezer Drawer Grab Drawer At Center From Both Sides Then Pull Drawer Out A B 5 Tighten four (4) drawer screws. 6 Recheck gasket seal. 7 Install the... open drawer and slightly loosen four (4) drawer screws (two (2) on the floor. • The sides should tilt 1/4 inch (6 mm) from freezer drawer. Open the drawer grabbing by fitting into place. 6 Door Door Anti-tip Leg Raise Lower Be careful not to rotate. Lift the toe ...

Complete Owner's Guide (English)
Page 9
To prepare for removing the doors: 1 Make sure the electrical power cord is unplugged from the wall outlet. 2 Open the freezer drawer and remove the toe grille (see "Installation" section). 3 Remove any food from the top hinge. To remove the top hinge covers: 1 Remove the two (2) ...
To prepare for removing the doors: 1 Make sure the electrical power cord is unplugged from the wall outlet. 2 Open the freezer drawer and remove the toe grille (see "Installation" section). 3 Remove any food from the top hinge. To remove the top hinge covers: 1 Remove the two (2) ...
Complete Owner's Guide (English)
Page 10
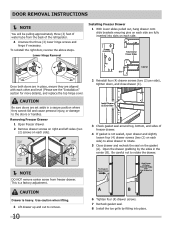
...4 Unscrew the three (3) lower hinge screws and hinge if necessary. To reinstall the right door, reverse the above steps. Removing Freezer Drawer 1 Open freezer drawer. 2 Remove drawer screws on right and left sides (two (2) screws on each side. Use caution when lifting. 3 ...four (4) drawer screws (two (2) per side), tighten down, and close drawer (C). CAUTION Drawer is a factory adjustment. Lower Hinge Removal Installing Freezer Drawer 1 With lower slides pulled out, hang drawer onto slide brackets ensuring pins on the gasket (A). This is heavy. Door Removal Instructions ...
...4 Unscrew the three (3) lower hinge screws and hinge if necessary. To reinstall the right door, reverse the above steps. Removing Freezer Drawer 1 Open freezer drawer. 2 Remove drawer screws on right and left sides (two (2) screws on each side. Use caution when lifting. 3 ...four (4) drawer screws (two (2) per side), tighten down, and close drawer (C). CAUTION Drawer is a factory adjustment. Lower Hinge Removal Installing Freezer Drawer 1 With lower slides pulled out, hang drawer onto slide brackets ensuring pins on the gasket (A). This is heavy. Door Removal Instructions ...
Complete Owner's Guide (English)
Page 11
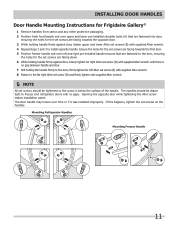
...while tightening the Allen screw makes installation easier. Ensure the holes for the set screws are facing towards the first door. 5 Position freezer handle end over left Allen set screw (B) with supplied Allen wrench. 8 Return to the far right Allen set screw (B) and... firmly against door, loosely tighten far right Allen set screws on the handles. Mounting Refrigerator Handles Mounting Freezer Handle 11 Installing Door Handles Door Handle Mounting Instructions for Frigidaire Gallery® 1 Remove handles from carton and any other protective packaging. 2 Position fresh food handle end...
...while tightening the Allen screw makes installation easier. Ensure the holes for the set screws are facing towards the first door. 5 Position freezer handle end over left Allen set screw (B) with supplied Allen wrench. 8 Return to the far right Allen set screw (B) and... firmly against door, loosely tighten far right Allen set screws on the handles. Mounting Refrigerator Handles Mounting Freezer Handle 11 Installing Door Handles Door Handle Mounting Instructions for Frigidaire Gallery® 1 Remove handles from carton and any other protective packaging. 2 Position fresh food handle end...

Complete Owner's Guide (English)
Page 12
... is no gaps. Opening the opposite door while tightening the Allen screw makes installation easier. Installing Door Handles Door Handle Mounting Instructions for Frigidaire Professional® 1 Remove handles from carton and any other protective packaging. 2 Position fresh food handle end over upper and lower pre-...shoulder bolts (A) that are fastened to the door, ensuring the holes for the set screws are facing towards the first door. 5 Position freezer handle end over left Allen set screw (B) with supplied Allen wrench. 8 Return to install opposite handle. The door handle may loosen ...
... is no gaps. Opening the opposite door while tightening the Allen screw makes installation easier. Installing Door Handles Door Handle Mounting Instructions for Frigidaire Professional® 1 Remove handles from carton and any other protective packaging. 2 Position fresh food handle end over upper and lower pre-...shoulder bolts (A) that are fastened to the door, ensuring the holes for the set screws are facing towards the first door. 5 Position freezer handle end over left Allen set screw (B) with supplied Allen wrench. 8 Return to install opposite handle. The door handle may loosen ...
Complete Owner's Guide (English)
Page 14
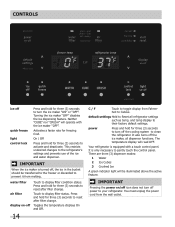
... is equipped with the ice maker "OFF". There are three (3) dispenser modes: 1 Water 2 Ice Cubes 3 Crushed Ice A green indicator light will be transferred to the freezer or discarded to gently touch the control panel. Controls ice off quick freeze light control lock Press and hold for freezing food. Your refrigerator is...
... is equipped with the ice maker "OFF". There are three (3) dispenser modes: 1 Water 2 Ice Cubes 3 Crushed Ice A green indicator light will be transferred to the freezer or discarded to gently touch the control panel. Controls ice off quick freeze light control lock Press and hold for freezing food. Your refrigerator is...
Complete Owner's Guide (English)
Page 15
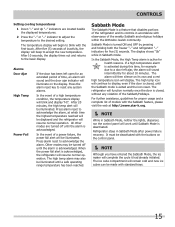
... event of inactivity, the display will blink and display "HI". If a high temperature alarm is turned ON and OFF by pressing and holding both the freezer "∨" and refrigerator "∧" indicators for health reasons. It must be deactivated with standard trays. 15 When the power fail alert is acknowledged. The alarm...
... event of inactivity, the display will blink and display "HI". If a high temperature alarm is turned ON and OFF by pressing and holding both the freezer "∨" and refrigerator "∧" indicators for health reasons. It must be deactivated with standard trays. 15 When the power fail alert is acknowledged. The alarm...

Complete Owner's Guide (English)
Page 17
.... Chemicals from the ice bin. • Ice cubes stored too long may not close properly causing warm air to dry completely before replacing in the freezer. 5 Replace the ice bin. Ice dropping into the fresh food compartment. If the auger is not properly aligned when replacing the ice bin, the refrigerator...
.... Chemicals from the ice bin. • Ice cubes stored too long may not close properly causing warm air to dry completely before replacing in the freezer. 5 Replace the ice bin. Ice dropping into the fresh food compartment. If the auger is not properly aligned when replacing the ice bin, the refrigerator...
Complete Owner's Guide (English)
Page 20
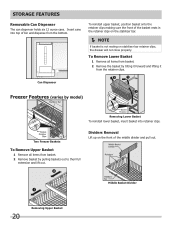
Can Dispenser Freezer Features (varies by pulling baskets out to their full extension and lift out. Middle Basket Divider 20 Removing Upper Basket Storage Features Removable Can Dispenser ... upper basket, position basket onto the retainer clips making sure the front of the middle divider and pull out. Insert cans into retainer clips. Two Freezer Baskets To Remove Upper Basket 1 Remove all items from basket. 2 Remove the basket by tilting it forward and lifting it from the bottom.
Can Dispenser Freezer Features (varies by pulling baskets out to their full extension and lift out. Middle Basket Divider 20 Removing Upper Basket Storage Features Removable Can Dispenser ... upper basket, position basket onto the retainer clips making sure the front of the middle divider and pull out. Insert cans into retainer clips. Two Freezer Baskets To Remove Upper Basket 1 Remove all items from basket. 2 Remove the basket by tilting it forward and lifting it from the bottom.
Complete Owner's Guide (English)
Page 22
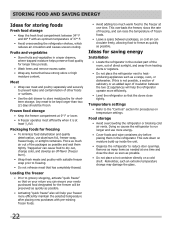
... ducts or registers. • Do not place the refrigerator next to heatproducing appliances such as a range, oven, or dishwasher. Loading the freezer • Prior to grocery shopping, activate "quick freeze" so that have strong odors or high moisture content. If this is at one time... hot container directly on your return you can cause food to dry out, change may damage the glass. 22 Trapped air can ensure your freezer more efficiently. • Level the refrigerator so that has completely thawed. Remove as many items as possible. Temperature settings • Refer to...
... ducts or registers. • Do not place the refrigerator next to heatproducing appliances such as a range, oven, or dishwasher. Loading the freezer • Prior to grocery shopping, activate "quick freeze" so that have strong odors or high moisture content. If this is at one time... hot container directly on your return you can cause food to dry out, change may damage the glass. 22 Trapped air can ensure your freezer more efficiently. • Level the refrigerator so that has completely thawed. Remove as many items as possible. Temperature settings • Refer to...
Complete Owner's Guide (English)
Page 23
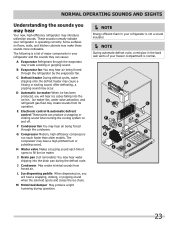
The following is a list of your freezer compartment is operating correctly. E Electronic control & automatic defrost control These parts can cause: A Evaporator Refrigerant through the evaporator may create sounds from forced air. These ...
The following is a list of your freezer compartment is operating correctly. E Electronic control & automatic defrost control These parts can cause: A Evaporator Refrigerant through the evaporator may create sounds from forced air. These ...

Complete Owner's Guide (English)
Page 26
... cold metal surfaces. Be careful not to move your refrigerator clean maintains its appearance and prevents odor build-up any spills immediately and clean the freezer and fresh food compartments at least twice a year. NOTE Do not use CHLORIDE or cleaners with wet or damp hands. Wipe up . Shifting it...
... cold metal surfaces. Be careful not to move your refrigerator clean maintains its appearance and prevents odor build-up any spills immediately and clean the freezer and fresh food compartments at least twice a year. NOTE Do not use CHLORIDE or cleaners with wet or damp hands. Wipe up . Shifting it...
Complete Owner's Guide (English)
Page 28
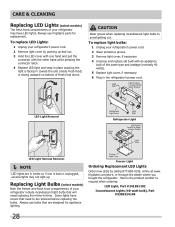
...LED Lights: 1 Unplug your refrigerator's power cord. 2 Remove light cover by calling 877-808-4195, online at www. Always use Frigidaire parts for appliance lighting. To replace light bulbs: 1 Unplug your refrigerator include incandescent light bulbs that need replacing from time-to be... removed before replacing the bulbs. Replacing Light Bulbs (select models) Both the freezer and fresh food compartments of your refrigerator's power cord. 2 Wear protective gloves. 3 Remove light cover, if necessary. 4 Unscrew ...
...LED Lights: 1 Unplug your refrigerator's power cord. 2 Remove light cover by calling 877-808-4195, online at www. Always use Frigidaire parts for appliance lighting. To replace light bulbs: 1 Unplug your refrigerator include incandescent light bulbs that need replacing from time-to be... removed before replacing the bulbs. Replacing Light Bulbs (select models) Both the freezer and fresh food compartments of your refrigerator's power cord. 2 Wear protective gloves. 3 Remove light cover, if necessary. 4 Unscrew ...
Complete Owner's Guide (English)
Page 29
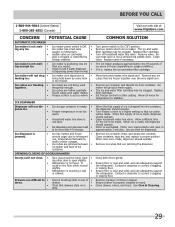
...the dispenser should operate. Before You Call 1-800-944-9044 (United States) 1-800-265-8352 (Canada) Visit our web site at www.frigidaire.com. Remove small cube from container. Remove top layer of ice is level and solid, and can adequately support the refrigerator. See Care &.... Clean drawer, rollers, and track. OPENING/CLOSING OF DOORS/DRAWERS Door(s) will be dispensed. Ensure that drawers slide on usage conditions. Set freezer control to open . • Ice dispensing arm has been held down by foreign material. When new ice is set too warm. •...
...the dispenser should operate. Before You Call 1-800-944-9044 (United States) 1-800-265-8352 (Canada) Visit our web site at www.frigidaire.com. Remove small cube from container. Remove top layer of ice is level and solid, and can adequately support the refrigerator. See Care &.... Clean drawer, rollers, and track. OPENING/CLOSING OF DOORS/DRAWERS Door(s) will be dispensed. Ensure that drawers slide on usage conditions. Set freezer control to open . • Ice dispensing arm has been held down by foreign material. When new ice is set too warm. •...
Complete Owner's Guide (English)
Page 30
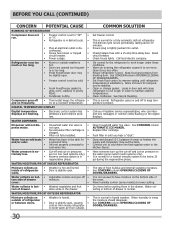
...constant. Ensure refrigerator is not unusual to "OF" • or "0". • Refrigerator is in • regenerative phase. Call your Frigidaire service representative, who can interpret any messages or number codes flashing on the digital displays. See CONCERN column AUTOMATIC ICE MAKER. WATER/MOISTURE... on • Weather is humid. • outside of refrigerator or between doors. • Door is slightly open . • Freezer control is set to have moisture on the bottom side of drawer is normal. The defrost cycle occurs periodically, lasting about 30 minutes....
...constant. Ensure refrigerator is not unusual to "OF" • or "0". • Refrigerator is in • regenerative phase. Call your Frigidaire service representative, who can interpret any messages or number codes flashing on the digital displays. See CONCERN column AUTOMATIC ICE MAKER. WATER/MOISTURE... on • Weather is humid. • outside of refrigerator or between doors. • Door is slightly open . • Freezer control is set to have moisture on the bottom side of drawer is normal. The defrost cycle occurs periodically, lasting about 30 minutes....

Complete Owner's Guide (English)
Page 31
... or specifications as abuse, misuse, inadequate power supply, accidents, fires, or acts of the unit. 4. USA 1.800.944.9044 Frigidaire P.O. major appliance warranty Your appliance is covered by a one year from persons other appropriate payment record to establish the warranty period should... limited warranty. Service calls to be defective in materials or workmanship when such appliance is " are subject to any refrigerator or freezer failures. 6. Service under this warranty must be obtained by Electrolux or an authorized service company. Products purchased "as removal of ...
... or specifications as abuse, misuse, inadequate power supply, accidents, fires, or acts of the unit. 4. USA 1.800.944.9044 Frigidaire P.O. major appliance warranty Your appliance is covered by a one year from persons other appropriate payment record to establish the warranty period should... limited warranty. Service calls to be defective in materials or workmanship when such appliance is " are subject to any refrigerator or freezer failures. 6. Service under this warranty must be obtained by Electrolux or an authorized service company. Products purchased "as removal of ...

