Wiring Diagram (All Languages)
Page 1
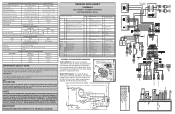
...herein is 102 to 130cc (3.4 to assist qualified repair personnel only. it will display when the heater is complete. AUTOMATIC DEFROST BOTTOM FREEZER - All components of electrical shock. Caution All electrical parts and wiring must be shielded from housing. DO NOT allow torch to ...system evacuation. Software version Evaporator fan De-activate: Hold FF (+) for complete description. 22 Damper 23 Fresh food door 24 Freezer door 26 Defrost limit switch 28 Dispenser paddle 36 Ice door 29 FF Thermistor 30 FZ Thermistor 33 Ambient Thermistor 0- Use screwdriver...
...herein is 102 to 130cc (3.4 to assist qualified repair personnel only. it will display when the heater is complete. AUTOMATIC DEFROST BOTTOM FREEZER - All components of electrical shock. Caution All electrical parts and wiring must be shielded from housing. DO NOT allow torch to ...system evacuation. Software version Evaporator fan De-activate: Hold FF (+) for complete description. 22 Damper 23 Fresh food door 24 Freezer door 26 Defrost limit switch 28 Dispenser paddle 36 Ice door 29 FF Thermistor 30 FZ Thermistor 33 Ambient Thermistor 0- Use screwdriver...
Installation Instructions (All Languages)
Page 1
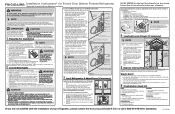
...damage if plastic tubing is flush with a 20 ft. Drawer Screw Push Against Freezer Drawer A Drawer Screw Grab Drawer At Center From Both Sides Then Pull Drawer Out B 5 Remove Internal Shipping Materials Frigidaire uses packing foam and tape to soft water, ensure that leak. 8. Congratulations!... Water Line) and for water leaks, and the manufacturer will not be able to drawers and freezer baskets, doors must rest firmly on the tubing. Use a 3/8 inch socket wrench to www.frigidaire.com for leveling your refrigerator, please read the entire Use & Care Guide. • You may...
...damage if plastic tubing is flush with a 20 ft. Drawer Screw Push Against Freezer Drawer A Drawer Screw Grab Drawer At Center From Both Sides Then Pull Drawer Out B 5 Remove Internal Shipping Materials Frigidaire uses packing foam and tape to soft water, ensure that leak. 8. Congratulations!... Water Line) and for water leaks, and the manufacturer will not be able to drawers and freezer baskets, doors must rest firmly on the tubing. Use a 3/8 inch socket wrench to www.frigidaire.com for leveling your refrigerator, please read the entire Use & Care Guide. • You may...
Complete Owner's Guide (English)
Page 2
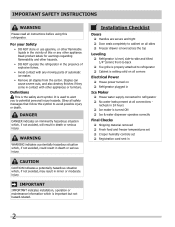
... is turned ON Ice & water dispenser operates correctly Final Checks Shipping material removed Fresh food and freezer temperatures set Crisper humidity controls set Registration card sent in 2 IMPORTANT IMPORTANT indicates installation, operation or maintenance information... or death. Installation Checklist Doors Handles are secure and tight Door seals completely to cabinet on all sides Freezer drawer is level across the top Leveling Refrigerator is level, side-to-side and tilted 1/4" (6mm) front-to-back ...
... is turned ON Ice & water dispenser operates correctly Final Checks Shipping material removed Fresh food and freezer temperatures set Crisper humidity controls set Registration card sent in 2 IMPORTANT IMPORTANT indicates installation, operation or maintenance information... or death. Installation Checklist Doors Handles are secure and tight Door seals completely to cabinet on all sides Freezer drawer is level across the top Leveling Refrigerator is level, side-to-side and tilted 1/4" (6mm) front-to-back ...
Complete Owner's Guide (English)
Page 3
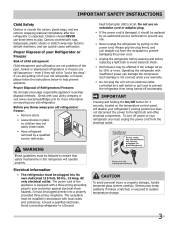
... To avoid personal injury or property damage, handle tempered glass shelves carefully. Consult a qualified electrician. Proper Disposal of Refrigerators/Freezers We strongly encourage responsible appliance recycling/ disposal methods. Fault Interrupter (GFI) circuit. Do not use these items to avoid ... refrigerant removed by a qualified service technician. Operating the refrigerator with local codes and ordinances. Junked or abandoned refrigerators or freezers are not problems of the appliance is unpacked. IMPORTANT Pressing and holding the On/Off button for 3 seconds, located...
... To avoid personal injury or property damage, handle tempered glass shelves carefully. Consult a qualified electrician. Proper Disposal of Refrigerators/Freezers We strongly encourage responsible appliance recycling/ disposal methods. Fault Interrupter (GFI) circuit. Do not use these items to avoid ... refrigerant removed by a qualified service technician. Operating the refrigerator with local codes and ordinances. Junked or abandoned refrigerators or freezers are not problems of the appliance is unpacked. IMPORTANT Pressing and holding the On/Off button for 3 seconds, located...

Complete Owner's Guide (English)
Page 4
Features At A Glance Features may vary according to model Can Rack (select models) SpillSafeTM Shelves Crisper Drawer Store-More TM Drawer Air Filter (above ice bin) Incandescent Light (select models) (select models) Ice Flipper Guide Bin Ice Maker LED Light (select models) Water Filter Dairy Compartment Air Filter SpillSafeTM Shelves Flipper Mullion Crisper Drawer Door Bin Adjustable Hinges Freezer Baskets Toe Grille 4
Features At A Glance Features may vary according to model Can Rack (select models) SpillSafeTM Shelves Crisper Drawer Store-More TM Drawer Air Filter (above ice bin) Incandescent Light (select models) (select models) Ice Flipper Guide Bin Ice Maker LED Light (select models) Water Filter Dairy Compartment Air Filter SpillSafeTM Shelves Flipper Mullion Crisper Drawer Door Bin Adjustable Hinges Freezer Baskets Toe Grille 4
Complete Owner's Guide (English)
Page 5
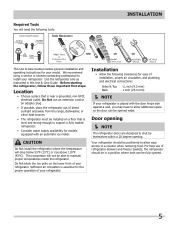
... your refrigerator. Installation • Allow the following tools: Installation This Use & Care Guide provides general installation and operating instructions for ease of refrigerator drawers and freezer baskets, the refrigerator should be positioned to install your refrigerator. Before starting the refrigerator, follow these important first steps. For best use an extension cord...
... your refrigerator. Installation • Allow the following tools: Installation This Use & Care Guide provides general installation and operating instructions for ease of refrigerator drawers and freezer baskets, the refrigerator should be positioned to install your refrigerator. Before starting the refrigerator, follow these important first steps. For best use an extension cord...
Complete Owner's Guide (English)
Page 6
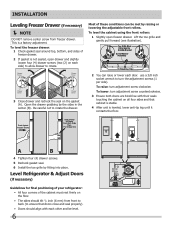
...Be careful not to ensure that cabinet is stable. 4 After unit is a factory adjustment. To lower: turn adjustment screw clockwise. Installation Leveling Freezer Drawer (if necessary) NOTE DO NOT remove center screw from front to back (to rotate the drawer. 2 You can be level...To raise: turn adjustment screw counterclockwise. 3 Ensure both doors are bind-free with their seals touching the cabinet on the gasket (A). Push Against Freezer Drawer Grab Drawer At Center From Both Sides Then Pull Drawer Out A B 4 Tighten four (4) drawer screws. 5 Recheck gasket seal. ...
...Be careful not to ensure that cabinet is stable. 4 After unit is a factory adjustment. To lower: turn adjustment screw clockwise. Installation Leveling Freezer Drawer (if necessary) NOTE DO NOT remove center screw from front to back (to rotate the drawer. 2 You can be level...To raise: turn adjustment screw counterclockwise. 3 Ensure both doors are bind-free with their seals touching the cabinet on the gasket (A). Push Against Freezer Drawer Grab Drawer At Center From Both Sides Then Pull Drawer Out A B 4 Tighten four (4) drawer screws. 5 Recheck gasket seal. ...
Complete Owner's Guide (English)
Page 9
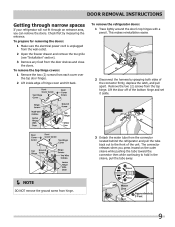
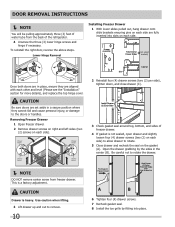
... harness by measuring the entrance. To prepare for removing the doors: 1 Make sure the electrical power cord is unplugged from the wall outlet. 2 Open the freezer drawer and remove the toe grille (see "Installation" section). 3 Remove any food from the top hinge. Check first by grasping both sides of hinge cover...
... harness by measuring the entrance. To prepare for removing the doors: 1 Make sure the electrical power cord is unplugged from the wall outlet. 2 Open the freezer drawer and remove the toe grille (see "Installation" section). 3 Remove any food from the top hinge. Check first by grasping both sides of hinge cover...
Complete Owner's Guide (English)
Page 10
...slots on each side). 2 Reinstall four (4) drawer screws (two (2) per side), tighten down, and close drawer (C). Lower Hinge Removal Installing Freezer Drawer 1 With lower slides pulled out, hang drawer onto slide brackets ensuring pins on select Drawer Slides models) Pin Slot Cabinet Once both ...section for more details), and replace the top hinge cover. Use caution when lifting. 3 Lift drawer up and out to remove. 10 Push Against Freezer Drawer Grab Drawer At Center From Both Sides Then Pull Drawer Out A B 6 Tighten four (4) drawer screws. 7 Recheck gasket seal. 8 Install...
...slots on each side). 2 Reinstall four (4) drawer screws (two (2) per side), tighten down, and close drawer (C). Lower Hinge Removal Installing Freezer Drawer 1 With lower slides pulled out, hang drawer onto slide brackets ensuring pins on select Drawer Slides models) Pin Slot Cabinet Once both ...section for more details), and replace the top hinge cover. Use caution when lifting. 3 Lift drawer up and out to remove. 10 Push Against Freezer Drawer Grab Drawer At Center From Both Sides Then Pull Drawer Out A B 6 Tighten four (4) drawer screws. 7 Recheck gasket seal. 8 Install...
Complete Owner's Guide (English)
Page 11
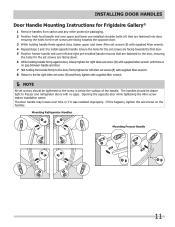
Mounting Refrigerator Handles Mounting Freezer Handle 11 Opening the opposite door while tightening the Allen screw makes installation easier. Installing Door Handles Door Handle Mounting Instructions for Frigidaire Gallery® 1 Remove handles from carton and any other protective packaging. 2 Position fresh food handle...handle firmly against door, fasten upper and lower Allen set screws (B) with supplied Allen wrench. 4 Repeat steps 2 and 3 to freezer and refrigerator doors with supplied Allen wrench. NOTE All set screws should be tightened so the screw is below the surface of...
Mounting Refrigerator Handles Mounting Freezer Handle 11 Opening the opposite door while tightening the Allen screw makes installation easier. Installing Door Handles Door Handle Mounting Instructions for Frigidaire Gallery® 1 Remove handles from carton and any other protective packaging. 2 Position fresh food handle...handle firmly against door, fasten upper and lower Allen set screws (B) with supplied Allen wrench. 4 Repeat steps 2 and 3 to freezer and refrigerator doors with supplied Allen wrench. NOTE All set screws should be tightened so the screw is below the surface of...
Complete Owner's Guide (English)
Page 12
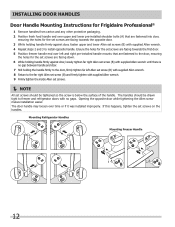
... install opposite handle. Opening the opposite door while tightening the Allen screw makes installation easier. Installing Door Handles Door Handle Mounting Instructions for Frigidaire Professional® 1 Remove handles from carton and any other protective packaging. 2 Position fresh food handle end over upper and lower pre-...installed handle mounts that are fastened into door, ensuring the holes for the set screws are facing towards the first door. 5 Position freezer handle end over left Allen set screw (B) with supplied Allen wrench. 8 Return to the far right Allen set screw (B) and...
... install opposite handle. Opening the opposite door while tightening the Allen screw makes installation easier. Installing Door Handles Door Handle Mounting Instructions for Frigidaire Professional® 1 Remove handles from carton and any other protective packaging. 2 Position fresh food handle end over upper and lower pre-...installed handle mounts that are fastened into door, ensuring the holes for the set screws are facing towards the first door. 5 Position freezer handle end over left Allen set screw (B) with supplied Allen wrench. 8 Return to the far right Allen set screw (B) and...
Complete Owner's Guide (English)
Page 14
... to prevent it from the wall outlet. There are three (3) dispenser modes: 1 Water 2 Ice Cubes 3 Crushed Ice A green indicator light will be transferred to the freezer or discarded to your refrigerator. It also turns off icon does not turn the ice maker "ON" or "OFF". Press and hold for three (3) seconds...
... to prevent it from the wall outlet. There are three (3) dispenser modes: 1 Water 2 Ice Cubes 3 Crushed Ice A green indicator light will be transferred to the freezer or discarded to your refrigerator. It also turns off icon does not turn the ice maker "ON" or "OFF". Press and hold for three (3) seconds...
Complete Owner's Guide (English)
Page 15
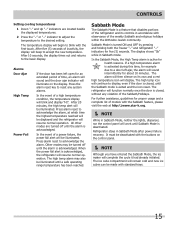
... Sabbath Mode after power failure recovery. The refrigerator will function normally once the door is turned ON and OFF by pressing and holding both the freezer "∨" and refrigerator "∧" indicators for proper usage and a complete list of time, an alarm will sound and the door ajar indicator will work until...
... Sabbath Mode after power failure recovery. The refrigerator will function normally once the door is turned ON and OFF by pressing and holding both the freezer "∨" and refrigerator "∧" indicators for proper usage and a complete list of time, an alarm will sound and the door ajar indicator will work until...

Complete Owner's Guide (English)
Page 16
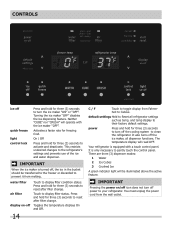
... to adjust the temperature to accept the new temperature setting. The Lock icon will read "OF". Use the menu buttons to scroll down to either freezer or refrigerator temp to touch the panel. Controls LCD Controls options User Interface Your refrigerator is equipped with force. It is only necessary to adjust...
... to adjust the temperature to accept the new temperature setting. The Lock icon will read "OF". Use the menu buttons to scroll down to either freezer or refrigerator temp to touch the panel. Controls LCD Controls options User Interface Your refrigerator is equipped with force. It is only necessary to adjust...
Complete Owner's Guide (English)
Page 18
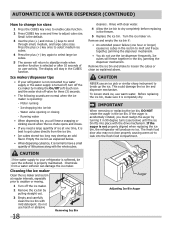
... the auger in the CUBES function. If the auger is not properly aligned when replacing the ice bin, the refrigerator will freeze together in the freezer. 5 Replace the ice bin. Rinse with the drive mechanism. To loosen stuck ice, use harsh or abrasive Removing Ice Bin 18 cleaners. If the auger...
... the auger in the CUBES function. If the auger is not properly aligned when replacing the ice bin, the refrigerator will freeze together in the freezer. 5 Replace the ice bin. Rinse with the drive mechanism. To loosen stuck ice, use harsh or abrasive Removing Ice Bin 18 cleaners. If the auger...

Complete Owner's Guide (English)
Page 21
... (varies by pulling baskets out to their full extension and lift out. Insert cans into retainer clips. Two Freezer Baskets To Remove Upper Basket 1 Remove all items from basket. 2 Remove the basket by tilting it forward and lifting it from the retainer clips. To ...
... (varies by pulling baskets out to their full extension and lift out. Insert cans into retainer clips. Two Freezer Baskets To Remove Upper Basket 1 Remove all items from basket. 2 Remove the basket by tilting it forward and lifting it from the retainer clips. To ...
Complete Owner's Guide (English)
Page 23
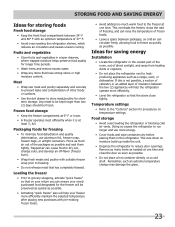
... for freezing • To minimize food dehydration and quality deterioration, use more efficiently maintain the selected temperature after placing new purchases with suitable freezer wrap prior to dry out, change may damage the glass. 23 Remove as many items as possible. • Do not place a... not refreeze meat that have strong odors or high moisture content. Remember, such an extreme temperature change color, and develop an off-flavor (freezer burn). • Wrap fresh meats and poultry with pre-existing frozen foods. • Avoid adding too much air out of direct sunlight,...
... for freezing • To minimize food dehydration and quality deterioration, use more efficiently maintain the selected temperature after placing new purchases with suitable freezer wrap prior to dry out, change may damage the glass. 23 Remove as many items as possible. • Do not place a... not refreeze meat that have strong odors or high moisture content. Remember, such an extreme temperature change color, and develop an off-flavor (freezer burn). • Wrap fresh meats and poultry with pre-existing frozen foods. • Avoid adding too much air out of direct sunlight,...
Complete Owner's Guide (English)
Page 24
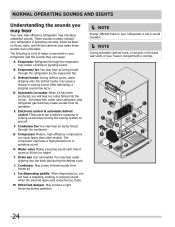
... maker When ice has been produced, you will hear ice cubes falling into the drain pan during operation. NOTE Energy efficient foam in your freezer compartment is normal. 24 I Drain pan (not removable) You may hear air being forced through the condenser. C Defrost heater During defrost cycles, water dripping onto...
... maker When ice has been produced, you will hear ice cubes falling into the drain pan during operation. NOTE Energy efficient foam in your freezer compartment is normal. 24 I Drain pan (not removable) You may hear air being forced through the condenser. C Defrost heater During defrost cycles, water dripping onto...
Complete Owner's Guide (English)
Page 28
... empty ice bucket, even if you set your temperature controls to turn off (see "Controls" section for details on any spills immediately and clean the freezer and fresh food compartments at least twice a year. NOTE Do not use razor blades or other abrasive cleaning materials. • Never use metallic scouring...
... empty ice bucket, even if you set your temperature controls to turn off (see "Controls" section for details on any spills immediately and clean the freezer and fresh food compartments at least twice a year. NOTE Do not use razor blades or other abrasive cleaning materials. • Never use metallic scouring...

Complete Owner's Guide (English)
Page 30
...place assuring the light is facing in toward the unit (inside fresh food). Some lights have LED lights. Always use Frigidaire parts for appliance lighting. Freezer Light (select models one hand and pull the connector with an appliance bulb of the same type and wattage (normally 40... up . Always use bulbs that are in the refrigerator's power cord. frigidaire.com/store, or through the dealer where you bought the refrigerator. Replacing Light Bulbs (select models) Both the freezer and fresh food compartments of your refrigerator include incandescent light bulbs that need ...
...place assuring the light is facing in toward the unit (inside fresh food). Some lights have LED lights. Always use Frigidaire parts for appliance lighting. Freezer Light (select models one hand and pull the connector with an appliance bulb of the same type and wattage (normally 40... up . Always use bulbs that are in the refrigerator's power cord. frigidaire.com/store, or through the dealer where you bought the refrigerator. Replacing Light Bulbs (select models) Both the freezer and fresh food compartments of your refrigerator include incandescent light bulbs that need ...

