
Use and Care Manual
Page 1
... Saving Energy 23 Normal Operating Sounds and Sights 24 Changing the Filter 25 Care and Cleaning 27 Before you Call 30 Major Appliance Warranty 33 www.frigidaire.com USA 1-800-944-9044 www.frigidaire.ca Canada 1-800-265-8352 All about the Use &Care of your Refrigerator 242291900 (October 2012) TABLE OF CONTENTS Important Safety Instructions 2 Features at a Glance 4 Installation 5 Door Removal Instructions 9 Installing Door Handles 11 Connecting Water Supply 13 Controls 15 Automatic Ice & Water Dispenser...
... Saving Energy 23 Normal Operating Sounds and Sights 24 Changing the Filter 25 Care and Cleaning 27 Before you Call 30 Major Appliance Warranty 33 www.frigidaire.com USA 1-800-944-9044 www.frigidaire.ca Canada 1-800-265-8352 All about the Use &Care of your Refrigerator 242291900 (October 2012) TABLE OF CONTENTS Important Safety Instructions 2 Features at a Glance 4 Installation 5 Door Removal Instructions 9 Installing Door Handles 11 Connecting Water Supply 13 Controls 15 Automatic Ice & Water Dispenser...
Use and Care Manual
Page 2
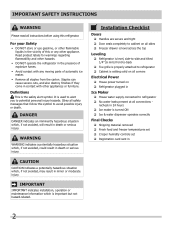
... 2 Definitions This is turned ON Ice & water dispenser operates correctly Final Checks Shipping material removed Fresh food and freezer temperatures set Crisper humidity controls set Registration card sent in contact with any other flammable liquids in Ice Maker House water supply connected to potential personal injury hazards. It is setting solid on all corners Electrical Power House power turned on Refrigerator plugged in the vicinity of...
... 2 Definitions This is turned ON Ice & water dispenser operates correctly Final Checks Shipping material removed Fresh food and freezer temperatures set Crisper humidity controls set Registration card sent in contact with any other flammable liquids in Ice Maker House water supply connected to potential personal injury hazards. It is setting solid on all corners Electrical Power House power turned on Refrigerator plugged in the vicinity of...

Use and Care Manual
Page 3
... climb inside. • Have refrigerant removed by pulling on the temperature control panel, will sit for more . If you are getting rid of child entrapment Child entrapment and suffocation are throwing away your old refrigerator or freezer, please follow the instructions below to the light bulb and other electrical components. IMPORTANT Pressing and holding the On/Off button for three seconds, located on the power cord...
... climb inside. • Have refrigerant removed by pulling on the temperature control panel, will sit for more . If you are getting rid of child entrapment Child entrapment and suffocation are throwing away your old refrigerator or freezer, please follow the instructions below to the light bulb and other electrical components. IMPORTANT Pressing and holding the On/Off button for three seconds, located on the power cord...
Use and Care Manual
Page 4
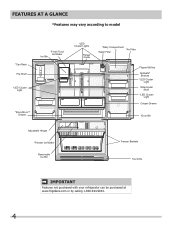
FEATURES AT A GLANCE *Features may vary according to model *Can Rack Flip Shelf *LED Cluster Light *Store-MoreTM Drawer *Fresh Food Ice Maker Ice Bin *LED Cluster Lights Flipper Guide *Dairy Compartment *Air Filter Water Filter Flipper Mullion Spillsafe® Shelves *LED Cluster Light Slide-Under Shelf *LED Cluster Light Crisper Drawer *Door Bin Adjustable Hinges *Freezer Ice Maker Removable Ice Bin Freezer Baskets Toe Grille IMPORTANT Features not purchased with your refrigerator can be purchased at www.frigidaire.com or by calling 1-800-944-9044. 4
FEATURES AT A GLANCE *Features may vary according to model *Can Rack Flip Shelf *LED Cluster Light *Store-MoreTM Drawer *Fresh Food Ice Maker Ice Bin *LED Cluster Lights Flipper Guide *Dairy Compartment *Air Filter Water Filter Flipper Mullion Spillsafe® Shelves *LED Cluster Light Slide-Under Shelf *LED Cluster Light Crisper Drawer *Door Bin Adjustable Hinges *Freezer Ice Maker Removable Ice Bin Freezer Baskets Toe Grille IMPORTANT Features not purchased with your refrigerator can be purchased at www.frigidaire.com or by calling 1-800-944-9044. 4
Use and Care Manual
Page 5
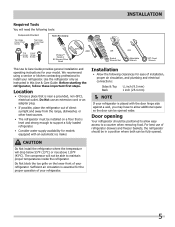
..., electrical outlet. The compressor will not be able to install your refrigerator. Installation • Allow the following tools: Components Provided: Top Hinge Cover Front Screw Top Hinge Cover Rear Screw Top Lower Hinge Hinge Screw Screw Tools Necessary: Phillips™ Head or #2 Square Drive Head (OR) AND OR Socket Wrench Set OR Adjustable Wrench 3/8" Fixed Wrench This Use & Care Guide provides general installation and operating instructions for ease of your refrigerator. INSTALLATION Required...
..., electrical outlet. The compressor will not be able to install your refrigerator. Installation • Allow the following tools: Components Provided: Top Hinge Cover Front Screw Top Hinge Cover Rear Screw Top Lower Hinge Hinge Screw Screw Tools Necessary: Phillips™ Head or #2 Square Drive Head (OR) AND OR Socket Wrench Set OR Adjustable Wrench 3/8" Fixed Wrench This Use & Care Guide provides general installation and operating instructions for ease of your refrigerator. INSTALLATION Required...
Use and Care Manual
Page 10
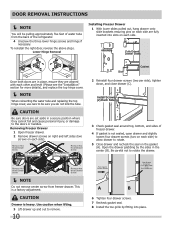
CAUTION Be sure doors are set aside in a secure position where they are fully inserted into place. This is heavy. Open the drawer grabbing by fitting into slots on each other and level (Please see the "Installation" section for more details), and replace the top hinge cover. NOTE When reinserting the water tube and replacing the top hinge cover, use care to rotate the drawer. Lower Hinge Removal Installing Freezer Drawer 1 With...
CAUTION Be sure doors are set aside in a secure position where they are fully inserted into place. This is heavy. Open the drawer grabbing by fitting into slots on each other and level (Please see the "Installation" section for more details), and replace the top hinge cover. NOTE When reinserting the water tube and replacing the top hinge cover, use care to rotate the drawer. Lower Hinge Removal Installing Freezer Drawer 1 With...
Use and Care Manual
Page 14
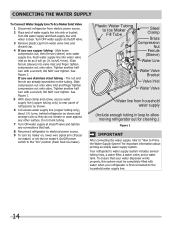
... (freezer ice maker) or set the ice maker's On/Off power switch to the "On" position (fresh food ice maker). Turn ON water supply and flush supply line until water is first connected to the household water supply line. 14 See Figure 1. See Figure 1. 5 With steel clamp and screw, secure water supply line (copper tubing only) to rear panel of water supply line into sink or bucket. To ensure that leak. 8 Reconnect refrigerator to electrical power source. 9 To turn with a wrench; Push water supply line into valve...
... (freezer ice maker) or set the ice maker's On/Off power switch to the "On" position (fresh food ice maker). Turn ON water supply and flush supply line until water is first connected to the household water supply line. 14 See Figure 1. See Figure 1. 5 With steel clamp and screw, secure water supply line (copper tubing only) to rear panel of water supply line into sink or bucket. To ensure that leak. 8 Reconnect refrigerator to electrical power source. 9 To turn with a wrench; Push water supply line into valve...
Use and Care Manual
Page 15
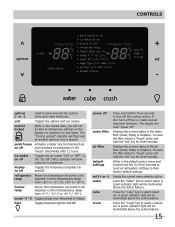
... set -points to reset all dispenser functions. power off the ice maker and all refrigerator settings to change any settings on off and increases ice production in the locked state, you will read "power off the cooling system. It also turns off water filter air filter default settings set " key for three seconds to +47° F / +8° C. light Toggles dispenser light On and Off. exit Toggles the options and run modes. control locked While in the freezer...
... set -points to reset all dispenser functions. power off the ice maker and all refrigerator settings to change any settings on off and increases ice production in the locked state, you will read "power off the cooling system. It also turns off water filter air filter default settings set " key for three seconds to +47° F / +8° C. light Toggles dispenser light On and Off. exit Toggles the options and run modes. control locked While in the freezer...
Use and Care Manual
Page 16
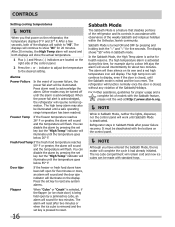
... Mode, neither the lights, dispenser, nor the control panel will continue to a door left open by pressing and holding both of the weekly Sabbath and religious holidays within the Orthodox Jewish community. For further assistance, guidelines for proper usage and a complete list of the Sabbath/Holidays. When the power fail alert is deactivated. If a high temperature alarm is exited and the icon reset. CONTROLS Setting cooling temperatures...
... Mode, neither the lights, dispenser, nor the control panel will continue to a door left open by pressing and holding both of the weekly Sabbath and religious holidays within the Orthodox Jewish community. For further assistance, guidelines for proper usage and a complete list of the Sabbath/Holidays. When the power fail alert is deactivated. If a high temperature alarm is exited and the icon reset. CONTROLS Setting cooling temperatures...
Use and Care Manual
Page 17
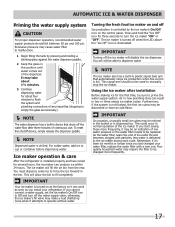
..., the ice maker's fill valve may make a loud chattering noise when it may be replaced. The ice maker is turned off the ice maker will fill the ice bin from the rear. Using the ice maker after three minutes of any impurities (stopping to turn off the water flow after installation Before making ice for several hours, the ice maker can result in dispensed ice. Air in new plumbing lines can produce ice within 24 hours. If you cannot connect a water supply, set the ice maker...
..., the ice maker's fill valve may make a loud chattering noise when it may be replaced. The ice maker is turned off the ice maker will fill the ice bin from the rear. Using the ice maker after three minutes of any impurities (stopping to turn off the water flow after installation Before making ice for several hours, the ice maker can result in dispensed ice. Air in new plumbing lines can produce ice within 24 hours. If you cannot connect a water supply, set the ice maker...
Use and Care Manual
Page 18
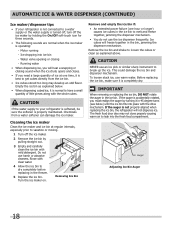
... cubes. The fresh food door also may develop an odd flavor. AUTOMATIC ICE & WATER DISPENSER (CONTINUED) Ice maker/dispenser tips • If your refrigerator is softened, be sure the softener is completely dry. Ice dropping into the fresh food compartment. Water valve opening or closing - Running water • When dispensing ice, you will not dispense ice. Turn the ice maker on. CAUTION NEVER use warm water. IMPORTANT When removing or replacing the ice bin, DO NOT rotate the...
... cubes. The fresh food door also may develop an odd flavor. AUTOMATIC ICE & WATER DISPENSER (CONTINUED) Ice maker/dispenser tips • If your refrigerator is softened, be sure the softener is completely dry. Ice dropping into the fresh food compartment. Water valve opening or closing - Running water • When dispensing ice, you will not dispense ice. Turn the ice maker on. CAUTION NEVER use warm water. IMPORTANT When removing or replacing the ice bin, DO NOT rotate the...
Use and Care Manual
Page 19
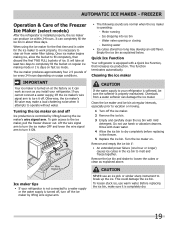
... fast ice mode. Cleaning the ice maker CAUTION If the water supply to your refrigerator is not connected to fill completely, then discard the first TWO FULL buckets of the Freezer Ice Maker (select models) After the refrigerator is properly maintained. Do not use warm water. Before replacing the ice bin, make a loud chattering noise when it attempts to turn off the ice maker. 2 Remove the ice bin. 3 Empty and carefully clean the ice bin with mild detergent. Chemicals from water filter tubing. Clean the ice maker and ice bin...
... fast ice mode. Cleaning the ice maker CAUTION If the water supply to your refrigerator is not connected to fill completely, then discard the first TWO FULL buckets of the Freezer Ice Maker (select models) After the refrigerator is properly maintained. Do not use warm water. Before replacing the ice bin, make a loud chattering noise when it attempts to turn off the ice maker. 2 Remove the ice bin. 3 Empty and carefully clean the ice bin with mild detergent. Chemicals from water filter tubing. Clean the ice maker and ice bin...
Use and Care Manual
Page 23
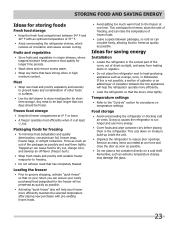
... moisture build-up inside the unit. • Organize the refrigerator to reduce door openings. Loading the freezer • Prior to grocery shopping, activate "quick freeze" so that the doors close the door as soon as possible. • Do not place a hot container directly on temperature settings. Temperature settings • Refer to the "Controls" section for procedures on a cold shelf. Remove as many items as needed at least...
... moisture build-up inside the unit. • Organize the refrigerator to reduce door openings. Loading the freezer • Prior to grocery shopping, activate "quick freeze" so that the doors close the door as soon as possible. • Do not place a hot container directly on temperature settings. Temperature settings • Refer to the "Controls" section for procedures on a cold shelf. Remove as many items as needed at least...
Use and Care Manual
Page 25
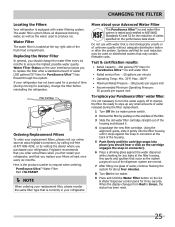
... the filter replacement. 1 Turn Off the ice maker power switch. 2 Remove the filter by visiting the dealer where you should hear a click as the system purges air out of the dispenser system are normal. 7 After filling one glass of water, continue flushing the system for example), change the filter before or after a standard amount of the housing. 5 Push firmly until it . 4 Unpackage the new filter cartridge. When the display changes...
... the filter replacement. 1 Turn Off the ice maker power switch. 2 Remove the filter by visiting the dealer where you should hear a click as the system purges air out of the dispenser system are normal. 7 After filling one glass of water, continue flushing the system for example), change the filter before or after a standard amount of the housing. 5 Push firmly until it . 4 Unpackage the new filter cartridge. When the display changes...

Use and Care Manual
Page 26
... the top and bottom to lock the door closed. 5 Press and hold the Air Filter Reset button on the Touch Panel prompts you to consider ordering extra filters when you first install your PureAdvantageTM air filter To ensure optimal filtering of the filter should change the air filter every six months (the filter status light on the control panel for three seconds. CHANGING THE FILTER Air filter (select models) The air filter is located under the utility bin.
... the top and bottom to lock the door closed. 5 Press and hold the Air Filter Reset button on the Touch Panel prompts you to consider ordering extra filters when you first install your PureAdvantageTM air filter To ensure optimal filtering of the filter should change the air filter every six months (the filter status light on the control panel for three seconds. CHANGING THE FILTER Air filter (select models) The air filter is located under the utility bin.

Use and Care Manual
Page 27
..., concentrated detergents, bleaches, or cleansers containing petroleum products on caring and cleaning specific areas of three weeks or less. • Use all perishable items from refrigerator compartment. • Turn automatic ice maker off (see "Controls" section for details on plastic parts, interior doors, gaskets, or cabinet liners. Removal of On/Off button) and disconnect power cord. • Turn water supply valve to prevent odors and mold build-up . Moving •...
..., concentrated detergents, bleaches, or cleansers containing petroleum products on caring and cleaning specific areas of three weeks or less. • Use all perishable items from refrigerator compartment. • Turn automatic ice maker off (see "Controls" section for details on plastic parts, interior doors, gaskets, or cabinet liners. Removal of On/Off button) and disconnect power cord. • Turn water supply valve to prevent odors and mold build-up . Moving •...
Use and Care Manual
Page 30
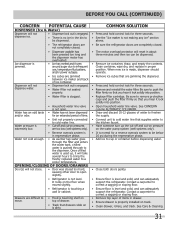
... the ice maker (freezer ice maker). This is open in manual. • Remove ice container and discard ice. See Automatic Ice Maker-Freezer section in the bin and leak their water onto existing ice, which causes it should be clogged with water inside). Replace valve if necessary. • Press Fast Freeze to temporarily increase ice production rate. • Set freezer control to colder setting to freeze together. The ice maker will each produce approximately 2.5 pounds of power for three seconds until the indicator light...
... the ice maker (freezer ice maker). This is open in manual. • Remove ice container and discard ice. See Automatic Ice Maker-Freezer section in the bin and leak their water onto existing ice, which causes it should be clogged with water inside). Replace valve if necessary. • Press Fast Freeze to temporarily increase ice production rate. • Set freezer control to colder setting to freeze together. The ice maker will each produce approximately 2.5 pounds of power for three seconds until the indicator light...
Use and Care Manual
Page 31
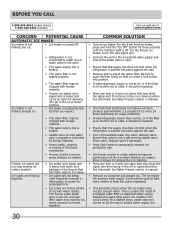
... use, temperature fluctuations, and/or power outages. Drawers are jammed between ice maker and back of water to freshen the supply. • Connect unit to cold water line that you hear it lock solidly into position. • Replace filter cartridge. Be sure to push the filter firmly so that supplies water to the kitchen faucet. • Have someone turn up , it lock solidly into position. • Open household water line valve. Be sure to remove...
... use, temperature fluctuations, and/or power outages. Drawers are jammed between ice maker and back of water to freshen the supply. • Connect unit to cold water line that you hear it lock solidly into position. • Replace filter cartridge. Be sure to push the filter firmly so that supplies water to the kitchen faucet. • Have someone turn up , it lock solidly into position. • Open household water line valve. Be sure to remove...
Use and Care Manual
Page 32
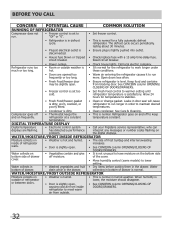
... defrost refrigerator. Water bottom of frost buildup and internal sweating inside refrigerator to meet warm air from blocking door. refrigerator at electrical outlet is disconnected. • Ensure plug is slightly open . • Ensure refrigerator is dirty, worn, cracked, or poorly fitted. • Clean or change gasket. BEFORE YOU CALL CONCERN POTENTIAL CAUSE COMMON SOLUTION RUNNING OF REFRIGERATOR Compressor does not run. • Freezer control is set too cold. • Set Fresh Food control to warmer setting until refrigerator temperature...
... defrost refrigerator. Water bottom of frost buildup and internal sweating inside refrigerator to meet warm air from blocking door. refrigerator at electrical outlet is disconnected. • Ensure plug is slightly open . • Ensure refrigerator is dirty, worn, cracked, or poorly fitted. • Clean or change gasket. BEFORE YOU CALL CONCERN POTENTIAL CAUSE COMMON SOLUTION RUNNING OF REFRIGERATOR Compressor does not run. • Freezer control is set too cold. • Set Fresh Food control to warmer setting until refrigerator temperature...
Use and Care Manual
Page 33
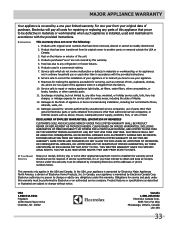
... repair or replace appliance light bulbs, air filters, water filters, other consumables, or knobs, handles, or other appropriate payment record to floors, cabinets, walls, etc. 13. Service calls to correct the installation of your receipt, delivery slip, or some other cosmetic parts. 11. DISCLAIMER OF IMPLIED WARRANTIES; Products with the provided instructions. 8. Expenses for making the appliance accessible for appliances not in ordinary household use or used...
... repair or replace appliance light bulbs, air filters, water filters, other consumables, or knobs, handles, or other appropriate payment record to floors, cabinets, walls, etc. 13. Service calls to correct the installation of your receipt, delivery slip, or some other cosmetic parts. 11. DISCLAIMER OF IMPLIED WARRANTIES; Products with the provided instructions. 8. Expenses for making the appliance accessible for appliances not in ordinary household use or used...


