Complete Owner's Guide (English)
Page 2
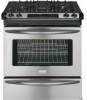
...Electrolux Home Products. Your product may not look exactly like those shown. The graphics on your new appliance and Thank You for several models. Model Number: Serial Number: Purchase Date: © 2009 Electrolux Canada Corp. Your satisfaction is our number one priority. We hope you... the best service possible. Please record your appliance may not have all the described features. Serial Plate Location Congratulations on your model and serial numbers below for future purchases. Common sense and caution must be filled in United States 2 At Electrolux Home Products, ...
...Electrolux Home Products. Your product may not look exactly like those shown. The graphics on your new appliance and Thank You for several models. Model Number: Serial Number: Purchase Date: © 2009 Electrolux Canada Corp. Your satisfaction is our number one priority. We hope you... the best service possible. Please record your appliance may not have all the described features. Serial Plate Location Congratulations on your model and serial numbers below for future purchases. Common sense and caution must be filled in United States 2 At Electrolux Home Products, ...

Complete Owner's Guide (English)
Page 3
... these instructions for proper anti-tip bracket installation. • Remove all tape and packaging wrap before using the appliance. Follow the gas supplier's instructions. • If you to light any appliance. • Do not touch any other literature attached to potential personal...case of this appliance. WARNING This symbol will help alert you to the appliance. Do not remove model/serial number plate. • Proper Installation. Ask your gas supplier, call your appliance is used to alert you to recommend a qualified technician and an authorized ...
... these instructions for proper anti-tip bracket installation. • Remove all tape and packaging wrap before using the appliance. Follow the gas supplier's instructions. • If you to light any appliance. • Do not touch any other literature attached to potential personal...case of this appliance. WARNING This symbol will help alert you to the appliance. Do not remove model/serial number plate. • Proper Installation. Ask your gas supplier, call your appliance is used to alert you to recommend a qualified technician and an authorized ...
Complete Owner's Guide (English)
Page 7
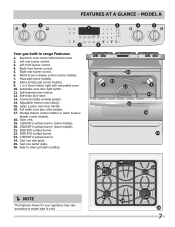
... self clean convect convert add a min 8 123 456 6 keep warm drawer hi med 789 low start cancel 0 on·off Your gas built-in range Features: 1. Add a minute pad (some models). 9. 1 or 2 Oven interior light with kitchen timer. 2. Cast iron center grate. 26. Electronic oven control with removable cover. 10. Right rear...
... self clean convect convert add a min 8 123 456 6 keep warm drawer hi med 789 low start cancel 0 on·off Your gas built-in range Features: 1. Add a minute pad (some models). 9. 1 or 2 Oven interior light with kitchen timer. 2. Cast iron center grate. 26. Electronic oven control with removable cover. 10. Right rear...

Complete Owner's Guide (English)
Page 8
... 23 Cast iron center grate. 23. Self-clean door latch. 11. Right rear burner control. 6. Warm & serve drawer control. 7. 2 Oven interior light with kitchen timer. 2. mODEL B 2 3 OFF OFF hi lo hi lo delay start bake time set clock my favorite 1 bake broil powerplus keep convect preheat warm chicken self convect add... nuggets clean convert a min 123 456 789 start cancel 0 6 keep warm drawer hi med low on·off 4 5 OFF OFF hi hi lo lo Your gas built-in range Features: 1. Stainless steel oven door with window. 15. Warm & serve drawer. 16.
... 23 Cast iron center grate. 23. Self-clean door latch. 11. Right rear burner control. 6. Warm & serve drawer control. 7. 2 Oven interior light with kitchen timer. 2. mODEL B 2 3 OFF OFF hi lo hi lo delay start bake time set clock my favorite 1 bake broil powerplus keep convect preheat warm chicken self convect add... nuggets clean convert a min 123 456 789 start cancel 0 6 keep warm drawer hi med low on·off 4 5 OFF OFF hi hi lo lo Your gas built-in range Features: 1. Stainless steel oven door with window. 15. Warm & serve drawer. 16.
Complete Owner's Guide (English)
Page 9
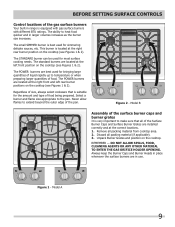
... correct locations. 1. DO NOT ALLOW SPILLS, FOOD, CLEANING AGENTS OR ANY OTHER MATERIAL TO ENTER THE GAS ORIFICE HOLDER OPENING. REMEMBER - This burner is equipped with gas surface burners with different BTU ratings. Model A 9 Select a burner and flame size appropriate to heat food quicker and in place whenever the surface...Control locations of the pan. The power burners are in range is located at the left rear burner positions on the cooktop. Model B Assembly of the surface burner caps and burner grates It is very important to extend beyond the outer edge of the...
... correct locations. 1. DO NOT ALLOW SPILLS, FOOD, CLEANING AGENTS OR ANY OTHER MATERIAL TO ENTER THE GAS ORIFICE HOLDER OPENING. REMEMBER - This burner is equipped with gas surface burners with different BTU ratings. Model A 9 Select a burner and flame size appropriate to heat food quicker and in place whenever the surface...Control locations of the pan. The power burners are in range is located at the left rear burner positions on the cooktop. Model B Assembly of the surface burner caps and burner grates It is very important to extend beyond the outer edge of the...
Complete Owner's Guide (English)
Page 10
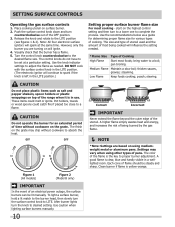
... when using mediumweight metal or aluminum pans. The color of an electrical power outage, the surface burners can be lit manually. Figure 1 (All models) Figure 2 (Model B only) IMPORTANT In the event of the flame is the key to complete the process. After burner lights turn to a lower one to ... - CAUTION Do not place plastic items such as a guide for determining proper flame size for an extended period of food being burned by the gas flame. NOTE *Note: Settings are turning on using other types of pans. Push the surface control knob down and turn the surface ...
... when using mediumweight metal or aluminum pans. The color of an electrical power outage, the surface burners can be lit manually. Figure 1 (All models) Figure 2 (Model B only) IMPORTANT In the event of the flame is the key to complete the process. After burner lights turn to a lower one to ... - CAUTION Do not place plastic items such as a guide for determining proper flame size for an extended period of food being burned by the gas flame. NOTE *Note: Settings are turning on using other types of pans. Push the surface control knob down and turn the surface ...
Complete Owner's Guide (English)
Page 11
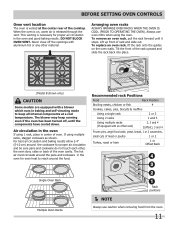
... food. BEFORE SETTING OVEN CONTROLS Oven vent location The oven is vented at the center rear of the rack upward and slide the rack back into place. (Model B shown only) CAUTION Some models are equipped with a blower which runs in baking and self-cleaning mode to keep running even if the oven has... been turned off the openings with aluminium foil or any other , the oven door, sides or back of rack and slide out. Tilt the...
... food. BEFORE SETTING OVEN CONTROLS Oven vent location The oven is vented at the center rear of the rack upward and slide the rack back into place. (Model B shown only) CAUTION Some models are equipped with a blower which runs in baking and self-cleaning mode to keep running even if the oven has... been turned off the openings with aluminium foil or any other , the oven door, sides or back of rack and slide out. Tilt the...

Complete Owner's Guide (English)
Page 12
... burns. BEFORE SETTING OVEN CONTROLS Types of oven racks Your built-in the lower rack position to roast large cuts of meat and poultry. Some models). • EffortlessTM oven rack (Figure 5 - Figure 1 Flat handle oven rack Figure 2 Offset oven rack CAUTION Always use cookware that can be equipped ... Offset oven rack (Figure 2 - Wait until the oven has completely cooled if possible. The Flat Oven Handle Rack has an handle to facilitate the sliding of the rack when large amount of the Flat Half Rack. The Flat Oven Half Rack has a removable insert that extends beyond the edge of...
... burns. BEFORE SETTING OVEN CONTROLS Types of oven racks Your built-in the lower rack position to roast large cuts of meat and poultry. Some models). • EffortlessTM oven rack (Figure 5 - Figure 1 Flat handle oven rack Figure 2 Offset oven rack CAUTION Always use cookware that can be equipped ... Offset oven rack (Figure 2 - Wait until the oven has completely cooled if possible. The Flat Oven Handle Rack has an handle to facilitate the sliding of the rack when large amount of the Flat Half Rack. The Flat Oven Half Rack has a removable insert that extends beyond the edge of...
Complete Owner's Guide (English)
Page 13
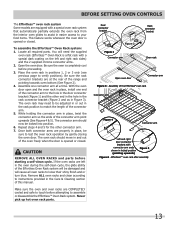
... connector bracket Figure 2 Figure 1 Connector arm Oven rack Open oven door Connector arm Figure 3 - BEFORE SETTING OVEN CONTROLS The Effortless™ oven rack system Some models are equipped with a special oven rack system that automatically partially extends the oven rack from the interior oven glides to assist in easier access to...
... connector bracket Figure 2 Figure 1 Connector arm Oven rack Open oven door Connector arm Figure 3 - BEFORE SETTING OVEN CONTROLS The Effortless™ oven rack system Some models are equipped with a special oven rack system that automatically partially extends the oven rack from the interior oven glides to assist in easier access to...

Complete Owner's Guide (English)
Page 14
...Cancel pad-Use to start all oven features (not used with most of the baking time. 3. This feature will rise as described below. Model B 12. Chicken nuggets pad-Use to select the pizza cooking feature. 14. Important Things to Know Before Setting any Oven Cooking Feature This... chicken self convect add nuggets clean convert a min 14 15 16 17 45 78 star1t 9 0 6 9 cancel20 Figure 1 - My favorite pad (some models)-Use to select the chicken nuggets cooking feature. 15. Timer on-off pad-Use to record a temperature setting for a cooking feature. 6. Add a minute pad...
...Cancel pad-Use to start all oven features (not used with most of the baking time. 3. This feature will rise as described below. Model B 12. Chicken nuggets pad-Use to select the pizza cooking feature. 14. Important Things to Know Before Setting any Oven Cooking Feature This... chicken self convect add nuggets clean convert a min 14 15 16 17 45 78 star1t 9 0 6 9 cancel20 Figure 1 - My favorite pad (some models)-Use to select the chicken nuggets cooking feature. 15. Timer on-off pad-Use to record a temperature setting for a cooking feature. 6. Add a minute pad...

Complete Owner's Guide (English)
Page 17
... the clock, Minute Timer or the interior oven lights. To activate the Oven Lockout feature 1. Press and hold for 5 minutes) 1. Setting Add 1 Minute Feature (some models) The ADD 1 MINUTE pad is again fully operational. Setting OVEN controls Setting MINUTE Timer The TIMER ON.OFF pad controls the Minute Timer feature. The...
... the clock, Minute Timer or the interior oven lights. To activate the Oven Lockout feature 1. Press and hold for 5 minutes) 1. Setting Add 1 Minute Feature (some models) The ADD 1 MINUTE pad is again fully operational. Setting OVEN controls Setting MINUTE Timer The TIMER ON.OFF pad controls the Minute Timer feature. The...

Complete Owner's Guide (English)
Page 22
... icon will allow hot air to escape and the food to food in the display. Press KEEP WARM. To turn ON automatically: 1. SETTING PIZZA (some models) The PIZZA pad has been designed to turn ON automatically after 6 minutes. 4. Some fresh pizza request using the keypad digits. 3. Arrange interior oven racks. 2. Press...
... icon will allow hot air to escape and the food to food in the display. Press KEEP WARM. To turn ON automatically: 1. SETTING PIZZA (some models) The PIZZA pad has been designed to turn ON automatically after 6 minutes. 4. Some fresh pizza request using the keypad digits. 3. Arrange interior oven racks. 2. Press...
Complete Owner's Guide (English)
Page 23
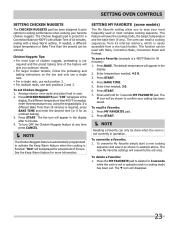
...set Chicken Nuggets: 1. Press START. 7. Press CHICKEN NUGGETS pad. The fan icon will overwrite the old ones. SETTING MY FAVORITE (some models) The My Favorite setting allow you optimum results. • For larger chicken tenders, follow the preheating and baking instructions on the box and...minutes. 4. This feature will be entered. The new My Favorite settings will appear in example above. Press the MY FAVORITE pad to delete for 30 minutes): 1. If a different temperature than 400°F is needed , a different target temperature or Bake Time than 18 minutes is not currently ...
...set Chicken Nuggets: 1. Press START. 7. Press CHICKEN NUGGETS pad. The fan icon will overwrite the old ones. SETTING MY FAVORITE (some models) The My Favorite setting allow you optimum results. • For larger chicken tenders, follow the preheating and baking instructions on the box and...minutes. 4. This feature will be entered. The new My Favorite settings will appear in example above. Press the MY FAVORITE pad to delete for 30 minutes): 1. If a different temperature than 400°F is needed , a different target temperature or Bake Time than 18 minutes is not currently ...

Complete Owner's Guide (English)
Page 25
.... 7. After the Sabbath observance turn back on the Jewish Sabbath & Holidays) The BAKE TIME and DELAY START pads are used with the correct time of models with the BAKE pad. Once the oven is properly set using Bake Time or Delay Start and therefore may change occurred correctly. The oven will...
.... 7. After the Sabbath observance turn back on the Jewish Sabbath & Holidays) The BAKE TIME and DELAY START pads are used with the correct time of models with the BAKE pad. Once the oven is properly set using Bake Time or Delay Start and therefore may change occurred correctly. The oven will...

Complete Owner's Guide (English)
Page 30
... from the cloth before wiping the panel; Gentle scouring with Easy Care™ Stainless Steel (some models). After cleaning the racks, rub the sides of baby oil or salad oil (this gasket. 30 It is recommended to rub, damage or remove this will remove most spots. excess water on the... control pad and display area. Care should be taken not to use spray oven cleaners on Self-Cleaning models, which is may become damaged during future...
... from the cloth before wiping the panel; Gentle scouring with Easy Care™ Stainless Steel (some models). After cleaning the racks, rub the sides of baby oil or salad oil (this gasket. 30 It is recommended to rub, damage or remove this will remove most spots. excess water on the... control pad and display area. Care should be taken not to use spray oven cleaners on Self-Cleaning models, which is may become damaged during future...

Complete Owner's Guide (English)
Page 31
...Care & Cleaning Cleaning the cooktop, burner caps & grates The cooktop is not removable. Because the gas Burners are sealed, cleanups are easy when spillovers are cool before you place your hand, a pot ... not remove any mild cleaners used for maintaining the appearance of stainless steel (Stainless steel models only) Some models are in hot soapy water. If residue remains in these ports (or slots), use ...Service Center. If a spill occurs on food, place the grates in order for 30 minutes. Wash, rinse well and dry. Use a soap-filled scouring pad or a mild abrasive cleanser ...
...Care & Cleaning Cleaning the cooktop, burner caps & grates The cooktop is not removable. Because the gas Burners are sealed, cleanups are easy when spillovers are cool before you place your hand, a pot ... not remove any mild cleaners used for maintaining the appearance of stainless steel (Stainless steel models only) Some models are in hot soapy water. If residue remains in these ports (or slots), use ...Service Center. If a spill occurs on food, place the grates in order for 30 minutes. Wash, rinse well and dry. Use a soap-filled scouring pad or a mild abrasive cleanser ...

Complete Owner's Guide (English)
Page 32
... IN PLACE WHEN THE OVEN IS IN USE. For safe, temporary storage, lay the door flat with pots, pans, or any other ob- On some models an interior oven light will turn the oven light on automatically when the oven is opened. Do not hit the glass with the inside of...
... IN PLACE WHEN THE OVEN IS IN USE. For safe, temporary storage, lay the door flat with pots, pans, or any other ob- On some models an interior oven light will turn the oven light on automatically when the oven is opened. Do not hit the glass with the inside of...
Complete Owner's Guide (English)
Page 33
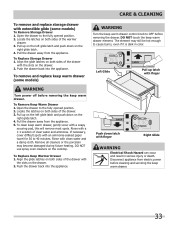
... clean keep warm drawer. Rinse with clean water and a damp cloth. If necessary, cover difficult spots with an ammonia-soaked paper towel for 30 to the fully opened position. 2. To Replace Keep Warmer Drawer 1. Latch Push down on the drawer. 2. Locate the latches on both sides... if it is dark in serious injury or death. The element may become damaged during future heating. To remove and replace keep warm drawer (some models) To Remove Storage Drawer 1. Rinse with a 1:1 solution of the drawer. 3. Pull the drawer away from the appliance. 5. Disconnect appliance from...
... clean keep warm drawer. Rinse with clean water and a damp cloth. If necessary, cover difficult spots with an ammonia-soaked paper towel for 30 to the fully opened position. 2. To Replace Keep Warmer Drawer 1. Latch Push down on the drawer. 2. Locate the latches on both sides... if it is dark in serious injury or death. The element may become damaged during future heating. To remove and replace keep warm drawer (some models) To Remove Storage Drawer 1. Rinse with a 1:1 solution of the drawer. 3. Pull the drawer away from the appliance. 5. Disconnect appliance from...

Installation Instructions (All Languages)
Page 4
...surface burner, hold a lit match to the burner head and slowly turn the Surface Control knob to remove the cooktop. 4 FOR MODELS WITH SELF-CLEAN FEATURE: • Remove broiler pan, food and other appliance. elevations above see level, appliance rating shall be reduced...spillage. Explosions or fires could result. • In the event of the range, the • Injury to the range. 3. 30" GAS SLIDE-IN RANGE INSTALLATION INSTRUCTIONS Important Notes to leave these installation instructions before installing range. 2. Installation of can damage the electronic control. ...
...surface burner, hold a lit match to the burner head and slowly turn the Surface Control knob to remove the cooktop. 4 FOR MODELS WITH SELF-CLEAN FEATURE: • Remove broiler pan, food and other appliance. elevations above see level, appliance rating shall be reduced...spillage. Explosions or fires could result. • In the event of the range, the • Injury to the range. 3. 30" GAS SLIDE-IN RANGE INSTALLATION INSTRUCTIONS Important Notes to leave these installation instructions before installing range. 2. Installation of can damage the electronic control. ...

Installation Instructions (All Languages)
Page 5
...to side, then front to record the serial number for satisfactory baking results. Disconnect electrical supply cord from the power cord. Figure 1 5 30" GAS SLIDE-IN RANGE INSTALLATION INSTRUCTIONS Serial Plate Location You will not be level. For personal safety, this appliance is located as shown. Do not,... remove the third (ground) prong from wall receptacle before servicing cooktop. If there is not level, the range will find the model and serial number printed on edge of the cabinet. Cooktop sides lay directly on the serial plate. If the countertop is cabinet storage...
...to side, then front to record the serial number for satisfactory baking results. Disconnect electrical supply cord from the power cord. Figure 1 5 30" GAS SLIDE-IN RANGE INSTALLATION INSTRUCTIONS Serial Plate Location You will not be level. For personal safety, this appliance is located as shown. Do not,... remove the third (ground) prong from wall receptacle before servicing cooktop. If there is not level, the range will find the model and serial number printed on edge of the cabinet. Cooktop sides lay directly on the serial plate. If the countertop is cabinet storage...


