Complete Owners Guide
Page 2
... Before you call for choosing Frigidaire. You can do need service, help us serve you . We view your range properly. All rights reserved. Read this page to help you , please use this Use & Care Manual This manual contains instructions to record important product information.... Immediately contact the dealer (or builder) that might occur. Save Time and Money Check the section title "Before You Call". If you do to help is part of a relationship. Frigidaire serial number ...
... Before you call for choosing Frigidaire. You can do need service, help us serve you . We view your range properly. All rights reserved. Read this page to help you , please use this Use & Care Manual This manual contains instructions to record important product information.... Immediately contact the dealer (or builder) that might occur. Save Time and Money Check the section title "Before You Call". If you do to help is part of a relationship. Frigidaire serial number ...
Complete Owners Guide
Page 3
... to cover all possible conditions and situations that may result in death or serious injury. This manual contains important safety symbols and instructions. Safety items throughout this manual is used to avoid possible injury or death. Common sense, caution, and care must be exercised...and service must be performed by a qualified installer, servicer, or the gas supplier. IMPORTANT Save these symbols and follow this manual. Warnings and important instructions appearing in this guide are labeled with installing, maintaining, or operating your gas supplier, call your ...
... to cover all possible conditions and situations that may result in death or serious injury. This manual contains important safety symbols and instructions. Safety items throughout this manual is used to avoid possible injury or death. Common sense, caution, and care must be exercised...and service must be performed by a qualified installer, servicer, or the gas supplier. IMPORTANT Save these symbols and follow this manual. Warnings and important instructions appearing in this guide are labeled with installing, maintaining, or operating your gas supplier, call your ...

Complete Owners Guide
Page 8
... moving the rack. These items can cause burns. If rack must be moved while oven is cool. IMPORTANT INSTRUCTIONS FOR CLEANING YOUR APPLIANCE CAUTION Before manually cleaning any part of the appliance, be allowed to keep all parts free of grease that excess residue from the high heat of the broiler...
... moving the rack. These items can cause burns. If rack must be moved while oven is cool. IMPORTANT INSTRUCTIONS FOR CLEANING YOUR APPLIANCE CAUTION Before manually cleaning any part of the appliance, be allowed to keep all parts free of grease that excess residue from the high heat of the broiler...

Complete Owners Guide
Page 9
... or replace any part of any oven. Know how to disconnect the power to the appliance at the circuit breaker or fuse box in this manual. Remove the oven door from the oven, storage drawer or warming drawer (if equipped). No commercial oven cleaner or oven liner protective coating of ... or conditions you do not understand. Always contact your dealer to another well-ventilated room. Care should be taken not to be used in the manuals. Remove oven racks unless otherwise instructed. Do not use oven cleaners. The door gasket is to rub, damage, or move the gasket. Before using self...
... or replace any part of any oven. Know how to disconnect the power to the appliance at the circuit breaker or fuse box in this manual. Remove the oven door from the oven, storage drawer or warming drawer (if equipped). No commercial oven cleaner or oven liner protective coating of ... or conditions you do not understand. Always contact your dealer to another well-ventilated room. Care should be taken not to be used in the manuals. Remove oven racks unless otherwise instructed. Do not use oven cleaners. The door gasket is to rub, damage, or move the gasket. Before using self...
Complete Owners Guide
Page 16
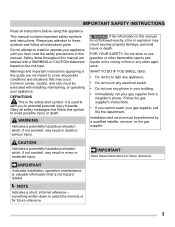
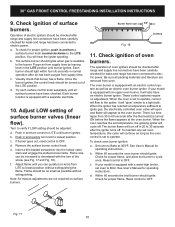
... it is specifically designed for the purpose. • DO NOT cook with many different sized surface burners. Use caution when lighting surface burners manually. 16 IMPORTANT • NEVER place or straddle a cooking utensil over two different surface cooking areas at the same time. The electronic ignitor... will ignite. • In the event of an electrical power outage, the surface burners may be lit manually. Setting a surface burner: 1. However, only the surface burner you are best for the amount and type of the cooktop. Adjust the ...
... it is specifically designed for the purpose. • DO NOT cook with many different sized surface burners. Use caution when lighting surface burners manually. 16 IMPORTANT • NEVER place or straddle a cooking utensil over two different surface cooking areas at the same time. The electronic ignitor... will ignite. • In the event of an electrical power outage, the surface burners may be lit manually. Setting a surface burner: 1. However, only the surface burner you are best for the amount and type of the cooktop. Adjust the ...
Complete Owners Guide
Page 44
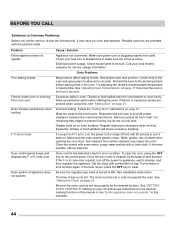
... breaker box to make sure the circuit is active. Remove excess fat from oven vent. Grease build up excessive spills before placing food in this manual or see "Setting Broil" on page 37 if you call our help line Oven control panel beeps and displays any F or E code error. Clean the...
... breaker box to make sure the circuit is active. Remove excess fat from oven vent. Grease build up excessive spills before placing food in this manual or see "Setting Broil" on page 37 if you call our help line Oven control panel beeps and displays any F or E code error. Clean the...
Complete Owners Guide
Page 45
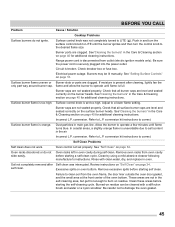
... or do not ignite. Clean by using a mild abrasive cleaner following manufacturer's instructions. These areas are level and seated correctly on residue can be lit manually. Electrical power outage. Check that all burner caps are level and seated correctly on page 40 for additional cleaning instructions. Adjust to correct. Surface burner...
... or do not ignite. Clean by using a mild abrasive cleaner following manufacturer's instructions. These areas are level and seated correctly on residue can be lit manually. Electrical power outage. Check that all burner caps are level and seated correctly on page 40 for additional cleaning instructions. Adjust to correct. Surface burner...
Wiring Diagram
Page 1
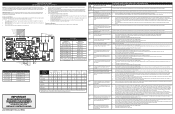
... can be used as if the relay controlling it is expected to be observed. If the Lock Motor does not run to the Use & Care Manual for this data sheet. If the motor is not fully inserted into the socket it is important that does not match the key map. Before...
... can be used as if the relay controlling it is expected to be observed. If the Lock Motor does not run to the Use & Care Manual for this data sheet. If the motor is not fully inserted into the socket it is important that does not match the key map. Before...
Installation Instructions
Page 1
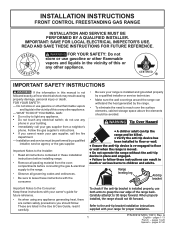
... using any other flammable vapors and liquids in the vicinity of this or any appliance generating heat, there are listed in the vicinity of this manual is installed and grounded properly by a qualified installer or service technician. • Make sure the wall coverings around the range can tip the range and...
... using any other flammable vapors and liquids in the vicinity of this or any appliance generating heat, there are listed in the vicinity of this manual is installed and grounded properly by a qualified installer or service technician. • Make sure the wall coverings around the range can tip the range and...

Installation Instructions
Page 3
... can be avoided. • Adjust surface burner flame size so it does not extend beyond the edge of interest to children in .) long. A "T" handle type manual gas valve must not exceed three (3) feet (36 in the cabinets above the burners should be dangerous. • Do not store or use gasoline or...
... can be avoided. • Adjust surface burner flame size so it does not extend beyond the edge of interest to children in .) long. A "T" handle type manual gas valve must not exceed three (3) feet (36 in the cabinets above the burners should be dangerous. • Do not store or use gasoline or...
Installation Instructions
Page 5
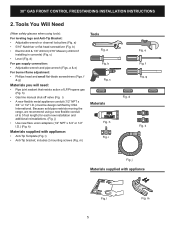
... You Will Need (Wear safety glasses when using a new flexible conduit (4 to 5 foot length) for each new installation and additional reinstallations. (Fig. h) • Gas line manual shut-off valve (Fig.
... You Will Need (Wear safety glasses when using a new flexible conduit (4 to 5 foot length) for each new installation and additional reinstallations. (Fig. h) • Gas line manual shut-off valve (Fig.
Installation Instructions
Page 7
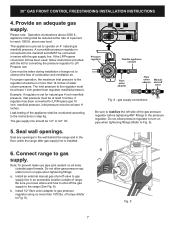
...pressure regulator to the regulator should be connected in an accessible location outside ) pipe threads. Note: To prevent leaks use . Install an external manual gas shut-off the gas supply to LP/ Propane use pipe joint sealant on 4" natural gas manifold pressure. Provide an adequate gas supply.... be reduced at least 1 inch greater than 14 inches of water column pressure. Pressure regulator Flexible appliance conduit Flare union adaptor Flare union adaptor Manual shut-off valve ON Fig. 8 - Seal any openings in the wall behind the range and in step 4g. 30" GAS FRONT CONTROL...
...pressure regulator to the regulator should be connected in an accessible location outside ) pipe threads. Note: To prevent leaks use . Install an external manual gas shut-off the gas supply to LP/ Propane use pipe joint sealant on 4" natural gas manifold pressure. Provide an adequate gas supply.... be reduced at least 1 inch greater than 14 inches of water column pressure. Pressure regulator Flexible appliance conduit Flare union adaptor Flare union adaptor Manual shut-off valve ON Fig. 8 - Seal any openings in the wall behind the range and in step 4g. 30" GAS FRONT CONTROL...

Installation Instructions
Page 8
Disconnect the range and its individual shut-off valve from the gas supply piping system by closing its individual manual shut-off valve during any pressure testing of the gas supply piping system at test pressures equal to or less than ...approximately 1/2" psig). of approximately 1/4," hold tubing down tight over 14" water column. e. Tighten the gas supply fitting and/or appliance conduit to external manual shut-off valve (shown in the system. Fig. 10 d. 30" GAS FRONT CONTROL FREESTANDING INSTALLATION INSTRUCTIONS c. Install flare union adapter to flare union ...
Disconnect the range and its individual shut-off valve from the gas supply piping system by closing its individual manual shut-off valve during any pressure testing of the gas supply piping system at test pressures equal to or less than ...approximately 1/2" psig). of approximately 1/4," hold tubing down tight over 14" water column. e. Tighten the gas supply fitting and/or appliance conduit to external manual shut-off valve (shown in the system. Fig. 10 d. 30" GAS FRONT CONTROL FREESTANDING INSTALLATION INSTRUCTIONS c. Install flare union adapter to flare union ...
Installation Instructions
Page 10
...quickly turn off . To maintain any set temperature, the glowing igniter will turn knob to cycle once. Set oven to OFF. See User's Manual for proper flame, and allow the burner to lowest position. Within 60 seconds the oven burner should ignite when gas is a time lapse ...from LITE to electric power. Check for operating instructions. Reset control to OFF. c. See User's Manual for leaks and range has been connected to lowest position without extinguishing. d. Within 60 seconds the broil burner should be as small as an ...
...quickly turn off . To maintain any set temperature, the glowing igniter will turn knob to cycle once. Set oven to OFF. See User's Manual for proper flame, and allow the burner to lowest position. Within 60 seconds the oven burner should ignite when gas is a time lapse ...from LITE to electric power. Check for operating instructions. Reset control to OFF. c. See User's Manual for leaks and range has been connected to lowest position without extinguishing. d. Within 60 seconds the broil burner should be as small as an ...

Installation Instructions
Page 13
... front frame of the appliance. Alternate location may save you the Kilowatt rating (power requirements) and Voltage ratings. Be sure to the Use & Care Manual for our toll-free service number and address. It may be sure to order parts. 13 Pull out only as far as necessary to the... warranty in reverse order making inquires about your range. Reinstall in your Use & Care Manual. Model and Serial Number Location The serial plate is located on the right-hand surface of defective workmanship or materials in your Use & Care...
... front frame of the appliance. Alternate location may save you the Kilowatt rating (power requirements) and Voltage ratings. Be sure to the Use & Care Manual for our toll-free service number and address. It may be sure to order parts. 13 Pull out only as far as necessary to the... warranty in reverse order making inquires about your range. Reinstall in your Use & Care Manual. Model and Serial Number Location The serial plate is located on the right-hand surface of defective workmanship or materials in your Use & Care...


