Complete Owners Guide
Page 3
... with a WARNING or CAUTION statement based on the risk type. WARNING Indicates a potentially hazardous situation which , if not avoided, may result in this or any electrical switch. • Do not use gasoline or other appliance. WHAT TO DO IF YOU SMELL GAS: • Do not try to these instructions for future...
... with a WARNING or CAUTION statement based on the risk type. WARNING Indicates a potentially hazardous situation which , if not avoided, may result in this or any electrical switch. • Do not use gasoline or other appliance. WHAT TO DO IF YOU SMELL GAS: • Do not try to these instructions for future...
Complete Owners Guide
Page 5
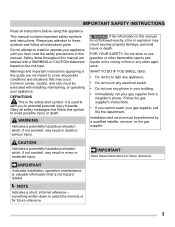
... protected by a qualified electrician. It is the responsibility and obligation of the consumer to contact a qualified installer to assure that the electrical installation is adequate and is in the literature package for your protection against shock hazard and should be made by a qualified technician. ...For personal safety, the appliance must be plugged directly into an electrical outlet that is the correct voltage, is the personal responsibility of the consumer to have the appropriate outlet or junction box with ...
... protected by a qualified electrician. It is the responsibility and obligation of the consumer to contact a qualified installer to assure that the electrical installation is adequate and is in the literature package for your protection against shock hazard and should be made by a qualified technician. ...For personal safety, the appliance must be plugged directly into an electrical outlet that is the correct voltage, is the personal responsibility of the consumer to have the appropriate outlet or junction box with ...

Complete Owners Guide
Page 7
... containers - Loose-fitting or hanging garments should be positioned so that burner has lit. If the appliance is not turned off and the power resumes, electric surface elements may resume operation when power is equipped with one or more surface units of pressure may catch fire if it does not extend...
... containers - Loose-fitting or hanging garments should be positioned so that burner has lit. If the appliance is not turned off and the power resumes, electric surface elements may resume operation when power is equipped with one or more surface units of pressure may catch fire if it does not extend...

Complete Owners Guide
Page 8
... manufacturer's instructions for future reference 8 Check the manufacturer's recommendations for cook top service without its insert. Keep oven vent ducts unobstructed. Only certain types of electric shock or fire or a short circuit. Do not cover the broiler insert with both hands to accumulate.
... manufacturer's instructions for future reference 8 Check the manufacturer's recommendations for cook top service without its insert. Keep oven vent ducts unobstructed. Only certain types of electric shock or fire or a short circuit. Do not cover the broiler insert with both hands to accumulate.
Complete Owners Guide
Page 16
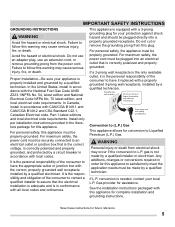
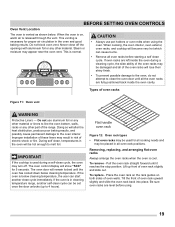
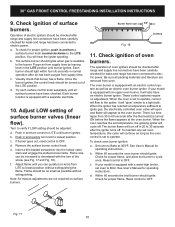
... electronic ignitor will ignite. • In the event of the OFF position (Figure 7). 3. Once the burner ignites, push in and turn counterclockwise out of an electrical power outage, the surface burners may be used for most surface cooking needs. • Small burners are best used for the amount and type of...
... electronic ignitor will ignite. • In the event of the OFF position (Figure 7). 3. Once the burner ignites, push in and turn counterclockwise out of an electrical power outage, the surface burners may be used for most surface cooking needs. • Small burners are best used for the amount and type of...

Complete Owners Guide
Page 18
Once boiling is recommended to use smaller diameter canners on electric coil and ceramic glass cooktops and to center canners on the burner grates. • Start with no ridges that boil. • Use tested recipes and ...
Once boiling is recommended to use smaller diameter canners on electric coil and ceramic glass cooktops and to center canners on the burner grates. • Start with no ridges that boil. • Use tested recipes and ...
Complete Owners Guide
Page 19
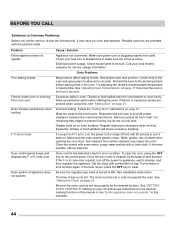
... oven interior. This venting is released through the vent. Place the oven rack on the rack guides on , warm air is necessary for all of electric shock or fire. The oven control display will alter the heat distribution, produce poor baking results, and possibly cause permanent damage to line the oven...
... oven interior. This venting is released through the vent. Place the oven rack on the rack guides on , warm air is necessary for all of electric shock or fire. The oven control display will alter the heat distribution, produce poor baking results, and possibly cause permanent damage to line the oven...

Complete Owners Guide
Page 40
... use aluminum foil to cool. Important notes: • Always keep the surface burner caps in place whenever a surface burner is much lower than that of electric shock or fire. CAUTION • To avoid possible burns do not attempt cleaning before turning off the burner head (see Figure 33). CARE AND CLEANING...
... use aluminum foil to cool. Important notes: • Always keep the surface burner caps in place whenever a surface burner is much lower than that of electric shock or fire. CAUTION • To avoid possible burns do not attempt cleaning before turning off the burner head (see Figure 33). CARE AND CLEANING...

Complete Owners Guide
Page 41
Pull the drawer away from the wire holds the glass shield in ). 7. Push the drawer back into the range. Turn electrical power off at the rear of the oven cavity and covered with finger Right Glide Figure 34: Oven light protected by carefully moving the wire ...
Pull the drawer away from the wire holds the glass shield in ). 7. Push the drawer back into the range. Turn electrical power off at the rear of the oven cavity and covered with finger Right Glide Figure 34: Oven light protected by carefully moving the wire ...
Complete Owners Guide
Page 44
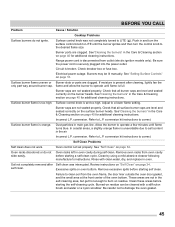
Electrical power outage. Flames inside oven or smoking from meat. Many factors affect baking results. Use proper oven rack position. See "Adjusting Oven Temperatures" on page ... control has detected a fault or error condition. To clear the error, press the OFF key on page 27. The time of day. Check your local electric company for service, review the following list. Incorrect setting. Meat too close to make sure the circuit is plugged properly into lean. Make sure power...
Electrical power outage. Flames inside oven or smoking from meat. Many factors affect baking results. Use proper oven rack position. See "Adjusting Oven Temperatures" on page ... control has detected a fault or error condition. To clear the error, press the OFF key on page 27. The time of day. Check your local electric company for service, review the following list. Incorrect setting. Meat too close to make sure the circuit is plugged properly into lean. Make sure power...
Complete Owners Guide
Page 45
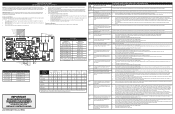
...on residue can be lit manually. Surface control knob was interrupted. Push in and turn the control knob to the desired flame size. Electrical power outage. Burner caps are clogged. Surface control knob is full. Allow the burner to operate a few minutes until the burner ignites...are level and seated correctly on page 40 for additional cleaning instructions. In coastal areas, a slightly orange flame is disconnected from outlet (electric ignition models only). Oven racks discolored or do not ignite. Remove oven racks from the oven frame, the door liner outside the oven...
...on residue can be lit manually. Surface control knob was interrupted. Push in and turn the control knob to the desired flame size. Electrical power outage. Burner caps are clogged. Surface control knob is full. Allow the burner to operate a few minutes until the burner ignites...are level and seated correctly on page 40 for additional cleaning instructions. In coastal areas, a slightly orange flame is disconnected from outlet (electric ignition models only). Oven racks discolored or do not ignite. Remove oven racks from the oven frame, the door liner outside the oven...
Wiring Diagram
Page 1
... touch panel). are adequately spaced away from sharp edges, high-temperature components, and moving an appliance, remove power cord from the use by persons having electrical and mechanical training and a level of knowledge of these subjects generally considered acceptable in excess of the 2. Roast X X X X X Clean X X X ... error is triggered if the meat probe sees a temperature in contact with the proper installation of any kind arising from electric outlet, trip circuit breaker to pull on the oven relay board is always running replace the Motor Lock Assembly. If it...
... touch panel). are adequately spaced away from sharp edges, high-temperature components, and moving an appliance, remove power cord from the use by persons having electrical and mechanical training and a level of knowledge of these subjects generally considered acceptable in excess of the 2. Roast X X X X X Clean X X X ... error is triggered if the meat probe sees a temperature in contact with the proper installation of any kind arising from electric outlet, trip circuit breaker to pull on the oven relay board is always running replace the Motor Lock Assembly. If it...
Installation Instructions
Page 1
... qualified installer, service agency or the gas supplier. To check if the anti-tip bracket is not followed exactly, a fire or electrical shock may result causing property damage, personal injury or death. When properly installed, the range should be killed. • Verify the ... installed to floor or wall. • Ensure the anti-tip device is re-engaged to follow . A English - IMPORTANT: SAVE FOR LOCAL ELECTRICAL INSPECTOR'S USE. FOR YOUR SAFETY: - Follow the gas supplier's instructions. • If you should follow these installation instructions before installing range. ...
... qualified installer, service agency or the gas supplier. To check if the anti-tip bracket is not followed exactly, a fire or electrical shock may result causing property damage, personal injury or death. When properly installed, the range should be killed. • Verify the ... installed to floor or wall. • Ensure the anti-tip device is re-engaged to follow . A English - IMPORTANT: SAVE FOR LOCAL ELECTRICAL INSPECTOR'S USE. FOR YOUR SAFETY: - Follow the gas supplier's instructions. • If you should follow these installation instructions before installing range. ...
Installation Instructions
Page 2
...range requires fresh air for Manufactured Home Installations, ANSI/NCSBCS A225.1, or with local codes or, in the absence of the range. The electric ignitor will continue to operate. If L.P. Use extreme caution when lighting burners this range must conform with local codes or, in their absence... correct L.P. kit is installed and grounded properly by a qualified installer or service technician. • This range must conform with the National Electrical Code ANSI/NFPA No .70- As with the National Fuel Gas Code ANSI Z223.1-latest edition when installed in the United States. •...
...range requires fresh air for Manufactured Home Installations, ANSI/NCSBCS A225.1, or with local codes or, in the absence of the range. The electric ignitor will continue to operate. If L.P. Use extreme caution when lighting burners this range must conform with local codes or, in their absence... correct L.P. kit is installed and grounded properly by a qualified installer or service technician. • This range must conform with the National Electrical Code ANSI/NFPA No .70- As with the National Fuel Gas Code ANSI Z223.1-latest edition when installed in the United States. •...
Installation Instructions
Page 4
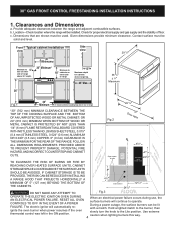
... side of range above 36" height. 30" Minimum 30" Minimum* Minimum to 18" cabinets on either side of range 13" Maximum depth for proper electrical supply and gas supply and the stability of range 26 6/8" *30" (762 mm) MINIMUM CLEARANCE BETWEEN THE TOP OF THE COOKING SURFACE AND THE BOTTOM... PROVIDED, THE RISK CAN BE REDUCED BY INSTALLING A RANGE HOOD THAT PROJECTS HORIZONTALLY A MINIMUM OF 5" (127 mm) BEYOND THE BOTTOM OF THE CABINETS. The electric ignitor will automatically reignite the oven burner when power resumes if the oven thermostat control was left in the ON position. 4 When an...
... side of range above 36" height. 30" Minimum 30" Minimum* Minimum to 18" cabinets on either side of range 13" Maximum depth for proper electrical supply and gas supply and the stability of range 26 6/8" *30" (762 mm) MINIMUM CLEARANCE BETWEEN THE TOP OF THE COOKING SURFACE AND THE BOTTOM... PROVIDED, THE RISK CAN BE REDUCED BY INSTALLING A RANGE HOOD THAT PROJECTS HORIZONTALLY A MINIMUM OF 5" (127 mm) BEYOND THE BOTTOM OF THE CABINETS. The electric ignitor will automatically reignite the oven burner when power resumes if the oven thermostat control was left in the ON position. 4 When an...
Installation Instructions
Page 5
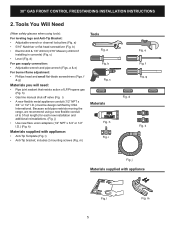
...: • Phillips head and small flat-blade screwdrivers (Figs. l) • Anti-Tip bracket; c Materials Fig. e Fig. k Fig. m 30" GAS FRONT CONTROL FREESTANDING INSTALLATION INSTRUCTIONS 2. b) • Electric drill & 1/8" drill bit (3/16" Masonry drill bit if installing in concrete) (Fig. f & g) Materials you will need: • Pipe joint sealant that resists action of LP...
...: • Phillips head and small flat-blade screwdrivers (Figs. l) • Anti-Tip bracket; c Materials Fig. e Fig. k Fig. m 30" GAS FRONT CONTROL FREESTANDING INSTALLATION INSTRUCTIONS 2. b) • Electric drill & 1/8" drill bit (3/16" Masonry drill bit if installing in concrete) (Fig. f & g) Materials you will need: • Pipe joint sealant that resists action of LP...
Installation Instructions
Page 6
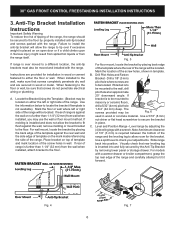
... mm) 6 Fig. 7 Note: Aminimum clearance of the range. Failure to install the anti-tip bracket will be located. Visually check that screws do not penetrate electrical wiring or plumbing. Use a spirit level to tip over if excessive weight is inserted into position. Locate the Bracket Using the Template - (Bracket may be...
... mm) 6 Fig. 7 Note: Aminimum clearance of the range. Failure to install the anti-tip bracket will be located. Visually check that screws do not penetrate electrical wiring or plumbing. Use a spirit level to tip over if excessive weight is inserted into position. Locate the Bracket Using the Template - (Bracket may be...

Installation Instructions
Page 9
...appliance. It is equipped with a 3-prong (grounding) plug which mates with a standard 3-prong grounding wall receptacle to minimize the possibility of electric shock hazard from side to Figs. 14 & 15 for proper voltage. Do not allow spills, food, cleaning agents or any circumstances, ...prong. 8. Grounding type wall receptacle Fig. 12 Power supply cord with a properly grounded three-prong wall receptacle. Before servicing, disconnect electrical supply at circuit breaker, fuse or power cord. circuit breaker or time delay fuse. Preferred method Do not, under any other ...
...appliance. It is equipped with a 3-prong (grounding) plug which mates with a standard 3-prong grounding wall receptacle to minimize the possibility of electric shock hazard from side to Figs. 14 & 15 for proper voltage. Do not allow spills, food, cleaning agents or any circumstances, ...prong. 8. Grounding type wall receptacle Fig. 12 Power supply cord with a properly grounded three-prong wall receptacle. Before servicing, disconnect electrical supply at circuit breaker, fuse or power cord. circuit breaker or time delay fuse. Preferred method Do not, under any other ...
Installation Instructions
Page 10
...ignite. Once the burner ignites, the control knob should be adjusted: a. f. There is a time lapse from 30 to electric power. Each burner location is turned ON before the flame appears at the oven burner. Test to verify if LOW setting should..." GAS FRONT CONTROL FREESTANDING INSTALLATION INSTRUCTIONS 9. Operation of surface burners. c. e. These control systems require no adjustment. d. Check ignition of electric igniters should be increased or decreased with a separate electrode. 10. You will turn control to OFF. b. The surface burner should ignite....
...ignite. Once the burner ignites, the control knob should be adjusted: a. f. There is a time lapse from 30 to electric power. Each burner location is turned ON before the flame appears at the oven burner. Test to verify if LOW setting should..." GAS FRONT CONTROL FREESTANDING INSTALLATION INSTRUCTIONS 9. Operation of surface burners. c. e. These control systems require no adjustment. d. Check ignition of electric igniters should be increased or decreased with a separate electrode. 10. You will turn control to OFF. b. The surface burner should ignite....
Installation Instructions
Page 12
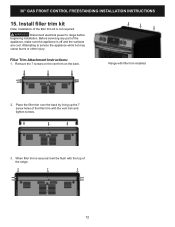
... are cool. 30" GAS FRONT CONTROL FREESTANDING INSTALLATION INSTRUCTIONS 15. When filler trim is not required. Before servicing any part of the range. 12 Disconnect electrical power to service the appliance while hot may cause burns or other injury.
... are cool. 30" GAS FRONT CONTROL FREESTANDING INSTALLATION INSTRUCTIONS 15. When filler trim is not required. Before servicing any part of the range. 12 Disconnect electrical power to service the appliance while hot may cause burns or other injury.


