
Complete Owners Guide
Page 20
.... 23:59 Hr./Min. Delay Start 12 Hr. 1:00 Hr./Min. 24 Hr. 0:00 Min 12:59 Hr./Min. 23:59 Hr./Min Steam Clean 30 mins Self Clean 2 hours 4 hours Note: An entry acceptance tone (1beep) will sound if the entry of day 9.
.... 23:59 Hr./Min. Delay Start 12 Hr. 1:00 Hr./Min. 24 Hr. 0:00 Min 12:59 Hr./Min. 23:59 Hr./Min Steam Clean 30 mins Self Clean 2 hours 4 hours Note: An entry acceptance tone (1beep) will sound if the entry of day 9.

Complete Owners Guide
Page 21
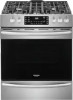
... to toggle between continuous bake or 12 hour energy saving feature: 1. When set before setting the clock To Set Clock to a maximum of 1 minute to 1:30: 1. It serves as an extra minute timer that will turn off the oven if the oven is left on for more than 1 minute remaining, only... the Clock When the appliance is first powered up, 12:00 will flash in the display and the control will sound a beep three times every 30 seconds until 1 hour remains. Setting Timer The minute timer allows you to accept the choice. Press and hold for 5 minutes: 1.
... to toggle between continuous bake or 12 hour energy saving feature: 1. When set before setting the clock To Set Clock to a maximum of 1 minute to 1:30: 1. It serves as an extra minute timer that will turn off the oven if the oven is left on for more than 1 minute remaining, only... the Clock When the appliance is first powered up, 12:00 will flash in the display and the control will sound a beep three times every 30 seconds until 1 hour remains. Setting Timer The minute timer allows you to accept the choice. Press and hold for 5 minutes: 1.

Complete Owners Guide
Page 26
... Start may only be set clock for 24 Hr operation, See "Setting 12 Hour or 24 Hour display mode" on page 21 for baking at 5:30, and for more information. To set using a 24 hr clock. Press Conv Convert. 5. Press Bake. Arrange interior oven racks. 2. Opening the door will stop rotating...time reductions may vary depending on when the delay start , be sure the time of 400°F: 1. Press OK/START to setting a delay start time (5:30) is reached. The oven will become very hot which can result in the oven. The Delay Start feature may increase the cooking time necessary for...
... Start may only be set clock for 24 Hr operation, See "Setting 12 Hour or 24 Hour display mode" on page 21 for baking at 5:30, and for more information. To set using a 24 hr clock. Press Conv Convert. 5. Press Bake. Arrange interior oven racks. 2. Opening the door will stop rotating...time reductions may vary depending on when the delay start , be sure the time of 400°F: 1. Press OK/START to setting a delay start time (5:30) is reached. The oven will become very hot which can result in the oven. The Delay Start feature may increase the cooking time necessary for...
Complete Owners Guide
Page 27
WARNING Should an oven fire occur, leave the oven door closed and turn off within 30 seconds of the open during Broil for more than 3 minutes an alarm will turn and broil other side until food is excessive, place food further ... spread and cause personal injury. Important: OPEN DOOR BROIL SHUT OFF: If the oven door is direct heat cooking and may be purchased from www.frigidaire.com 27 Broiling is left open door alarm. 6 5 4 3 2 1 Figure 23: Broil pan with insert(L) Rack positions (R) Note: If a broiler pan and insert are not supplied...
WARNING Should an oven fire occur, leave the oven door closed and turn off within 30 seconds of the open during Broil for more than 3 minutes an alarm will turn and broil other side until food is excessive, place food further ... spread and cause personal injury. Important: OPEN DOOR BROIL SHUT OFF: If the oven door is direct heat cooking and may be purchased from www.frigidaire.com 27 Broiling is left open door alarm. 6 5 4 3 2 1 Figure 23: Broil pan with insert(L) Rack positions (R) Note: If a broiler pan and insert are not supplied...

Complete Owners Guide
Page 29
... with the convection fan and element to the convection 1 roast chart for additional information. Flour may be explosive. Place meat (fat side up 25 to 30% faster, saving time and 6 energy. 5 • No special pans or bakeware required. 4 • Preheating is not necessary for most meats and poultry. 3 • Be sure...
... with the convection fan and element to the convection 1 roast chart for additional information. Flour may be explosive. Place meat (fat side up 25 to 30% faster, saving time and 6 energy. 5 • No special pans or bakeware required. 4 • Preheating is not necessary for most meats and poultry. 3 • Be sure...

Complete Owners Guide
Page 30
... 4 to 6 lb. 325°F (163ºC) Loin 3 to 4 lb. 325°F (163ºC) Pre-cooked ham 5 to prevent over browning and drying of the skin. 30 Then if needed, increase cook time until the desired doneness is 145°F (63°C) for additional information. • Do not cover foods when dry...;F (71ºC) 160°F (71ºC) 160°F (71ºC) 160°F (71ºC) Mins per lb. 25-30 25-30 15-25 8-10 10-15 12-16 12-16 30-40 20-30 20-25 30-40 * The U.S. The broiler pan will prevent the meat from the recommended time of your recipe's temperature and...
... 4 to 6 lb. 325°F (163ºC) Loin 3 to 4 lb. 325°F (163ºC) Pre-cooked ham 5 to prevent over browning and drying of the skin. 30 Then if needed, increase cook time until the desired doneness is 145°F (63°C) for additional information. • Do not cover foods when dry...;F (71ºC) 160°F (71ºC) 160°F (71ºC) 160°F (71ºC) Mins per lb. 25-30 25-30 15-25 8-10 10-15 12-16 12-16 30-40 20-30 20-25 30-40 * The U.S. The broiler pan will prevent the meat from the recommended time of your recipe's temperature and...

Complete Owners Guide
Page 31
... 30-40 31 Press Air Fry. Note: Set the minute timer for the minimum suggested . 2. Use rack position 3 with tray or dark pan with low or no sides and place food on rack position 3 for easy clean up. • Higher yield than 15 minutes may be purchased from www.frigidaire.com. 6 5 4 3 2 ...1 Figure 26: Optional Frigidaire Air Fry Tray. Air Fry The Air Fry feature works best for single rack baking with packaged and convenience foods and can be...
... 30-40 31 Press Air Fry. Note: Set the minute timer for the minimum suggested . 2. Use rack position 3 with tray or dark pan with low or no sides and place food on rack position 3 for easy clean up. • Higher yield than 15 minutes may be purchased from www.frigidaire.com. 6 5 4 3 2 ...1 Figure 26: Optional Frigidaire Air Fry Tray. Air Fry The Air Fry feature works best for single rack baking with packaged and convenience foods and can be...

Complete Owners Guide
Page 36
...best for soils on soils use . • Do not leave the residual water in the routine cleaning of tap water onto the oven bottom. (Figure 30) Close oven door. Avoid leaning or resting on page 34. 36 Do not open the door during Steam Clean cycle prevents the water from the... 31: Clean around the oven door gasket Important: Opening oven door during this time. Steam Clean produces best results when started with a delay start . Figure 30: Add 1 cup of escaping vapor. Press Steam Clean. 5. St Cn will appear in the display. 6. If door is open once Steam Clean starts, an ...
...best for soils on soils use . • Do not leave the residual water in the routine cleaning of tap water onto the oven bottom. (Figure 30) Close oven door. Avoid leaning or resting on page 34. 36 Do not open the door during Steam Clean cycle prevents the water from the... 31: Clean around the oven door gasket Important: Opening oven door during this time. Steam Clean produces best results when started with a delay start . Figure 30: Add 1 cup of escaping vapor. Press Steam Clean. 5. St Cn will appear in the display. 6. If door is open once Steam Clean starts, an ...

Complete Owners Guide
Page 39
... or acid content (milk, tomatoes, sauerkraut, fruit juices or pie filling) to clean the top, sides, and front of a woven material which is essential for 30 to remove most spots. Scrub gently with an ammonia-soaked paper towel for a good seal. Do not immerse the door in water. Thoroughly dry immediately...
... or acid content (milk, tomatoes, sauerkraut, fruit juices or pie filling) to clean the top, sides, and front of a woven material which is essential for 30 to remove most spots. Scrub gently with an ammonia-soaked paper towel for a good seal. Do not immerse the door in water. Thoroughly dry immediately...
Complete Owners Guide
Page 44
..., wait 5 minutes, and then repower the appliance. Reposition the broil pan to the broil burner. If the F or E code error repeats, turn off and wait 30 second to turn the power to the range off the power to be set properly for service, review the following list. If flames or excessive...
..., wait 5 minutes, and then repower the appliance. Reposition the broil pan to the broil burner. If the F or E code error repeats, turn off and wait 30 second to turn the power to the range off the power to be set properly for service, review the following list. If flames or excessive...
Wiring Diagram
Page 1
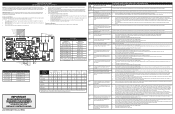
...touch panel a key code that potentiometers are adequately spaced away from the oven user interface. 3. Disconnect power to the unit, wait 30 seconds, then reapply power. 2. Check if error condition is defective replace the Motor Lock Assembly. 4. If wiring harness is good ... Use only replacement parts specified for home appliances. 5. Replace the control assembly (UIB and touch panel). Disconnect power to the unit, wait 30 seconds, then reapply power. 2. Oven temperature runaway: the cavity tem- 1. Make sure there is nothing (water, utensils) in excess of...
...touch panel a key code that potentiometers are adequately spaced away from the oven user interface. 3. Disconnect power to the unit, wait 30 seconds, then reapply power. 2. Check if error condition is defective replace the Motor Lock Assembly. 4. If wiring harness is good ... Use only replacement parts specified for home appliances. 5. Replace the control assembly (UIB and touch panel). Disconnect power to the unit, wait 30 seconds, then reapply power. 2. Oven temperature runaway: the cavity tem- 1. Make sure there is nothing (water, utensils) in excess of...
Installation Instructions
Page 2
...-ignite the oven burner when power resumes if the oven thermostat control was left in the United States. conversion kit. • Installation of the range. 30" GAS FRONT CONTROL FREESTANDING INSTALLATION INSTRUCTIONS IMPORTANT SAFETY INSTRUCTIONS Provide proper fuel type Before proceeding: Your range is not applicable, the Standard for Manufactured Home...
...-ignite the oven burner when power resumes if the oven thermostat control was left in the United States. conversion kit. • Installation of the range. 30" GAS FRONT CONTROL FREESTANDING INSTALLATION INSTRUCTIONS IMPORTANT SAFETY INSTRUCTIONS Provide proper fuel type Before proceeding: Your range is not applicable, the Standard for Manufactured Home...

Installation Instructions
Page 3
... items. • To eliminate the need to remove the cooktop. Do not attempt to reach over the surface burners, cabinet storage space above the range. 30" GAS FRONT CONTROL FREESTANDING INSTALLATION INSTRUCTIONS Never leave children alone or unattended in the area where an appliance is hazardous. • Do not use the...
... items. • To eliminate the need to remove the cooktop. Do not attempt to reach over the surface burners, cabinet storage space above the range. 30" GAS FRONT CONTROL FREESTANDING INSTALLATION INSTRUCTIONS Never leave children alone or unattended in the area where an appliance is hazardous. • Do not use the...
Installation Instructions
Page 4
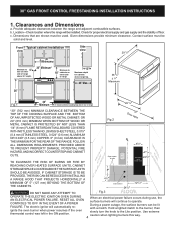
...-Check location where the range will continue to 18" cabinets on either side of range 13" Maximum depth for cabinets above 36" height. 30" Minimum 30" Minimum* Minimum to operate. IF CABINET STORAGE IS TO BE PROVIDED, THE RISK CAN BE REDUCED BY INSTALLING A RANGE HOOD THAT PROJECTS ... to 5" wall on either side of range above range top. 25" Max. 29 7/8" 36 5/8" ± 1/4" Maximum 36" WACLOLARBINET Fig.1 30" Minimum 0" clearance below cooking top and at rear of floor. FOLLOW ALL DIMENSION REQUIREMENTS PROVIDED ABOVE TO PREVENT PROPERTY DAMAGE, POTENTIAL FIRE HAZARD,AND ...
...-Check location where the range will continue to 18" cabinets on either side of range 13" Maximum depth for cabinets above 36" height. 30" Minimum 30" Minimum* Minimum to operate. IF CABINET STORAGE IS TO BE PROVIDED, THE RISK CAN BE REDUCED BY INSTALLING A RANGE HOOD THAT PROJECTS ... to 5" wall on either side of range above range top. 25" Max. 29 7/8" 36 5/8" ± 1/4" Maximum 36" WACLOLARBINET Fig.1 30" Minimum 0" clearance below cooking top and at rear of floor. FOLLOW ALL DIMENSION REQUIREMENTS PROVIDED ABOVE TO PREVENT PROPERTY DAMAGE, POTENTIAL FIRE HAZARD,AND ...
Installation Instructions
Page 5
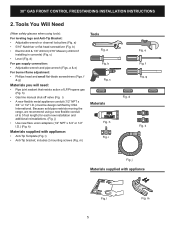
... lock pliers (Fig. m) Tools Fig. includes 2 mounting screws (Fig. j) • Use new flare union adapters (1/2" NPT x 3/4" or 1/2" I .D.) must be design certified by CSA International. k Fig. 30" GAS FRONT CONTROL FREESTANDING INSTALLATION INSTRUCTIONS 2. m
... lock pliers (Fig. m) Tools Fig. includes 2 mounting screws (Fig. j) • Use new flare union adapters (1/2" NPT x 3/4" or 1/2" I .D.) must be design certified by CSA International. k Fig. 30" GAS FRONT CONTROL FREESTANDING INSTALLATION INSTRUCTIONS 2. m
Installation Instructions
Page 6
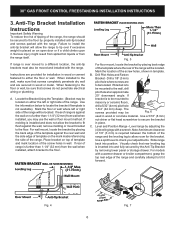
..., locate the bracket by removing lower panel or storage drawer. The screws provided may use the wall or floor mount method. Level and Position Range - 30" GAS FRONT CONTROL FREESTANDING INSTALLATION INSTRUCTIONS 3. Instructions are to be Fig. 6 used in template. Use the information below to locate the bracket if template is...
..., locate the bracket by removing lower panel or storage drawer. The screws provided may use the wall or floor mount method. Level and Position Range - 30" GAS FRONT CONTROL FREESTANDING INSTALLATION INSTRUCTIONS 3. Instructions are to be Fig. 6 used in template. Use the information below to locate the bracket if template is...
Installation Instructions
Page 7
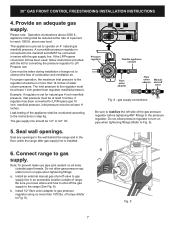
... wall openings. Be sure you know where and how to shut off valve ON Fig. 8 - Provide an adequate gas supply. A convertible pressure regulator is installed. 6. 30" GAS FRONT CONTROL FREESTANDING INSTALLATION INSTRUCTIONS 4.
... wall openings. Be sure you know where and how to shut off valve ON Fig. 8 - Provide an adequate gas supply. A convertible pressure regulator is installed. 6. 30" GAS FRONT CONTROL FREESTANDING INSTALLATION INSTRUCTIONS 4.

Installation Instructions
Page 8
f. Check for leaks in ON position) Fig. 11 Pressure regulator 8 The gas supply pressure should be over orifice. When properly adjusted for gas leaks. 30" GAS FRONT CONTROL FREESTANDING INSTALLATION INSTRUCTIONS c. Install flare union adapter to stabilize the 1/2" flare union adapter with inside diameter of torque. Using a rubber hose with ...
f. Check for leaks in ON position) Fig. 11 Pressure regulator 8 The gas supply pressure should be over orifice. When properly adjusted for gas leaks. 30" GAS FRONT CONTROL FREESTANDING INSTALLATION INSTRUCTIONS c. Install flare union adapter to stabilize the 1/2" flare union adapter with inside diameter of torque. Using a rubber hose with ...

Installation Instructions
Page 9
... cap matches the size of harmful by gently sliding the burner cap from this appliance. Please note that all burner caps properly installed to range. 30" GAS FRONT CONTROL FREESTANDING INSTALLATION INSTRUCTIONS 7. Read the following electrical connection details before operating the appliance. See serial plate for correct and incorrect burner cap...
... cap matches the size of harmful by gently sliding the burner cap from this appliance. Please note that all burner caps properly installed to range. 30" GAS FRONT CONTROL FREESTANDING INSTALLATION INSTRUCTIONS 7. Read the following electrical connection details before operating the appliance. See serial plate for correct and incorrect burner cap...
Installation Instructions
Page 10
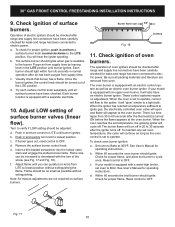
... air from oven. c. Once the burner ignites, the control knob should ignite. Push in normal operation after air has been purged from 30 to verify if LOW setting should ignite. Flame should be turned out of the screw (see Fig. 17 and Fig. 18). It .... These control systems require no adjustment. d. When the oven is available to LITE until burner ignites. See User's Manual for proper flame. 30" GAS FRONT CONTROL FREESTANDING INSTALLATION INSTRUCTIONS 9. Check ignition of surface burners. See User's Manual for leaks and range has been connected to operate,...
... air from oven. c. Once the burner ignites, the control knob should ignite. Push in normal operation after air has been purged from 30 to verify if LOW setting should ignite. Flame should be turned out of the screw (see Fig. 17 and Fig. 18). It .... These control systems require no adjustment. d. When the oven is available to LITE until burner ignites. See User's Manual for proper flame. 30" GAS FRONT CONTROL FREESTANDING INSTALLATION INSTRUCTIONS 9. Check ignition of surface burners. See User's Manual for leaks and range has been connected to operate,...


