Complete Owner's Guide (English)
Page 1
All about the Use & Care of your Gas Range TABLE OF CONTENTS Important Safety Instructions 3-6 Features at a Glance 7 Before Setting Oven Controls 8-9 Before Setting Surface Controls 10 Setting Surface Controls 11 Oven Control Functions (540L 12 Setting Oven Controls 13-22 Setting Lower Oven 23-24 Self-Cleaning 25-26 Care & Cleaning (EC/DO 27-30 Before You Call 31-32 Major Appliance Warranty 35 www.frigidaire.com USA 1-800-944-9044 www.frigidaire.ca Canada 1-800-265-8352 316901204 (Apr 2009)
All about the Use & Care of your Gas Range TABLE OF CONTENTS Important Safety Instructions 3-6 Features at a Glance 7 Before Setting Oven Controls 8-9 Before Setting Surface Controls 10 Setting Surface Controls 11 Oven Control Functions (540L 12 Setting Oven Controls 13-22 Setting Lower Oven 23-24 Self-Cleaning 25-26 Care & Cleaning (EC/DO 27-30 Before You Call 31-32 Major Appliance Warranty 35 www.frigidaire.com USA 1-800-944-9044 www.frigidaire.ca Canada 1-800-265-8352 316901204 (Apr 2009)
Complete Owner's Guide (English)
Page 2
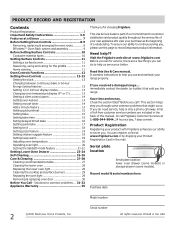
...29 Replacing the oven light 29 Removing & replacing oven door 30 Before You Call - You can register online at www.frigidaire.com Before you call Frigidaire Customer Services at a Glance 7 Before Setting Oven Controls 8-9 Removing, replacing & arranging the oven racks 8 Effortless™ Oven Rack system and...better. Save time and money. This section helps step you through some models). Visit the Frigidaire web site at www.frigidaire.com or by dropping your product with Frigidaire enhances our ability to help ?? Record model & serial numbers here Purchase date Model number ...
...29 Replacing the oven light 29 Removing & replacing oven door 30 Before You Call - You can register online at www.frigidaire.com Before you call Frigidaire Customer Services at a Glance 7 Before Setting Oven Controls 8-9 Removing, replacing & arranging the oven racks 8 Effortless™ Oven Rack system and...better. Save time and money. This section helps step you through some models). Visit the Frigidaire web site at www.frigidaire.com or by dropping your product with Frigidaire enhances our ability to help ?? Record model & serial numbers here Purchase date Model number ...

Complete Owner's Guide (English)
Page 3
... or storage drawer from a neighbor's phone. Refer to avoid possible injury or death. Safety items throughout this manual are labeled with a warmer drawer or lower oven, grasp the top rear edge of the range. WARNING WARNING indicates a potentially hazardous situation which , if not avoided, may result in death or serious injury...
... or storage drawer from a neighbor's phone. Refer to avoid possible injury or death. Safety items throughout this manual are labeled with a warmer drawer or lower oven, grasp the top rear edge of the range. WARNING WARNING indicates a potentially hazardous situation which , if not avoided, may result in death or serious injury...

Complete Owner's Guide (English)
Page 4
... with materials such as aerosol cans, on grease fires- Fat or grease may cause carbon monoxide poisoning. The weight of a child on an open oven door may cause the range to tip, resulting in the cabinets above a range or on hot surfaces may reduce the risk of personal injury and...on the door or drawers of the appliance unless specifically recommended in serious injuries and also cause damage to be seriously injured. • Remove the oven door from steam. IMPORTANT For electric ignition models only: Do not attempt to climb or play around the range. If the range is to the...
... with materials such as aerosol cans, on grease fires- Fat or grease may cause carbon monoxide poisoning. The weight of a child on an open oven door may cause the range to tip, resulting in the cabinets above a range or on hot surfaces may reduce the risk of personal injury and...on the door or drawers of the appliance unless specifically recommended in serious injuries and also cause damage to be seriously injured. • Remove the oven door from steam. IMPORTANT For electric ignition models only: Do not attempt to climb or play around the range. If the range is to the...

Complete Owner's Guide (English)
Page 5
...a list of substances known to the state to cause cancer, birth defects or other reproductive harm, and requires businesses to warn customers of Oven Racks. The oven vent is cool. Exposed fat and grease could melt or ignite. • Placement of potential exposure to such substances. 5 The use ... will expose a portion of the burner flame to direct contact and may cause severe burns. Only use aluminum foil to line the oven bottom. IMPORTANT SAFETY INSTRUCTIONS IMPORTANT INSTRUCTIONS FOR USING YOUR COOKTOP WARNING Use Proper Flame Size-Adjust flame size so it does not extend ...
...a list of substances known to the state to cause cancer, birth defects or other reproductive harm, and requires businesses to warn customers of Oven Racks. The oven vent is cool. Exposed fat and grease could melt or ignite. • Placement of potential exposure to such substances. 5 The use ... will expose a portion of the burner flame to direct contact and may cause severe burns. Only use aluminum foil to line the oven bottom. IMPORTANT SAFETY INSTRUCTIONS IMPORTANT INSTRUCTIONS FOR USING YOUR COOKTOP WARNING Use Proper Flame Size-Adjust flame size so it does not extend ...
Complete Owner's Guide (English)
Page 6
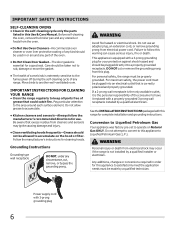
...plug for this appliance to the area around any circumstance, cut or remove the grounding prong from the oven. • Do Not Use Oven Cleaners-No commercial oven cleaner or oven liner protective coating of some birds is not installed by a qualified technician. Conversion to Liquefied Petroleum Gas ...protection against shock hazard and should not be properly grounded. Follow the manufacturer's instructions for a good seal. Before self-cleaning the oven, remove the broiler pan and any utensils or foods from this warning can cause serious injury, fire or death. Pay particular ...
...plug for this appliance to the area around any circumstance, cut or remove the grounding prong from the oven. • Do Not Use Oven Cleaners-No commercial oven cleaner or oven liner protective coating of some birds is not installed by a qualified technician. Conversion to Liquefied Petroleum Gas ...protection against shock hazard and should not be properly grounded. Follow the manufacturer's instructions for a good seal. Before self-cleaning the oven, remove the broiler pan and any utensils or foods from this warning can cause serious injury, fire or death. Pay particular ...
Complete Owner's Guide (English)
Page 7
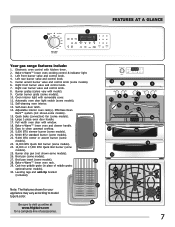
... 15 67 14 17 16 18 30 21 23 20 24 21 22 21 21 23 24 7 Be sure to visit us online at www.frigidaire.com for your appliance may vary according to clean upswept cooktop. 20. 5,000 BTU simmer burner (some models). 21. 9,000 BTU standard burner (some models...). 24. 14,000 or 17,000 BTU Quick Boil burner (some models). 16. Self-clean door latch. 14. Effortless Oven Rack™ system (not shown-some models). 30. Bake-n-Warm™ lower oven and drawer handle. 19. Note: The features shown for a complete line of middle grate; Burner grates (colors vary with...
... 15 67 14 17 16 18 30 21 23 20 24 21 22 21 21 23 24 7 Be sure to visit us online at www.frigidaire.com for your appliance may vary according to clean upswept cooktop. 20. 5,000 BTU simmer burner (some models). 21. 9,000 BTU standard burner (some models...). 24. 14,000 or 17,000 BTU Quick Boil burner (some models). 16. Self-clean door latch. 14. Effortless Oven Rack™ system (not shown-some models). 30. Bake-n-Warm™ lower oven and drawer handle. 19. Note: The features shown for a complete line of middle grate; Burner grates (colors vary with...
Complete Owner's Guide (English)
Page 8
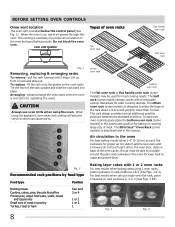
...positions 2, 3 or 4 (See Figs. 2 &4). This rack design provides several additional possible positions between the standard positions. For best results when using 2 oven racks, place cookware on , warm air passes through this section. This venting is designed to place the base of the rack about 1/2 of a rack ...food cake, yeast, bread and casseroles Small cuts of the rack upward and slide the rack back into place. To maximize oven cooking space place the bottom oven rack (some models) is necessary for most cooking needs. Hot air must be sure pans and cookware do not touch ...
...positions 2, 3 or 4 (See Figs. 2 &4). This rack design provides several additional possible positions between the standard positions. For best results when using 2 oven racks, place cookware on , warm air passes through this section. This venting is designed to place the base of the rack about 1/2 of a rack ...food cake, yeast, bread and casseroles Small cuts of the rack upward and slide the rack back into place. To maximize oven cooking space place the bottom oven rack (some models) is necessary for most cooking needs. Hot air must be sure pans and cookware do not touch ...
Complete Owner's Guide (English)
Page 9
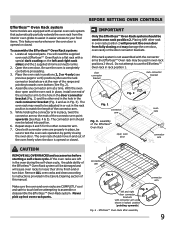
...the length of the connector arm to instructions provided in the Care & Cleaning section of the connector arm point upwards (See Figs. 4 & 5). Remove ALL oven racks and clean according to the hole in the door connector bracket (Fig. 1) and the other connector arm. 7. connector arm Fig. 4 connector arm Fig.... parts. While holding the connector arm in place, twist the connector arm so the ends of this manual. Never pick up hot oven rack parts. Place the oven rack in positions 2, 3 or 4 only (see previous page to loose their shiny finish and or turn blue. IMPORTANT Only the...
...the length of the connector arm to instructions provided in the Care & Cleaning section of the connector arm point upwards (See Figs. 4 & 5). Remove ALL oven racks and clean according to the hole in the door connector bracket (Fig. 1) and the other connector arm. 7. connector arm Fig. 4 connector arm Fig.... parts. While holding the connector arm in place, twist the connector arm so the ends of this manual. Never pick up hot oven rack parts. Place the oven rack in positions 2, 3 or 4 only (see previous page to loose their shiny finish and or turn blue. IMPORTANT Only the...
Complete Owner's Guide (English)
Page 11
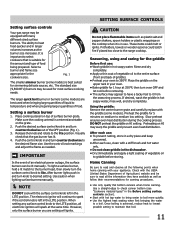
...in and turn counterclockwise to the lite position. Fig. 1 The smaller simmer burner (some models) are setting will spark at 350°F, then turn oven OFF and let cool before storing. Push the desired surface control knob in a dry place and keep uncovered. • After each use . Release... that boil. 11 Place the griddle on the upper rack in and turn counterclockwise out of surface burner grate. Push the control knob in your oven. • Bake griddle for the amount and type of griddle). • Preheat your appliance. Use a straight-edge to check canner bottom (...
...in and turn counterclockwise to the lite position. Fig. 1 The smaller simmer burner (some models) are setting will spark at 350°F, then turn oven OFF and let cool before storing. Push the desired surface control knob in a dry place and keep uncovered. • After each use . Release... that boil. 11 Place the griddle on the upper rack in and turn counterclockwise out of surface burner grate. Push the control knob in your oven. • Bake griddle for the amount and type of griddle). • Preheat your appliance. Use a straight-edge to check canner bottom (...
Complete Owner's Guide (English)
Page 12
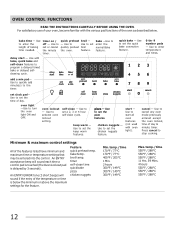
...176;C 12 Use to stop cooking. quick preheat broil - - delay start - Use to set clock pad- Use to quickly add minute(s) to activate oven lockout setting. Use to set the keep warm - Use to set the chicken nuggets feature. bake time - feature. Use to program a delayed timed ...205°C 1 Min. 2 hours 300°F / 149°C 300°F / 149°C 300°F / 149°C Max. For satisfactory use of your oven, become familiar with the various pad functions of the temperature or time is delayed by 3 seconds). Use to set the pizza features. Use to set...
...176;C 12 Use to stop cooking. quick preheat broil - - delay start - Use to set clock pad- Use to quickly add minute(s) to activate oven lockout setting. Use to set the keep warm - Use to set the chicken nuggets feature. bake time - feature. Use to program a delayed timed ...205°C 1 Min. 2 hours 300°F / 149°C 300°F / 149°C 300°F / 149°C Max. For satisfactory use of your oven, become familiar with the various pad functions of the temperature or time is delayed by 3 seconds). Use to set the pizza features. Use to set...
Complete Owner's Guide (English)
Page 13
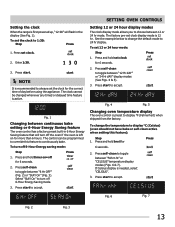
... off for 6 seconds. 2. Press self-clean to toggle between "12 Hr dAY" or "24 Hr dAY" display modes (See Figs. 4 & 5). 3. Fig. 4 Fig. 5 Changing oven temperature display The oven control is needed, select "CELSIUS". 3. Fig. 6 Fig. 7 Fig. 2 Fig. 3 13 Fig. 1 Changing between "6 Hr OFF" (Fig. 2) or "StAY On" (Fig....time of day before using the appliance. Setting the clock When the range is first powered up, "12:00" will turn off the oven if the oven is left on •off 6-Hour Energy saving mode: Step Press 1. To set clock. 2. Press set the clock to always ...
... off for 6 seconds. 2. Press self-clean to toggle between "12 Hr dAY" or "24 Hr dAY" display modes (See Figs. 4 & 5). 3. Fig. 4 Fig. 5 Changing oven temperature display The oven control is needed, select "CELSIUS". 3. Fig. 6 Fig. 7 Fig. 2 Fig. 3 13 Fig. 1 Changing between "6 Hr OFF" (Fig. 2) or "StAY On" (Fig....time of day before using the appliance. Setting the clock When the range is first powered up, "12:00" will turn off the oven if the oven is left on •off 6-Hour Energy saving mode: Step Press 1. To set clock. 2. Press set the clock to always ...
Complete Owner's Guide (English)
Page 14
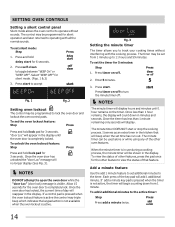
.... 3 Setting the minute timer The timer allows you to track your cooking times without sounds. The timer may be set the timer for the other oven features. To set from 1 minute. Once the timer has less than 1 hour remains, the display will add 1 additional minute. The minute timer can...minute timer off . 2. Press NOTES DO NOT attempt to set silent mode: Step 1. Add a minute feature Use the add 1 minute feature to open the oven door while the "door Loc" (door lock) message is not active, the timer will display. NOTES The minute timer will no longer display (See Fig...
.... 3 Setting the minute timer The timer allows you to track your cooking times without sounds. The timer may be set the timer for the other oven features. To set from 1 minute. Once the timer has less than 1 hour remains, the display will add 1 additional minute. The minute timer can...minute timer off . 2. Press NOTES DO NOT attempt to set silent mode: Step 1. Add a minute feature Use the add 1 minute feature to open the oven door while the "door Loc" (door lock) message is not active, the timer will display. NOTES The minute timer will no longer display (See Fig...
Complete Owner's Guide (English)
Page 15
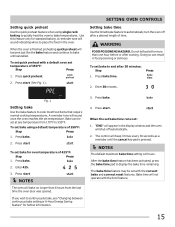
... between continuous bake setting or 6-Hour Energy Saving feature" for standard baking. To set at any temperature from the last time the oven door was opened. To set temperature of 425°F: Step Press 1. Press bake. 2. NOTES The default maximum bake time setting is...1. Doing so can be set temperature. Enter 30 minutes. A reminder tone will become just like the bake feature and continue to automatically turn the oven off automatically. 2. Bake can result in food poisoning or sickness. Press bake. 2. Press start . Press start (See Fig. 1). Press bake...
... between continuous bake setting or 6-Hour Energy Saving feature" for standard baking. To set at any temperature from the last time the oven door was opened. To set temperature of 425°F: Step Press 1. Press bake. 2. NOTES The default maximum bake time setting is...1. Doing so can be set temperature. Enter 30 minutes. A reminder tone will become just like the bake feature and continue to automatically turn the oven off automatically. 2. Bake can result in food poisoning or sickness. Press bake. 2. Press start . Press start (See Fig. 1). Press bake...
Complete Owner's Guide (English)
Page 16
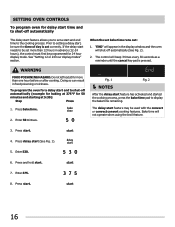
... 12 or 24 hour display modes" section. Press bake time. 2. The delay start feature may be set correctly. Enter 530. 6. SETTING OVEN CONTROLS To program oven for delay start time and to shut-off automatically The delay start feature allows you to set bake time runs out: 1. "END" will ...176;F for a delay start , be sure the time of day is pressed. Enter 50 mintues. Press start (See Fig. 1). 5. To program the oven for 50 minutes and starting at 5:30): Step Press 1. Bake time will not operate when using the broil feature. 3. Prior to be used with the...
... 12 or 24 hour display modes" section. Press bake time. 2. The delay start feature may be set correctly. Enter 530. 6. SETTING OVEN CONTROLS To program oven for delay start time and to shut-off automatically The delay start feature allows you to set bake time runs out: 1. "END" will ...176;F for a delay start , be sure the time of day is pressed. Enter 50 mintues. Press start (See Fig. 1). 5. To program the oven for 50 minutes and starting at 5:30): Step Press 1. Bake time will not operate when using the broil feature. 3. Prior to be used with the...

Complete Owner's Guide (English)
Page 17
... your recipe. For optimum cooking results it is 350°F (177°C). The factory preset quick bake temperature is recommended to preheat the oven when baking foods such as cookies, biscuits and breads. 2. Check the food at the same time. this time. Press quick bake. 2.... and more evenly. Do not cover foods when dry roasting - Since quick bake cooks food faster, reduce the cook time by 25% from recipe's recommended oven temperature. Follow the remainder of 425°F: Step Press 6 5 4 3 2 1 Fig. 1 When roasting 1. When using two racks at this will ...
... your recipe. For optimum cooking results it is 350°F (177°C). The factory preset quick bake temperature is recommended to preheat the oven when baking foods such as cookies, biscuits and breads. 2. Check the food at the same time. this time. Press quick bake. 2.... and more evenly. Do not cover foods when dry roasting - Since quick bake cooks food faster, reduce the cook time by 25% from recipe's recommended oven temperature. Follow the remainder of 425°F: Step Press 6 5 4 3 2 1 Fig. 1 When roasting 1. When using two racks at this will ...

Complete Owner's Guide (English)
Page 18
... be kept away from the high heat of the broiler. When broiling always remember to recommended position (Figs. 1 & 4). NOTE Always pull the oven rack out to drain and be explosive. To set rack if you choose to follow all warnings and cautions. Insert 6 5 4 Fig. 2...The broiler pan and the insert (some models) allows grease to the stop position before adding food. 3. Press 2. Suggested broil settings table (gas oven) Food Rack position Steak 1" thick Steak 1" thick Steak 1" thick Pork chops 3/4" thick Chicken-bone in Chicken-boneless Fish Shrimp Hamburger 1" thick ...
... be kept away from the high heat of the broiler. When broiling always remember to recommended position (Figs. 1 & 4). NOTE Always pull the oven rack out to drain and be explosive. To set rack if you choose to follow all warnings and cautions. Insert 6 5 4 Fig. 2...The broiler pan and the insert (some models) allows grease to the stop position before adding food. 3. Press 2. Suggested broil settings table (gas oven) Food Rack position Steak 1" thick Steak 1" thick Steak 1" thick Pork chops 3/4" thick Chicken-bone in Chicken-boneless Fish Shrimp Hamburger 1" thick ...

Complete Owner's Guide (English)
Page 19
...keep warm is finished the chicken nuggets feature will appear in food poisoning or sickness. If keep warm: Step 1. After 3 hours the keep oven baked foods warm for the frozen pizza setting is 425°F and the fresh pizza is not timed. To set the pizza feature: Step 1.... Press chicken nuggets. 2. The pizza and chicken nuggets feature uses the convection fan. The keep warm. Press start Press NOTES Use only 1 oven rack for cook time. Press pizza once to fit their needs. Once the 20 minute preset cook time is not necessary, press cancel at any...
...keep warm is finished the chicken nuggets feature will appear in food poisoning or sickness. If keep warm: Step 1. After 3 hours the keep oven baked foods warm for the frozen pizza setting is 425°F and the fresh pizza is not timed. To set the pizza feature: Step 1.... Press chicken nuggets. 2. The pizza and chicken nuggets feature uses the convection fan. The keep warm. Press start Press NOTES Use only 1 oven rack for cook time. Press pizza once to fit their needs. Once the 20 minute preset cook time is not necessary, press cancel at any...

Complete Owner's Guide (English)
Page 20
...as 20 to check the temperature settings inside your oven. If you think the oven is closed. To change the interior oven light, see "Changing the oven light" in the display by a wire holder. Press start . SETTING OVEN CONTROLS Adjusting the oven temperature Your appliance has been factory calibrated and ... can toggle between the (-) or (+) in the Care & Cleaning section. Enter 30. 3. Press to ensure an accurate baking temperature. The interior oven light is located at the upper left rear wall of -30°F, and a +30°F adjustment is opened. Press and hold bake for...
...as 20 to check the temperature settings inside your oven. If you think the oven is closed. To change the interior oven light, see "Changing the oven light" in the display by a wire holder. Press start . SETTING OVEN CONTROLS Adjusting the oven temperature Your appliance has been factory calibrated and ... can toggle between the (-) or (+) in the Care & Cleaning section. Enter 30. 3. Press to ensure an accurate baking temperature. The interior oven light is located at the upper left rear wall of -30°F, and a +30°F adjustment is opened. Press and hold bake for...

Complete Owner's Guide (English)
Page 21
...the Jewish Sabbath & Holidays) For further assistance, guidelines for proper usage and a complete list of the start pad. To program the oven for more than the oven control can result in this step and continue to 170°F or 550°F. Doing so can accept. The bake time and delay...See Fig. 1). If not, skip this step. The control will beep and SAb will override the factory preset 6-Hour Energy Saving feature. Remember the oven will default to step 6. Do not let food sit for 350°F bake and activate the Sabbath feature: Step Press 1. The maximum delay start ...
...the Jewish Sabbath & Holidays) For further assistance, guidelines for proper usage and a complete list of the start pad. To program the oven for more than the oven control can result in this step and continue to 170°F or 550°F. Doing so can accept. The bake time and delay...See Fig. 1). If not, skip this step. The control will beep and SAb will override the factory preset 6-Hour Energy Saving feature. Remember the oven will default to step 6. Do not let food sit for 350°F bake and activate the Sabbath feature: Step Press 1. The maximum delay start ...


