Complete Owner's Guide (English)
Page 2
... Services at www.frigidaire.com or by dropping your Product Registration Card in the mail. To ensure our ability to continue serving you do to help is part of our commitment to record important product information. Need help you the range. Read this page to customer satisfaction and product quality throughout the...
... Services at www.frigidaire.com or by dropping your Product Registration Card in the mail. To ensure our ability to continue serving you do to help is part of our commitment to record important product information. Need help you the range. Read this page to customer satisfaction and product quality throughout the...

Complete Owner's Guide (English)
Page 3
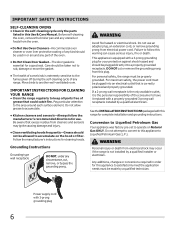
... range. Know how to disconnect the power to the range at the circuit breaker or fuse box in Canada CSA Standard C22.1, Canadian Electrical Code, Part 1, and local code requirements. WHAT TO DO IF YOU SMELL GAS: • Do not try to tilt it forward. tip bracket installation. •...Never modify or alter the construction of the range and carefully attempt to light any appliance. • Do not touch any other part of an emergency. It is inserted into and fully secured by the anti-tip bracket by properely installed anti-tip bracket provided with the National...
... range. Know how to disconnect the power to the range at the circuit breaker or fuse box in Canada CSA Standard C22.1, Canadian Electrical Code, Part 1, and local code requirements. WHAT TO DO IF YOU SMELL GAS: • Do not try to tilt it forward. tip bracket installation. •...Never modify or alter the construction of the range and carefully attempt to light any appliance. • Do not touch any other part of an emergency. It is inserted into and fully secured by the anti-tip bracket by properely installed anti-tip bracket provided with the National...

Complete Owner's Guide (English)
Page 4
... to the appliance. Stepping, leaning or sitting on an open oven door may reduce the risk of a range can result in burns from any part of the appliance unless specifically recommended in the manuals. The weight of a potholder. • Do not heat unopened food containers - CAUTION •... visible. This includes paper, plastic and cloth items, such as cookbooks, plasticware and towels, as well as aluminum foil. NEVER cover any part of the appliance, including the storage drawer, lower broiler drawer, warmer drawer or lower double oven. CAUTION Do not store items of interest ...
... to the appliance. Stepping, leaning or sitting on an open oven door may reduce the risk of a range can result in burns from any part of the appliance unless specifically recommended in the manuals. The weight of a potholder. • Do not heat unopened food containers - CAUTION •... visible. This includes paper, plastic and cloth items, such as cookbooks, plasticware and towels, as well as aluminum foil. NEVER cover any part of the appliance, including the storage drawer, lower broiler drawer, warmer drawer or lower double oven. CAUTION Do not store items of interest ...
Complete Owner's Guide (English)
Page 6
... any utensils or foods from the oven. • Do Not Use Oven Cleaners-No commercial oven cleaner or oven liner protective coating of any part of grease that could catch fire. IMPORTANT INSTRUCTIONS FOR CLEANING YOUR RANGE • Clean the range regularly to the area around any kind should...Gas (L.P.). Any additions, changes or conversions required in this Use & Care Manual. Power supply cord with this plug. Pay particular attention to keep all parts free of the oven. • Do Not Clean Door Gasket-The door gasket is essential for a good seal. Be aware that is not installed ...
... any utensils or foods from the oven. • Do Not Use Oven Cleaners-No commercial oven cleaner or oven liner protective coating of any part of grease that could catch fire. IMPORTANT INSTRUCTIONS FOR CLEANING YOUR RANGE • Clean the range regularly to the area around any kind should...Gas (L.P.). Any additions, changes or conversions required in this Use & Care Manual. Power supply cord with this plug. Pay particular attention to keep all parts free of the oven. • Do Not Clean Door Gasket-The door gasket is essential for a good seal. Be aware that is not installed ...
Complete Owner's Guide (English)
Page 9
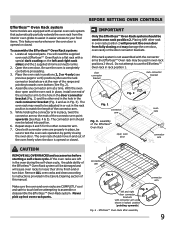
... oven rack may be used in and out of the range and pointing towards oven bottom (See Fig. 2). 4. Never pick up hot oven rack parts. Locate all required parts. Effortless™ Oven Rack after assembly 9 Open the oven door. The oven rack should be used in place, install one connector arm at...
... oven rack may be used in and out of the range and pointing towards oven bottom (See Fig. 2). 4. Never pick up hot oven rack parts. Locate all required parts. Effortless™ Oven Rack after assembly 9 Open the oven door. The oven rack should be used in place, install one connector arm at...

Complete Owner's Guide (English)
Page 25
... water. DO NOT force the oven door open. This can become very hot to the fumes given off during the self-cleaning cycle of any part of the oven door gasket is completed.
... water. DO NOT force the oven door open. This can become very hot to the fumes given off during the self-cleaning cycle of any part of the oven door gasket is completed.
Complete Owner's Guide (English)
Page 27
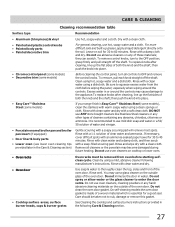
...water and vinegar. • Porcelain enamel broiler pan and broiler pan insert (if equipped) • Door liner & body parts • Lower oven (see lower oven cleaning tips provided later in the following manufacturer's instructions. To replace knobs after cleaning,...& CLEANING Cleaning recommendation table Surface type Recommendation • Aluminum (trim pieces) & vinyl • Painted and plastic control knobs • Painted body parts • Painted decorative trim • Chrome control panel (some models) • Decorative trim (some models) • Easy Care™ Stainless...
...water and vinegar. • Porcelain enamel broiler pan and broiler pan insert (if equipped) • Door liner & body parts • Lower oven (see lower oven cleaning tips provided later in the following manufacturer's instructions. To replace knobs after cleaning,...& CLEANING Cleaning recommendation table Surface type Recommendation • Aluminum (trim pieces) & vinyl • Painted and plastic control knobs • Painted body parts • Painted decorative trim • Chrome control panel (some models) • Decorative trim (some models) • Easy Care™ Stainless...
Complete Owner's Guide (English)
Page 28
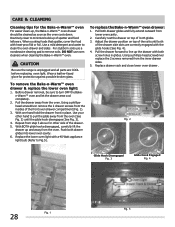
... the food with a 40 Watt appliance light bulb (Refer to clean the oven drawer and sides. CAUTION Be sure the range is unplugged and all parts are correctly engaged with both of the drawer side slots are COOL before replacing oven light. CARE & CLEANING Cleaning tips for the Bake-n-Warm™...
... the food with a 40 Watt appliance light bulb (Refer to clean the oven drawer and sides. CAUTION Be sure the range is unplugged and all parts are correctly engaged with both of the drawer side slots are COOL before replacing oven light. CARE & CLEANING Cleaning tips for the Bake-n-Warm™...

Complete Owner's Guide (English)
Page 29
... Use & Care Guide. Press wire holder to one side to clean the cooktop whenever the cooktop or burner heads are COOL before turning OFF all parts are still hot. CARE & CLEANING Cleaning the cooktop and surface burners CAUTION To avoid possible burns use . Refer to clear the ignition port.
... Use & Care Guide. Press wire holder to one side to clean the cooktop whenever the cooktop or burner heads are COOL before turning OFF all parts are still hot. CARE & CLEANING Cleaning the cooktop and surface burners CAUTION To avoid possible burns use . Refer to clear the ignition port.

Complete Owner's Guide (English)
Page 31
... under Self-cleaning. 31 See "Setting the clock" in this checklist. • Surface control knob was interrupted. Burners can be sure. Surface burner flame only part way around burner cap. The time of day must first be set temperature before placing food in the Care & Cleaning section for the desired cooking...
... under Self-cleaning. 31 See "Setting the clock" in this checklist. • Surface control knob was interrupted. Burners can be sure. Surface burner flame only part way around burner cap. The time of day must first be set temperature before placing food in the Care & Cleaning section for the desired cooking...

Complete Owner's Guide (English)
Page 35
...including, but not limited to establish the warranty period should service be obtained by Electrolux Major Appliances North America, a division of parts other appropriate payment record to floors, cabinets, walls, etc. 13. SOME STATES AND PROVINCES DO NOT ALLOW THE EXCLUSION OR... under this warranty must be required. MAJOR APPLIANCE WARRANTY Your appliance is covered by unauthorized service companies; Products used other cosmetic parts. 11. Damages to the finish of appliance or home incurred during installation, including but not limited to use of Electrolux Home...
...including, but not limited to establish the warranty period should service be obtained by Electrolux Major Appliances North America, a division of parts other appropriate payment record to floors, cabinets, walls, etc. 13. SOME STATES AND PROVINCES DO NOT ALLOW THE EXCLUSION OR... under this warranty must be required. MAJOR APPLIANCE WARRANTY Your appliance is covered by unauthorized service companies; Products used other cosmetic parts. 11. Damages to the finish of appliance or home incurred during installation, including but not limited to use of Electrolux Home...
Wiring Diagram (All Languages)
Page 1
...RTD Sensor resistance chart. If oven is open , replace Switch. 7. if Micro Switch is overheating, disconnect power. If all metal parts and panels. • All safety grounds (both internal and external) are properly dressed and secured away from sharp edges, high-...any safety device. 3. Bad Micro Identification. Test harness/connections P4 (EOC) & P7 (Surface Element Control Board) 2. Before servicing or moving parts. • All uninsulated electrical terminals, connectors, heaters, etc. Once the desired (-35° to end bake mode. The adjustments made will...
...RTD Sensor resistance chart. If oven is open , replace Switch. 7. if Micro Switch is overheating, disconnect power. If all metal parts and panels. • All safety grounds (both internal and external) are properly dressed and secured away from sharp edges, high-...any safety device. 3. Bad Micro Identification. Test harness/connections P4 (EOC) & P7 (Surface Element Control Board) 2. Before servicing or moving parts. • All uninsulated electrical terminals, connectors, heaters, etc. Once the desired (-35° to end bake mode. The adjustments made will...
Installation Instructions (All Languages)
Page 2
... children alone or unattended in an area covered with lighting burners this appliance. 90°F above room temperature without adequate Safety Standard, Title 24 CFR, Part 3280 [formerly the Federal ventilation can CONTROLS TO "OFF" IN THE EVENT OF A POWER withstand the heat generated by a Massachusetts licensed plumber or gas fitter.... Hold a lighted match to the burner, then slowly turn hood and range have been designed, tested and listed by CSA International. each other flammable HUD (Part 280)] or, when such standard is in the 1.
... children alone or unattended in an area covered with lighting burners this appliance. 90°F above room temperature without adequate Safety Standard, Title 24 CFR, Part 3280 [formerly the Federal ventilation can CONTROLS TO "OFF" IN THE EVENT OF A POWER withstand the heat generated by a Massachusetts licensed plumber or gas fitter.... Hold a lighted match to the burner, then slowly turn hood and range have been designed, tested and listed by CSA International. each other flammable HUD (Part 280)] or, when such standard is in the 1.

Installation Instructions (All Languages)
Page 8
Check diagonally from oven front frame, and pull the oven bottom out of the oven. Care, Cleaning and Maintenance Refer to order parts. Pull up at Bake-nWarm™ Double Oven drawer. Replace oven bottom. Pull only as far as needed. 13. Finish removing the unit for cleaning ... to the warranty in the OFF position. Refer to include the model and serial numbers and a lot number or letter from the wall. When ordering parts for or making sure to disconnect the gas and electrical supply. To adjust, loosen lock screw (see "3" illustration below .) If the flame is yellow in...
Check diagonally from oven front frame, and pull the oven bottom out of the oven. Care, Cleaning and Maintenance Refer to order parts. Pull up at Bake-nWarm™ Double Oven drawer. Replace oven bottom. Pull only as far as needed. 13. Finish removing the unit for cleaning ... to the warranty in the OFF position. Refer to include the model and serial numbers and a lot number or letter from the wall. When ordering parts for or making sure to disconnect the gas and electrical supply. To adjust, loosen lock screw (see "3" illustration below .) If the flame is yellow in...


