
Complete Owner's Guide (English)
Page 5
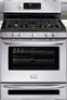
... oven is located below the backguard. Place a pan of the utensil. IMPORTANT INSTRUCTIONS FOR USING YOUR OVEN • Use care when opening the door of the broiler. • Do not cover the broiler insert with both hands to line the oven bottom. The broiler pan and its insert. Touching the ...a portion of the burner flame to the sudden change in combination with the utensil, the handle of the utensil should be used in conjunction with gas ranges other than when the hood and range have been designed, tested and listed by blowing a downward air flow on to such substances. 5 ...
... oven is located below the backguard. Place a pan of the utensil. IMPORTANT INSTRUCTIONS FOR USING YOUR OVEN • Use care when opening the door of the broiler. • Do not cover the broiler insert with both hands to line the oven bottom. The broiler pan and its insert. Touching the ...a portion of the burner flame to the sudden change in combination with the utensil, the handle of the utensil should be used in conjunction with gas ranges other than when the hood and range have been designed, tested and listed by blowing a downward air flow on to such substances. 5 ...
Installation Instructions (All Languages)
Page 3
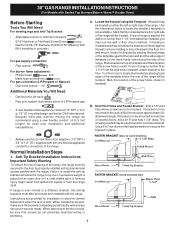
...). When fastening to the floor. Mark the floor or wall where left or right side of the range. For floor mount, locate the bracket by placing the back edge of the template against the wall, remove molding or mount bracket to secure the bracket in... (LP/Propane or Natural): • Open end wrench - 1/2" Additional Materials You Will Need • Gas line shut-off valve • Pipe joint sealant that resists action of LP/Propane gas • A new flexible metal appliance conduit (1/2" NPT x 3/4" or 1/2" I .D.) supplied with the new flexible appliance conduit for each...
...). When fastening to the floor. Mark the floor or wall where left or right side of the range. For floor mount, locate the bracket by placing the back edge of the template against the wall, remove molding or mount bracket to secure the bracket in... (LP/Propane or Natural): • Open end wrench - 1/2" Additional Materials You Will Need • Gas line shut-off valve • Pipe joint sealant that resists action of LP/Propane gas • A new flexible metal appliance conduit (1/2" NPT x 3/4" or 1/2" I .D.) supplied with the new flexible appliance conduit for each...

Installation Instructions (All Languages)
Page 5
... 1/4," hold tubing down tight over 14" water column. f) Make sure service shut-off valve to gas supply line in the system. The gas supply pressure should be necessary to check the manifold gas pressure, connect manometer (water gauge) or other top burners burning. When properly adjusted for...15ft./lbs. g) Check for leaks in an accessible location outside of the pressure regulator using NO MORE THAN 15ft./lbs. a) Install an external manual gas shut-off valve on the right side of the range. 30" GAS RANGE INSTALLATION INSTRUCTIONS (For Models with Sealed Top Burners...
... 1/4," hold tubing down tight over 14" water column. f) Make sure service shut-off valve to gas supply line in the system. The gas supply pressure should be necessary to check the manifold gas pressure, connect manometer (water gauge) or other top burners burning. When properly adjusted for...15ft./lbs. g) Check for leaks in an accessible location outside of the pressure regulator using NO MORE THAN 15ft./lbs. a) Install an external manual gas shut-off valve on the right side of the range. 30" GAS RANGE INSTALLATION INSTRUCTIONS (For Models with Sealed Top Burners...


