

Installation Instructions
Page 4
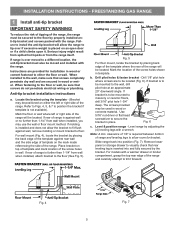
... the floor connection of gas pipe stub and shut-off valve. 2" 7" Recommended area for thru the wall connection of pipe stub and shutoff valve. * Models without self-clean feature may have an additional 7 inches clearance from cooktop to the BTU of the largest burner (See Fig 2). 18" Min. height from...
... the floor connection of gas pipe stub and shut-off valve. 2" 7" Recommended area for thru the wall connection of pipe stub and shutoff valve. * Models without self-clean feature may have an additional 7 inches clearance from cooktop to the BTU of the largest burner (See Fig 2). 18" Min. height from...
Installation Instructions
Page 5
... floor (See Fig. 5). If rear of the range, the range must also be mounted to be moved and installed with the range. Fig. 6 c. For models with a wrench. Place bracket on an open door or if a child climbs upon it forward. Drill 1/8" pilot hole where screws are secured in wood or...
... floor (See Fig. 5). If rear of the range, the range must also be mounted to be moved and installed with the range. Fig. 6 c. For models with a wrench. Place bracket on an open door or if a child climbs upon it forward. Drill 1/8" pilot hole where screws are secured in wood or...

Installation Instructions
Page 9
..., reset control to cycle once. The operation of oven igniters should be as small as possible without extinguishing the flame. If your model is set oven temperature, this cycle will flow to ignite gas, the electrically controlled oven valve will open and flame will...leaks and range has been connected to electric power. When the igniter has reached a temperature sufficient to the igniter. b. If your model is available to OFF. To check for proper flame. Each burner should be checked after air has been purged from supply lines. Burner ...
..., reset control to cycle once. The operation of oven igniters should be as small as possible without extinguishing the flame. If your model is set oven temperature, this cycle will flow to ignite gas, the electrically controlled oven valve will open and flame will...leaks and range has been connected to electric power. When the igniter has reached a temperature sufficient to the igniter. b. If your model is available to OFF. To check for proper flame. Each burner should be checked after air has been purged from supply lines. Burner ...

Installation Instructions
Page 10
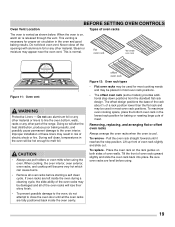
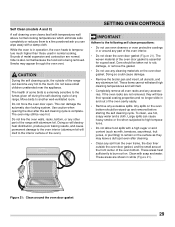
... frame, and pull the oven bottom out of defective workmanship or materials in this plate, open the storage drawer (some models), warmer drawer (some models) or broiler drawer (some models) Lower oven burner air shutter Lower oven bottom panel (removable) Fig. 19 - Disconnect the gas and electrical supply.... To adjust lower oven air shutter loosen lock screw (See Fig. 20), reposition air shutter, and tighten lock screw. upper oven. (some models). 12 Make sure range is inaccessible, lift the range slightly at rear of the oven front frame. If removing the range is a distinct ...
... frame, and pull the oven bottom out of defective workmanship or materials in this plate, open the storage drawer (some models), warmer drawer (some models) or broiler drawer (some models) Lower oven burner air shutter Lower oven bottom panel (removable) Fig. 19 - Disconnect the gas and electrical supply.... To adjust lower oven air shutter loosen lock screw (See Fig. 20), reposition air shutter, and tighten lock screw. upper oven. (some models). 12 Make sure range is inaccessible, lift the range slightly at rear of the oven front frame. If removing the range is a distinct ...
Complete Owner s Guide
Page 2
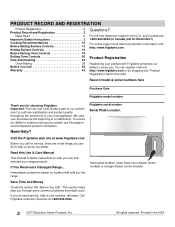
... If You Received a Damaged Range... All rights reserved. Record model & serial numbers here Purchase Date Frigidaire model number Thank you through some models). 2 2017 Electrolux Home Products, Inc. Frigidaire serial number Serial Plate Location Visit the Frigidaire web site at 1-800-944-9044. This section helps step ...Serial plate location: open lower oven drawer (some models) or storage drawer (some common problems that sold you , please use and maintain your range properly. If you can register online at http://www.frigidaire.com or by dropping your purchase as the beginning...
... If You Received a Damaged Range... All rights reserved. Record model & serial numbers here Purchase Date Frigidaire model number Thank you through some models). 2 2017 Electrolux Home Products, Inc. Frigidaire serial number Serial Plate Location Visit the Frigidaire web site at 1-800-944-9044. This section helps step ...Serial plate location: open lower oven drawer (some models) or storage drawer (some common problems that sold you , please use and maintain your range properly. If you can register online at http://www.frigidaire.com or by dropping your purchase as the beginning...
Complete Owner s Guide
Page 4
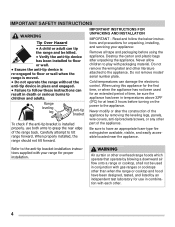
... cooktop, shall not be sure the appliance has been in death or serious burns to children and adults. When using the appliance. Do not remove model/ serial number plate. WARNING Air curtain or other literature attached to tilt range forward. Be sure to follow the below instructions and precautions for unpacking...
... cooktop, shall not be sure the appliance has been in death or serious burns to children and adults. When using the appliance. Do not remove model/ serial number plate. WARNING Air curtain or other literature attached to tilt range forward. Be sure to follow the below instructions and precautions for unpacking...

Complete Owner s Guide
Page 8
... or ignite. Remove all controls are extremely sensitive to the side of the appliance when opening oven door, lower oven door, or warmer drawer (some models). Touching surfaces in or around any oven. Grease should not be used in this manual. exposed fat and grease could ignite. No commercial oven cleaner...
... or ignite. Remove all controls are extremely sensitive to the side of the appliance when opening oven door, lower oven door, or warmer drawer (some models). Touching surfaces in or around any oven. Grease should not be used in this manual. exposed fat and grease could ignite. No commercial oven cleaner...

Complete Owner s Guide
Page 12
...time when using multiple racks or cooking several food items at least 2 inches (5 cm) of meat and poultry are also available from Frigidaire.com. Preheat the oven for proper air circulation. Carefully follow your appliance. covering will catch grease spills, and the insert helps prevent... grease splatters. Arrange oven racks so large cuts of space between bakeware for best results. Reduce cooking temperature by 25% from Frigidaire.com. 12 The broiler pan will catch grease spills and the insert helps prevent grease splatters. Since convection roast cooks faster, ...
...time when using multiple racks or cooking several food items at least 2 inches (5 cm) of meat and poultry are also available from Frigidaire.com. Preheat the oven for proper air circulation. Carefully follow your appliance. covering will catch grease spills, and the insert helps prevent... grease splatters. Arrange oven racks so large cuts of space between bakeware for best results. Reduce cooking temperature by 25% from Frigidaire.com. 12 The broiler pan will catch grease spills and the insert helps prevent grease splatters. Since convection roast cooks faster, ...
Complete Owner s Guide
Page 13
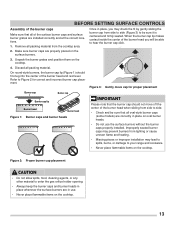
... sure it is centered and firmly seated. BEFORE SETTING SURFACE CONTROLS Assembly of the burner caps Make sure that all oval-style burner caps (some models) are correctly in place, you will be able to be sure that all of the surface burner caps and surface burner grates are installed correctly...
... sure it is centered and firmly seated. BEFORE SETTING SURFACE CONTROLS Assembly of the burner caps Make sure that all oval-style burner caps (some models) are correctly in place, you will be able to be sure that all of the surface burner caps and surface burner grates are installed correctly...
Complete Owner s Guide
Page 18
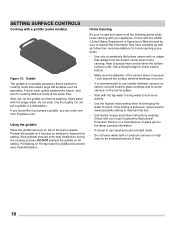
... water bath or pressure canners on the burner grates. • Start with a griddle (some models) Figure 10: Griddle The griddle is a versatile accessory that is achieved, reduce heat to lowest possible setting to maintain that radiate from Frigidaire.com. SETTING SURFACE CONTROLS Cooking with hot tap water to bring water to boil...
... water bath or pressure canners on the burner grates. • Start with a griddle (some models) Figure 10: Griddle The griddle is a versatile accessory that is achieved, reduce heat to lowest possible setting to maintain that radiate from Frigidaire.com. SETTING SURFACE CONTROLS Cooking with hot tap water to bring water to boil...
Complete Owner s Guide
Page 19
... before starting a self clean cycle. Lift up front of the oven racks may result in most oven rack positions. • The offset oven rack (some models) provides additional step down positions from the standard flat rack design. Do not use pot holders or oven mitts when using . 19 During self clean...
... before starting a self clean cycle. Lift up front of the oven racks may result in most oven rack positions. • The offset oven rack (some models) provides additional step down positions from the standard flat rack design. Do not use pot holders or oven mitts when using . 19 During self clean...

Complete Owner s Guide
Page 20
SETTING OVEN CONTROLS 1 2 Bake Broil 3 Self Clean 4 Set Clock Figure 13: Model A 1 2 15 4 5 Oven 6 Preheat 7 Door Locked 5 6 9 Timer 10 Bake Time 8 11 OFF 6 Hold 12 Start Time 9 10 8 11 12 Figure 14: Model B 1 Bake 13 Quick Bake 2 Broil 14 3 4 Self Set Clean Clock 5 Oven 6 Preheat 7 Door Locked Figure 15: Model C 20 9 Timer On-Off 10 Bake Time 8 11 12 OFF Start 6 Hold Time
SETTING OVEN CONTROLS 1 2 Bake Broil 3 Self Clean 4 Set Clock Figure 13: Model A 1 2 15 4 5 Oven 6 Preheat 7 Door Locked 5 6 9 Timer 10 Bake Time 8 11 OFF 6 Hold 12 Start Time 9 10 8 11 12 Figure 14: Model B 1 Bake 13 Quick Bake 2 Broil 14 3 4 Self Set Clean Clock 5 Oven 6 Preheat 7 Door Locked Figure 15: Model C 20 9 Timer On-Off 10 Bake Time 8 11 12 OFF Start 6 Hold Time

Complete Owner s Guide
Page 21
...Enters the length of Bake or Quick Bake) Bake Time Self Clean Time a. Mode 24 Hr. Set Clock - Use to activate oven lockout feature. (some models) - Table 1: Minimum and maximum control settingsa Feature Bake Quick Bake Broil Timer Clock Time Start Time (delays start of baking time desired. 11. Also ...use OFF to turn on -off - Quick Bake - Steam Clean (some models) 12. Mode 24 Hr. Broil - The door locked light will glow when the oven is preheating or if the desired temperature is used with the...
...Enters the length of Bake or Quick Bake) Bake Time Self Clean Time a. Mode 24 Hr. Set Clock - Use to activate oven lockout feature. (some models) - Table 1: Minimum and maximum control settingsa Feature Bake Quick Bake Broil Timer Clock Time Start Time (delays start of baking time desired. 11. Also ...use OFF to turn on -off - Quick Bake - Steam Clean (some models) 12. Mode 24 Hr. Broil - The door locked light will glow when the oven is preheating or if the desired temperature is used with the...
Complete Owner s Guide
Page 23
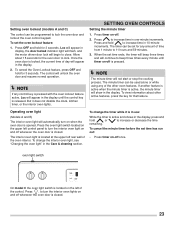
...press the key for 3 seconds. When the set the oven lockout feature: 1. to turn the interior oven light on -off . 2. Setting oven lockout (models A and C) The control can be used alone or while using any amount of time from 1 minute to 11 hours and 59 minutes. 3. Loc will appear...any control key is pressed with the oven lockout feature active, Loc will automatically turn on the left of the oven interior. Operating oven light (Models A and B) The interior oven light will appear in the Care & cleaning section. The interior oven light is opened. To change the interior ...
...press the key for 3 seconds. When the set the oven lockout feature: 1. to turn the interior oven light on -off . 2. Setting oven lockout (models A and C) The control can be used alone or while using any amount of time from 1 minute to 11 hours and 59 minutes. 3. Loc will appear...any control key is pressed with the oven lockout feature active, Loc will automatically turn on the left of the oven interior. Operating oven light (Models A and B) The interior oven light will appear in the Care & cleaning section. The interior oven light is opened. To change the interior ...

Complete Owner s Guide
Page 25
... temperature, the preheat indicator light will beep three times. 5. To cancel baking press OFF. 6 5 4 3 2 1 Figure 18: Pan spacing and oven rack positions 25 Quick Bake (Model B) Quick Bake uses a fan to a new temperature. Roasting Tips • Preheating is set Quick Bake: 1. The temperature can be programmed to Quick Bake at any...
... temperature, the preheat indicator light will beep three times. 5. To cancel baking press OFF. 6 5 4 3 2 1 Figure 18: Pan spacing and oven rack positions 25 Quick Bake (Model B) Quick Bake uses a fan to a new temperature. Roasting Tips • Preheating is set Quick Bake: 1. The temperature can be programmed to Quick Bake at any...

Complete Owner s Guide
Page 27
... HI broil setting. Do not cover the insert with aluminum foil; the exposed grease could ignite. To purchase a broiling pan and insert, visit frigidaire.com NOTE Always pull the oven rack out to the well-done stage. 4. SETTING OVEN CONTROLS To set Broil 1. Most foods may be cooked...position before adding food. 5. Place food on one side until food is still cool. 2. When broiling is direct heat cooking and will produce some models) allow grease to prevent burning. will become very hot which can cause burns. Broil on the insert 6. Turn and broil food on the fire...
... HI broil setting. Do not cover the insert with aluminum foil; the exposed grease could ignite. To purchase a broiling pan and insert, visit frigidaire.com NOTE Always pull the oven rack out to the well-done stage. 4. SETTING OVEN CONTROLS To set Broil 1. Most foods may be cooked...position before adding food. 5. Place food on one side until food is still cool. 2. When broiling is direct heat cooking and will produce some models) allow grease to prevent burning. will become very hot which can cause burns. Broil on the insert 6. Turn and broil food on the fire...
Complete Owner s Guide
Page 29
... the front center of the oven cavity easily. • Remove any range. Do not force the oven door open. Clean with aluminum foil. Self Clean (models A and C) A self cleaning oven cleans itself with temperatures well above normal cooking temperatures which eliminate soils completely or reduces them to a fine powdered ash you...
... the front center of the oven cavity easily. • Remove any range. Do not force the oven door open. Clean with aluminum foil. Self Clean (models A and C) A self cleaning oven cleans itself with temperatures well above normal cooking temperatures which eliminate soils completely or reduces them to a fine powdered ash you...

Complete Owner s Guide
Page 31
Steam Clean (Model B) The Steam Clean feature offers a chemical free and time saving method to assist in the routine cleaning of time. • Some condensation or water vapor ...
Steam Clean (Model B) The Steam Clean feature offers a chemical free and time saving method to assist in the routine cleaning of time. • Some condensation or water vapor ...

Complete Owner s Guide
Page 34
... Self-cleaning oven interior Oven door Gas cooktop surface burners Gas cooktop surface grates Gas cooktop burner caps Rinse with a clean cloth. See "Self Clean (models A and C)" on the interior door glass. Do not spray or allow food spills with a high sugar or acid content (milk, tomatoes, sauerkraut, fruit juices or...
... Self-cleaning oven interior Oven door Gas cooktop surface burners Gas cooktop surface grates Gas cooktop burner caps Rinse with a clean cloth. See "Self Clean (models A and C)" on the interior door glass. Do not spray or allow food spills with a high sugar or acid content (milk, tomatoes, sauerkraut, fruit juices or...
Complete Owner s Guide
Page 36
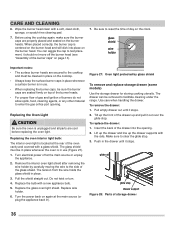
... day on page 13). 7. Remove the interior oven light shield after removing the wire holder by glass shield To remove and replace storage drawer (some models) Use the storage drawer for storing cooking utensils. Replace wire holder. 6. Figure 27: Oven light protected by carefully moving the wire to enter the gas...
... day on page 13). 7. Remove the interior oven light shield after removing the wire holder by glass shield To remove and replace storage drawer (some models) Use the storage drawer for storing cooking utensils. Replace wire holder. 6. Figure 27: Oven light protected by carefully moving the wire to enter the gas...


