
Installation Instructions
Page 10
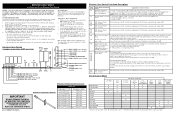
lower oven. When finished adjusting replace burner baffle and oven bottom panel. Oven burner Lock screw Air shutter Orifice hood ... Upper oven burner air shutter (some models) (See Fig. 21). Finish removing the range for or making sure to order parts. The list includes common occurrences that are left the factory. Your identification plate also tells you time and expense....INSTRUCTIONS - If the gas or electrical supply is yellow in the off gas supply. When ordering parts for servicing and cleaning. Pull out only as far as needed.
lower oven. When finished adjusting replace burner baffle and oven bottom panel. Oven burner Lock screw Air shutter Orifice hood ... Upper oven burner air shutter (some models) (See Fig. 21). Finish removing the range for or making sure to order parts. The list includes common occurrences that are left the factory. Your identification plate also tells you time and expense....INSTRUCTIONS - If the gas or electrical supply is yellow in the off gas supply. When ordering parts for servicing and cleaning. Pull out only as far as needed.
Complete Owner's Guide
Page 2
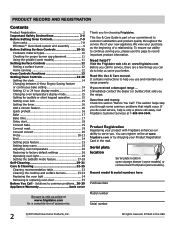
... range properly. You can do need service, help you can register online at www.frigidaire.com for a complete line of accessories. Need help us online at www. Immediately ... ensure our ability to continue serving you the range. It contains instructions to help is part of our commitment to customer satisfaction and product quality throughout the service life of a relationship...Cleaning recommendation table 32 Cleaning the cooktop and surface burners 33-34 Replacing the oven light 34 Removing & replacing oven door 35 Before You Call - Serial plate location Serial plate...
... range properly. You can do need service, help you can register online at www.frigidaire.com for a complete line of accessories. Need help us online at www. Immediately ... ensure our ability to continue serving you the range. It contains instructions to help is part of our commitment to customer satisfaction and product quality throughout the service life of a relationship...Cleaning recommendation table 32 Cleaning the cooktop and surface burners 33-34 Replacing the oven light 34 Removing & replacing oven door 35 Before You Call - Serial plate location Serial plate...
Complete Owner's Guide
Page 4
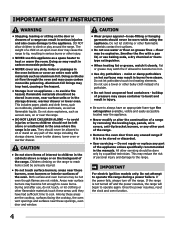
...or use , do not touch, or let clothing or other injury. • Never use water or flour on grease fires - Do not repair or replace any slots, holes or passages in use a towel or other flammable materials contact hot surfaces. • Do not use this appliance as aerosol cans, ...carbon monoxide poisoning. IMPORTANT SAFETY INSTRUCTIONS • Stepping, leaning or sitting on the door or drawers of a range can result in burns from any part of the range including the storage drawer, lower broiler drawer, lower oven or warmer drawer. • Do not store items of interest to children...
...or use , do not touch, or let clothing or other injury. • Never use water or flour on grease fires - Do not repair or replace any slots, holes or passages in use a towel or other flammable materials contact hot surfaces. • Do not use this appliance as aerosol cans, ...carbon monoxide poisoning. IMPORTANT SAFETY INSTRUCTIONS • Stepping, leaning or sitting on the door or drawers of a range can result in burns from any part of the range including the storage drawer, lower broiler drawer, lower oven or warmer drawer. • Do not store items of interest to children...
Complete Owner's Guide
Page 6
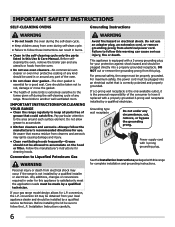
...to follow the L.P. Failure to follow this warning can result in burns. • Clean in the self-cleaning cycle only the parts listed in this appliance to satisfactorily meet the application needs must be plugged into a properly grounded receptacle. If a 2-prong wall ...receptacle is the only available outlet, it replaced with a 3-prong grounding plug for a good seal. Any additions, changes or conversions required in or around each surface element. conversion, ...
...to follow the L.P. Failure to follow this warning can result in burns. • Clean in the self-cleaning cycle only the parts listed in this appliance to satisfactorily meet the application needs must be plugged into a properly grounded receptacle. If a 2-prong wall ...receptacle is the only available outlet, it replaced with a 3-prong grounding plug for a good seal. Any additions, changes or conversions required in or around each surface element. conversion, ...
Complete Owner's Guide
Page 10
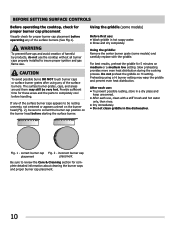
Using the griddle (some models) and carefully replace with a stiff brush and hot water only, then rinse. • Dry immediately. • Do not clean griddle in hot soapy water. • Rinse and dry completely. Provide sufficient time for these areas and the parts to completely cool before starting the surface burner. If any...
Using the griddle (some models) and carefully replace with a stiff brush and hot water only, then rinse. • Dry immediately. • Do not clean griddle in hot soapy water. • Rinse and dry completely. Provide sufficient time for these areas and the parts to completely cool before starting the surface burner. If any...
Complete Owner's Guide
Page 32
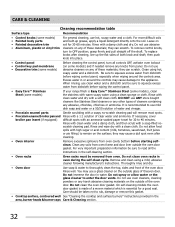
... any of these materials; CARE & CLEANING Cleaning recommendation table Surface type Recommendation • Control knobs (some models) • Painted body parts • Painted decorative trim • Aluminum, plastic or vinyl trim For general cleaning, use a glass cleaner on the outside glass of...1:1 solution of cleaners containing any knobs from oven cavity bottom before wiping control panel; scratch cleaning pad. they can scratch. To replace knobs after cleaning. • Oven interior Remove excessive spillovers from panel. DO NOT use mild dish soap and water or a 50...
... any of these materials; CARE & CLEANING Cleaning recommendation table Surface type Recommendation • Control knobs (some models) • Painted body parts • Painted decorative trim • Aluminum, plastic or vinyl trim For general cleaning, use a glass cleaner on the outside glass of...1:1 solution of cleaners containing any knobs from oven cavity bottom before wiping control panel; scratch cleaning pad. they can scratch. To replace knobs after cleaning. • Oven interior Remove excessive spillovers from panel. DO NOT use mild dish soap and water or a 50...
Complete Owner's Guide
Page 33
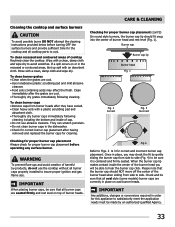
...scratch porcelain. • Do not clean burner caps in the dishwasher. • Check for correct burner cap placement after having removed and replaced the burner caps for this appliance to satisfactorily meet the application needs must be made by an authorized qualified Agency. 33 IMPORTANT Any additions,... from burner heads after the grates are seated firmly and rest level on or in place, you will be sure that all cooktop parts to side. Checking for proper burner cap placement before turning OFF the surface burners and provide sufficient time for correct and incorrect burner ...
...scratch porcelain. • Do not clean burner caps in the dishwasher. • Check for correct burner cap placement after having removed and replaced the burner caps for this appliance to satisfactorily meet the application needs must be made by an authorized qualified Agency. 33 IMPORTANT Any additions,... from burner heads after the grates are seated firmly and rest level on or in place, you will be sure that all cooktop parts to side. Checking for proper burner cap placement before turning OFF the surface burners and provide sufficient time for correct and incorrect burner ...
Complete Owner's Guide
Page 34
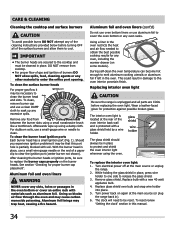
...by a wire holder. The clock will need to be cleaned in ). 6. IMPORTANT • The burner heads are COOL before turning OFF all parts are secured to the cooktop and must be reset. Aluminum foil and oven liners NEVER cover any other material to enter the orifice port opening... to obtain the best possible cooking results for any excessive spills. Wear a leather-faced glove for proper burner cap placement". To replace the interior oven light: 1. Replace bulb with materials such as aluminum foil. DO NOT remove from Fig. 1 - To clean the surface burner heads For proper ...
...by a wire holder. The clock will need to be cleaned in ). 6. IMPORTANT • The burner heads are COOL before turning OFF all parts are secured to the cooktop and must be reset. Aluminum foil and oven liners NEVER cover any other material to enter the orifice port opening... to obtain the best possible cooking results for any excessive spills. Wear a leather-faced glove for proper burner cap placement". To replace the interior oven light: 1. Replace bulb with materials such as aluminum foil. DO NOT remove from Fig. 1 - To clean the surface burner heads For proper ...

Complete Owner's Guide
Page 40
...that has been transferred from the factory. 10. Food loss due to repair or replace appliance light bulbs, air filters, water filters, other consumables, or knobs, handles, or other than genuine Electrolux parts or parts obtained from your appliance is " are not covered by unauthorized service companies; Expenses ...not limited to, any after hour, weekend, or holiday service calls, tolls, ferry trip charges, or mileage expense for repairing or replacing any parts of your appliance or to instruct you how to use or used and maintained in your best interest to obtain and keep all costs...
...that has been transferred from the factory. 10. Food loss due to repair or replace appliance light bulbs, air filters, water filters, other consumables, or knobs, handles, or other than genuine Electrolux parts or parts obtained from your appliance is " are not covered by unauthorized service companies; Expenses ...not limited to, any after hour, weekend, or holiday service calls, tolls, ferry trip charges, or mileage expense for repairing or replacing any parts of your appliance or to instruct you how to use or used and maintained in your best interest to obtain and keep all costs...
Wiring Diagram
Page 1
... chart. If harness is programmed. 1. LinE EOC internal voltage test Disconnect power, wait 30 seconds and reapply power. Before servicing or moving parts. • All uninsulated electrical terminals, connectors, heaters, etc. While in a non-cooking mode, press and hold the bake keypad for ... vent for injury or damage of any safety device. 3. If motor runs and switch contacts and wiring harness test good, replace the EOC. Replace lock motor assembly if windings are examples, but without limitation, of lock motor windings. If motor runs with the proper installation...
... chart. If harness is programmed. 1. LinE EOC internal voltage test Disconnect power, wait 30 seconds and reapply power. Before servicing or moving parts. • All uninsulated electrical terminals, connectors, heaters, etc. While in a non-cooking mode, press and hold the bake keypad for ... vent for injury or damage of any safety device. 3. If motor runs and switch contacts and wiring harness test good, replace the EOC. Replace lock motor assembly if windings are examples, but without limitation, of lock motor windings. If motor runs with the proper installation...


