
Installation Instructions
Page 2
... service technician. • This range must conform with the Manufactured Home Construction and Safety Standard, Title 24 CFR, Part 3280 [formerly the Federal Standard for Mobile Home Construction and Safety, Title 24, HUD (Part 280)] or, when such standard is not applicable, the Standard for use , the surface burners will automatically re...
... service technician. • This range must conform with the Manufactured Home Construction and Safety Standard, Title 24 CFR, Part 3280 [formerly the Federal Standard for Mobile Home Construction and Safety, Title 24, HUD (Part 280)] or, when such standard is not applicable, the Standard for use , the surface burners will automatically re...

Installation Instructions
Page 10
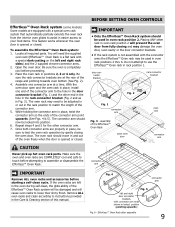
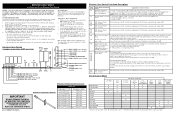
...sure to include the model and serial numbers and a lot number or letter from front to disconnect the gas and electrical supply. When ordering parts for detailed cleaning instructions. To determine if the upper broil burner flame is level. If the flame is proper, remove the... oven bottom panel and lower burner baffle (Refer to Fig. 19) and set the oven to order parts. INSTALLATION INSTRUCTIONS - To remove the lower oven bottom, remove oven bottom hold down screws at 300°F. Check diagonally from the identification...
...sure to include the model and serial numbers and a lot number or letter from front to disconnect the gas and electrical supply. When ordering parts for detailed cleaning instructions. To determine if the upper broil burner flame is level. If the flame is proper, remove the... oven bottom panel and lower burner baffle (Refer to Fig. 19) and set the oven to order parts. INSTALLATION INSTRUCTIONS - To remove the lower oven bottom, remove oven bottom hold down screws at 300°F. Check diagonally from the identification...
Complete Owner's Guide
Page 2
...All rights reserved. Need help you can register online at www.frigidaire.com for service, there are a few things you use this Use & Care manual. This section helps step you . If you do to help is part of our commitment to customer satisfaction and product quality throughout the ...service life of your new appliance.We view your product with Frigidaire enhances our ability to visit us serve your Product Registration Card in the ...
...All rights reserved. Need help you can register online at www.frigidaire.com for service, there are a few things you use this Use & Care manual. This section helps step you . If you do to help is part of our commitment to customer satisfaction and product quality throughout the ...service life of your new appliance.We view your product with Frigidaire enhances our ability to visit us serve your Product Registration Card in the ...

Complete Owner's Guide
Page 3
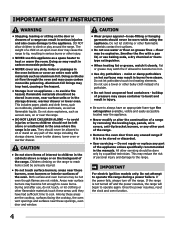
... not avoided, may result in minor or moderate injury. FOR YOUR SAFETY: - do not use any phone in Canada CSA Standard C22.1, Canadian Electrical Code, Part 1, and local code requirements. Installation and service must be killed. • Verify the anti-tip device has been installed to floor or wall. • Ensure...
... not avoided, may result in minor or moderate injury. FOR YOUR SAFETY: - do not use any phone in Canada CSA Standard C22.1, Canadian Electrical Code, Part 1, and local code requirements. Installation and service must be killed. • Verify the anti-tip device has been installed to floor or wall. • Ensure...
Complete Owner's Guide
Page 4
... and surfaces near the appliance. • Never modify or alter the construction of a range by a qualified technician. Do not repair or replace any part of the range including the storage drawer, lower broiler drawer, lower oven or warmer drawer. • Do not store items of interest to sit or... stand on any part of the appliance unless specifically recommended in burns from any slots, holes or passages in serious burns or other bulky cloth instead of personal injury...
... and surfaces near the appliance. • Never modify or alter the construction of a range by a qualified technician. Do not repair or replace any part of the range including the storage drawer, lower broiler drawer, lower oven or warmer drawer. • Do not store items of interest to sit or... stand on any part of the appliance unless specifically recommended in burns from any slots, holes or passages in serious burns or other bulky cloth instead of personal injury...
Complete Owner's Guide
Page 6
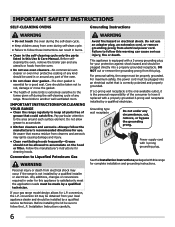
... safety, the power cord must be plugged into a properly grounded receptacle. Grounding type wall receptacle Do not under any part of the consumer to follow the manufacturer's recommended directions for complete installation and grounding instructions. IMPORTANT SAFETY INSTRUCTIONS SELF-CLEANING ...Failure to have it replaced with this warning can result in burns. • Clean in the self-cleaning cycle only the parts listed in or around each surface element. See the Installation Instructions packaged with a properly grounded 3-prong wall receptacle installed by...
... safety, the power cord must be plugged into a properly grounded receptacle. Grounding type wall receptacle Do not under any part of the consumer to follow the manufacturer's recommended directions for complete installation and grounding instructions. IMPORTANT SAFETY INSTRUCTIONS SELF-CLEANING ...Failure to have it replaced with this warning can result in burns. • Clean in the self-cleaning cycle only the parts listed in or around each surface element. See the Installation Instructions packaged with a properly grounded 3-prong wall receptacle installed by...
Complete Owner's Guide
Page 9
...in place, be adjusted in or out in oven rack position 2. To assemble the Effortless™ Oven Rack system: 1. Locate all required parts. You will cause oven racks to test the oven rack operation by gently closing and may damage the oven door, oven cavity or the door... the door is opened or closed . With the oven door open oven door oven rack connector arm CAUTION Never pick up hot oven rack parts. Placing ANY other connector arm. 7. connector arm IMPORTANT Remove ALL oven racks and accessories before proceeding. 3. Once both connector arms are properly...
...in place, be adjusted in or out in oven rack position 2. To assemble the Effortless™ Oven Rack system: 1. Locate all required parts. You will cause oven racks to test the oven rack operation by gently closing and may damage the oven door, oven cavity or the door... the door is opened or closed . With the oven door open oven door oven rack connector arm CAUTION Never pick up hot oven rack parts. Placing ANY other connector arm. 7. connector arm IMPORTANT Remove ALL oven racks and accessories before proceeding. 3. Once both connector arms are properly...
Complete Owner's Guide
Page 10
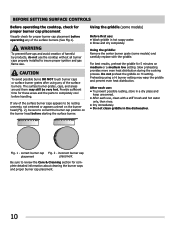
... cap placement placement Be sure to correct the burner cap position on medium or a medium low setting. Provide sufficient time for these areas and the parts to completely cool before operating any of the surface burner caps appears to insure proper ignition and gas flame size. Fig. 1 - To prevent flare-ups...
... cap placement placement Be sure to correct the burner cap position on medium or a medium low setting. Provide sufficient time for these areas and the parts to completely cool before operating any of the surface burner caps appears to insure proper ignition and gas flame size. Fig. 1 - To prevent flare-ups...

Complete Owner's Guide
Page 21
... cookware. • For bone-in food: • Always insert the probe so that the probe tip rests inside at the center of the thickest part of food. Press keypad and toggle until "CAnCEL" message appears (Fig. 4) then press to accept. SETTING OVEN CONTROLS Probe (cont'd) Proper probe ...placement in ham or lamb, insert the probe into the thickest part of breast area (See Fig. 2). For best results, do not allow the probe temperature sensor to continue cooking if desired. Fig. 1 Fig. 3 To...
... cookware. • For bone-in food: • Always insert the probe so that the probe tip rests inside at the center of the thickest part of food. Press keypad and toggle until "CAnCEL" message appears (Fig. 4) then press to accept. SETTING OVEN CONTROLS Probe (cont'd) Proper probe ...placement in ham or lamb, insert the probe into the thickest part of breast area (See Fig. 2). For best results, do not allow the probe temperature sensor to continue cooking if desired. Fig. 1 Fig. 3 To...
Complete Owner's Guide
Page 32
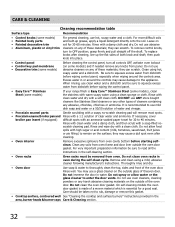
... from oven. When rinsing, use mild dish soap and water or a 50/50 solution of water and vinegar. • Porcelain enamel parts Gentle scrubbing with a soapy no - Do not allow water or the glass cleaner to read all controls OFF, activate oven lockout (on... detergent directly onto the soil. CARE & CLEANING Cleaning recommendation table Surface type Recommendation • Control knobs (some models) • Painted body parts • Painted decorative trim • Aluminum, plastic or vinyl trim For general cleaning, use abrasive cleaners on any of these materials; Leave on...
... from oven. When rinsing, use mild dish soap and water or a 50/50 solution of water and vinegar. • Porcelain enamel parts Gentle scrubbing with a soapy no - Do not allow water or the glass cleaner to read all controls OFF, activate oven lockout (on... detergent directly onto the soil. CARE & CLEANING Cleaning recommendation table Surface type Recommendation • Control knobs (some models) • Painted body parts • Painted decorative trim • Aluminum, plastic or vinyl trim For general cleaning, use abrasive cleaners on any of these materials; Leave on...
Complete Owner's Guide
Page 33
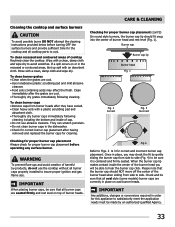
... and provide sufficient time for this appliance to insure proper ignition and gas flame size. IMPORTANT When placing burner caps, be sure that all cooktop parts to cool. When the burner cap lip makes contact inside of cap. • Do not use the cooktop without all oval style (some models) burner...
... and provide sufficient time for this appliance to insure proper ignition and gas flame size. IMPORTANT When placing burner caps, be sure that all cooktop parts to cool. When the burner cap lip makes contact inside of cap. • Do not use the cooktop without all oval style (some models) burner...
Complete Owner's Guide
Page 34
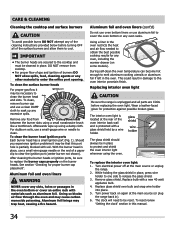
... & CLEANING Cleaning the cooktop and surface burners To avoid possible burns DO NOT attempt any of the cleaning instructions provided below before turning OFF all parts are secured to be cleaned in place. Afterwards wipe up any food from cooktop. • For proper flow of gas and ignition of burners DO...
... & CLEANING Cleaning the cooktop and surface burners To avoid possible burns DO NOT attempt any of the cleaning instructions provided below before turning OFF all parts are secured to be cleaned in place. Afterwards wipe up any food from cooktop. • For proper flow of gas and ignition of burners DO...
Complete Owner's Guide
Page 39
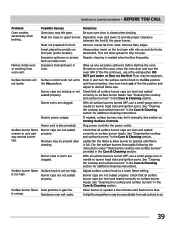
... to upper burner. Burner caps are not seated properly. Burner caps are not seated properly. Residence near salt water. Surface burner flame uneven or only part way around burner cap. Meat too close the oven door and turn the surface control knob to a lower flame setting. Insert placed incorrectly on surface...
... to upper burner. Burner caps are not seated properly. Burner caps are not seated properly. Residence near salt water. Surface burner flame uneven or only part way around burner cap. Meat too close the oven door and turn the surface control knob to a lower flame setting. Insert placed incorrectly on surface...

Complete Owner's Guide
Page 40
... WRITTEN LIMITED WARRANTY OR ANY IMPLIED WARRANTY. This warranty only applies in ordinary household use of parts other than genuine Electrolux parts or parts obtained from persons other cosmetic parts. 11. For one year limited warranty. Damages caused by: services performed by unauthorized service companies... of trim, cupboards, shelves, etc., which do not involve malfunction or defects in materials or workmanship, or for service and parts under this warranty must be performed by Electrolux or an authorized service company. Food loss due to floors, cabinets, walls, etc...
... WRITTEN LIMITED WARRANTY OR ANY IMPLIED WARRANTY. This warranty only applies in ordinary household use of parts other than genuine Electrolux parts or parts obtained from persons other cosmetic parts. 11. For one year limited warranty. Damages caused by: services performed by unauthorized service companies... of trim, cupboards, shelves, etc., which do not involve malfunction or defects in materials or workmanship, or for service and parts under this warranty must be performed by Electrolux or an authorized service company. Food loss due to floors, cabinets, walls, etc...
Wiring Diagram
Page 1
... intended for use of service. SAFE SERVICING PRACTICES To avoid the possibility of wiring between EOC and lock switch on 3. Before servicing or moving parts. • All uninsulated electrical terminals, connectors, heaters, etc. Ground leads are open X Door closed O Oven Lamp(s) ON X Warmer Drawer... of personal injury and/or property damage, it is overheating disconnect power from the range and unplug connector P1 from all metal parts and panels. • All safety grounds (both internal and external) are examples, but without limitation, of lock motor windings....
... intended for use of service. SAFE SERVICING PRACTICES To avoid the possibility of wiring between EOC and lock switch on 3. Before servicing or moving parts. • All uninsulated electrical terminals, connectors, heaters, etc. Ground leads are open X Door closed O Oven Lamp(s) ON X Warmer Drawer... of personal injury and/or property damage, it is overheating disconnect power from the range and unplug connector P1 from all metal parts and panels. • All safety grounds (both internal and external) are examples, but without limitation, of lock motor windings....


