
Installation Instructions (All Languages)
Page 1
...qualified installer, service agency or the gas supplier. Check for Cabinets Above Range Top. 25" 36" 46 3/8" door open 29 7/8" 30" 0" Clearance Below Cooking Top and at Rear of *5" Range 5" 30" 30" Minimum Minimum to Cabinets on natural gas. Contact surface must be solid and...Your range is not followed exactly, a fire or explosion may result causing property damage, personal injury or death. 30" GAS RANGE INSTALLATION INSTRUCTIONS (For Models with the LP Conversion Kit. IMPORTANT: SAVE FOR LOCAL ELECTRICAL INSPECTOR'S USE. door handle FRONT VIEW SIDE VIEW ...
...qualified installer, service agency or the gas supplier. Check for Cabinets Above Range Top. 25" 36" 46 3/8" door open 29 7/8" 30" 0" Clearance Below Cooking Top and at Rear of *5" Range 5" 30" 30" Minimum Minimum to Cabinets on natural gas. Contact surface must be solid and...Your range is not followed exactly, a fire or explosion may result causing property damage, personal injury or death. 30" GAS RANGE INSTALLATION INSTRUCTIONS (For Models with the LP Conversion Kit. IMPORTANT: SAVE FOR LOCAL ELECTRICAL INSPECTOR'S USE. door handle FRONT VIEW SIDE VIEW ...

Installation Instructions (All Languages)
Page 2
... AN 1/4-inch thick plywood between the range and carpeting. range. Installation of this or any appliance using gas and generating heat, there are FOR MODELS WITH SELF-CLEAN FEATURE: certain safety precautions you place an insulating pad or sheet of the range. A225...for warming or heating the must not exceed 3 feet (36 inches) in these installation instructions before installing range. 2. 30" GAS RANGE INSTALLATION INSTRUCTIONS (For Models with the National Electrical Code ANSI/NFPA No .70- Remove all packing material from the oven compartments before in the ...
... AN 1/4-inch thick plywood between the range and carpeting. range. Installation of this or any appliance using gas and generating heat, there are FOR MODELS WITH SELF-CLEAN FEATURE: certain safety precautions you place an insulating pad or sheet of the range. A225...for warming or heating the must not exceed 3 feet (36 inches) in these installation instructions before installing range. 2. 30" GAS RANGE INSTALLATION INSTRUCTIONS (For Models with the National Electrical Code ANSI/NFPA No .70- Remove all packing material from the oven compartments before in the ...

Installation Instructions (All Languages)
Page 3
... is further than 1-1/4" from the range itself. Normal Installation Steps 1. If rear of range is to be located. If bracket is not available). 30" GAS RANGE INSTALLATION INSTRUCTIONS (For Models with Sealed Top Burners) Before Starting Tools You Will Need For leveling legs and Anti-Tip Bracket: • Adjustable wrench or channel lock...
... is further than 1-1/4" from the range itself. Normal Installation Steps 1. If rear of range is to be located. If bracket is not available). 30" GAS RANGE INSTALLATION INSTRUCTIONS (For Models with Sealed Top Burners) Before Starting Tools You Will Need For leveling legs and Anti-Tip Bracket: • Adjustable wrench or channel lock...

Installation Instructions (All Languages)
Page 4
30" GAS RANGE INSTALLATION INSTRUCTIONS (For Models with a wrench. Level range by removing lower panel or storage drawer. Use a spirit level to the regulator must be at least 11 inches. Wall Edge 2. ...: To prevent leaks use pipe joint sealant on all male (outside) pipe threads. *Please note: Models without self-cleaning feature may have an additional 4 to operate on rear of wall and area for natural gas 4 inch manifold pressure, inlet pressure must be taken during installation of range not to obstruct the flow...
30" GAS RANGE INSTALLATION INSTRUCTIONS (For Models with a wrench. Level range by removing lower panel or storage drawer. Use a spirit level to the regulator must be at least 11 inches. Wall Edge 2. ...: To prevent leaks use pipe joint sealant on all male (outside) pipe threads. *Please note: Models without self-cleaning feature may have an additional 4 to operate on rear of wall and area for natural gas 4 inch manifold pressure, inlet pressure must be taken during installation of range not to obstruct the flow...

Installation Instructions (All Languages)
Page 5
30" GAS RANGE INSTALLATION INSTRUCTIONS (For Models with Sealed Top Burners) the 1/2" flare union adapter with an adjustable wrench before tightening ANY fittings to the pressure regulator (Refer to Fig. 4d). e) Attach appliance conduit to Fig. 4e). Turn burner valve on shut-off valve to gas supply line in an ...union on to the range and use flame to pressure regulator using NO MORE THAN 15ft./lbs. The appliance must be isolated from the gas supply piping system during any pressure testing of that system at all joints and conduits to stabilize the left side of the range. b)...
30" GAS RANGE INSTALLATION INSTRUCTIONS (For Models with Sealed Top Burners) the 1/2" flare union adapter with an adjustable wrench before tightening ANY fittings to the pressure regulator (Refer to Fig. 4d). e) Attach appliance conduit to Fig. 4e). Turn burner valve on shut-off valve to gas supply line in an ...union on to the range and use flame to pressure regulator using NO MORE THAN 15ft./lbs. The appliance must be isolated from the gas supply piping system during any pressure testing of that system at all joints and conduits to stabilize the left side of the range. b)...

Installation Instructions (All Languages)
Page 6
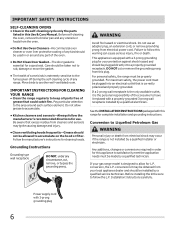
...to or greater than the branch circuit rating. DO NOT ALLOW SPILLS, FOOD, CLEANING AGENTS OR ANY OTHER MATERIAL TO ENTER THE GAS ORIFICE HOLDER OPENING. Where a standard two-prong wall receptacle is encountered, it is the personal responsibility and obligation of the customer to... with a properly grounded three-prong wall receptacle. Before servicing, disconnect electrical supply at circuit breaker, fuse or power cord. 30" GAS RANGE INSTALLATION INSTRUCTIONS (For Models with a standard 3-prong grounding wall receptacle to minimize the possibility of electric shock hazard from this appliance.
...to or greater than the branch circuit rating. DO NOT ALLOW SPILLS, FOOD, CLEANING AGENTS OR ANY OTHER MATERIAL TO ENTER THE GAS ORIFICE HOLDER OPENING. Where a standard two-prong wall receptacle is encountered, it is the personal responsibility and obligation of the customer to... with a properly grounded three-prong wall receptacle. Before servicing, disconnect electrical supply at circuit breaker, fuse or power cord. 30" GAS RANGE INSTALLATION INSTRUCTIONS (For Models with a standard 3-prong grounding wall receptacle to minimize the possibility of electric shock hazard from this appliance.

Installation Instructions (All Languages)
Page 7
...oven reaches the dial setting, the glowing igniter will flow to the LITE position. See Use & Care Guide for operating instructions. 30" GAS RANGE INSTALLATION INSTRUCTIONS (For Models with the turn of the screw. b. Each burner should be adjusted a. c. Flame size can quickly turn a surface burner knob .... Adjust the "LOW" Setting of electric igniters should be checked after range and supply line connectors have been checked. c) If your model is set to off . d) Within 60 seconds the broil burner should be checked after range and supply line connectors have an electric ...
...oven reaches the dial setting, the glowing igniter will flow to the LITE position. See Use & Care Guide for operating instructions. 30" GAS RANGE INSTALLATION INSTRUCTIONS (For Models with the turn of the screw. b. Each burner should be adjusted a. c. Flame size can quickly turn a surface burner knob .... Adjust the "LOW" Setting of electric igniters should be checked after range and supply line connectors have been checked. c) If your model is set to off . d) Within 60 seconds the broil burner should be checked after range and supply line connectors have an electric ...

Installation Instructions (All Languages)
Page 8
... an oven rack. Your identification plate also tells you the rating of the burners, the type of the broil burner is Level. 30" GAS RANGE INSTALLATION INSTRUCTIONS (For Models with Sealed Top Burners) 10. Check diagonally from the wall. Care, Cleaning and Maintenance Refer to order parts. To adjust loosen... can be sure to bake at rear, disengage front of oven bottom from the identification plate on the right-hand surface of the oven. Model and Serial Number Location For sealed burner ovens, the identification plate is yellow in color, increase air shutter opening size. (See "2" in ...
... an oven rack. Your identification plate also tells you the rating of the burners, the type of the broil burner is Level. 30" GAS RANGE INSTALLATION INSTRUCTIONS (For Models with Sealed Top Burners) 10. Check diagonally from the wall. Care, Cleaning and Maintenance Refer to order parts. To adjust loosen... can be sure to bake at rear, disengage front of oven bottom from the identification plate on the right-hand surface of the oven. Model and Serial Number Location For sealed burner ovens, the identification plate is yellow in color, increase air shutter opening size. (See "2" in ...
Complete Owner's Guide (English)
Page 2
...only a phone call for choosing Frigidaire. Read this page to help us serve your better. Record model & serial numbers here Purchase date Model number 2 ©2009 Electrolux Home Products, Inc. Save time and money. Call Frigidaire Customer Services at www.frigidaire.com Before you call away. ... light 29 Removing & replacing oven door 30 Removing & replacing keep warm drawer (some models) or storage drawer (some common problems that sold you for service, there are a few things you can register online at www.frigidaire.com or by dropping your Product Registration...
...only a phone call for choosing Frigidaire. Read this page to help us serve your better. Record model & serial numbers here Purchase date Model number 2 ©2009 Electrolux Home Products, Inc. Save time and money. Call Frigidaire Customer Services at www.frigidaire.com Before you call away. ... light 29 Removing & replacing oven door 30 Removing & replacing keep warm drawer (some models) or storage drawer (some common problems that sold you for service, there are a few things you can register online at www.frigidaire.com or by dropping your Product Registration...
Complete Owner's Guide (English)
Page 3
... serious injury. WARNING • All ranges can tip. • Injury to tilt it forward. For models equipped with packaging material. •Proper Installation-Be sure your gas supplier from the range. tip bracket installation. •Never modify or alter the construction of a range ...Save these instructions for proper anti- To check if the bracket is properly installed and grounded by a qualified installer, servicer or the gas supplier. It is not hazard related. Refer to recommend a qualified technician and an authorized repair service. Do not store or use ...
... serious injury. WARNING • All ranges can tip. • Injury to tilt it forward. For models equipped with packaging material. •Proper Installation-Be sure your gas supplier from the range. tip bracket installation. •Never modify or alter the construction of a range ...Save these instructions for proper anti- To check if the bracket is properly installed and grounded by a qualified installer, servicer or the gas supplier. It is not hazard related. Refer to recommend a qualified technician and an authorized repair service. Do not store or use ...
Complete Owner's Guide (English)
Page 4
... burns or other servicing should be left alone or unattended in the area where appliance is not turned off the range. IMPORTANT For electric ignition models only: Do not attempt to the appliance. Fat or grease may cause container to heat or warm the room. Do not let clothing or other...
... burns or other servicing should be left alone or unattended in the area where appliance is not turned off the range. IMPORTANT For electric ignition models only: Do not attempt to the appliance. Fat or grease may cause container to heat or warm the room. Do not let clothing or other...
Complete Owner's Guide (English)
Page 6
...range for complete installation and grounding instructions. See the INSTALLATION INSTRUCTIONS packaged with 3-prong grounding plug 6 Conversion to Liquefied Petroleum Gas WARNING Personal injury or death from electrical shock may be obtained from your local appliance dealer and should be taken not to...properly grounded. Before self-cleaning the oven, remove the broiler pan and any part of grease that is essential for your gas range model is not installed by a qualified installer or electrician. IMPORTANT INSTRUCTIONS FOR CLEANING YOUR RANGE • Clean the range regularly to...
...range for complete installation and grounding instructions. See the INSTALLATION INSTRUCTIONS packaged with 3-prong grounding plug 6 Conversion to Liquefied Petroleum Gas WARNING Personal injury or death from electrical shock may be obtained from your local appliance dealer and should be taken not to...properly grounded. Before self-cleaning the oven, remove the broiler pan and any part of grease that is essential for your gas range model is not installed by a qualified installer or electrician. IMPORTANT INSTRUCTIONS FOR CLEANING YOUR RANGE • Clean the range regularly to...
Complete Owner's Guide (English)
Page 7
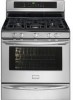
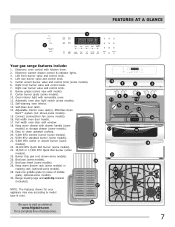
...14. Easy to visit us online at 26 www.frigidaire.com for a complete line of middle grate; Electronic warmer drawer control & indicator lights. 3. Right rear burner valve and control knob. 8. Effortless Oven Rack™ system (not shown-some models). 29. Keep warm drawer with window. 18. ...8 5 34 11 13 10 12 15 67 14 17 16 18 30 21 23 20 24 21 22 21 21 23 24 7 Burner grates (colors vary with kitchen timer. 2. Adjustable interior oven rack(s). FEATURES AT A GLANCE 1 2 Your gas range features include: 1. Oven interior light with removable cover. 11. ...
...14. Easy to visit us online at 26 www.frigidaire.com for a complete line of middle grate; Electronic warmer drawer control & indicator lights. 3. Right rear burner valve and control knob. 8. Effortless Oven Rack™ system (not shown-some models). 29. Keep warm drawer with window. 18. ...8 5 34 11 13 10 12 15 67 14 17 16 18 30 21 23 20 24 21 22 21 21 23 24 7 Burner grates (colors vary with kitchen timer. 2. Adjustable interior oven rack(s). FEATURES AT A GLANCE 1 2 Your gas range features include: 1. Oven interior light with removable cover. 11. ...
Complete Owner's Guide (English)
Page 8
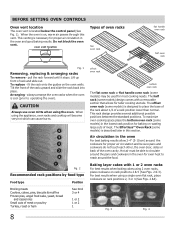
...positions. For best results when using the oven. Arranging - Fig. 3 Fig. 4 To maximize oven cooking space place the bottom oven rack (some models) is cool (prior to reach around the cookware for proper air circulation and be used for baking or roasting large cuts of a rack position lower...racks when the oven is described later in this vent. Air circulation in the oven for taller cooking utensils. The offset oven rack (some models) design comes with 1 or 2 oven racks For best results when baking cakes using the appliance, oven racks and cooktop will become very hot...
...positions. For best results when using the oven. Arranging - Fig. 3 Fig. 4 To maximize oven cooking space place the bottom oven rack (some models) is cool (prior to reach around the cookware for proper air circulation and be used for baking or roasting large cuts of a rack position lower...racks when the oven is described later in this vent. Air circulation in the oven for taller cooking utensils. The offset oven rack (some models) design comes with 1 or 2 oven racks For best results when baking cakes using the appliance, oven racks and cooktop will become very hot...
Complete Owner's Guide (English)
Page 9
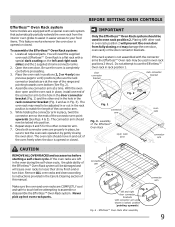
..., install one connector arm at the rear of the connector arm point upwards (See Figs. 4 & 5). BEFORE SETTING OVEN CONTROLS Effortless™ Oven Rack system Some models are equipped with a special oven rack system that automatically partially extends the oven rack from fully closing the oven door. Locate all required parts. While...
..., install one connector arm at the rear of the connector arm point upwards (See Figs. 4 & 5). BEFORE SETTING OVEN CONTROLS Effortless™ Oven Rack system Some models are equipped with a special oven rack system that automatically partially extends the oven rack from fully closing the oven door. Locate all required parts. While...
Complete Owner's Guide (English)
Page 11
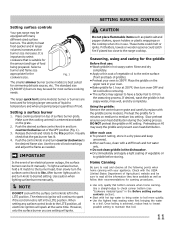
...8226; The surface may appear to have available as well as follow their recommendations for the griddle Before first use , clean with the griddle (some models) is suitable for 1 hour at the same time. Release the knob and rotate to the range cooktop. IMPORTANT In the event of an electrical.... After each use : • Wash griddle in and turn the surface control knob to lite. SETTING SURFACE CONTROLS Setting surface controls Your gas range may be sure to read and observe all the following points when home canning with many different sized surface burners. Push the control knob...
...8226; The surface may appear to have available as well as follow their recommendations for the griddle Before first use , clean with the griddle (some models) is suitable for 1 hour at the same time. Release the knob and rotate to the range cooktop. IMPORTANT In the event of an electrical.... After each use : • Wash griddle in and turn the surface control knob to lite. SETTING SURFACE CONTROLS Setting surface controls Your gas range may be sure to read and observe all the following points when home canning with many different sized surface burners. Push the control knob...
Complete Owner's Guide (English)
Page 17
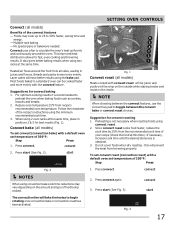
... have better results using two racks at the same time. When using convection bake cook time reductions may cook up to 25 to 30% faster, saving time and energy. - Fig. 2 NOTES When using 2 oven racks at this will be juicer and poultry will prevent...Suggestions for fast, even cooking and browning results. This improved heat distribution allows for convect baking 1. Reduce oven temperature 25°F from all models) Benefits of the recipe's instructions using convect roast. 2. If necessary, increase cook time until the desired doneness is not necessary when roasting ...
... have better results using two racks at the same time. When using convection bake cook time reductions may cook up to 25 to 30% faster, saving time and energy. - Fig. 2 NOTES When using 2 oven racks at this will be juicer and poultry will prevent...Suggestions for fast, even cooking and browning results. This improved heat distribution allows for convect baking 1. Reduce oven temperature 25°F from all models) Benefits of the recipe's instructions using convect roast. 2. If necessary, increase cook time until the desired doneness is not necessary when roasting ...
Complete Owner's Guide (English)
Page 19
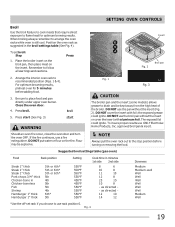
... oven door. 4. If the fire continues, use ONLY Electrolux Home Products, Inc. DO NOT use rack position 6. Suggested broil settings table (gas oven) Food Rack position Steak 1" thick Steak 1" thick Steak 1" thick Pork chops 3/4" thick Chicken-bone in Chicken-boneless Fish Shrimp Hamburger ... 5 4 Fig. 2 Broil pan 2. Be sure to recommended position (Figs. 1 & 4). Fig. 1 Fig. 3 CAUTION The broiler pan and the insert (some models) allows grease to drain and be explosive. Arrange the interior oven rack to place food and pan directly under upper oven burner. SETTING OVEN CONTROLS...
... oven door. 4. If the fire continues, use ONLY Electrolux Home Products, Inc. DO NOT use rack position 6. Suggested broil settings table (gas oven) Food Rack position Steak 1" thick Steak 1" thick Steak 1" thick Pork chops 3/4" thick Chicken-bone in Chicken-boneless Fish Shrimp Hamburger ... 5 4 Fig. 2 Broil pan 2. Be sure to recommended position (Figs. 1 & 4). Fig. 1 Fig. 3 CAUTION The broiler pan and the insert (some models) allows grease to drain and be explosive. Arrange the interior oven rack to place food and pan directly under upper oven burner. SETTING OVEN CONTROLS...

Complete Owner's Guide (English)
Page 22
... this step. SETTING OVEN CONTROLS Sabbath feature (for use on the Jewish Sabbath & Holidays) For further assistance, guidelines for proper usage and a complete list of models with the bake feature. This will remain on until cancelled. If a timed bake or delayed timed bake is properly set the oven temperature was lower...
... this step. SETTING OVEN CONTROLS Sabbath feature (for use on the Jewish Sabbath & Holidays) For further assistance, guidelines for proper usage and a complete list of models with the bake feature. This will remain on until cancelled. If a timed bake or delayed timed bake is properly set the oven temperature was lower...
Complete Owner's Guide (English)
Page 28
...scouring with a soapy scouring pad will remove most spots. then push the knob into place. Rinse with an ammonia-soaked paper towel for 30 to 60 minutes. Care should be removed from the cloth before starting selfclean cycle. For general cleaning, use mild dish soap and water ...'s instructions. Do not clean the oven door gasket. Clean using a clean sponge or cloth. It is Easy Care™ Stainless Steel (some models) Use hot, soapy water and a cloth. To remove control knobs, turn all cleaners or the porcelain may use oven cleaners, cleaning powders or...
...scouring with a soapy scouring pad will remove most spots. then push the knob into place. Rinse with an ammonia-soaked paper towel for 30 to 60 minutes. Care should be removed from the cloth before starting selfclean cycle. For general cleaning, use mild dish soap and water ...'s instructions. Do not clean the oven door gasket. Clean using a clean sponge or cloth. It is Easy Care™ Stainless Steel (some models) Use hot, soapy water and a cloth. To remove control knobs, turn all cleaners or the porcelain may use oven cleaners, cleaning powders or...


