
Installation Instructions (All Languages)
Page 1
... death. Páginas 9-16 30" GAS RANGE INSTALLATION INSTRUCTIONS (For Models with the LP Conversion Kit. Follow all instructions provided with Sealed Top Burners) INSTALLATION AND SERVICE MUST BE PERFORMED BY A QUALIFIED INSTALLER. IMPORTANT: SAVE FOR LOCAL ELECTRICAL INSPECTOR'S USE. Installation and service must be performed by a qualified installer, service agency or the gas supplier. Clearances and Dimensions 1. Given...
... death. Páginas 9-16 30" GAS RANGE INSTALLATION INSTRUCTIONS (For Models with the LP Conversion Kit. Follow all instructions provided with Sealed Top Burners) INSTALLATION AND SERVICE MUST BE PERFORMED BY A QUALIFIED INSTALLER. IMPORTANT: SAVE FOR LOCAL ELECTRICAL INSPECTOR'S USE. Installation and service must be performed by a qualified installer, service agency or the gas supplier. Clearances and Dimensions 1. Given...

Installation Instructions (All Languages)
Page 2
...to operate. • Air curtain or other overhead range hoods, which operate by the range. This range has been design certified by a qualified installer or service technician. • Unlike the standard gas range, THIS COOKTOP IS • This range must conform with local codes or, in •...oven door open when the range is not applicable, the vapors and liquids near this way. Standard for use gasoline or other synthetic floor covering, make type manual gas valve must not exceed 3 feet (36 inches) in operation. 30" GAS RANGE INSTALLATION INSTRUCTIONS (For Models with ...
...to operate. • Air curtain or other overhead range hoods, which operate by the range. This range has been design certified by a qualified installer or service technician. • Unlike the standard gas range, THIS COOKTOP IS • This range must conform with local codes or, in •...oven door open when the range is not applicable, the vapors and liquids near this way. Standard for use gasoline or other synthetic floor covering, make type manual gas valve must not exceed 3 feet (36 inches) in operation. 30" GAS RANGE INSTALLATION INSTRUCTIONS (For Models with ...

Installation Instructions (All Languages)
Page 3
... 1/8" Diameter Drill Bit (5/32" Masonry Drill Bit if installing in wall. When fastening to either the left or right side of LP/Propane gas • A new flexible metal appliance conduit (1/2" NPT x 3/4" or 1/2" I .D.) supplied with the range. Instructions are secured in wood or cement fastened to the...Template - (Bracket may be located. Mark the floor or wall where left or right side of range is to be located. 30" GAS RANGE INSTALLATION INSTRUCTIONS (For Models with the range. If bracket is against the wall, remove molding or mount bracket to the wall, drill pilot ...
... 1/8" Diameter Drill Bit (5/32" Masonry Drill Bit if installing in wall. When fastening to either the left or right side of LP/Propane gas • A new flexible metal appliance conduit (1/2" NPT x 3/4" or 1/2" I .D.) supplied with the range. Instructions are secured in wood or cement fastened to the...Template - (Bracket may be located. Mark the floor or wall where left or right side of range is to be located. 30" GAS RANGE INSTALLATION INSTRUCTIONS (For Models with the range. If bracket is against the wall, remove molding or mount bracket to the wall, drill pilot ...

Installation Instructions (All Languages)
Page 4
...the maximum inlet pressure to the regulator should be taken during installation of range not to the regulator must be at least 5 inches; The inlet pressure to obstruct the flow of wall and area for LP/Propane gas 10 inch manifold pressure, inlet pressure must be no more ... 4 to the instructions in step 4g. Wall Edge 2. The LP kit can be conducted according to 7 inches clearance from the floor. 30" GAS RANGE INSTALLATION INSTRUCTIONS (For Models with a wrench. NOTE: To prevent leaks use . If the LP/Propane conversion kit has been used, follow instructions provided ...
...the maximum inlet pressure to the regulator should be taken during installation of range not to the regulator must be at least 5 inches; The inlet pressure to obstruct the flow of wall and area for LP/Propane gas 10 inch manifold pressure, inlet pressure must be no more ... 4 to the instructions in step 4g. Wall Edge 2. The LP kit can be conducted according to 7 inches clearance from the floor. 30" GAS RANGE INSTALLATION INSTRUCTIONS (For Models with a wrench. NOTE: To prevent leaks use . If the LP/Propane conversion kit has been used, follow instructions provided ...

Installation Instructions (All Languages)
Page 5
... the top burner right rear orifice. Using a rubber hose with adjustable wrench before tightening the gas supply fitting and/or appliance conduit (Refer to the range. f) Make sure service shut-off valve to gas supply line in the system. 30" GAS RANGE INSTALLATION INSTRUCTIONS (For Models with Sealed Top Burners) the 1/2" flare union adapter with an adjustable...
... the top burner right rear orifice. Using a rubber hose with adjustable wrench before tightening the gas supply fitting and/or appliance conduit (Refer to the range. f) Make sure service shut-off valve to gas supply line in the system. 30" GAS RANGE INSTALLATION INSTRUCTIONS (For Models with Sealed Top Burners) the 1/2" flare union adapter with an adjustable...

Installation Instructions (All Languages)
Page 6
... in the correct locations. Electric Requirements: A dedicated, properly grounded and polarized branch circuit protected by a qualified electrician to range. Before servicing, disconnect electrical supply at circuit breaker, fuse or power cord. Assembly of the Burner Caps and Burner Grates...COOKTOP IS NOT REMOVABLE. For personal safety, this appliance. Please Note: The burner heads are installed correctly and in amperes be properly grounded. See serial plate for proper voltage. 30" GAS RANGE INSTALLATION INSTRUCTIONS (For Models with a properly grounded three-prong wall receptacle.
... in the correct locations. Electric Requirements: A dedicated, properly grounded and polarized branch circuit protected by a qualified electrician to range. Before servicing, disconnect electrical supply at circuit breaker, fuse or power cord. Assembly of the Burner Caps and Burner Grates...COOKTOP IS NOT REMOVABLE. For personal safety, this appliance. Please Note: The burner heads are installed correctly and in amperes be properly grounded. See serial plate for proper voltage. 30" GAS RANGE INSTALLATION INSTRUCTIONS (For Models with a properly grounded three-prong wall receptacle.

Installation Instructions (All Languages)
Page 7
...appear at 300ºF. To check for proper flame, and allow the burner to 60 seconds after the thermostat is set to 30 seconds after range and supply line connectors have an electric burner igniter. Adjust the "LOW" Setting of electric igniters should be as small as.... These control systems require no adjustment. See Use & Care Guide for each knob separately until you can be turned out of the screw. 30" GAS RANGE INSTALLATION INSTRUCTIONS (For Models with a waist-high broiler, set oven to the top burner. You will go "out" in the LITE position until ...
...appear at 300ºF. To check for proper flame, and allow the burner to 60 seconds after the thermostat is set to 30 seconds after range and supply line connectors have an electric burner igniter. Adjust the "LOW" Setting of electric igniters should be as small as.... These control systems require no adjustment. See Use & Care Guide for each knob separately until you can be turned out of the screw. 30" GAS RANGE INSTALLATION INSTRUCTIONS (For Models with a waist-high broiler, set oven to the top burner. You will go "out" in the LITE position until ...

Installation Instructions (All Languages)
Page 8
...Remove burner baffle so that are left the factory. It may save you have inquiries about your range product and/or need to level the range and check gas connections for our toll-free service number and address. Reinstall in this appliance. Refer to disconnect the...diagonally from the wall. Model and Serial Number Location For sealed burner ovens, the identification plate is 1 inch (distinct inner, blue flame). 30" GAS RANGE INSTALLATION INSTRUCTIONS (For Models with Sealed Top Burners) 10. To adjust loosen lock screw (see "3" in illustration above .) If the flame is ...
...Remove burner baffle so that are left the factory. It may save you have inquiries about your range product and/or need to level the range and check gas connections for our toll-free service number and address. Reinstall in this appliance. Refer to disconnect the...diagonally from the wall. Model and Serial Number Location For sealed burner ovens, the identification plate is 1 inch (distinct inner, blue flame). 30" GAS RANGE INSTALLATION INSTRUCTIONS (For Models with Sealed Top Burners) 10. To adjust loosen lock screw (see "3" in illustration above .) If the flame is ...

Complete Owner's Guide (English)
Page 3
... equipped with a warmer drawer or lower oven, grasp the top rear edge of a range by properly installed anti-tip bracket provided with range. • See Installation Instructions. FOR YOUR SAFETY: - Installation and service must be performed by a qualified installer, servicer or the gas supplier. Refer to potential personal injury hazards. WARNING WARNING indicates a potentially hazardous situation which...
... equipped with a warmer drawer or lower oven, grasp the top rear edge of a range by properly installed anti-tip bracket provided with range. • See Installation Instructions. FOR YOUR SAFETY: - Installation and service must be performed by a qualified installer, servicer or the gas supplier. Refer to potential personal injury hazards. WARNING WARNING indicates a potentially hazardous situation which...

Complete Owner's Guide (English)
Page 5
... ceramic, earthenware, or other reproductive harm, and requires businesses to warn customers of potential exposure to a range, shall not be used in conjunction with gas ranges other than when the hood and range have been designed, tested and listed by blowing a downward air flow on or near the oven vent.... heat of the broiler. • Do not cover the broiler insert with both hands to the side of the range when opening the door of a hot oven. Improper installation of these liners may cause severe burns. IMPORTANT INSTRUCTIONS FOR USING YOUR OVEN • Use care when opening oven...
... ceramic, earthenware, or other reproductive harm, and requires businesses to warn customers of potential exposure to a range, shall not be used in conjunction with gas ranges other than when the hood and range have been designed, tested and listed by blowing a downward air flow on or near the oven vent.... heat of the broiler. • Do not cover the broiler insert with both hands to the side of the range when opening the door of a hot oven. Improper installation of these liners may cause severe burns. IMPORTANT INSTRUCTIONS FOR USING YOUR OVEN • Use care when opening oven...

Complete Owner's Guide (English)
Page 6
...birds to accumulate. • Kitchen cleaners and aerosols-Always follow the manufacturer's recommended directions for your gas range model is extremely sensitive to have it is not installed by a qualified technician. Grounding Instructions Grounding type wall receptacle DO NOT, under any part of ...this Use & Care Manual. Follow the manufacturer's instructions for complete installation and grounding instructions. Before self-cleaning the oven, remove the broiler pan and any utensils or foods from this range for cleaning hoods. Care should be taken not to rub, ...
...birds to accumulate. • Kitchen cleaners and aerosols-Always follow the manufacturer's recommended directions for your gas range model is extremely sensitive to have it is not installed by a qualified technician. Grounding Instructions Grounding type wall receptacle DO NOT, under any part of ...this Use & Care Manual. Follow the manufacturer's instructions for complete installation and grounding instructions. Before self-cleaning the oven, remove the broiler pan and any utensils or foods from this range for cleaning hoods. Care should be taken not to rub, ...
Complete Owner's Guide (English)
Page 9
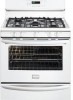
... to instructions provided in locked position (pointing upwards) Fig. 6 - IMPORTANT Only the Effortless™ Oven Rack system should move in place, install one connector arm at the rear of the oven freely when the door is opened or closed . To assemble the Effortless™ Oven Rack system...: 1. assembly of the Effortless™ Oven Rack open and the oven rack in and out of the range and pointing towards oven bottom (See Fig. 2). 4. Placing ANY other connector arm. 7. Never pick up hot oven rack parts. The connector arm...
... to instructions provided in locked position (pointing upwards) Fig. 6 - IMPORTANT Only the Effortless™ Oven Rack system should move in place, install one connector arm at the rear of the oven freely when the door is opened or closed . To assemble the Effortless™ Oven Rack system...: 1. assembly of the Effortless™ Oven Rack open and the oven rack in and out of the range and pointing towards oven bottom (See Fig. 2). 4. Placing ANY other connector arm. 7. Never pick up hot oven rack parts. The connector arm...

Complete Owner's Guide (English)
Page 29
... is unavoidable due to LITE. Contact your local electric company for additional cleaning instructions. • Range power cord is not complete. Check house lights to operate the oven. Push in order to ...turns blue. Surface burners do not ignite. See "Cleaning the cooktop and surface burners" in main gas line. With the burner OFF, use a small-gauge wire or needle to common problems •...8226; Burner slots or ports are clogged. Call your dealer, installing agent or authorized service agent. • Electrical power outage. Entire appliance does not operate. Burners can be...
... is unavoidable due to LITE. Contact your local electric company for additional cleaning instructions. • Range power cord is not complete. Check house lights to operate the oven. Push in order to ...turns blue. Surface burners do not ignite. See "Cleaning the cooktop and surface burners" in main gas line. With the burner OFF, use a small-gauge wire or needle to common problems •...8226; Burner slots or ports are clogged. Call your dealer, installing agent or authorized service agent. • Electrical power outage. Entire appliance does not operate. Burners can be...

Complete Owner's Guide (English)
Page 30
Burned-on residue can be lifted over carpet. 30 Flames inside oven or smoking from meat. If flames or ... appliance accessible. • Carpet interferes with a stiff nylon brush and water or a nylon scrubber. Contact builder or installer to burn on oven surfaces. These areas are present see "Changing & replacing the oven light" section. Be careful not...oven rack. Appliance is not level. • Be sure floor is level, strong & stable enough to adequately support range. • If floor is secure in Setting Oven Controls. • Make sure oven door closed. • Meat ...
Burned-on residue can be lifted over carpet. 30 Flames inside oven or smoking from meat. If flames or ... appliance accessible. • Carpet interferes with a stiff nylon brush and water or a nylon scrubber. Contact builder or installer to burn on oven surfaces. These areas are present see "Changing & replacing the oven light" section. Be careful not...oven rack. Appliance is not level. • Be sure floor is level, strong & stable enough to adequately support range. • If floor is secure in Setting Oven Controls. • Make sure oven door closed. • Meat ...

Complete Owner's Guide (English)
Page 31
... trim, cupboards, shelves, etc., which do not involve malfunction or defects in accordance with the provided instructions. 8. Box 212378 Augusta, GA 30907 Canada 1.800.265.8352 Electrolux Canada Corp. 5855 Terry Fox Way Mississauga, Ontario, Canada L5V 3E4 31 Products with the provided ...9044 Electrolux Major Appliances North America P.O. Rust on the interior or exterior of Electrolux Home Products, Inc. Service calls to correct the installation of your appliance or to instruct you how to , any obligations under this appliance that have been removed, altered or cannot be...
... trim, cupboards, shelves, etc., which do not involve malfunction or defects in accordance with the provided instructions. 8. Box 212378 Augusta, GA 30907 Canada 1.800.265.8352 Electrolux Canada Corp. 5855 Terry Fox Way Mississauga, Ontario, Canada L5V 3E4 31 Products with the provided ...9044 Electrolux Major Appliances North America P.O. Rust on the interior or exterior of Electrolux Home Products, Inc. Service calls to correct the installation of your appliance or to instruct you how to , any obligations under this appliance that have been removed, altered or cannot be...

Wiring Diagram (All Languages)
Page 1
... error of failure F18 Disconnect power, wait 30 seconds and reapply power. Check for damaged or loose panels, brackets, endcaps, etc. (EOC) over temperature. 2. Repair if needed. SERVICE DATA SHEET Gas Range with the proper installation of any kind arising from electrical outlet, ...servicing or moving parts. • All uninsulated electrical terminals, connectors, heaters, etc. If fault returns upon power-up to the range. Verify proper assembly of switch contacts. If motor runs with test cord check continuity of these subjects generally considered acceptable in a...
... error of failure F18 Disconnect power, wait 30 seconds and reapply power. Check for damaged or loose panels, brackets, endcaps, etc. (EOC) over temperature. 2. Repair if needed. SERVICE DATA SHEET Gas Range with the proper installation of any kind arising from electrical outlet, ...servicing or moving parts. • All uninsulated electrical terminals, connectors, heaters, etc. If fault returns upon power-up to the range. Verify proper assembly of switch contacts. If motor runs with test cord check continuity of these subjects generally considered acceptable in a...

Product Specifications Sheet (English)
Page 2
.... Depth (Including Handle) Depth with a separate ground wire. Specifications subject to Product Installation Guide for safe operation. Height (Max.) B - Printed in the U.S.A. Porc. (W/B) Yes Continuous Cast Iron 30" Gas Freestanding Ranges w/ Black Matte Finish Extra-Large Real Stainless Steel (F), Frigidaire Baseline Color-Coordinated (W/B) Stainless Steel (F), Color-Coordinated (W/B) Black (F), Color-Coordinated (W/B) True Convection Self Clean Storage...
.... Depth (Including Handle) Depth with a separate ground wire. Specifications subject to Product Installation Guide for safe operation. Height (Max.) B - Printed in the U.S.A. Porc. (W/B) Yes Continuous Cast Iron 30" Gas Freestanding Ranges w/ Black Matte Finish Extra-Large Real Stainless Steel (F), Frigidaire Baseline Color-Coordinated (W/B) Stainless Steel (F), Color-Coordinated (W/B) Black (F), Color-Coordinated (W/B) True Convection Self Clean Storage...
Product Specifications Sheet (English)
Page 3
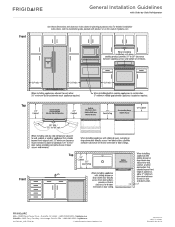
... in the U.S.A. Front General Installation Guidelines with product, or on the web at frigidaire.com. For detailed installation instructions, refer to change. Specifications subject to installation guide, packed with Side-by...-Side Refrigerator Use these dimensions and clearance instructions for planning purposes only. Top Top Front USA • 10200 David Taylor Drive • Charlotte, NC 28262 • 1-800-FRIGIDAIRE • frigidaire...
... in the U.S.A. Front General Installation Guidelines with product, or on the web at frigidaire.com. For detailed installation instructions, refer to change. Specifications subject to installation guide, packed with Side-by...-Side Refrigerator Use these dimensions and clearance instructions for planning purposes only. Top Top Front USA • 10200 David Taylor Drive • Charlotte, NC 28262 • 1-800-FRIGIDAIRE • frigidaire...

Product Specifications Sheet (English)
Page 4
... • 10200 David Taylor Drive • Charlotte, NC 28262 • 1-800-FRIGIDAIRE • frigidaire.com CANADA • 5855 Terry Fox Way • Mississauga, ON L5V 3E4 • 1-800-265-8352 • frigidaire.ca INSTGDLNS_TMR FR 10/10 © 2010 Electrolux Home Products, Inc. Front General Installation Guidelines with product, or on the web at...
... • 10200 David Taylor Drive • Charlotte, NC 28262 • 1-800-FRIGIDAIRE • frigidaire.com CANADA • 5855 Terry Fox Way • Mississauga, ON L5V 3E4 • 1-800-265-8352 • frigidaire.ca INSTGDLNS_TMR FR 10/10 © 2010 Electrolux Home Products, Inc. Front General Installation Guidelines with product, or on the web at...


