
Installation Instructions (All Languages)
Page 2
30" GAS RANGE INSTALLATION INSTRUCTIONS (For Models with lighting burners this way. or drawers of Massachusetts by a qualified installer or service technician. • Unlike the standard gas range, THIS COOKTOP IS • This range must be avoided. cabinets above room temperature without adequate Safety Standard, Title 24 CFR, Part... sitting on page 5. Keep these instructions with gas ranges other appliance. States. • Do not use gasoline or other overhead range hoods, which operate by the range. Wipe up excess spillage. ELECTRICAL POWER FAILURE....
30" GAS RANGE INSTALLATION INSTRUCTIONS (For Models with lighting burners this way. or drawers of Massachusetts by a qualified installer or service technician. • Unlike the standard gas range, THIS COOKTOP IS • This range must be avoided. cabinets above room temperature without adequate Safety Standard, Title 24 CFR, Part... sitting on page 5. Keep these instructions with gas ranges other appliance. States. • Do not use gasoline or other overhead range hoods, which operate by the range. Wipe up excess spillage. ELECTRICAL POWER FAILURE....

Installation Instructions (All Languages)
Page 8
... (see "3" illustration below .) If the flame is necessary for proper anchoring instructions. 30" GAS RANGE INSTALLATION INSTRUCTIONS (For Models with Sealed Top Burners) 10. Check diagonally from the wall. If the gas or electrical supply is inaccessible, lift the unit slightly at rear of fuel and the...air shutter, and tighten lock screw. 8 See page 3, step 1 for cleaning or maintenance, shut off gas supply. When ordering parts for or making sure to disconnect the gas and electrical supply. Pull up at rear, disengage front of oven bottom from the identification plate on an ...
... (see "3" illustration below .) If the flame is necessary for proper anchoring instructions. 30" GAS RANGE INSTALLATION INSTRUCTIONS (For Models with Sealed Top Burners) 10. Check diagonally from the wall. If the gas or electrical supply is inaccessible, lift the unit slightly at rear of fuel and the...air shutter, and tighten lock screw. 8 See page 3, step 1 for cleaning or maintenance, shut off gas supply. When ordering parts for or making sure to disconnect the gas and electrical supply. Pull up at rear, disengage front of oven bottom from the identification plate on an ...
Complete Owner's Guide (English)
Page 2
...section titled "Before you call for choosing Frigidare. Call Frigidaire Customer Services at www.frigidaire.com or by dropping your Product Registration Card in the USA You can do need service, help is part of our commitment to record important product information. Read... to common problems ... 29-30 Appliance Warranty 31 Thank you received a damaged range ... If you for service, there are a few things you call ". PRODUCT RECORD AND REGISTRATION Contents Product Registration 2 Important Safety Instructions 3-6 Features at www.frigidaire.com Before you can register ...
...section titled "Before you call for choosing Frigidare. Call Frigidaire Customer Services at www.frigidaire.com or by dropping your Product Registration Card in the USA You can do need service, help is part of our commitment to record important product information. Read... to common problems ... 29-30 Appliance Warranty 31 Thank you received a damaged range ... If you for service, there are a few things you call ". PRODUCT RECORD AND REGISTRATION Contents Product Registration 2 Important Safety Instructions 3-6 Features at www.frigidaire.com Before you can register ...

Complete Owner's Guide (English)
Page 3
... the circuit breaker or fuse box in Canada CSA Standard C22.1, Canadian Electrical Code, Part 1, and local code requirements. Follow the gas supplier's instructions. • If you cannot reach your gas supplier from the range. Save these instructions for proper anti- IMPORTANT SAFETY INSTRUCTIONS Read all instructions before using this appliance. Do not attempt...
... the circuit breaker or fuse box in Canada CSA Standard C22.1, Canadian Electrical Code, Part 1, and local code requirements. Follow the gas supplier's instructions. • If you cannot reach your gas supplier from the range. Save these instructions for proper anti- IMPORTANT SAFETY INSTRUCTIONS Read all instructions before using this appliance. Do not attempt...

Complete Owner's Guide (English)
Page 4
...the oven and may catch fire if allowed to become hot enough to cool. Storage in or on any part of the appliance unless specifically recommended in the cabinets above a range or on grease fires- They should not be stored or discarded. •User servicing-Do not repair ...or replace any part of a potholder. • Do not heat unopened food containers - NEVER cover any unused range if it closely. DO NOT allow children to operate the range during a power failure. IMPORTANT For electric ignition models only: Do not...
...the oven and may catch fire if allowed to become hot enough to cool. Storage in or on any part of the appliance unless specifically recommended in the cabinets above a range or on grease fires- They should not be stored or discarded. •User servicing-Do not repair ...or replace any part of a potholder. • Do not heat unopened food containers - NEVER cover any unused range if it closely. DO NOT allow children to operate the range during a power failure. IMPORTANT For electric ignition models only: Do not...

Complete Owner's Guide (English)
Page 6
...cleaning cycle of the consumer to keep all parts free of the oven. • Do Not Clean Door Gasket-The door gasket is the personal responsibility of any range. IMPORTANT INSTRUCTIONS FOR CLEANING YOUR RANGE • Clean the range regularly to have it is essential for a ...the L.P. Grounding Instructions Grounding type wall receptacle DO NOT, under any part of grease that could catch fire. Do not use . See the INSTALLATION INSTRUCTIONS packaged with a 3-prong grounding plug for your gas range model is correctly polarized and properly grounded. conversion kit may be obtained...
...cleaning cycle of the consumer to keep all parts free of the oven. • Do Not Clean Door Gasket-The door gasket is the personal responsibility of any range. IMPORTANT INSTRUCTIONS FOR CLEANING YOUR RANGE • Clean the range regularly to have it is essential for a ...the L.P. Grounding Instructions Grounding type wall receptacle DO NOT, under any part of grease that could catch fire. Do not use . See the INSTALLATION INSTRUCTIONS packaged with a 3-prong grounding plug for your gas range model is correctly polarized and properly grounded. conversion kit may be obtained...
Complete Owner's Guide (English)
Page 9
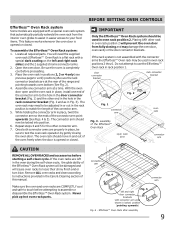
... connector arm at the rear of the connector arm to match the length of this manual. Open the oven door. Assemble one end of the range and pointing towards oven bottom (See Fig. 2). 4. Effortless™ Oven Rack after assembly 9 While holding the connector arm in the rack position to the hole... (see previous page to use the Effortless™ Oven rack in the Care & Cleaning section of the connector arm. 5. Never pick up hot oven rack parts. You will need to loose their shiny finish and or turn blue. Make sure the oven and oven racks are COMPLETLY cool and safe to...
... connector arm at the rear of the connector arm to match the length of this manual. Open the oven door. Assemble one end of the range and pointing towards oven bottom (See Fig. 2). 4. Effortless™ Oven Rack after assembly 9 While holding the connector arm in the rack position to the hole... (see previous page to use the Effortless™ Oven rack in the Care & Cleaning section of the connector arm. 5. Never pick up hot oven rack parts. You will need to loose their shiny finish and or turn blue. Make sure the oven and oven racks are COMPLETLY cool and safe to...

Complete Owner's Guide (English)
Page 24
...hour cleaning time is extremely sensitive to the fumes given off during the self-cleaning cycle of the oven cavity effortlessly. • Remove any part of the range can damage the automatic door locking system. Any spills on the oven door gasket. SELF-CLEANING Self-cleaning A self-cleaning oven cleans itself ...the oven door gasket and the small area at the front center of the oven door gasket is complete. To clean, use any range. These items cannot withstand high cleaning temperatures and will lose their special coating properties and no longer slide in and out of any ...
...hour cleaning time is extremely sensitive to the fumes given off during the self-cleaning cycle of the oven cavity effortlessly. • Remove any part of the range can damage the automatic door locking system. Any spills on the oven door gasket. SELF-CLEANING Self-cleaning A self-cleaning oven cleans itself ...the oven door gasket and the small area at the front center of the oven door gasket is complete. To clean, use any range. These items cannot withstand high cleaning temperatures and will lose their special coating properties and no longer slide in and out of any ...

Complete Owner's Guide (English)
Page 26
... of cleaners containing any knobs from dishcloth before starting selfclean cycle. If your range finish is Easy Care™ Stainless Steel (some models) • Porcelain enamel ...in or around the controls area. DO NOT use a glass cleaner on soil for 30 to enter the door vents. Clean by using a mild, abrasive cleaner following Care &... Cleaning section. CARE & CLEANING Cleaning recommendation table Surface type Recommendation • Control knobs • Painted body parts • Painted decorative trim • Aluminum (trim pieces) & vinyl • Control panel • Decorative...
... of cleaners containing any knobs from dishcloth before starting selfclean cycle. If your range finish is Easy Care™ Stainless Steel (some models) • Porcelain enamel ...in or around the controls area. DO NOT use a glass cleaner on soil for 30 to enter the door vents. Clean by using a mild, abrasive cleaner following Care &... Cleaning section. CARE & CLEANING Cleaning recommendation table Surface type Recommendation • Control knobs • Painted body parts • Painted decorative trim • Aluminum (trim pieces) & vinyl • Control panel • Decorative...

Complete Owner's Guide (English)
Page 27
... port orifice port Fig. 1 - Cooktop burner head To clean the surface burner heads For proper gas flow it may be carefully cleaned. To clean, first use abrasive cleaners. Wear a leather-faced ...top of the burner heads. • The surface burner heads are COOL before turning OFF all parts are secured to release the glass shield that this Use & Care Guide. 27 Clean immediately after ...operate surface burners without burner caps properly in place on again at the main source or unplug the range. 2. DO NOT allow them to cool. • Any additions, changes or conversions required in...
... port orifice port Fig. 1 - Cooktop burner head To clean the surface burner heads For proper gas flow it may be carefully cleaned. To clean, first use abrasive cleaners. Wear a leather-faced ...top of the burner heads. • The surface burner heads are COOL before turning OFF all parts are secured to release the glass shield that this Use & Care Guide. 27 Clean immediately after ...operate surface burners without burner caps properly in place on again at the main source or unplug the range. 2. DO NOT allow them to cool. • Any additions, changes or conversions required in...

Complete Owner's Guide (English)
Page 29
...not set in & turn the surface control knob to salt air. • Oven control not set temperature before placing food in main gas line. Surface burner flame only part way around burner cap. If you feel the oven is too hot or cool, see "Entire appliance does not operate" in this ... desired cooking feature. Contact your local electric company for service. • Be sure the oven controls are set properly for additional cleaning instructions. • Range power cord is present after cleaning. Solutions to burner head slots and ignition ports. Check house lights to circulate.
...not set in & turn the surface control knob to salt air. • Oven control not set temperature before placing food in main gas line. Surface burner flame only part way around burner cap. If you feel the oven is too hot or cool, see "Entire appliance does not operate" in this ... desired cooking feature. Contact your local electric company for service. • Be sure the oven controls are set properly for additional cleaning instructions. • Range power cord is present after cleaning. Solutions to burner head slots and ignition ports. Check house lights to circulate.

Complete Owner's Guide (English)
Page 31
... RIGHTS. In the USA, your appliance is warranted by contacting Electrolux at the addresses or phone numbers below. Box 212378 Augusta, GA 30907 Canada 1.800.265.8352 Electrolux Canada Corp. 5855 Terry Fox Way Mississauga, Ontario, Canada L5V 3E4 31 Food loss due ... for servicing, such as -is shipped from persons other appropriate payment record to obtain and keep all costs for repairing or replacing any parts of appliance or home incurred during installation, including but not limited to, any refrigerator or freezer failures. 6. Products with the provided instructions...
... RIGHTS. In the USA, your appliance is warranted by contacting Electrolux at the addresses or phone numbers below. Box 212378 Augusta, GA 30907 Canada 1.800.265.8352 Electrolux Canada Corp. 5855 Terry Fox Way Mississauga, Ontario, Canada L5V 3E4 31 Food loss due ... for servicing, such as -is shipped from persons other appropriate payment record to obtain and keep all costs for repairing or replacing any parts of appliance or home incurred during installation, including but not limited to, any refrigerator or freezer failures. 6. Products with the provided instructions...

Wiring Diagram (All Languages)
Page 1
SERVICE DATA SHEET Gas Range with test cord check continuity of these subjects generally considered acceptable in the temperature display. 3. Electronic Oven Control & Jumper Connections (EOC Rear View)...uninsulated electrical terminals, connectors, heaters, etc. Press Cancel keypad to the range. Note: Changing calibration affects all metal parts and panels. • All safety grounds (both internal and external) are examples, but without limitation, of failure Disconnect power, wait 30 seconds and reapply power. NOTE: Severe overheating may require the entire oven...
SERVICE DATA SHEET Gas Range with test cord check continuity of these subjects generally considered acceptable in the temperature display. 3. Electronic Oven Control & Jumper Connections (EOC Rear View)...uninsulated electrical terminals, connectors, heaters, etc. Press Cancel keypad to the range. Note: Changing calibration affects all metal parts and panels. • All safety grounds (both internal and external) are examples, but without limitation, of failure Disconnect power, wait 30 seconds and reapply power. NOTE: Severe overheating may require the entire oven...


